General Page
Objective
Completing the tutorial gives you a working Db2 or Db2 Warehouse instance on the AWS cloud. Steps include:
- Setting up an AWS account.
- Configuring ROSA with the needed prerequisites.
- Creating a ROSA cluster.
- Adding nodes to your cluster.
- Setting up block storage for your cluster.
- Setting up shared file storage for your cluster.
- Deploying the database to your ROSA cluster.
Overview of a Db2/Db2 Warehouse on AWS configuration
Deploying a Db2 or Db2 Warehouse database on AWS can be summarized as follows:
- Your system administrator creates an AWS account and chooses a managed service platform for your database instance. You can run your database on the following AWS managed services:
- Db2 on the Red Hat OpenShift Service on AWS (ROSA).
- Amazon Elastic Kubernetes Service (EKS).
- Using a series of command line tools, your administrator creates an AWS cluster based on your specific requirements. An EC2 instance is selected and a file system and storage class are created.
- Your administrator then runs the Db2 Operator and deploys your database instance to your AWS cluster.
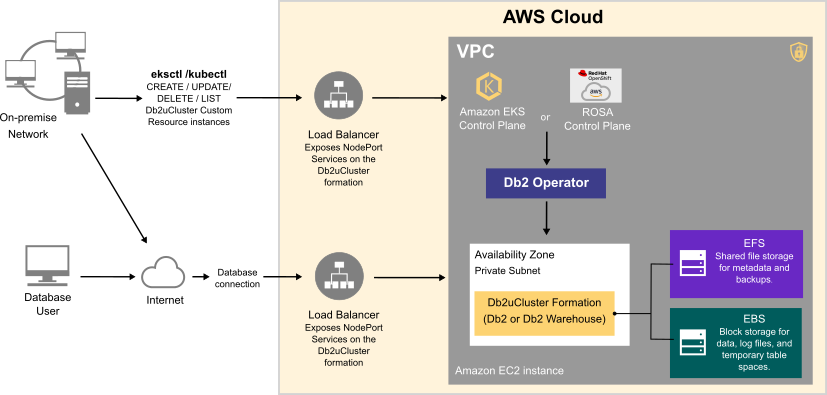
Once your database instance is deployed, users can connect to a database in the instance in much the same way as they connect to an on-premise data source.
The flowchart below shows how users interact with the database instance when it is hosted on AWS:
Choosing an Amazon EC2 instance type
Use the information in the following tables to determine the size requirements of your Db2 or Db2 Warehouse instance. Based on your selection, go to the list of Amazon EC2 instance types to find the AWS instance type that's right for your database deployment. In addition to the sizing values shown in the tables, the EC2 instance type list shows other factors to consider, such as cost and region.
For OTLP workloads on single-partition Db2 environments, choose an instance from the General Purpose or Storage Optimized categories.
Table 1. Sizing guidelines for Db2 on AWS systems
| Size | CPUs | Memory (GB) | AWS Instance Type (Suggested) | Description |
|---|---|---|---|---|
| Small | 8 | 24 |
|
|
| Medium | 16 | 128 |
|
|
| Large | 49 | 1001 |
|
|
For Db2 Warehouse workloads on single-partition or multi-partition environments, choose an instance from the Memory Optimized category.
Table 2. Sizing guidelines for a single partition Db2 Warehouse on AWS system
| Size | CPUs | Memory (GB) | AWS Instance Type (Suggested) | Description |
|---|---|---|---|---|
| Small | 7 | 98 |
|
|
| Medium | 15 | 226 |
|
|
| Large | 31 | 482 |
|
|
Table 3 provides sizing guidelines for small, medium, and large multi-partition Db2 Warehouse on AWS systems.
Table 3. Sizing guidelines for a multi-partition Db2 Warehouse on AWS system
| Size | CPUs | Memory (GB) | AWS Instance Type (Suggested) | Description |
|---|---|---|---|---|
| Small | 39 | 610 |
|
|
| Medium | 77 | 1201 |
| 40 TB of uncompressed data. |
| Large | 153 | 2406 |
| 80 TB of uncompressed data. |
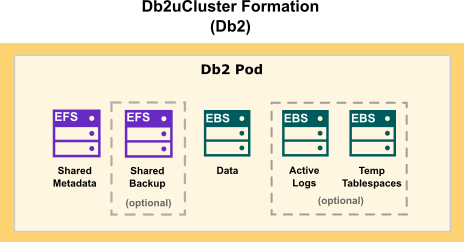
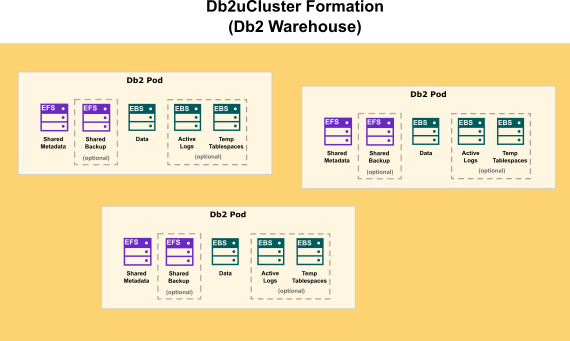
Choosing cloud storage
When choosing cloud storage options for your Db2 on AWS configuration, consider the following points:
- For database storage, log storage, and use of temporary table spaces, use a block storage solution.
- For metadata storage and backup storage, use a shared file storage solution.
Amazon provides block storage (EBS) and shared file storage (EKS) options for your Db2 deployment. The following diagram shows how storage is distributed in a Db2 OLTP formation:
Environment
- ACCOUNT_ID: Your 12-digit AWS account ID (for example, 001234567890).
- CLUSTER: The name you use for your EKS Cluster. Use rosa-db2-demo.
- REGION: The region where your AWS instances are being deployed. For example, us-east-2.
- INSTANCE_TYPE: The kind of instance to select for deploying workloads:
- For For single-partition Db2 instances, use m5.xlarge.
- For single-partition Db2 Warehouse instances, use r5.8xlarge.
- For multi-partition Db2 Warehouse instances, use r5.16xlarge.
- MIN_NODES: The minimum number of instances for the EKS cluster:
- For single-partition Db2 instances, use 1.
- For single-partition Db2 Warehouse instances, use 1.
- For multi-partition Db2 Warehouse instances, use 6.
- MAX_NODES: The maximum number of instances for the EKS cluster.
- For single-partition Db2 instances, use 1.
- For single-partition Db2 Warehouse instances, use 1.
- For multi-partition Db2 Warehouse instances, use 6.
- NAMESPACE: The namespace where your database instance will be deployed. Use db2u.
- AWS CLI: An open source tool for communicating with an AWS service, directly from your OS command line, or from a remote terminal program. This tool requires some post-install configuration.
- ROSA CLI: A Red Hat tool used to create, update, manage, and remove your ROSA cluster and resources.
- OpenShift CLI: A Red Hat tool used to create and manage RHOS projects container platform projects.
Create an AWS account
- From a web browser, go to https://portal.aws.amazon.com/billing/signup .
- Follow the online instructions.
NOTE: You will be contacted by phone and be required to enter a verification code on your phone keypad.
Configure ROSA with the needed AWS prerequisites
- From the AWS CLI, run the command
aws configure. Use your IAM user account and access key. ROSA does not support configuration using the root user account. Verify the AWS configuration:
aws sts get-caller-identityA successful configuration returns a table, listing the account, userid, and ARN values.
Confirm that the Elastic Load Balancing role exists:
aws iam get-role --role-name "AWSServiceRoleForElasticLoadBalancing" || aws iam create-service-linked-role
--aws-service-name "elasticloadbalancing.amazonaws.com
NOTE: Running the command creates the role if it does not already exist.
Log in using the ROSA CLI:
rosa login --token=<token>where
tokencan be retrieved from the OpenShift console.Confirm that the configuration is done successfully:
rosa whoamiConfirm that you have enough quota on AWS for the region to which ROSA was configured:
rosa verify quotaVerify that your RHOS client is using ROSA:
rosa verify openshift-client- From the OpenShift console, attach the ServiceQuotaFullAccess for the IAM user - This can be done from the console - https://aws.amazon.com/iam/ or command line if you're familiar with it.
NOTE: The Amazon Security Token Service (STS) provides enhanced security and is the recommended access management method for installing and interacting with clusters on ROSA.
Create a ROSA cluster
If this is your first time deploying ROSA in this account, create the account-wide roles:
rosa create account-roles --mode auto –yesRun the following command to begin the ROSA cluster creation in interactive mode:
rosa create cluster --cluster-name ${CLUSTER} --sts --mode auto --yes --interactiveTo configure interactive mode options, follow the Interactive cluster creation mode reference.
Check the status of your cluster:
rosa describe cluster --cluster ${CLUSTER}It takes around 30 - 40 minutes to complete this setup. The cluster is ready when you see the cluster listed as
Readyin the description. Any errors will also appear in the description of the cluster.Create an admin user for your cluster:
rosa create admin --cluster=${CLUSTER}To obtain the console URL, run:
rosa describe cluster --cluster=${CLUSTER} | grep -i Console
Configure your ROSA cluster for shared file storage
Shared file storage is the best option for your Db2 metadata/backup storage, log storage, and uses of temporary table spaces. To make use of shared file storage, you create an Amazon Elastic File System (EFS) storage class for your ROSA cluster. Creating shared file storage involves the following steps:
- Installing and setting up AWS EFS CSI Driver Operator.
- Creating and configuring an EFS volume.
- Creating a storage class for your EFS volume.
Install and set up AWS EFS CSI Driver Operator
Db2U supports version 4.10+ of the AWS EFS CSI Driver Operator, which is not installed in OpenShift Container Platform by default. Use the following steps to install the AWS EFS CSI Driver Operator in your cluster:
Procedure
- Log in to the OpenShift Container Web Console.
- Click Operators → OperatorHub.
- Search for "AWS EFS CSI Driver Operator" in the filter box.
Click Install on the AWS EFS CSI Driver Operator page.
NOTE: Ensure that:- AWS EFS CSI Driver Operator Version is 4.10+.
- All namespaces on the cluster (default) is selected.
- Installed namespace is set to
openshift-cluster-csi-drivers.
- Click Install → administration → CustomResourceDefinitions.
- Search for ClusterCSIDriver in the filter box.
On the Instances tab, click Create ClusterCSIDriver and enter the following YAML:
apiVersion: operator.openshift.io/v1 kind: ClusterCSIDriver metadata: name: efs.csi.aws.com spec: managementState: Managed- Click Create.
Wait for the EFS pods in the
openshift-cluster-csi-drivers to appear.EXAMPLE:users-MacBook-Pro:db2u user$ oc get pods -n openshift-cluster-csi-drivers | grep -i efs aws-efs-csi-driver-controller-84bf85d9df-86ms5 4/4 Running 0 3d14h aws-efs-csi-driver-controller-84bf85d9df-c7k89 4/4 Running 0 3d14h aws-efs-csi-driver-node-cc4gc 3/3 Running 0 3d14h aws-efs-csi-driver-node-hnh97 3/3 Running 0 3d14h aws-efs-csi-driver-node-sc8ln 3/3 Running 0 3d14h aws-efs-csi-driver-node-sq5qg 3/3 Running 0 3d14h aws-efs-csi-driver-node-w6j5c 3/3 Running 0 3d14h aws-efs-csi-driver-node-wz5kp 3/3 Running 0 3d14h aws-efs-csi-driver-node-xcqxx 3/3 Running 0 3d14h aws-efs-csi-driver-node-zb28n 3/3 Running 0 3d14h aws-efs-csi-driver-operator-76db8f8d97-jh795 1/1 Running 0 3d18hNOTE: If theaws-efs-csi-driver-controllerpod is stuck incontainer-creatingbecauseaws-efs-cloud-credentialsis not getting created, enter the following to create a secret:apiVersion: v1 kind: Secret metadata: namespace: openshift-cluster-csi-drivers name: aws-efs-cloud-credentials stringData: aws_access_key_id: <access key id> aws_secret_access_key: <secret access key>Replace<access key id>and<secret key id>with the user ID of the IAM user who created the ROSA cluster.
Create and configure an EFS volume
The steps in the following procedure explain how to create EFS volumes and access for the IAM user that created the ROSA cluster.
Procedure
- On the AWS console, open https://console.aws.amazon.com/efs.
Navigate to File systems and click Create file system
NOTE: Ensure that you are in the correct AWS region before proceeding.- Enter a name for the file system.
- For Virtual Private Cloud (VPC), select the VPC that was used for the OpenShift cluster built by using ROSA CLI.
- Accept default settings for all other selections.
- Wait for the volume and mount targets to be created fully.
- Select your new EFS volume and navigate to the Network tab.
- Copy the Security Group ID to your clipboard (for example, sg-012115e5809162746)
- Go to Security Groups and find the Security Group used by the EFS volume copied from the previous step.
On the Inbound rules tab, click Edit inbound rules, and then add a new rule with the following settings:
Type: NFS Protocol: TCP Port range: 2049 Source: Custom/IP address range of your nodes (for example: “10.0.0.0/16”)- Save the rule.
Create a storage class for your EFS volume
Ensure that you have the following information before running the command to create your EFS storage class:
provisioningMode: The EFS access point mode. Use efs-apfileSystemId: The EFS file system ID. For example, - fs-08a5b4467d198bf3e.uid: The access point user ID. Use zero (0).gid: The access point group ID. Use zero (0).directoryPerms: The directory permissions for the access point root directory. Use 777.
Procedure
- In the OpenShift Container Platform console, click Storage → Storage Classes
- On the StorageClasses overview page, click Create Storage Class.
- On the StorageClasses create page, do the following:
- Enter a name to reference the storage class.
- Select the reclaim policy.
- Select
efs.csi.aws.comfrom the Provisioner drop-down list. Enter additional parameters for the storage class as follows:
apiVersion: storage.k8s.io/v1
kind: StorageClass
metadata:
  name: efs-test-sc
parameters:
  directoryPerms: "777"
  fileSystemId: <efs file system ID>
  uid: "0"
  gid: "0"
  provisioningMode: efs-ap
provisioner: efs.csi.aws.com
reclaimPolicy: Delete
volumeBindingMode: Immediate
NOTE: The above parameters are validated for Db2u. If you are deploying any other service, validate the parameters that work for your service.
- Replace
<efs file system ID>with the Elastic File System (EFS) ID created in the previous "Create and configure an EFS volume" procedure.
Create an EBS storage class
Before you deploy your database instance, ensure that you create an EBS storage class. The EBS CSI Driver Operator is installed by default on the ROSA cluster.
Ensure that you have the following information:
- The EBS volume type (type).
- The number of I/O operations per second, per GB (iopsPerGB).
The storage class YAML code:
apiVersion: storage.k8s.io/v1
kind: StorageClass
metadata:
  name: ebs-sc
parameters:
  type: io2
  iopsPerGB: "500" #this field is required for io1 and io2 type storage classes. This can be calulated based on your volume size and maximum allowable iops. Details: https://docs.aws.amazon.com/AWSEC2/latest/UserGuide/ebs-volume-types.html
provisioner: ebs.csi.aws.com
reclaimPolicy: Delete
volumeBindingMode: WaitForFirstConsumer
When you have finished creating your ROSA cluster, and configured your cloud storage option, you can deploy one of the following instances to the cluster, using the Db2 Operator:
- A single-partition instance of Db2.
- A single-partition instance of Db2 Warehouse.
- A multi-partition instance of Db2 Warehouse.
Fore more information, see Installing Db2 Operator V2 and Deploying Db2 or Db2 Warehouse on your OpenShift or Kubernetes cluster for next steps.
Was this topic helpful?
Document Information
Modified date:
24 June 2026
UID
ibm16600093