General Page
Objective
- Setting up an AWS account.
- Creating an Amazon EKS cluster.
- Adding nodes to your cluster.
- Setting up block storage for your cluster.
- Setting up shared file storage for your cluster.
- Deploying a database instance to your EKS cluster.
Overview of a Db2/Db2 Warehouse on AWS configuration
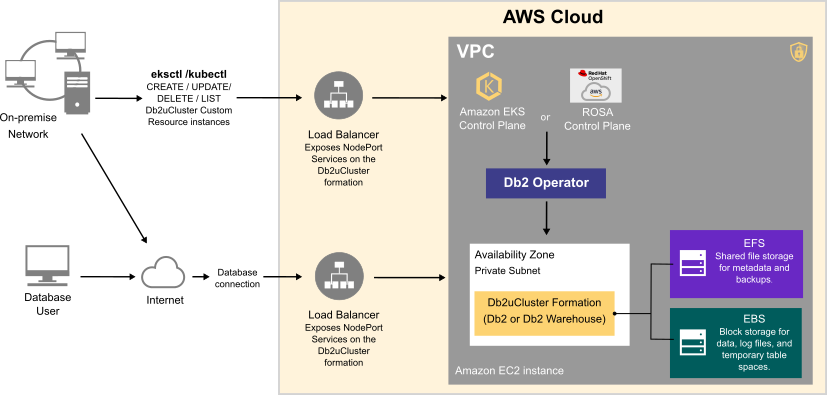
Deploying a Db2 or Db2 Warehouse database on AWS can be summarized as follows:
- Your system administrator creates an AWS account and chooses a managed service platform for your database instance. You can run your database on the following AWS managed services:
- Db2 on the Red Hat OpenShift Service on AWS (ROSA).
- Amazon Elastic Kubernetes Service (EKS).
- Using a series of command line tools, your administrator creates an AWS cluster based on your specific requirements. An EC2 instance is selected and a file system and storage class are created.
- Your administrator then runs the Db2 Operator and deploys your database instance to your AWS cluster.
Once your database instance is deployed, users can connect to a database in the instance in much the same way as they connect to an on-premise data source.
The flowchart below shows how users interact with the database instance when it is hosted on AWS:
Choosing an Amazon EC2 instance type
Use the information in the following tables to determine the size requirements of your Db2 or Db2 Warehouse instance. Based on your selection, go to the list of Amazon EC2 instance types to find the AWS instance type that's right for your database deployment. In addition to the sizing values shown in the tables, the EC2 instance type list shows other factors to consider, such as cost and region.
For OTLP workloads, choose an instance from the General Purpose or Storage Optimized categories.
Table 1. Sizing guidelines for Db2 OLTP on AWS systems
| Size | CPUs | Memory (GB) | AWS Instance Type (Suggested) | Description |
|---|---|---|---|---|
| Small | 8 | 24 |
|
|
| Medium | 16 | 128 |
|
|
| Large | 49 | 1001 |
|
|
For Db2 Warehouse workloads on single-partition or multi-partition environments, choose an instance from the Memory Optimized category.
Table 2. Sizing guidelines for a single-partition Db2 Warehouse on AWS system
| Size | CPUs | Memory (GB) | AWS Instance Type (Suggested) | Description |
|---|---|---|---|---|
| Small | 7 | 98 |
|
|
| Medium | 15 | 226 |
|
|
| Large | 31 | 482 |
|
|
Table 3 provides sizing guidelines for small, medium, and large multi-partition Db2 Warehouse on AWS systems.
Table 3. Sizing guidelines for a multi-partition Db2 Warehouse on AWS system
| Size | CPUs | Memory (GB) | AWS Instance Type (Suggested) | Description |
|---|---|---|---|---|
| Small | 39 | 610 |
|
|
| Medium | 77 | 1201 |
| 40 TB of uncompressed data. |
| Large | 153 | 2406 |
| 80 TB of uncompressed data. |
Choosing cloud storage
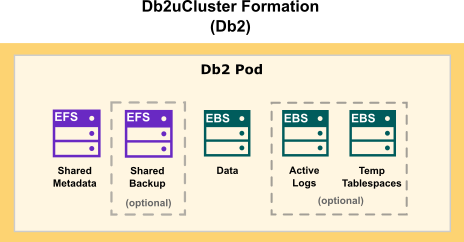
When choosing cloud storage options for your Db2 on AWS configuration, consider the following points:
- For database storage, log storage, and use of temporary table spaces, use a block storage solution.
- For metadata storage and backup storage, use a shared file storage solution.
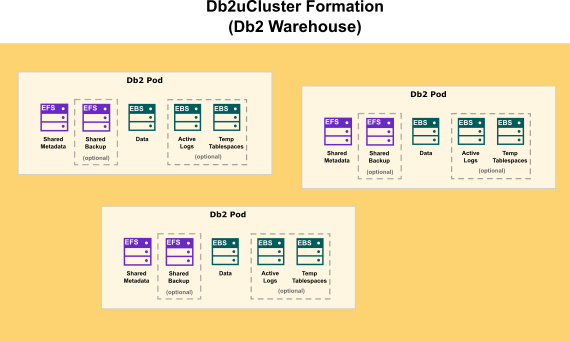
Amazon provides block storage (EBS) and shared file storage (EKS) options for your Db2 deployment. The following diagram shows how storage is distributed in a single-partition Db2 formation:
The following diagram show how storage is distributed in a Db2 Warehouse formation:
Environment
- ACCOUNT_ID: Your 12-digit AWS account ID (for example, ACCOUNT_ID="001234567890").
- CLUSTER: The name you use for your EKS Cluster. Use eks-db2-demo.
- REGION: The region where your AWS instances are being deployed. Use us-east-2.
- AZ: The availability zone. Because EBS (data) volumes cannot move across availability zones, you must ensure that your database instance is running in one AZ only. Use us-east-2a.
- VERSION: The Kubernetes version. Use 1.21.
- INSTANCE_TYPE: The kind of instance to select for deploying workloads:
- For single-partition Db2 instances, use m5.xlarge.
- For single-partition Db2 Warehouse instances, use r5.8xlarge.
- For multi-partition Db2 Warehouse instances, use r5.16xlarge.
- MIN_NODES: The minimum number of instances for the EKS cluster:
- For single-partition Db2 instances, use 1.
- For single-partition Db2 Warehouse instances, use 1.
- For multi-partition Db2 Warehouse instances, use 6.
- MAX_NODES: The maximum number of instances for the EKS cluster.
- For single-partition Db2 instances, use 1.
- For For single-partition Db2 Warehouse instances, use 1.
- For multi-partition Db2 Warehouse instances, use 6.
- NAMESPACE: The namespace where your database instance will be deployed. Use db2u.
- NODE_GROUP: The Node Group for creating instances. Use db2-dev-nodes.
- EFS_SG: The Security Group name for EFS. Use EFSDb2SecurityGroup.
- EBS_IAM_ROLE: The IAM Role name for EBS. Use AmazonEKS_EBS_CSI_DriverRole.
- AWS CLI: An open-source tool for communicating with an AWS service, directly from your OS command line, or from a remote terminal program. This tool requires some post-install configuration.
- kubectl: The Amazon flavor of the Kubernetes command-line utility that is used to communicate with the cluster API server.
- eksctl : A command-line utility for creating and managing Kubernetes clusters on Amazon EKS.
Steps
Create an AWS account
- From a web browser, go to https://portal.aws.amazon.com/billing/signup .
- Follow the online instructions.
NOTE: You will be contacted by phone and be required to enter a verification code on you phone keypad.
Create an Amazon EKS cluster
You use the eksctl utility to create an Amazon EKS cluster for your Db2® deployment. You can also use the utility to define the node type properties for your cluster.
Procedure
Run the following command to create an EKS cluster without adding any nodes:
eksctl create cluster --version=${VERSION} --name=${CLUSTER} --without-nodegroup --region=${REGION} --asg-access --with-oidcwhere
versionis the Amazon EKS version. For example, 1.21.nameis the name you give to your cluster.without-nodegrouptells the eksctl utility to not create a node group.regionidentifies the location of your EKS server. For example, us-east-2.with-oidctells the eksctl utility to add an external identity provider service for sign-in that supports the OpenID Connect (OIDC) standard.
Get the vpc_id of your cluster:
vpc_id=$(aws eks describe-cluster --name ${CLUSTER} --query "cluster.resourcesVpcConfig.vpcId" --output text)Get the subnet ids for one availability zone in the same vpc as the EKS cluster:
subnet_ids=$(aws ec2 describe-subnets --filters "Name=vpc-id,Values=$vpc_id" "Name=availability-zone,Values=$AZ" --query 'Subnets[*].SubnetId' --output text | sed -e 's/[[:space:]]/,/')Add a nodegroup for your worker nodes:
eksctl create nodegroup --cluster=${CLUSTER} --region=${REGION} --managed --spot --name=${NODE_GROUP} --instance-types=${INSTANCE_TYPE} --nodes-min=${MIN_NODES} --nodes-max=${MAX_NODES} --subnet-ids ${subnet_ids} --asg-accessValidate the added nodes:
kubectl get nodes
Configure your Amazon EKS cluster for block storage using the EBS CSI driver
Block storage is the best option for your Db2 data. To make use of block storage, you create an Amazon Elastic Block Store (EBS) storage class for your EKS cluster. Creating block storage involves the following steps:
- Creating a role and attaching a policy for setting up EBS.
- Installing the EKS managed add-on for the EBS CSI.
- Creating a storage class for your EBS volume.
Before you begin
The EBS CSI Driver for your EKS cluster can be installed either directly or as an EKS managed add-on. The steps in the following procedures explain how to install the EKS managed add-on.
Before you begin configuring your EKS cluster for block storage, ensure that you have the following information:
- type: The EBS volume type.
- iopsPerGB: The number of I/O operations per second, per GB.
An IAM OIDC provider. You can check whether a URL exists for your IAM OIDC provider by running the following command:
url=$(aws eks describe-cluster --name ${CLUSTER} --query "cluster.identity.oidc.issuer" --output text | sed 's|.*/||')The following command creates an OIDC provider for your cluster if it doesn't exist:
aws iam list-open-id-connect-providers | grep ${url} || eksctl utils associate-iam-oidc-provider --cluster ${CLUSTER} --approve
Procedure
Create a role and attach a policy for configuring the CSI driver.
You set up a storage class for EBS by using the appropriate Container Storage Interface (CSI) driver. To use the CSI driver, you first need to create a role for your EKS cluster, and then download and attach an AWS policy to the role. This policy provides the credentials that you need to use the CSI driver.
Run the following command:eksctl create iamserviceaccount --name ebs-csi-controller-sa --namespace kube-system --cluster ${CLUSTER} --attach-policy-arn arn:aws:iam::aws:policy/service-role/AmazonEBSCSIDriverPolicy --approve --role-only --role-name ${EBS_IAM_ROLE}where
clusteris the name of your EKS cluster.namespaceis the name of the Kubernetes namespace that you want to associate with the role.nameis the name you want to assign to the role.
Install the EKS managed add-on for the EBS CSI.
eksctl create addon --name aws-ebs-csi-driver --cluster ${CLUSTER} --service-account-role-arn arn:aws:iam::${ACCOUNT_ID}:role/${EBS_IAM_ROLE} --forceCreate a storage class for your EBS file system.
Run the following code to create a io2 storage class:apiVersion: storage.k8s.io/v1 kind: StorageClass metadata: name: ebs-sc parameters: type: io2 iopsPerGB: "500" #this field is required for io1 and io2 type storage classes. This can be calulated based on your volume size and maximum allowable iops. Details: https://docs.aws.amazon.com/AWSEC2/latest/UserGuide/ebs-volume-types.html provisioner: ebs.csi.aws.com reclaimPolicy: Delete volumeBindingMode: WaitForFirstConsumer
Configure your Amazon EKS cluster for shared file storage
Shared file storage is the best option for your database metadata and backups. To make use of shared file storage, you create an Amazon Elastic File System (EFS) storage class for your EKS cluster. Creating shared file storage involves the following steps:
- Creating a role and attaching a policy for setting up EFS.
- Installing the AWS EFS CSI Driver, using a manifest.
- Creating an AWS EFS File System for your EKS cluster.
- Creating a storage class for your EFS file system.
Procedure
- Create a role and attach a policy for configuring the EFS CSI driver.
Download the IAM policy:
curl -o iam-policy-example.json https://raw.githubusercontent.com/kubernetes-sigs/aws-efs-csi-driver/v1.3.7/docs/iam-policy-example.jsonInstall the IAM Policy:
aws iam create-policy --policy-name AmazonEKS_EFS_CSI_Driver_Policy --policy-document file://iam-policy-example.jsonCreate the IAM role and attach the IAM policy to the role:
eksctl create iamserviceaccount --cluster ${CLUSTER} --namespace kube-system --name efs-csi-controller-sa --attach-policy-arn arn:aws:iam::${ACCOUNT_ID}:policy/AmazonEKS_EFS_CSI_Driver_Policy --approve --region ${REGION}where
clusteris the name of your EKS cluster.namespaceis the Kubernetes namespace that you want to associate with the role.nameis the name you want to assign to the role.regionis where your AWS instance is being deployed.
- Install the AWS EFS CSI Driver, using a manifest.
To run applications on an Amazon EKS cluster that is configured for shared file storage (EFS), you need to create and mount an EFS file system on your cluster. To mount the file system, you need to download and install the Amazon EFS Container Storage Interface (CSI) driver.Download the manifest:
kubectl kustomize "github.com/kubernetes-sigs/aws-efs-csi-driver/deploy/kubernetes/overlays/stable/?ref=release-1.3" > public-ecr-driver.yaml- Edit the public-ecr-driver.yaml file to remove the efs-csi-controller-sa ServiceAccount. This service account was created previously.
Install the CSI driver:
kubectl apply -f public-ecr-driver.yamlThis command also creates pods in the kube-system namespace.
Check that the pods are created in the namespace:
kubectl get pods -n kube-system
- Create an AWS EFS File System for your EKS cluster.
Retrieve the virtual private cloud (VPC) ID of your EKS cluster:
vpc_id=$(aws eks describe-cluster --name ${CLUSTER} --query "cluster.resourcesVpcConfig.vpcId" --output text)Retrieve the subnetting (CIDR) range for the cluster's VPC:
cidr_range=$(aws ec2 describe-vpcs --vpc-ids ${vpc_id} --query "Vpcs[].CidrBlock" --output text)Create a security group using the vpc_id:
security_group_id=$(aws ec2 create-security-group --group-name ${EFS_SG} --description "My EFS security group" --vpc-id $vpc_id --output text)Create an inbound rule that allows inbound nfs traffic from the CIDR for your cluster's vpc:
aws ec2 authorize-security-group-ingress --group-id $security_group_id --protocol tcp --port 2049 --cidr $cidr_rangeCreate an AWS EFS file system for your EKS cluster in the same region as your EKS cluster:
file_system_id=$(aws efs create-file-system --region ${REGION} --performance-mode generalPurpose --query 'FileSystemId' --output text)- Create the mount targets:
Determine the subnet IDs in your VPC of your EKS cluster:
TAG="tag:alpha.eksctl.io/cluster-name"
eks_subnet_ids=$(aws ec2 describe-subnets --filters "Name=vpc-id,Values=${vpc_id}" "Name=${TAG},Values=${CLUSTER}" --query 'Subnets[*].SubnetId' --output text)
Run the following code to create your mount targets for each of the subnets in your EKS Cluster:
for subnet in ${eks_subnet_ids}; do
    aws efs create-mount-target --file-system-id ${file_system_id} --security-groups ${security_group_id} --subnet-id ${subnet}
done
Create a storage class for your EFS file system.
Ensure that you have the following information before running the command to create your EFS storage class:provisioningMode: The EFS access point mode. Use efs-ap.fileSystemId: The EFS file system ID. For example, - fs-08a5b4467d198bf3e.uid: The access point user ID. Use zero (0).gid: The access point group ID. Use zero (0).directoryPerms: The directory permissions for the access point root directory. Use 777.
Run the following command to create the storage class for your EFS file system. Include the ID of the AWS EFS File System that you created for your EKS cluster:
cat << EOF | kubectl create -f -
apiVersion: storage.k8s.io/v1
kind: StorageClass
metadata:
  name: efs-test-sc
parameters:
  directoryPerms: "777"
  fileSystemId: ${file_system_id}
  gid: "0"
  provisioningMode: efs-ap
  uid: "0"
provisioner: efs.csi.aws.com
reclaimPolicy: Delete
volumeBindingMode: Immediate
EOF
Deploy a database instance on your Amazon EKS cluster
When you have finished creating your Amazon EKS cluster, and configured your cloud storage option, you can deploy one of the following instances to the cluster:
- A single-partition instance of Db2.
- A single-partition instance of Db2 Warehouse.
- A multi-partition instance of Db2 Warehouse.
Fore more information, see Installing Db2 Operator V2 and Deploying Db2 or Db2 Warehouse on your OpenShift or Kubernetes cluster for next steps.
Connect to a Db2 database from outside the EKS cluster
- Install the AWS Load Balancer Controller add-on.
- Tag the public and private subnets in the Virtual Private Cloud (VPC) that is being used by your EKS cluster.
- Create an External Load Balancer service.
- Install the AWS Load Balancer Controller add-on.
- Tag the private subnets and public subnets in the Virtual Private Cloud (VPC) that is used by your EKS cluster:
Get the vpc_id of your cluster:
vpc_id=$(aws eks describe-cluster --name ${CLUSTER} --query "cluster.resourcesVpcConfig.vpcId" --output text)Find the public subnets of your VPC:
public_subnets=$(aws ec2 describe-subnets --filter Name=vpc-id,Values=$vpc_id --query 'Subnets[?MapPublicIpOnLaunch==`true`].SubnetId')Find the private subnets of your VPC:
private_subnets=$(aws ec2 describe-subnets --filter Name=vpc-id,Values=$vpc_id --query 'Subnets[?MapPublicIpOnLaunch==`false`].SubnetId')Tag the public subnets:
for subnet_id in "${public_subnets[@]}"; do
    aws ec2 create-tags --resources "$subnet_id" --tags Key=kubernetes.io/role/elb,Value=1 Key=kubernetes.io/cluster/${CLUSTER},Value=owned
done
Tag the private subnets:
for subnet_id in "${private_subnets[@]}"; do
    aws ec2 create-tags --resources "$subnet_id" --tags Key=kubernetes.io/role/internal-elb,Value=1
done
- Create an External Load Balancer service.
To expose the TCP/IP listener port of your Db2 deployment, you need to log in to your deployed EKS cluster and create a Load Balancer service.Create a Load Balancer service. Define the variable LOAD_BALANCER_SVC and name it (e.g., db2u-db2wh-load-balancer)
The following example shows the command syntax for exposing both the Transport Layer Security (TLS/SSL) port number (50001) and the non-TLS/SSL Db2 port number (50000) for a Db2 Warehouse deployment:kubectl create -f - << EOF --- apiVersion: v1 kind: Service metadata: annotations: service.beta.kubernetes.io/aws-load-balancer-attributes: load_balancing.cross_zone.enabled=true service.beta.kubernetes.io/aws-load-balancer-nlb-target-type: instance service.beta.kubernetes.io/aws-load-balancer-scheme: internet-facing service.beta.kubernetes.io/aws-load-balancer-target-node-labels: topology.kubernetes.io/zone=${REGION} service.beta.kubernetes.io/aws-load-balancer-type: external name: ${LOAD_BALANCER_SVC} namespace: ${NAMESPACE} spec: allocateLoadBalancerNodePorts: true internalTrafficPolicy: Cluster externalTrafficPolicy: Cluster ipFamilies: - IPv4 ipFamilyPolicy: SingleStack ports: - name: legacy-server port: 50000 - name: ssl-server port: 50001 publishNotReadyAddresses: true selector: app: ${DB2U_DEPLOYMENT_NAME} component: db2wh role: db type: engine type: LoadBalancer EOFOnce the the Load Balancer service is created, EKS creates a public (external) IP address and exposes the target port that is defined in the service specification.
Note: It takes about 5 minutes for the service to be provisioned and exposed on external traffic.Query your EKS cluster for the Load Balancer service to get the public IP address:
kubectl get svc -n ${NAMESPACE} | grep ${LOAD_BALANCER_SVC}
db2u-db2wh-load-balancer   LoadBalancer   10.0.247.179  k8s-db2u-cdb2ueks-774f18ba0e-659d91e7552f2355.elb.us-east-2.amazonaws.com 50001:32331/TCP,50000:31831/TCP   14d
Test whether the Load Balancer service endpoint is accessible from outside the EKS cluster by using a curl command.
The following example shows the command syntax for testing the accessibility of the service endpoint 3.23.82.224 on port 50000:curl -kv k8s-db2u-cdb2ueks-774f18ba0e-659d91e7552f2355.elb.us-east-2.amazonaws.com:50000 * Trying 3.23.82.224:50000... * Connected to k8s-db2u-cdb2ueks-774f18ba0e-659d91e7552f2355.elb.us-east-2.amazonaws.com (3.23.82.224) port 50000 (#0) > GET / HTTP/1.1 > Host: k8s-db2u-cdb2ueks-774f18ba0e-659d91e7552f2355.elb.us-east-2.amazonaws.com:50000 > User-Agent: curl/8.1.2 > Accept: */* >
Was this topic helpful?
Document Information
Modified date:
24 June 2026
UID
ibm16600071