Troubleshooting
Problem
Resolving The Problem
Following is an example: If a user signed on with invalid attempts and you want to find IP address of the PC.
Security journal QAUDJRN exists . . . . . :  YES
Current QAUDCTL system value  . . . . . . :  *AUDLVL
Current QAUDLVL system value  . . . . . . :  *AUTFAIL
IBM i 7.3 or later:
- The QAUDJRN (Audit Journal) must be configured and active
- Password auditing (PW journal entries) must be enabled via system values (for example, QAUDCTL)
Operating System Requirements:
- The SYSTOOLS.AUDIT_JOURNAL_PW table function must be available on the system
- Required PTFs or Technology Refresh levels must be applied for the target IBM i release
Authority Requirements:
- Authority to read audit journal information
- Membership in or equivalent authority to roles that permit access to audit data (for example, *ALLOBJ, *AUDIT, or appropriate object and SQL privileges)
SELECT JOB_NAME,
       JOB_USER,
       DATE(ENTRY_TIMESTAMP) AS ENTRY_DATE,
       TIME(ENTRY_TIMESTAMP) AS ENTRY_TIME,
       DEVICE_NAME,
       VIOLATION_TYPE,
       VIOLATION_TYPE_DETAIL,
       AUDIT_USER_NAME,
       REMOTE_ADDRESS
    FROM TABLE (
            SYSTOOLS.AUDIT_JOURNAL_PW(
                STARTING_TIMESTAMP => TIMESTAMP('2026-05-01-00.00.01'), ENDING_TIMESTAMP => TIMESTAMP('2026-05-07-08.30.00'))
        ) AS PW;
- Update the date and time parameters in the SQL query as needed.
- The command creates a report with user profiles that attempted to Signon with an invalid password for the current chain of journal receivers attached to the QAUDJRN and going back to the time and date specified on the SQL.
- The remote IP address may not always be available to the Operating System at the time the Invalid Signon Attempt occurred, if that is the case, the remote address field is blank. Refer to document Why is the IP Address Is Not Always Available in the Audit Logs
| JOB_NAME | JOB_USER | ENTRY_DATE | ENTRY_TIME | DEVICE_NAME | VIOLATION_TYPE | VIOLATION_TYPE_DETAIL | AUDIT_USER_NAME | REMOTE_ADDRESS |
| QINTER | QSYS | 5/7/2026 | 07.32.37 | QPADEV001L | P | Password not valid | HUGO | 172.16.3.250 |
| QINTER | QSYS | 5/7/2026 | 07.32.44 | QPADEV001L | U | User name not valid | ADMIN | 172.16.3.250 |
| QINTER | QSYS | 5/7/2026 | 07.33.25 | QPADEV001L | P | Password not valid | QSECOFR | 172.16.3.250 |
| QINTER | QSYS | 5/7/2026 | 07.33.47 | QPADEV001L | U | User name not valid | ROOT | 172.16.3.250 |
| QINTER | QSYS | 5/7/2026 | 07.34.15 | QPADEV001L | P | Password not valid | HUGO | 172.16.3.250 |
| QINTER | QSYS | 5/7/2026 | 07.34.17 | QPADEV001L | Q | Attempted signon (user authentication) failed because user profile is disabled | HUGO | 172.16.3.250 |
| QZSOSIGN | QUSER | 5/7/2026 | 07.42.26 | P | Password not valid | V6CASTIL | 127.0.0.1 |
- The user profile associated with the invalid sign-on attempt is listed in the
AUDIT_USER_NAMEcolumn. - The User ID shown in the
JOB_USERcolumn represents the user profile under which the system job is running and performing the authentication request. It is not the User Profile that is being disabled. - The value 'P' in the
VIOLATION_TYPEcolumn indicates that an Invalid Password was used. - The value 'U' in the VIOLATION_TYPE column indicates that an Invalid User profile ID was used.
- The value 'Q' in the VIOLATION_TYPE column indicates that a sign-on attempt (user authentication) failed because the user profile is disabled.
- For descriptions of other
VIOLATION_TYPEvalues, refer to Appendix F of the Security Reference Manual
Investigation Steps After Identifying a Source IP Address
Once a source IP address has been identified from password-related audit journal entries, the following steps should be taken to investigate and remediate the issue.
1. Identify the Source of the Connection
- Use the source IP address (
REMOTE_ADDRESS) to determine the origin of the invalid sign-on attempt. This may involve identifying whether the address is internal or external and correlating it with known systems, application servers, middleware, or user workstations.
2. Analyze the Job Information
Review the associated JOB_NAME to help identify the type of connection involved.
Examples include:
- QINTER: Indicates a 5250 interactive session.
- QZSOSIGN: Indicates a host server sign-on job, commonly associated with application or remote access services.
- QZLSFILE or QZLSFILET: Identifies a NetServer sign‑on attempt associated with access through a mapped network drive or SMB/CIFS file share.
This information helps determine whether the failed authentication was user-initiated or application-driven.
3. Special Case: Loopback Address (127.0.0.1)
- If the source IP address is
127.0.0.1, the issue typically originates from local services on the system rather than an external source. - This situation commonly occurs when a user changes a password while an active HTTP or application session continues to run using cached credentials. Repeated authentication attempts using the old password can result in the user profile being disabled.
4. Resolving Loopback-Related Password Failures (HTTP Services)
To resolve issues caused by cached credentials in HTTP services, perform the following steps:
End the HTTP administrative server:
ENDTCPSVR *HTTP HTTPSVR(*ADMIN)Verify that all administrative HTTP jobs have ended:
WRKACTJOB SBS(QHTTPSVR)Ensure that all Admin server jobs (for example, Admin1 through Admin5) have terminated.
Restart the HTTP administrative server:
STRTCPSVR *HTTP HTTPSVR(*ADMIN)
This process clears cached authentication data so that subsequent connections use the updated password.
The Security Reference Manual can be obtained on the following link:
Security Reference Manual
Step 1: On the operating system command line, type the following commands and press the Enter key.
CPYAUDJRNE ENTTYP(PW) OUTFILE(yourlib/QAUDIT)Note: The command above searches for PW entries in the current receiver attached to your auditing journal. If you are not finding entries you need, the journal receiver may have been recently detached. To obtain the needed information, you may want to query the whole receiver chain instead, specifying a time period for the search:
CPYAUDJRNE ENTTYP(PW) JRNRCV(*CURCHAIN) FROMTIME('date' 'time') TOTIME('date' 'time') OUTFILE(yourlib/QAUDIT)Note: Where yourlib is the name of the library where the file is to be created
Special Note: Run Step 2 or Step 3:
Step 2: On the operating system command line, type the following commands and press the Enter key.
STRSQL to get to the interactive SQL command line. Then type the following:
SELECT PWJOB,
       PWUSER,
       PWNBR,
       PWPGM,
       PWUSPF,
       PWRPORT,
       PWRADR,
       PWESDL,
       PWTYPE,
       PWUSRN,
       PWTSTP
    FROM yourlib/qauditpw
Note: Where yourlib is the name of the library where the file was created
Step 3: Do the following:
| 1) | On the operating system command line, type the STRQRY command and press the Enter key. |
| 2) | Select Option 1, Work with queries from the Query Utilities display, and press the Enter key. |
| 3) | Select Option 1, Create from the Work with Queries display, and press the Enter key. |
| 4) | Type a query and library. |
| 5) | Select Option 1, Specify file selections from the Define the Query display, and press the Enter key. |
| 6) | Type the file name of QAUDITPW and library of YOURLIB on the Specify File Selections display. |
| 7) | Select additional options, if required, or press F3 to save or run the query from the Define the Query display. |
| 8) | Select Save definition = Y and choose option 1 to run interactively or 2 to run in batch from the Exit this Query display. The Remote address and port can now be shown. Note: If you are going to run it in batch, you need to specify a library other than QTEMP on the cpyaudjrne command in Step 1. Also use that same library in Step 3f. |
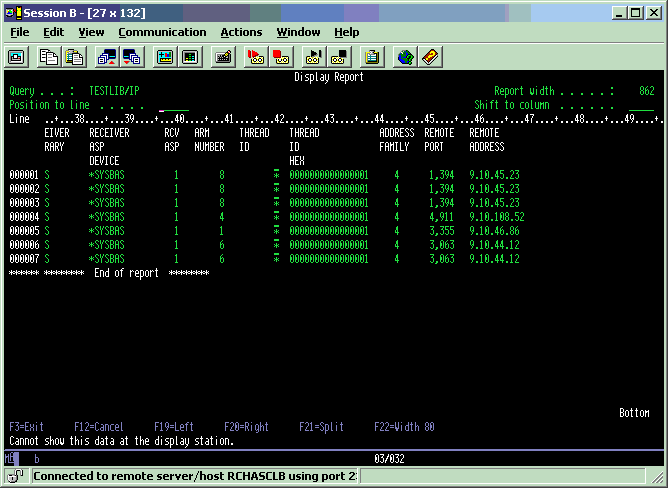
Tracking IP address at R520 and R530
Auditing Standard Field (QASYPWJ5) Record format Type 5 (at R520 and R530). Refer to the Security Reference manual for V5R2 Appendix F.
Step 1: On the operating system command line, type the following commands and press the Enter key.
CRTLIB TESTLIB
CRTDUPOBJ OBJ(QADSPJR5) FROMLIB(QSYS) OBJTYPE(*FILE) TOLIB(TESTLIB) NEWOBJ(IP)
DSPJRN JRN(QAUDJRN) ENTTYP(PW) OUTPUT(*OUTFILE) OUTFILFMT(*TYPE5) OUTFILE(TESTLIB/IP)
Special Note: Run Step 2 or Step 3:
Step 2: On the operating system command line, type the following commands and press the Enter key.
STRSQL to get to the interactive SQL command line. Then type the following:
SELECT PWJOB,
       PWUSER,
       PWNBR,
       PWPGM,
       PWUSPF,
       PWRPORT,
       PWRADR,
       PWESDL,
       PWTYPE,
       PWUSRN,
       PWTSTP
    FROM TESTLIB/IP
Step 3: Do the following:
| 1) | On the operating system command line, type the STRQRY command and press the Enter key. |
| 2) | Select Option 1, Work with queries from the Query Utilities display, and press the Enter key. |
| 3) | Select Option 1, Create form the Work with Queries display, and press the Enter key. |
| 4) | Type a query and library. |
| 5) | Select Option 1, Specify file selections from the Define the Query display, and press the Enter key. |
| 6) | Type the file of IP and library of TESTLIB on the Specify File Selections display. |
| 7) | Select additional options, if required, or press F3 to save or run the query from the Define the Query display. |
| 8) | Select Save definition = Y and choose option 1 to run interactively or 2 to run in batch from the Exit this Query display. The Remote address and port can now be shown. |

Historical Number
329133089
Was this topic helpful?
Document Information
Modified date:
07 July 2026
UID
nas8N1016247