Question & Answer
Question
How do you setup Distributed Power Management (DPM)?
Answer
How to configure and enable VMware DPM
Important Fact:
- How HA/DRS and DPM works together, please refer to:
http://kb.vmware.com/kb/1007006
http://kb.vmware.com/kb/1004884
( important!: Please be sure to factor in ESX Fault Tolerance when enabling DPM
- About Load Balancing vs. CPU Utilization: How the DRS threshold compares with the DPM threshold, see: http://pubs.vmware.com/vsp40_e/resmgmt/wwhelp/wwhimpl/common/html/wwhelp.htm#href=c_threshold.html#1_16_19_11_9_1&single=true
- DPM concepts and usage on ESX 3.5/ Virtual Center 2.5 (it was still experimental)
- DPM is ready for production on vSphere)
This DCF only covers DPM enabling through BMC, because the BMC is able to interpret IPMI protocol without relying on extra components attached to motherboard. There are other alternatives which will not be covered within this DCF such as iLo (Integrated Lights-Out) which is an HP technology or DRAC (Dell Remote Access Card) which uses Dell's proprietary service processor technology.
In general the technology above is used to forward instruction to the motherboard when DPM would like the system to be placed into standby mode.
- If you are configuring DPM on Blade, please skip this BMC/IPMI step, and scroll to the fourth screenshot below within this DCF. The first section of the document is intended for IBM X Series, or systems that have an individual BMC and not for Blades.
Setting up DPM using IPMI method (not for use with Blades)
Preparation on the hardware level:
To utilize IPMI protocol on the IBM X series, you would need to configure the BMC though the BIOS first. Use the BMC IP and MAC address, which is NOT the Ethernet1 MAC and IP. The BMC shares a port with Ethernet1, but the BMC has its own MAC and IP address that you can set on the BIOS. You will need to provision another IP for this, and not use the same IP as your server which would cause and IP address conflict.
You also need to set in the BIOS a username and password for enabling remote BMC.
-------------------------------------------------------------------------------------------------
For BMCi (interactive setup on BIOS), please refer to:
IBM eServer xSeries and BladeCenter Server Management (Redbook moved to Lenovo Site) [SG24-6495.pdf]
Please obtain the most recent document revision (when applicable) or contact your Hardware support for help.
Page 33, mentions that BMC is available on X Series but not on Blade. Blades use AMM instead (see below).
Chapter 2 on page 21 is all about BMC
Page 26 on BMC setup
Page 28 on setting up user
-------------------------------------------------------------------------------------------------
Login to vCenter

and enter the BMC MAC, IP, with the username and password that you setup on the BIOS in the "Preparation on the hardware level" section above.
Then from the edit setting menu for your cluster, enable "power management". You may use a per host setting (or leave it to use cluster default).

NOTE:
This applies to xSeries but not the IBM blade, since each blade slot does not have an individual BMC. The BMC is controlled by the BladeCenter Advance Management Module. Hardware Support could potentially provide different direction, but at present we do not expect the IPMI method to work with Blades due to this fact.
To make the IPMI work the host/ESX hardware would need to be able to interpret and receive the IPMI. Without the BMC on the blade slot, it would not be able to know which slot needs to be power on/off. Assigning the Blade AMM's BMC username/password within the DPM settings does not work.
-----------------------------
Setting up DPM using Wake on Lan method
This info below is using Wake on LAN supported NIC, and this would work on your X series or Blade.
How do you configure VMware Distributed Power Management (DPM)?
Before I show you how to configure it, let me start with a few requirements that you nee to make sure you meet.
- VMware Virtual Infrastructure Suite Enterprise (or it can be purchased separately)
- Two or more ESX host servers installed and running
- Wake on LAN (WOL) available and enabled on the ESX host servers
- VMware Virtual Center managing those host servers
If you are unsure if your physical server (ESX(i) host system) supports WOL, you can bring up the server inside the VI Client, go to the Configuration Tab, then click on Network Adapters, and you will see the Wake on LAN Supported column, as in the graphic below.

Figure 1: Checking to see if your adaptor supports WOL
If this does not show as supported you may also need to go into your server’s BIOS and ensure that Wake on LAN is enabled there as well.
Next, go into your VI Client Configuration -> Networking section and make sure that the adapter associated with the server’s VMkernel vSwitch is also an adapter that supports WOL. If this is not the case, you will need to do some adapter rearranging to ensure the vmkernel port uses an uplink with WOL support because DPM uses the server’s VMkernel vSwitch NIC.

Figure 2: Checking to see if your VMkernel adaptor is connected to the physical WOL adaptor
You can test WOL easily using VMware ESX(i) and the VI Client. To do this, VMotion off production VMs from an ESX host, put that ESX host in standby mode. Next, wake it up by using Power On, in the VI Client, for that host.
Next, you need to create a typical ESX Server Cluster by right clicking on the datacenter, then clicking New Cluster.

Figure 3: Creating a DRS cluster
From there, you will go through the new cluster wizard. It is critical that you choose for this ESX host cluster to be a Distributed Resource Cluster, like this:

Figure 4: Creating a DRS enabled Cluster
You could, of course, also make it a HA cluster.
Go though all the typical DRS cluster setup configuration, review your configuration in the final step, and click Finish to create your DRS (soon to be DPM) cluster.
Now that you have your cluster, right click on the cluster and click Edit Settings, as you see in Figure 5.

Figure 5: Editing settings on a VMware DRS Cluster
Inside the cluster settings window, under VMware DRS, you can click on Power Management, as you see in Figure 6.
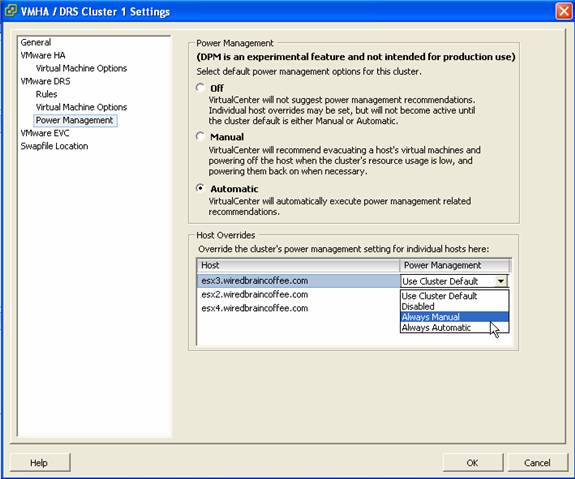
Figure 6: Power Management options for the DRS Cluster
With the cluster power management options, you can choose to either 1) turn off DPM for the cluster, 2) set the cluster to manual DPM or, 3) set the cluster to fully automatic DPM. You can also manually override the DPM settings for each ESX host that is in that cluster in the Host Overrides section of the Power Management window (see Figure 6).
Let’s talk about manual versus automatic for a moment. With a manual DPM cluster, DPM will make recommendations to power on or off servers in your cluster based on the demand. You can see one of these recommendations in Figure 7 and close up of the recommendation in Figure 8.

Figure 7: DPM Recommendation for a manual DPM cluster
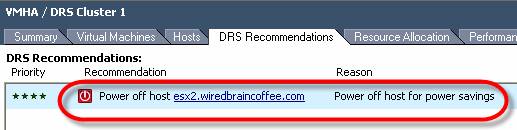
Figure 8: DPM Recommendation for a manual DPM cluster
In Figure 7, you can see how you can choose to Apply Recommendation and accept this power off.
On the other hand, with an automatic DPM cluster, the guests are automatically migrated off of a host that is not needed and that host is automatically powered off. There will not be any questions, you will just see in the Events section of your VI Client that VM guests have been migrated and that hosts are “Entering Standby Mode”. An example of this is in Figure 9.

Figure 9: ESX Host in a DPM cluster is entering Standby Mode due to Automatic DPM
You can tell the status of your DRS/DPM cluster by looking at the Summary tab of the cluster, as you see in Figure 10.

Figure 10: Summary tab of a DRS/DPM Cluster in Automatic mode
It is best to test your environment on pilot ESXs and cluster
Was this topic helpful?
Document Information
Modified date:
28 January 2020
UID
isg3T1012280