IBM Support

SEA (Shared Ethernet Adapter) Configuration Information for i Client LPAR Hosted by VIOS (Virtual I/O Server)

Troubleshooting


Problem

This document assists the user in creating and implementing Shared Ethernet Adapter (SEA) for use with i.client that is hosted by VIOS.

Resolving The Problem

This document assists the user in creating and implementing Shared Ethernet Adapter (SEA) for use with i.


Overall Concept of SEA (Shared Ethernet Adapter)


Picture of Partitions using VLAN ID 67 = ent5 = SEA = ent0.


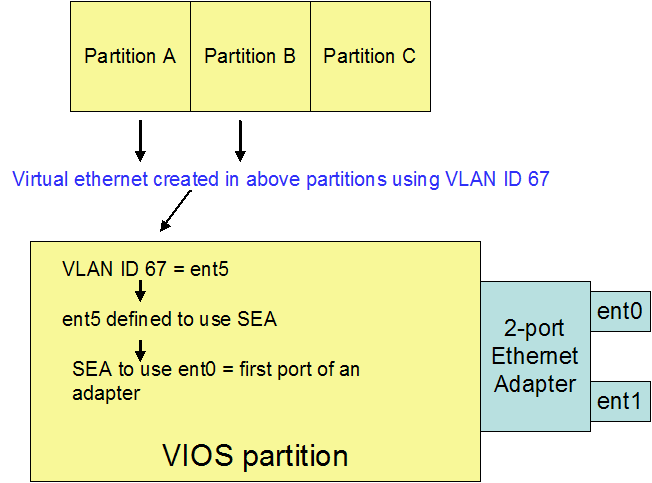
o In this scenario, the VIOS (virtual IO server) partition owns an Ethernet adapter.
o Partitions A through C do not own any LAN resources.
o Partitions A and B will create a virtual Ethernet adapter so it can access a shared Ethernet adapter in the VIOS partition to access the network.


Creating a SEA

Verify VIOS Partition Has Physical Resource

Step A
    • - Expand for details


      To verify if a VIOS partition has physical adapters associated with it, get to a terminal screen for the VIOS partition. In the example, find the virtual I/O server partition and place a checkmark next to it. There will be an arrow to the right of the partition name. You should choose Console Window and then choose Open Terminal Window. A terminal window should pop up. Use PADMIN (lowercase) as the user and the provided password.

      This picture is a screen shot from the HMC showing how to Open a Terminal Window for the VIOS partition.


      In the terminal window, type lsdev -type adapter |grep en. In the example below, resources ent0 and ent1 belong to one dual port adapter. Resources ent9 and ent10 belong to another dual port adapter.


      This picture is a screen shot of the output of lsdev -type adapter |grep en command on VIOS command line.

    Create Virtual Ethernet in the VIOS Partitition

    Step B
      • - Expand for details


        A user needs to create a virtual ethernet adapter or several virtual Ethernet in the VIOS partition. One way to create a virtual Ethernet adapter is from the HMC. Using the same VIOS partition as above, go to Dynamic Logical Partitioning.

        Note: Dynamic Logical Partitioning will create resources immediately without an IPL. However, if the partition is restarted, the information is lost. One must go into Configurations-->Manage Profiles, select the intended profile, and make the changes there. There is an example below. Both are necessary if a user wishes to use the configuration without restarting the VIOS partition and have the VIOS partition use it again after a restart.

        Dynamic Logical Partitioning (temporary change until restart)

        Go to Dynamic Logical Partitioning --> Virtual Adapters

        This picture is a screen shot from the HMC of DLPAR Virtual Adapters on VIOS server partition.


        Click on Actions and go to Create-->Ethernet Adapter.

        This picture is a screen shot from the HMC of the Create Ethernet Adapter.

        When creating the virtual Ethernet adapter, the system may choose the VLAN ID. You can put your own in here. The VLAN ID 67 in the example should be unique to the SEA and 802.1Q. Place a checkmark in IEEE 802.1Q and Access External Network.


        Note: After this virtual Ethernet adapter is created by the VIOS partition, this will be available to guest partitions such as i OS. This will be explained later. Also, this same virtual adapter can be used by more than 1 partition. For example, i OS partition A and i OS partition B can use the same VIOS virtual ethernet resource independently. It is not necessary a requirement to create additional virtual Ethernet adapters for each guest partition.


        This is a screen shot of the Create Virtual Ethernet Adapter screen on the HMC.

        After dynamically creating the Adapter you have to run cfgdev command in VIOS either from the HMC or the VIOS command line.

        Adding To VIOS Partition Profile

        Go to Configuration --> Manage Profiles


        This is a screen shot of the Manage Profiles on the HMC for the VIOS partition profile.

        Select the profile, go to Actions --> Edit.


        This is a screen shot from the HMC of how to Edit the Partiton profile from Managed profiles screen.


        Click on the Virtual Adapters tab. Click on Actions --> Create --> Ethernet Adapter. The same window should appear to create a virtual Ethernet adapter as above.


        This is a screen shot of Creating Virtual Ethernet Adapter  in partition profile on the HMC.

      Verify The Virtual Ethernet Resource In VIOS

      Step C
        • - Expand for details


          From the above example, a virtual Ethernet adapter with a VLAN ID of 67 was created. To see what resource was assigned to the VIOS partition, go to Hardware Information --> Virtual I/O Adapters --> Ethernet from the HMC.


          This is a screen shot of Hardware Information, Virtual I/O Adapters, Ethernet from the HMC.


          Resource ent5 is created in the VIOS partition.
          Note: ENT5 has VLAN ID as 67, so we know that was the virtual resource that was defined.


          This is a screen shot of the Virtual LAN Adapters from the HMC.


          Get a command line to VIOS (follow Step A). From the command line, verify if the resource is there. Type lsdev -virtual |grep en. Below we see ent5.


          This is a screen shot of the lsdev -vritual |grep en from the VIOS command line.

        Create a SEA (Shared Ethernet Adapter)

        Step D
          • - Expand for details


            In this procedure, we are telling the VIOS partition which virtual Ethernet adapters should it route to a physical adapter's port. A command line to VIOS is needed (follow Step A).

            Following the example used, we will tell VIOS to use virtual Ethernet ENT5 to use the first port of a 2 port adapter owned by the VIOS partition. In Step A, ENT0 is the first port of a dual port Ethernet card.

            lsdev -sea <physical port> -vadapter <virtual adapters to be used, separated by spaces> -default <put in a default virtual ethernet adapter> -defaultid <the VLAN ID of the default ethernet adapter>

            Using the above example:

            mkvdev -sea ent0 -vadapter ent5 -default ent5 -defaultid 67

            After completion, the VIOS will create a SEA adapter. This adapter has no bearing for i OS.

            This is a screen shot of the mkvdev -sea ent0 -vadapter ent5 -default ent5 -defaultid 67 from VIOS command line.

          Validate SEA Configuration

          Step E


          • - Expand for details


            From the HMC, go to Hardware Information --> Virtual I/O Adapters --> Ethernet.

            This is a screen shot of the Hardware Information, Virtual I/O Adapters, Ethernet  from the HMC.


            ENT5 now shows ENT0 under the Shared Adapter column.


          Adding Virtual Ethernet In i OS Partition To Use The Configured SEA

          Step F
            • - Expand for details


              Note: As mentioned in Step D, the SEA resource that was created in VIOS is not the one being selected for the i OS partition.

              In this step, a virtual Ethernet adapter needs to be created for an i OS partition using the VLAN ID of the virtual Ethernet that was created by VIOS in Step B. In that step, a virtual ethernet adapter with VLAN ID 67 was created.

              Note: In this step, Dynamic Logical Partitioning method is used. As mentioned in Step B, this will procedure will not survive an IPL of the i OS partition. For a permanent method, add the virtual Ethernet adapter through the profile configuration.

              Go to Dynamic Logical Partitioning --> Virtual Adapters

              This is a screen shot of Dynamic Logical Partitioning, Virtual Adapters screen on the HMC.


              Click on Actions --> Create --> Ethernet Adapter.


              This is a screen shot of the Create Ethernet Adapter screen from the HMC.


              The only parameter that should be necessary is the VLAN ID parameter. That VLAN ID must match a VLAN ID that was created in VIOS in Step B. In that step, VLAN ID 67 was created.


              This is a screen shot of the Create Virtual Ethernet Adapter screen on the HMC.


              On the i OS command line, a resource should have been created. To verify the correct resource (type F/C268C), go into communications hardware resources (Go Hardware Option 1, WRKHDWRSC TYPE(*CMN), and so on). Select the virtual Ethernet resource with an Option 7 and press Enter.

              Work with Communication Resources
              Sys
              Type options, press Enter.
              5=Work with configuration descriptions 7=Display resource d

              Opt Resource Type Status Text
              CMB10 268C Operational Comm Processor
              LIN06 268C Operational LAN Adapter
              7 CMN06 268C Operational Ethernet Port
              CMB11 268C Not detected Comm Processor
              LIN07 268C Not detected LAN Adapter
              CMN07 268C Not detected Ethernet Port


              Page down to parameter Adapter and a number should appear. That value should match the Adapter ID when the virtual ethernet was created.

              Display Resource Detail

              Resource name . . . . . . . : CMN06
              Text . . . . . . . . . . . . : Ethernet Port
              Type-model . . . . . . . . . : 268C-002
              Serial number . . . . . . . : 00-00000
              Part number . . . . . . . . :


              Location : U9406.675.107074C-V5-C7-T1

              System card 7
              Communications:
              I/O bus 208
              Adapter 7
              Port 0

            Creating An Ethernet Line In i OS

            Step G

            Create an Ethernet line and configure TCP/IP on i OS using the provided resource in Step F.


            The intention in this document is to configure the SEA for use with an i Client LPAR. For configuring SEA Failover on Dual VIOS, you should refer to the following link:

            http://www-304.ibm.com/support/docview.wss?uid=isg3T1011040

            [{"Product":{"code":"SSPHKW","label":"PowerVM Virtual I\/O Server"},"Business Unit":{"code":"BU058","label":"IBM Infrastructure w\/TPS"},"Component":"--","Platform":[{"code":"PF012","label":"IBM i"}],"Version":"6.1;6.1.0","Edition":"","Line of Business":{"code":"LOB57","label":"Power"}}]

            Historical Number

            513647547

            Document Information

            Modified date:
            19 February 2022

            UID

            nas8N1013225