General Page
Watson Studio Local (WSL) and Cloud Pak for Data (CPD) are supporting Security Assertion Markup Language (SAML) for single sign-on (SSO) to their web client. With correct implementation, SSO implementation helps improving user experience and authentication processes and also simplifies the user access control that means reducing security problems related with lost, forgotten, and weak password.
Once the installation of Watson Studio Local (WSL) on Cloud Pak for Data (CPD) finished, the default admin account for login to CPD web client is created. With this admin account, you can access the Manage users page by selecting menu Administer -> Manage users, where you can create and manage various user accounts with various roles.
By default, CPD stores these user accounts in CPD internal repository database. These internal user accounts work well for test environment. However, for implementation in production environment, it is recommended to use enterprise-grade LDAP provider for user management. With LDAP provider, you can centralize organization’s resources and security administration. In addition, you can also use Security Assertion Markup Language (SAML) for single sign-on (SSO) to the CPD web client.
This article describes the steps to implement single sign-on (SSO) to the CPD web client by using Microsoft Active Directory (AD) with Active Directory Federation Service (ADFS) single sign-on solution.
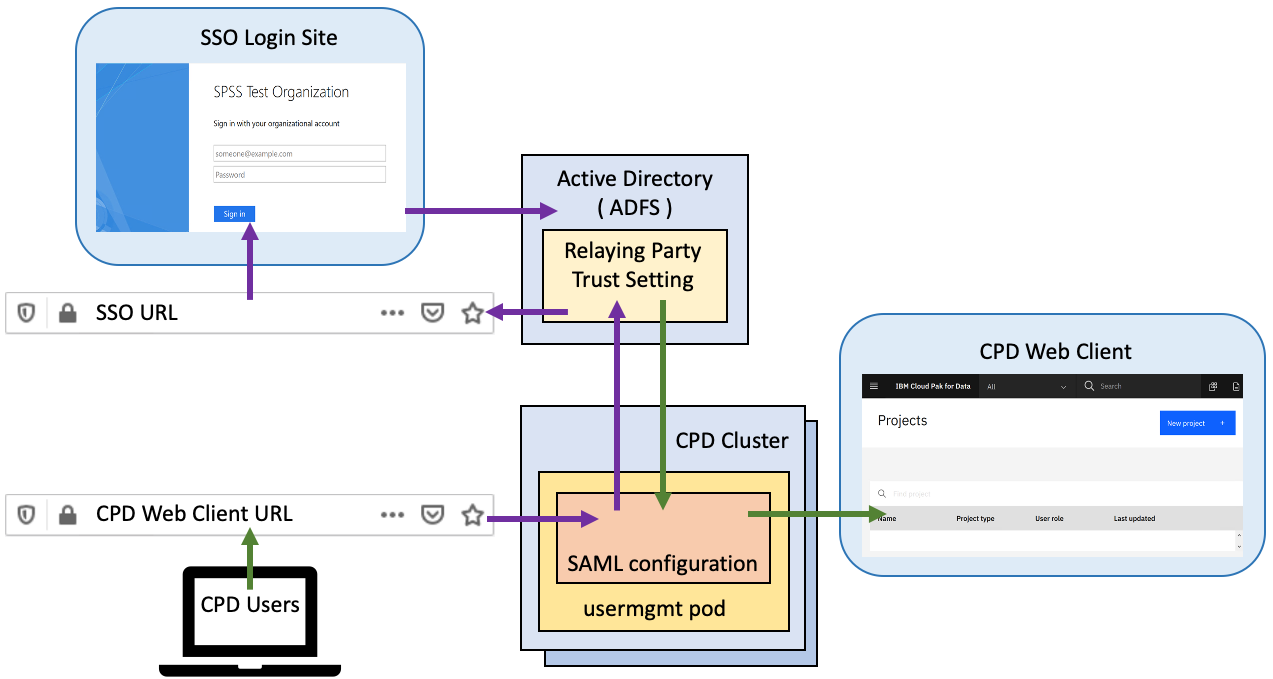
Figure 1. Single Sign-on Authentication Flow
System Topology and Authentication Flow
In this article, we are using following system components:
- CPD 3.0 installed on OpenShift 3.11 cluster
- Windows Server 2016 with Active Directory and ADFS roles installed
- Openssl installed on a Linux Server to publish trust certificates (optional)
When CPD user accesses the CPD Web Client URL, the usermgmt pod in the CPD Cluster checks its SAML configuration file and redirects user to the SSO Authentication login page that served by ADFS service. ADFS service authenticates the user via the organization’s Active Directory service. Upon the authentication, ADFS service creates an authentication claim which then forwarded by user browser to the CPD user management components that provides user access to the CPD Web Client.
In general, to implement this single sign-on solution we need to perform following steps:
- Preparing Windows Server 2016 with Active Directory and ADFS services
- Set up an ADFS Relying Party Trust
- Create Claim Issuance Policy for the Relying Party Trust
- Configure LDAP Connection on Cloud Pak for Data
- Create SAML Configuration for Enabling single sign-on (SSO) to the CPD web client
- Confirm single sign-on (SSO) to the CPD web client works correctly
In addition, it is recommended to replace the CPD’s default self-signed TLS certificate with your own certificate to avoid web browser warning on problem with the insecure website certificate.
Preparing Windows Server 2016 with Active Directory and ADFS services
You need to have Windows Server 2016 with Active Directory and ADFS services installed and ready on your system to implement this SSO solution for WSL and CPD. For more information about detail steps on how to install and set up Windows Server 2016 with Active Directory and ADFS services, see Windows Server AD FS Deployment Guide.
Once your Active Directory and ADFS services ready on Windows Server 2016, confirm the ADFS SSO login page is working properly by accessing following URL:
https://<adfs-server>/adfs/ls/idpinitiatedsignon.htm

Figure 2. Single Sign-on page of Active Directory Federation Service (ADFS)
Set up an ADFS Relying Party Trust
SAML is an XML-based framework for authentication and authorization between a Service Provider and an Identity Provider, where the service provider agrees to trust Identity Provider to authenticate users. Upon the authentication, Identity Provider generates an authentication claim, which indicates that a user has been authenticated.
To establish the trust relationship between CPD and ADFS, in the ADFS Management snap-in, you need to create a Relying Party Trust configuration for CPD web application. ADFS uses the identifiers, names, and rules set in this Relying Party Trust to create an authentication claim which then forwarded by user browser to the CPD login components
Following is sample steps to set the Relying Party Trust for CPD 3.0 web client application.
- In the ADFS Management snap-in, right-click Relying Party Trust folder, and select Add Relying Party Trust.

- Select Claim Aware on the Welcome window, and then click Start button

- On the Select data source window, check Enter data about the relying party manually

- In this sample, we use "CPD30" as display name for this setting

- In this sample, we don't use optional token encryption certificate

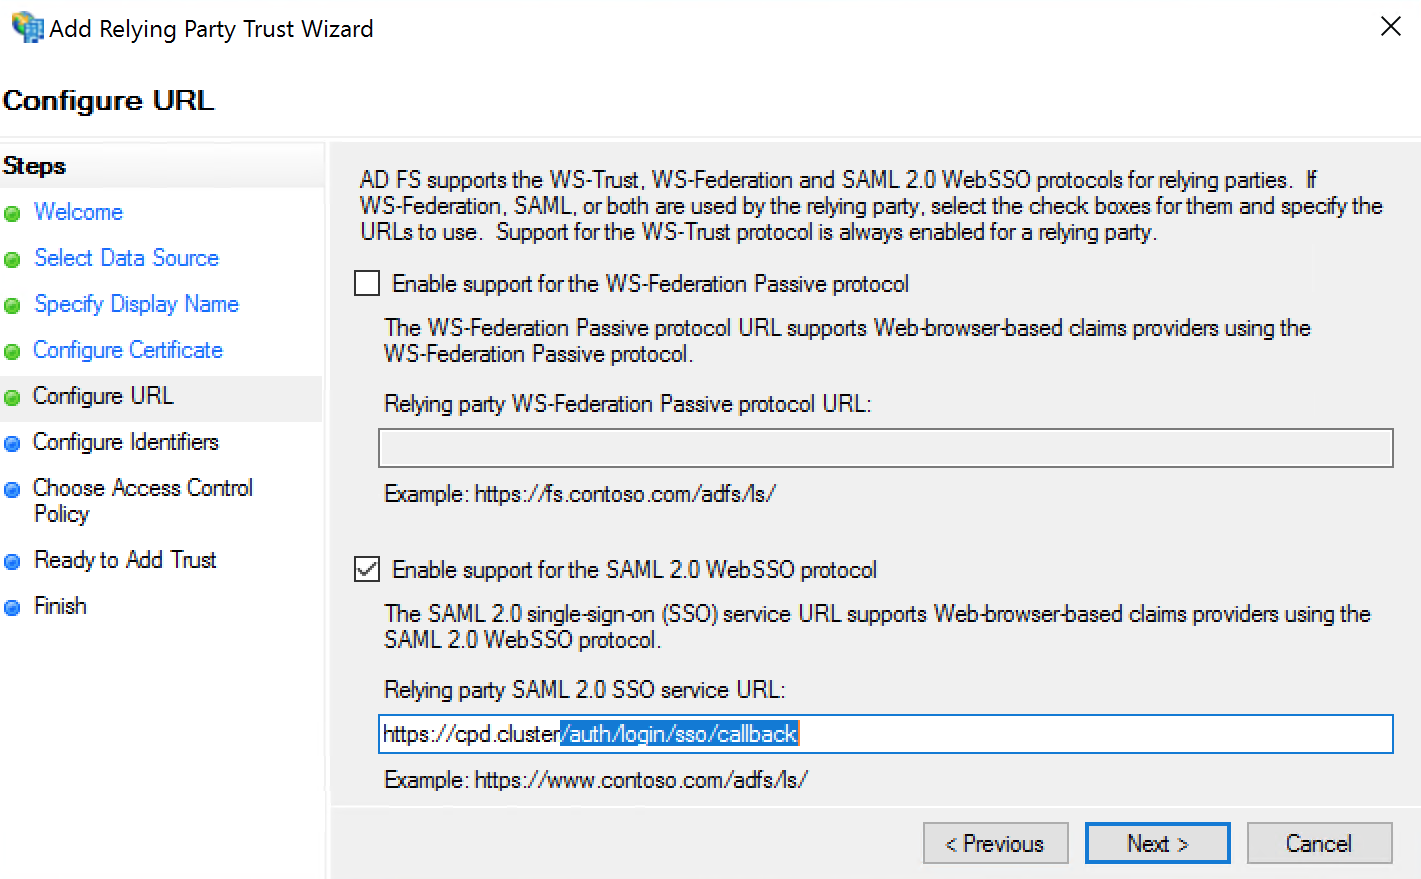
- Check the Enable support for the SAML 2.0 Web SSO protocol, and add https://cpd.cluster/auth/login/sso/callback as the relying party SAML 2.0 SSL service URL
- In this sample, we use CPD30 and CPD cluster web client URL (https://cpd.cluster/) as the identifier strings

- In this sample, we use Permit everyone for the Access Control Policy

- Confirm all items set correctly

- Checked Configure claims issuance policy for this application and click the close button

Create Claim Issuance Policy for the Relying Party Trust
Edit Claim Issuance window opens immediately by checking the option to Configure claims Issuance policy during creating Relying Party Trust. We can edit this claim issuance anytime by clicking the Edit Claim Issuance Policy from the Action Menu. In this sample, we create 2 rules, Send LDAP Attributes as Claims and Transform an Incoming Claim with following steps:
- Click Add Rule button to create new rule

- Select Send LDAP Attributes as Claims for the first rule

- Select Active Directory as the Attribute store and create map for SAM-Account-Name and E-Mail-Addresses. Then, set the appropriate rule name.

- Create Transform an Incoming Claim as the second rule

- Select Common Name as Incoming and Outgoing claim type. Select Pass through all claim values and then set the appropriate name

- Confirm you have 2 rules as Claim issuance policy for the Relying Party Trust we created

Configure LDAP Connection on Cloud Pak for Data
To deploy a single sign-on (SSO) solution to the CPD web client, you need to use LDAP users. You can configure a connection to your Active Directory server from the Manage users page by using following steps.
- Log in to CPD web client by using default admin account, access the Manage users page by selecting menu Administer -> Manage users

- Click the Configure LDAP link on the left top of Manage users page

- On the Configure LDAP page, set the correct information for the connection to your Active Directory

- Set the correct LDAP attribute-mapping

- You can manage CPD roles for a group of users by Adding LDAP group

- Confirm the connection to Active Directory by pressing the Test Connection button

- Confirm you can log in to the CPD web client by using Active Directory user

Create SAML Configuration for Enabling single sign-on (SSO) to the CPD web client
You can use SAML for single sign-on to the CPD web client by configuring the SAML setting on usermgmt pod. SAML configuration file is a JSON file with some parameters to allow CPD work with ADFS as the SAML identity provider (IdP) for single sign-on to the CPD web client. For more information about each parameter on SAML configuration file, see Configuring single sign-on on CPD documentation
Following is sample steps to enable single sign-non to the CPD web client by using ADFS as the identity provider.
- Log in to OpenShift console
# oc login -u ocadmin
Logged into "https://cpd.cluster:8443" as "ocadmin" using existing credentials. - Check current running usermgmt pod names
# oc get pod |grep user
usermgmt-cd45cb678-rqvm4 1/1 Running 0 3h
usermgmt-cd45cb678-wvzzl 1/1 Running 0 3h - Log in to the usermgmt pod
# oc exec -it usermgmt-cd45cb678-rqvm4 /bin/sh
sh-4.2$ - Move to /user-home/_global_/config/saml/ directory and create samlConfig.json
sh-4.2$ cd /user-home/_global_/config/saml/
sh-4.2$ vi samlConfig.json - Type following configuration file and save it
{
"entryPoint": "https://hs0-adjp.myspss-test.org/adfs/ls",
"callbackUrl": "https://cpd.cluster/auth/login/sso/callback",
"fieldToAuthenticate": "username",
"spCert": "",
"idpCert": "",
"issuer": "CPD30",
"identifierFormat": ""
} - Exit from usermgnt pod, and delete current running usermgmt pods
sh-4.2$ exit
exit
# oc delete pod usermgmt-cd45cb678-rqvm4 usermgmt-cd45cb678-wvzzl
pod "usermgmt-cd45cb678-rqvm4" deleted
pod "usermgmt-cd45cb678-wvzzl" deleted - Wait for a while and confirm usermgmt pods are restarted
# oc get pod |grep user
usermgmt-cd45cb678-56zl6 1/1 Running 0 1m
usermgmt-cd45cb678-bv7qr 1/1 Running 0 1m
Confirm single sign-on (SSO) to the CPD web client works correctly
Now, you can confirm single sign-on to the CPD web client work correctly by accessing the CPD web client URL. Your request will redirect to the ADFS single sign-on page, and once you log in with correct Active Directory user, you get access to the CPD web client.
- Type CPD web client URL into the web browser URL bar

- The request redirected to the ADFS single sign-on page, where you can log in as Active Directory user. Confirm SAMLRequest with the claim token added to the request URL
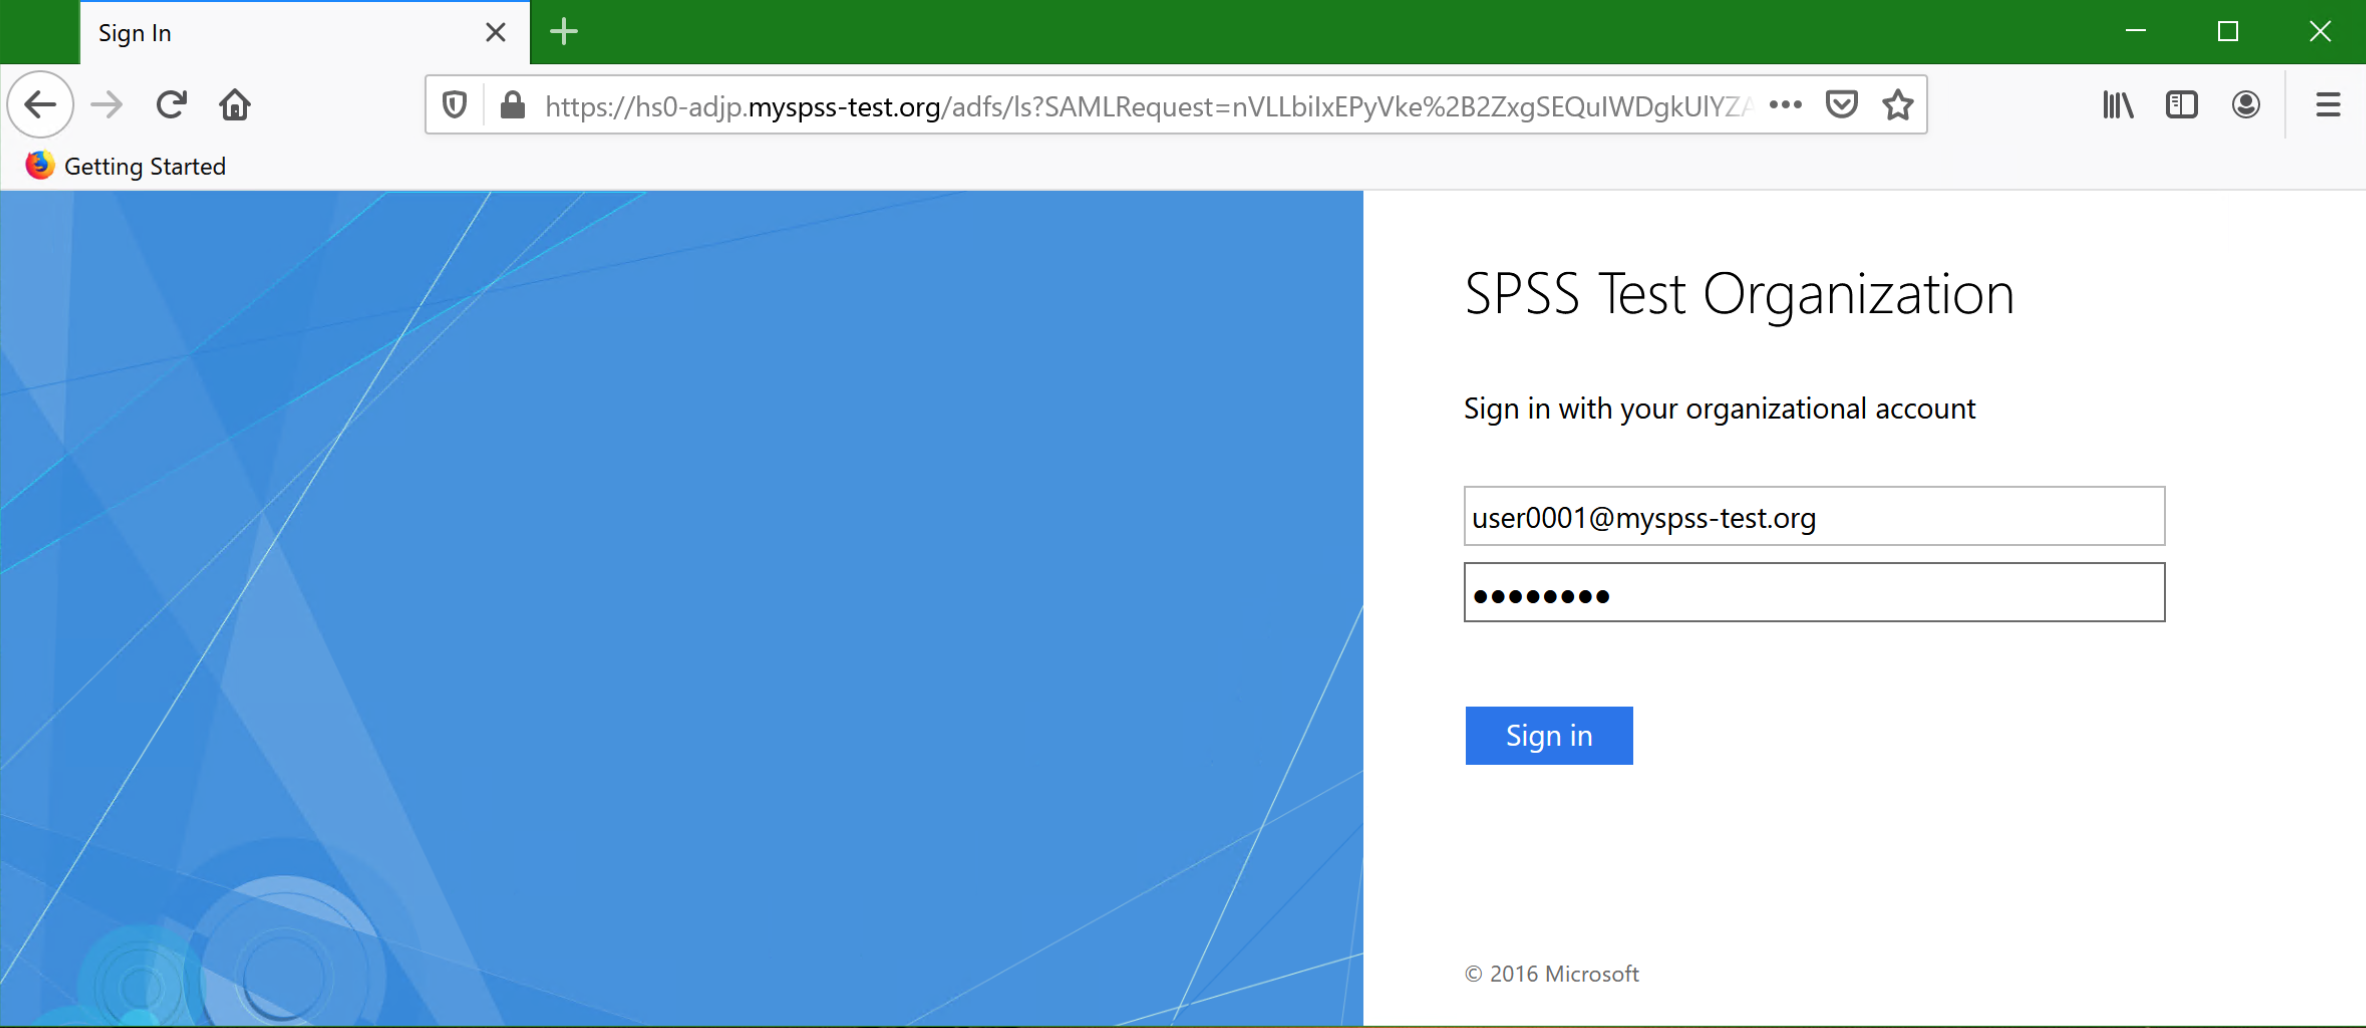
- Confirm you get access to CPD web client with Active Directory user as your login user

Conclusion
With correct implementation, single sign-on could simplify account management and improving organization security. By centralized session and user authentication service, user can use one set of login credential to access multiple applications within the organization. Single sign-on not only improved the productivity, but it also can eliminate problem related with remembering different password, managing strong password that means reducing the risk of lost, forgotten, or weak passwords.
From the system administrator perspective, single sign-on implementation could potentially reduce cost related to dealing with password-related problems and mitigate the risk of insider threats. Single sign-on helps improving user experience and authentication processes and also simplifies the user access control that helps improving security.
References
Appendix A: Preparing self-manage certificate authority (CA) certificate
During the installation, CPD generated a self-signed TLS certificate used to enable HTTPS connections to its web client. Since this certificate is untrusted by all HTTPS clients, it is recommended to use your own SSL certificate.
You can use a certificate issued by well-known public Internet certificate authority provider, which requiring a purchase to obtain it. As an alternative, you can also create and operate your self-manage certificate authority to issue the certificates. You can take more control on certificate distribution in your organization by creating and maintaining your self-manage certificate authority that can help you improving the security.
Following simple steps show how to create and operate private certificate authority by using openssl on a Linux server.
- Install openssl on a Linux server
# yum install openssl -y
- Create a private key for our self-manage certificate authority
# openssl genrsa -aes256 -out /data/priv-ca/cakey.pem 2048
Generating RSA private key, 2048 bit long modulus
...............................................+++
............................................................+++
e is 65537 (0x10001)
Enter pass phrase for /data/priv-ca/cakey.pem: <password>
Verifying - Enter pass phrase for /data/priv-ca/cakey.pem: <password> - Create a Certificate Signing Request (CSR) for this certificate authority
# openssl req -new -key /data/priv-ca/cakey.pem -out /data/priv-ca/cacert.csr
Enter pass phrase for /data/priv-ca/cakey.pem: <password>
You are about to be asked to enter information that will be incorporated
into your certificate request.
What you are about to enter is what is called a Distinguished Name or a DN.
There are quite a few fields but you can leave some blank
For some fields there will be a default value,
If you enter '.', the field will be left blank.
-----
Country Name (2 letter code) [XX]: JP
State or Province Name (full name) []: Tokyo
Locality Name (eg, city) [Default City]: Dokoka-Ku
Organization Name (eg, company) [Default Company Ltd]: IBM
Organizational Unit Name (eg, section) []: SPSS-Test
Common Name (eg, your name or your server's hostname) []: hs0-dock
Email Address []: noreply@myspss-test.org
Please enter the following 'extra' attributes
to be sent with your certificate request
A challenge password []: <blank>
An optional company name []: <blank> - Generate Certificate for our self-manage certificate authority
# openssl x509 -days 3650 -in /data/priv-ca/cacert.csr -req -signkey /data/priv-ca/cakey.pem -out /data/priv-ca/cacert.pem
Signature ok
subject=/C=JP/ST=Tokyo/L=Dokoka-Ku/O=IBM/OU=SPSS-Test/CN=hs0-dock
/emailAddress=noreply@myspss-test.org
Getting Private key
Enter pass phrase for /data/priv-ca/cakey.pem: <password>
# touch /etc/pki/CA/index.txt
# echo '1000' > /etc/pki/CA/serial
Since by default user web browser doesn’t trust any certificate issued by your self-manage certificate authority, you need to distribute and ask users to add this certificate to their web browser certificate manager.
Confirm each web browser setting has certificate of your self-manage certificate authority as a trust certificate. For example, Chrome Browser and Internet Explorer inherit certificate trust from the Operating System. However, Firefox use its own Certificate Manager to manage the trust certificates. Figure 3 shows the Firefox Certificate Manager with the trust certificate from self-manage certificate authority.

Figure 3. Firefox's Certificate Manager
Appendix B: Issuing certificate that uses self-manage certificate authority (CA)
Once your self-manage certificate authority certificate deployed to the user's web browser, you can start issuing certificates for your applications. For example, we can use following steps to issue certificate for our ADFS service.
- Create a server key for ADFS service
# openssl genrsa -out adfs.key 2048
Generating RSA private key, 2048 bit long modulus
............+++
......+++
e is 65537 (0x10001) - Create CSR for ADFS service (note: add ADFS hostname as the Common Name)
# openssl req -new -key /data/priv-ca/adfs.key -out /data/priv-ca/adfs.csr
You are about to be asked to enter information that will be incorporated
into your certificate request.
What you are about to enter is what is called a Distinguished Name or a DN.
There are quite a few fields but you can leave some blank
For some fields there will be a default value,
If you enter '.', the field will be left blank.
-----
Country Name (2 letter code) [XX]: JP
State or Province Name (full name) []: Tokyo
Locality Name (eg, city) [Default City]: Dokoka-Ku
Organization Name (eg, company) [Default Company Ltd]: IBM
Organizational Unit Name (eg, section) []: SPSS-Test
Common Name (eg, your name or your server's hostname) []: hs0-adjp.myspss-test.org
Email Address []: noreply@myspss-test.org
Please enter the following 'extra' attributes
to be sent with your certificate request
A challenge password []: <blank>
An optional company name []: <blank> - Generate certificate for ADFS service
# openssl ca -cert /data/priv-ca/cacert.pem -keyfile /data/priv-ca/cakey.pem -out adfs.crt -days 365 -infiles adfs.csr
Using configuration from /etc/pki/tls/openssl.cnf
Enter pass phrase for /data/priv-ca/cakey.pem:
Check that the request matches the signature
Signature ok
Certificate Details:
Serial Number: 4096 (0x1000)
Validity
Not Before: May 2 05:22:00 2020 GMT
Not After: May 2 05:22:00 2021 GMT
Subject:
countryName = JP
stateOrProvinceName = Tokyo
organizationName = IBM
organizationalUnitName = SPSS-Test
commonName = hs0-adjp.myspss-test.org
emailAddress = noreply@myspss-test.org
X509v3 extensions:
X509v3 Basic Constraints:
CA:FALSE
Netscape Comment:
OpenSSL Generated Certificate
X509v3 Subject Key Identifier:
5A:25:9F:21:C5:9F:67:36:27:70:C1:11:89:D2:B0:95:BD:50:E2:F2
X509v3 Authority Key Identifier:
DirName:/C=JP/ST=Tokyo/L=Dokoka-Ku/O=IBM/OU=SPSS-Test/
CN=hs0-dock/emailAddress=noreply@myspss-test.org
serial:E4:43:0B:22:7D:F0:32:11
Certificate is to be certified until May 2 05:22:00 2021 GMT (365 days)
Sign the certificate? [y/n]: y
1 out of 1 certificate requests certified, commit? [y/n] y
Write out database with 1 new entries
Data Base Updated - Create PFX format certificate for ADFS service
# openssl pkcs12 -export -in adfs.crt -inkey adfs.key -out adfs.pfx
Enter Export Password: <password>
Verifying - Enter Export Password: <password>
# ls
adfs.crt adfs.csr adfs.key adfs.pfx
Notes:
You can use the same steps to generate custom TLS certificate for CPD HTTPS connections.
For more information about replacing the CPD’s TLS certificate, see Using a custom TLS certificate for HTTPS connections on CPD documentation.
[{"Business Unit":{"code":"BU059","label":"IBM Software w\/o TPS"},"Product":{"code":"SSHGWL","label":"IBM Watson Studio Local"},"ARM Category":[{"code":"a8m0z000000brYyAAI","label":"Admin-\u003ESecurity"},{"code":"a8m0z0000008ZrZAAU","label":"Admin-\u003EUser management"}],"ARM Case Number":"","Platform":[{"code":"PF025","label":"Platform Independent"}],"Version":"1.2.0;2.0.0;2.1.x","Line of Business":{"code":"LOB10","label":"Data and AI"}},{"Type":"MASTER","Line of Business":{"code":"LOB10","label":"Data and AI"},"Business Unit":{"code":"BU059","label":"IBM Software w\/o TPS"},"Product":{"code":"SSHGYS","label":"IBM Cloud Pak for Data"},"ARM Category":[{"code":"a8m3p000000UoReAAK","label":"Authentication"}],"Platform":[{"code":"PF025","label":"Platform Independent"}],"Version":"All Versions"}]
Was this topic helpful?
Document Information
Modified date:
14 August 2023
UID
ibm16205628