Troubleshooting
Problem
This document explains how to remove disk units concurrently from an ASP using SST.
Resolving The Problem
Starting in IBM i V7R1, disk units can be removed from an ASP using SST by doing the following:
1. Issue the STRSST command.
2. Select Option 3. Work with Disk Units.
3. Select Option 2. Work with Disk Configuration:
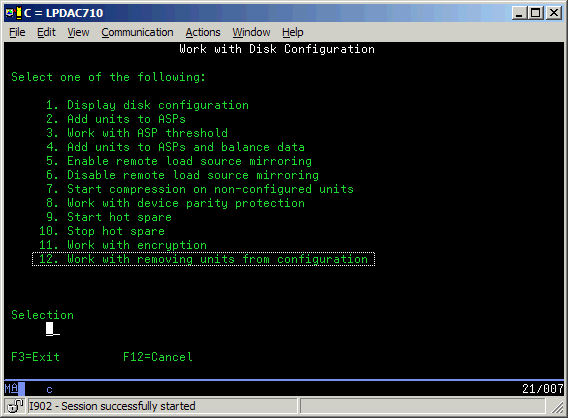
4. Option 12. Work with Removing Units From Configuration:
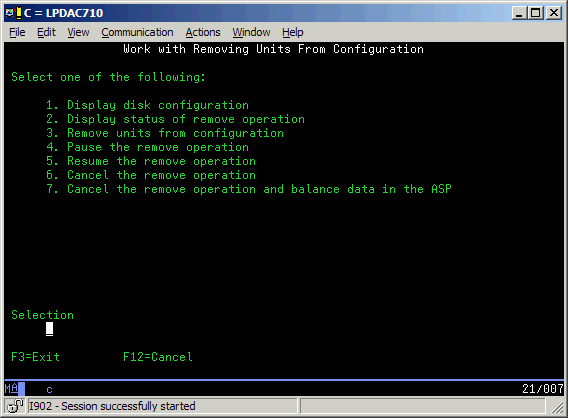
5. Option 3 to remove units (Remove Units from Configuration). Important Note: You can only remove units from one ASP at a time:
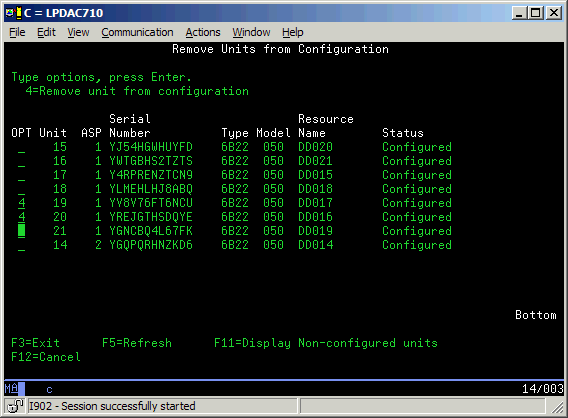
6. When you press Enter to select the units for removal, you receive the following confirmation screen:
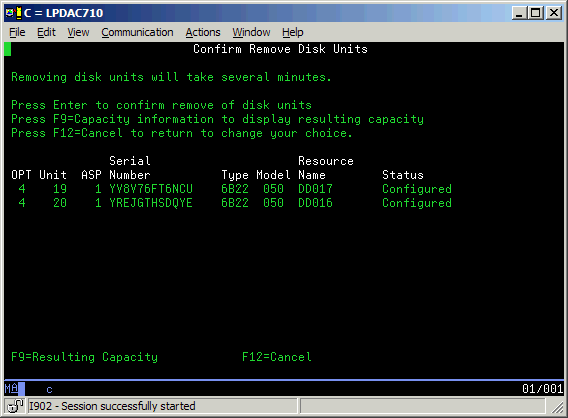
7. Pressing F9 on the confirmation screen can be used to check what the resulting capacity will be after the units are removed:
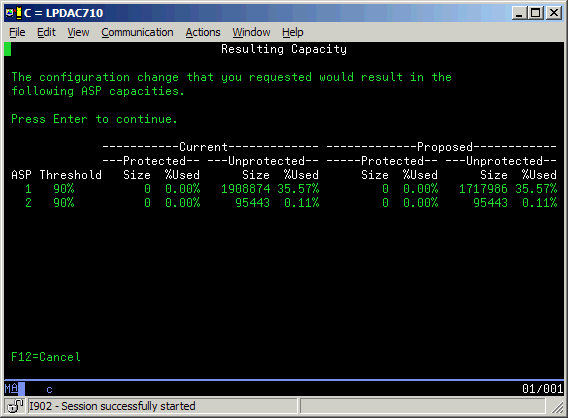
8. Selecting Option 2 from the Work with Removing units From Configuration screen will show the status.
9. Selecting Option 4 will pause the remove operation. This stops the data removal from all of the drives being removed; however, they are still marked for removal.
10. Selecting Option 5 will resume a paused remove operation.
11. Selecting Option 6 will cancel a paused remove operation. Warning: This option does not rebalance the data.
12. Selecting Option 7 will cancel a paused remove operation and balance the ASP data.
Notes:
1. An IPL or Vary Off during a concurrent remove operation will force the remove into paused status. It will not automatically resume.
2. When moving data off units, Media preferences for SSD units are respected.
3. DST only has options to remove units and to display status - DST does not allow Pause, Resume or Cancel.
1. Issue the STRSST command.
2. Select Option 3. Work with Disk Units.
3. Select Option 2. Work with Disk Configuration:
4. Option 12. Work with Removing Units From Configuration:
5. Option 3 to remove units (Remove Units from Configuration). Important Note: You can only remove units from one ASP at a time:
6. When you press Enter to select the units for removal, you receive the following confirmation screen:
7. Pressing F9 on the confirmation screen can be used to check what the resulting capacity will be after the units are removed:
8. Selecting Option 2 from the Work with Removing units From Configuration screen will show the status.
9. Selecting Option 4 will pause the remove operation. This stops the data removal from all of the drives being removed; however, they are still marked for removal.
10. Selecting Option 5 will resume a paused remove operation.
11. Selecting Option 6 will cancel a paused remove operation. Warning: This option does not rebalance the data.
12. Selecting Option 7 will cancel a paused remove operation and balance the ASP data.
Notes:
1. An IPL or Vary Off during a concurrent remove operation will force the remove into paused status. It will not automatically resume.
2. When moving data off units, Media preferences for SSD units are respected.
3. DST only has options to remove units and to display status - DST does not allow Pause, Resume or Cancel.
4. Even though units can be concurrently removed from an ASP, removal of physical disk units (see note 5) and logical removal (unmapping/rezoning, etc.) of LUN paths should be performed while the partition/system is shutdown.
5. Starting with IBM i 7.5 TR2, concurrent removal of non-configured physical DASD resources is supported via hardware concurrent maintenance.
[{"Type":"MASTER","Line of Business":{"code":"LOB68","label":"Power HW"},"Business Unit":{"code":"BU070","label":"IBM Infrastructure"},"Product":{"code":"SWG60","label":"IBM i"},"ARM Category":[{"code":"a8m0z0000000CH0AAM","label":"Internal LIC and Partitions"},{"code":"a8m3p000000PCSOAA4","label":"Internal LIC and Partitions-\u003EDisk"}],"ARM Case Number":"","Platform":[{"code":"PF012","label":"IBM i"}],"Version":"7.3.0;7.4.0;7.5.0"}]
Historical Number
595484398
Was this topic helpful?
Document Information
Modified date:
10 June 2026
UID
nas8N1011602