Question & Answer
Question
Answer
Agent Policy Information
The ReaQta-Hive solution supports 4 different types of policies, created by the Dashboard user, and delivered to the Agent. Through the policies, it is possible to configure some of the behaviors of the agent, such as: suppress the generation of an alert, block, or alert when a process is executed, automatically block a behavior. ReaQta supports the following policy types:
Blocklist: Through them, it is possible to automatically block (kill the process) of specific applications and receive an alert every time a “block listed” process is executed. The blocklist also supports the “Alert Only” mode, if specified, the process is not killed but the user receives a “Policy Hit” alert. The blocklist has the highest priority and cannot be allowlisted.
Protection: Through them, it is possible to switch the agent from EDR (Endpoint Detection and Response) mode to EPP (Endpoint Protection Platform) mode. By activating one or more protection policies the Agent automatically blocks (kill) a specific trigger (Cross-Process Operation, ransomware Behavior). The protection policy generates an Alert when suspicious behavior is detected regardless the name, hash, or path of the executable application involved. A specific icon (Shield) indicates the presence of a protective action. The protection policies can be allowlisted.
DeStra: Stands for Detection Strategy and offers the capability to create custom detections based on the information gathered by the events collected from the agent.
Hive-Cloud (Optional if endpoints are internet connected): the policies beginning with “Hive-Policy” are automatically generated by the external service Hive-Cloud. Hive-Cloud are blocklist policies in “Alert Only” mode. The policy is generated when an executable application observed for the first time in the infrastructure is identified as malicious by Hive-Cloud, which retrieves the information from a public Threat Intelligence source. The generated policy has a global scope, and it is applied to the entire infrastructure.
Important: The Hive-Cloud policy is created once for each detected malicious executable application per server. If a Hive-Cloud policy is deleted, the Hive-Brain does not re-create the policy if the same malicious executable application is seen again.
How to create an allowlist
- Log in to the ReaQta Hive dashboard.
- Go to the policies page and click "Create Policy" button, a new drop-down box is displayed with the supported policies, select allowlist:
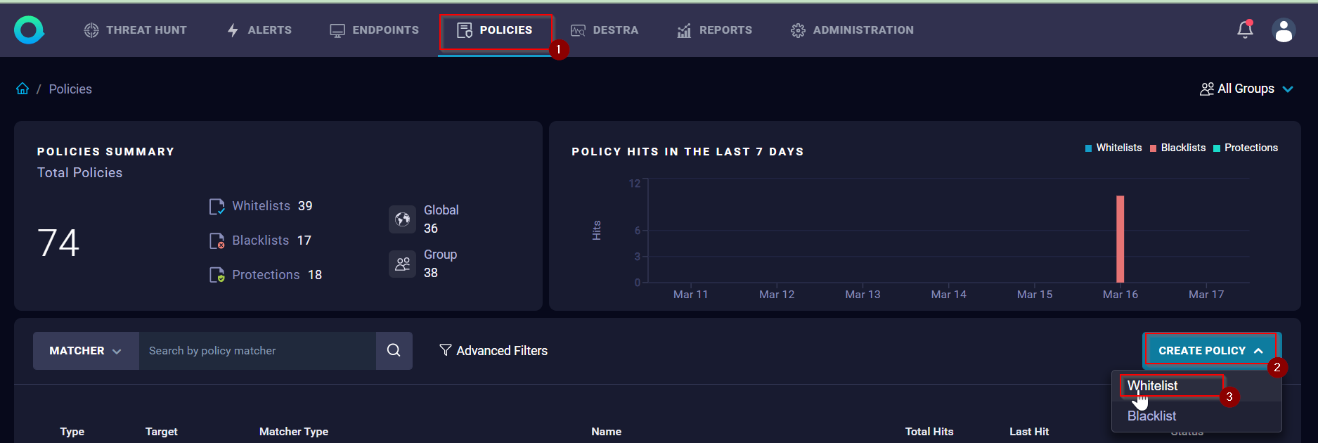
- Complete the next Create allowlist Policy fields:
Policy Name: Name of the policy to reflect the specific behavior you are looking for across all your endpoints.
Description (optional): Brief description of what the policy is intending to do.
Targets: It represents the scope of the policy, where policies are applied, Global or Group.
Matcher: Describes the matching criteria for the policy to get triggered. Two types of matchers are found here based on Application and Behavior.
- Application: as its name implies it applies to the application itself and allow action can be configured in 2 ways:
- App Directory: To allow the application, based on the directory the application is allocated.
Example: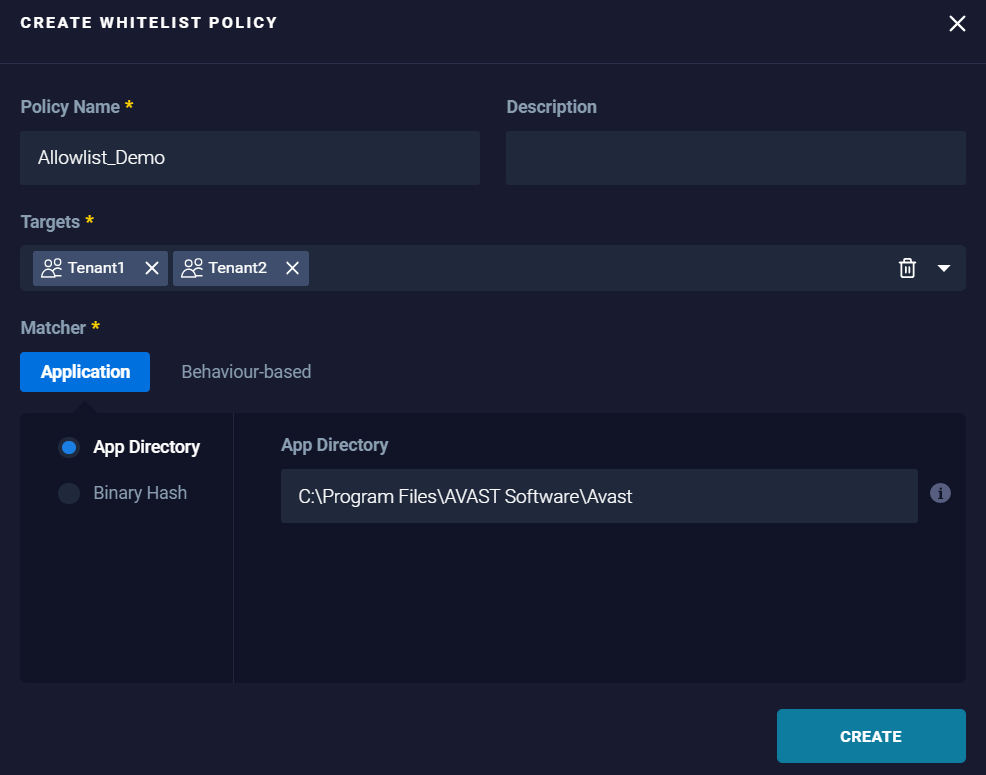
Results: Applications running within the specified App Directory are added to the allowlist and are trusted by the organization. - Binary Hash: To allow the application, based on the specific hash of the application.
Example: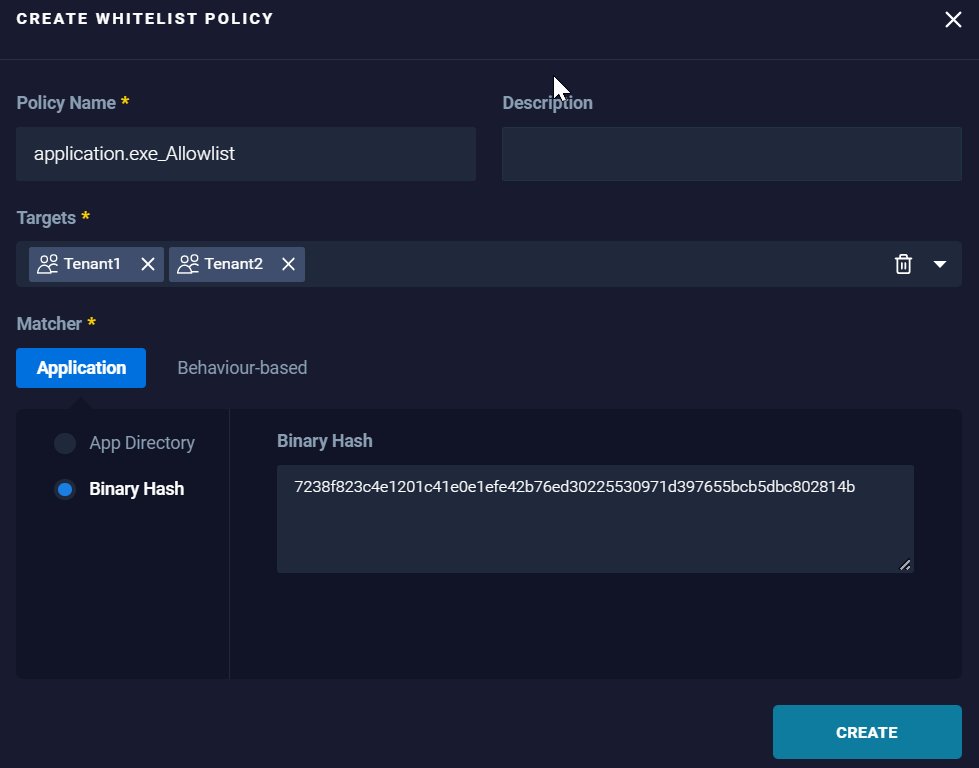
Results: It adds "application.exe" to the allowlist granting it access without generating any alert as it is now trusted by the organization.
- App Directory: To allow the application, based on the directory the application is allocated.
- Behavior-based: Focuses on the application only when it exhibits a behavior and as same as the application matcher it can be configured in 2 ways:
- App Directory: To allow the application based on the directory the application it is allocated along with the trigger type that, represents the intended application behavior.
Example:
Results: Trust files access from applications in 'Program Files' - Binary Hash: To allow the application based on the specific hash of the application allocated along with the trigger type that, represent the intended application behavior.
Example: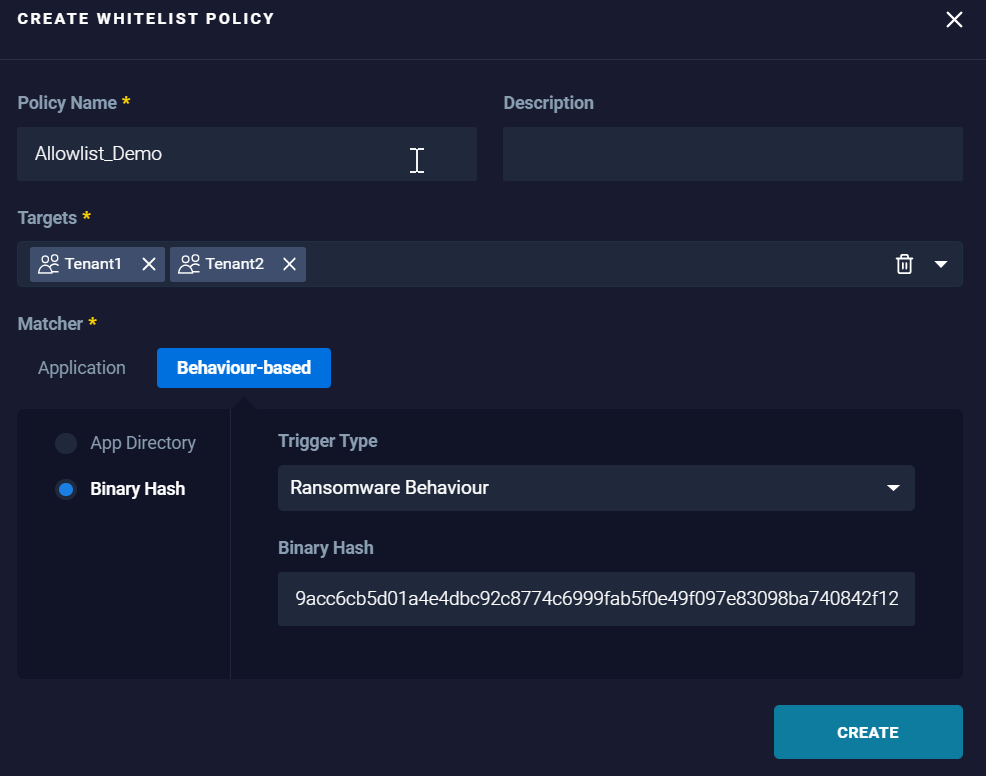
Results: Applications matching the specified hash and trigger type (application behavior) are added to the allowlist to become trusted by the organization.
- App Directory: To allow the application based on the directory the application it is allocated along with the trigger type that, represents the intended application behavior.
How to create a blocklist
- Log in to the ReaQta Hive dashboard.
- Go to the policies page and click "Create Policy" button, a new drop-down box is displayed with the supported policies, select blocklist:
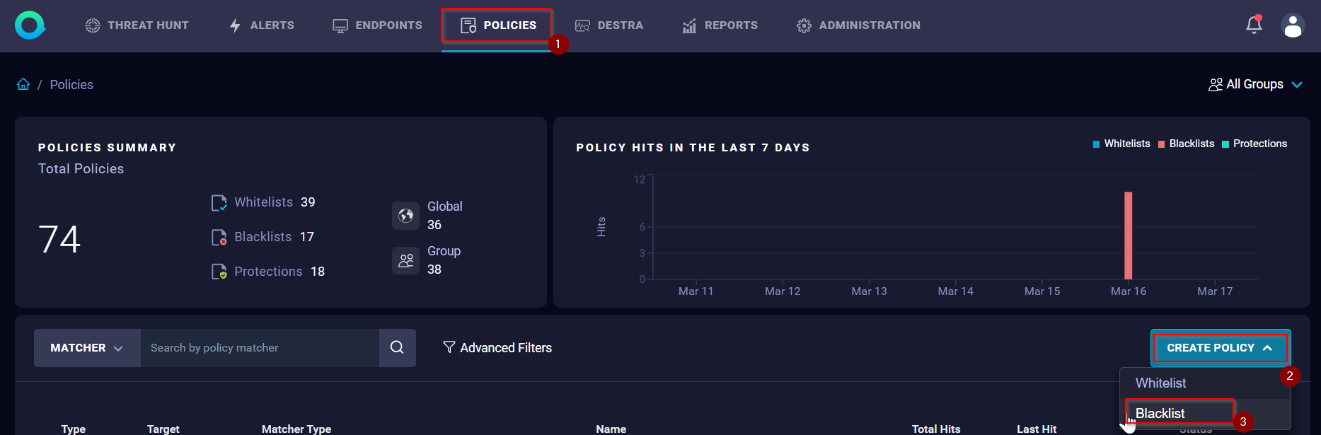
- Complete the next Create allowlist Policy fields:
Policy Name: Name of the policy to reflect the specific behavior you are looking for across all of your endpoints.
Description (optional): Brief description of what the policy is intending to do.
Targets: It represents the scope of the policy, where policies are applied, Global or Group.
Matcher: Describes the matching criteria for the policy to get triggered. Two types of matchers are found here based on Application and Behavior.
- Application: as its name implies it applies to the application itself and allow action can be:
- App Directory: To block the application based, on the directory the application is allocated.
Example: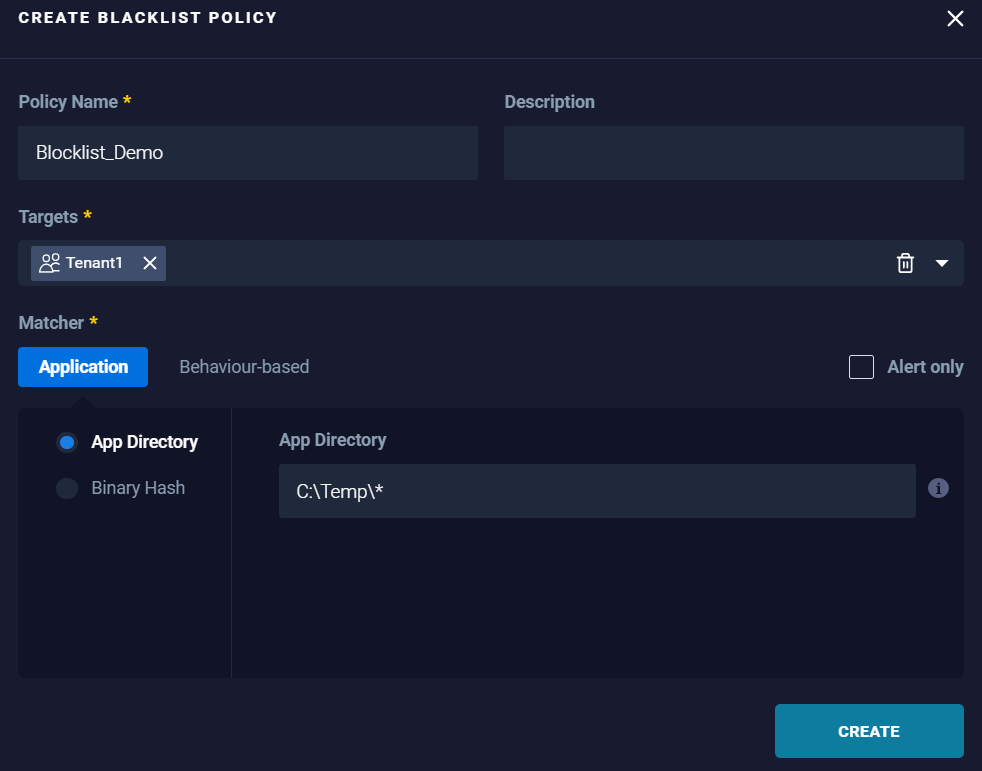
Results: Any application running within the specified directory and subdirectories are blocked.
- Binary Hash: To block the application based on the specific hash of the application.
Example: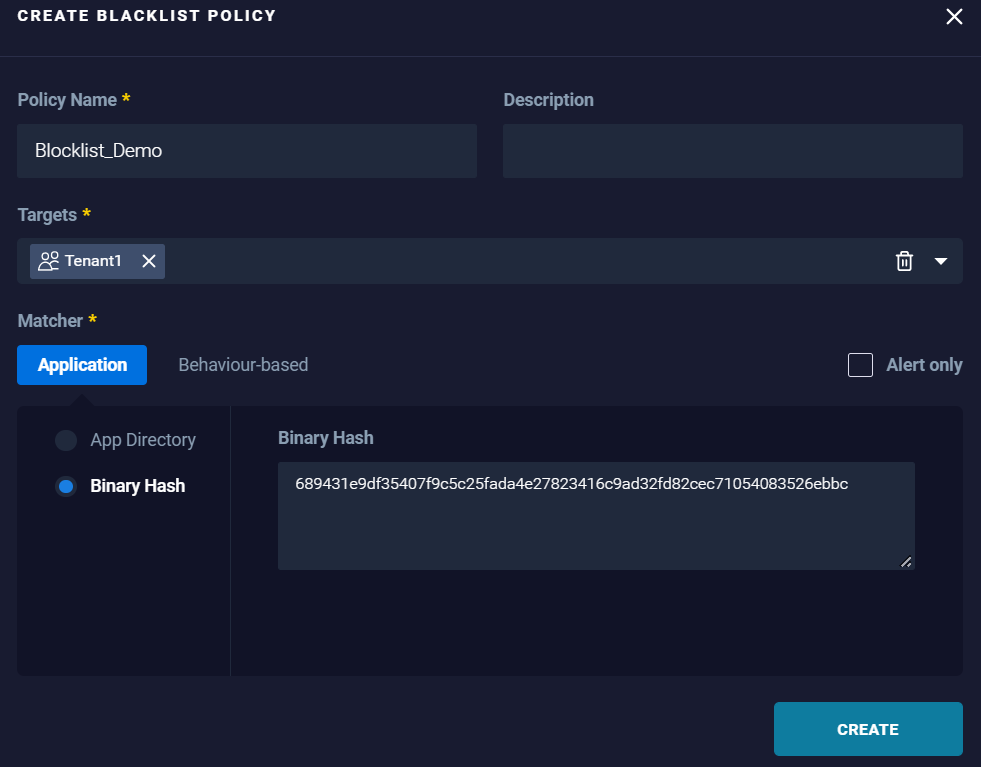
Results: Applications matching the specified hash are blocked.
- App Directory: To block the application based, on the directory the application is allocated.
- Behavior-based: Focuses on the application only when it exhibits a behavior and as same as the application matcher it can be configured in 2 ways:
- App Directory: To block the application based on the directory the application is allocated along with the trigger type that, represents the intended application behavior.
Example: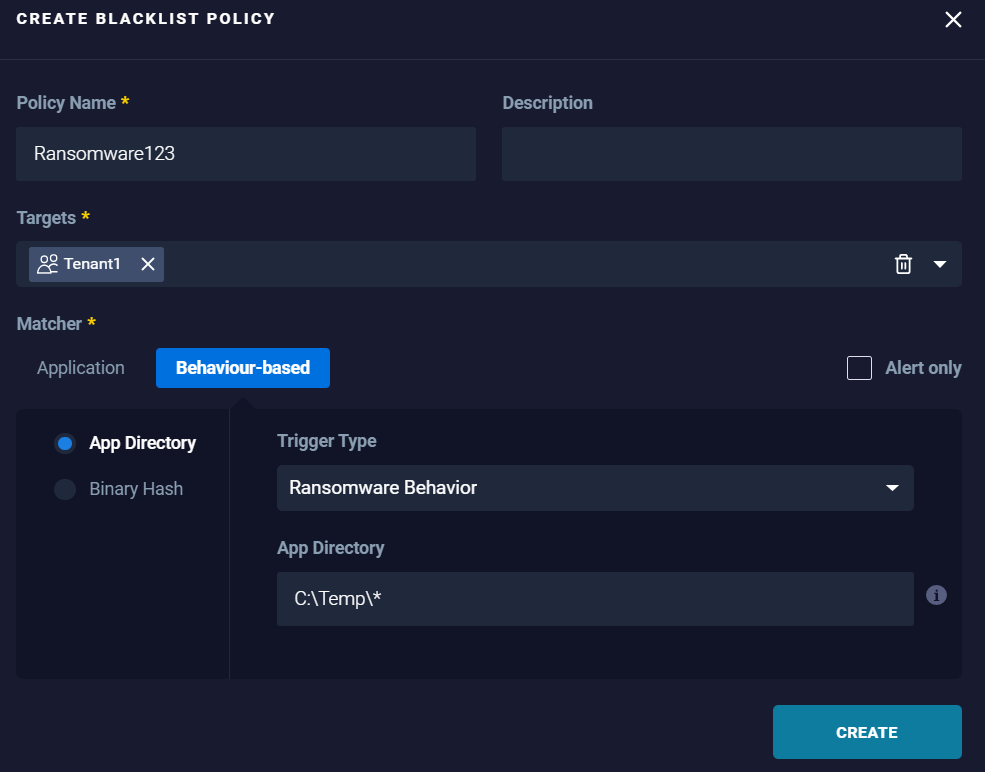
Results: Any application running within the specified directory and subdirectories exhibiting ransomware behavior are blocked.
- Binary Hash: To block the application based on the specific hash of the application allocated along with the trigger type that, represent the intended application behavior.
Example: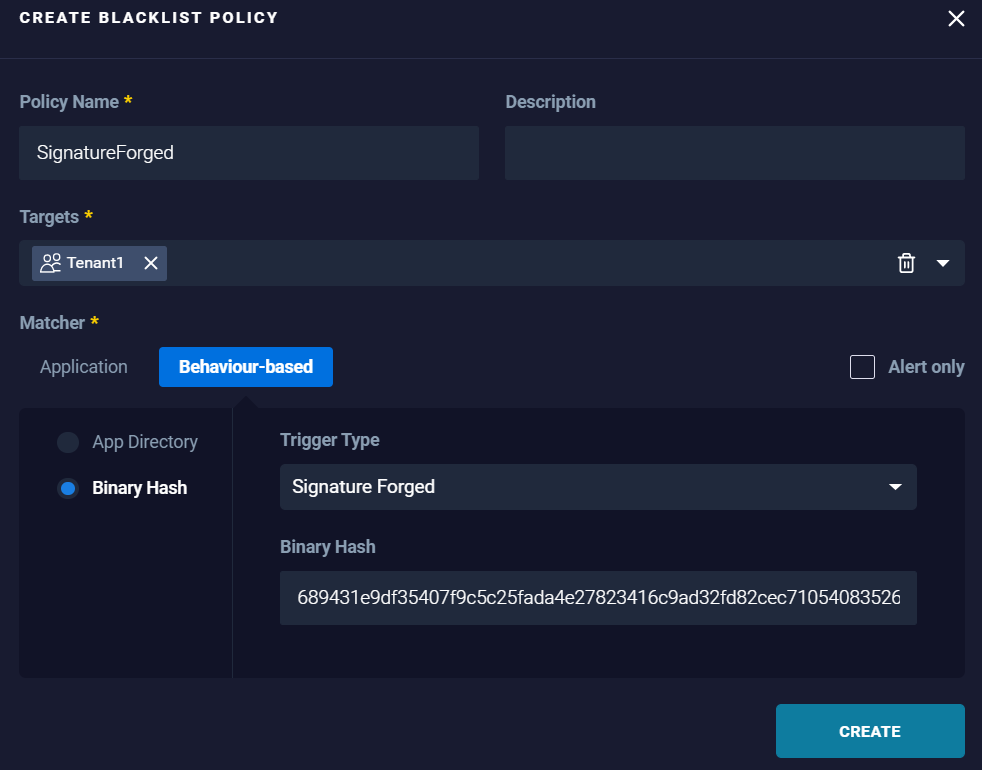
Results: Applications matching the specified hash and trigger type (application behavior) are blocked.
- App Directory: To block the application based on the directory the application is allocated along with the trigger type that, represents the intended application behavior.
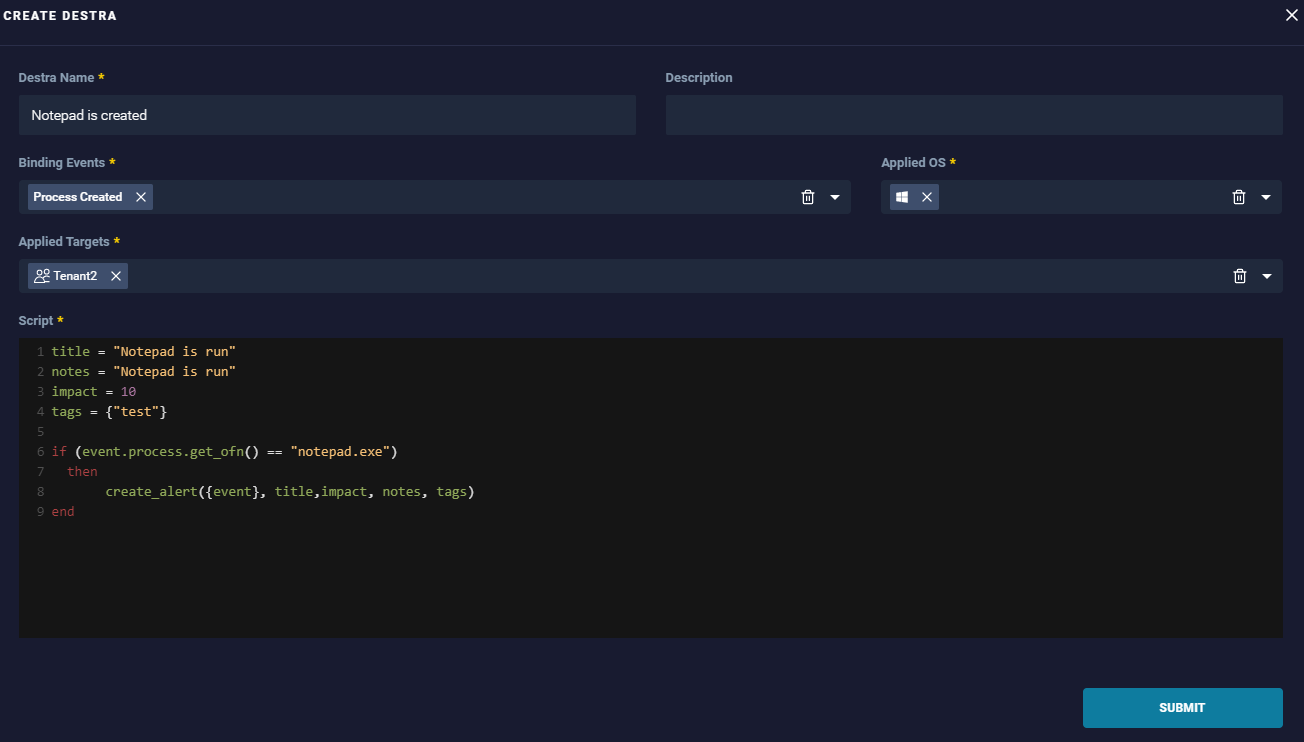
How to create a Destra policy
- Give it a name to reflect the specific behavior you are looking for across all your endpoints.
- Select one or more binding events that it looks for the customized logic against.
- Select the applicable operating system that it would specifically apply to. If it applies to all operating systems, it can be a multiselection.
- Select the target, which represents the scope of the policy, Global or Group.
- Select the blank script environment to pre-fill the necessary logic to look for the specific events. To allowlist a behavior triggered by a DeStra policy, it is necessary to edit the policy script. The complete documentation can be found at the following address: ReaQta DeStra Docs
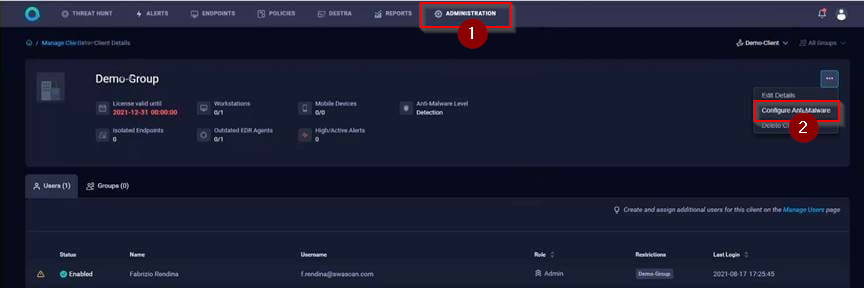
How to create an Antimalware Exception
- From the dashboard, go to the Administration page and select Configure Anti-Malware.
- Click “Create Exception”
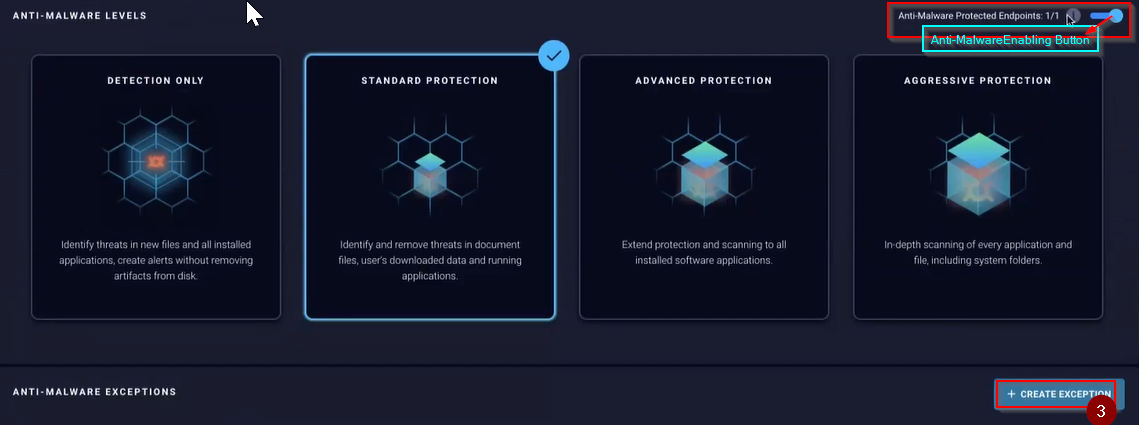
- Complete the fields of the Create Exception form and press the create button to finish
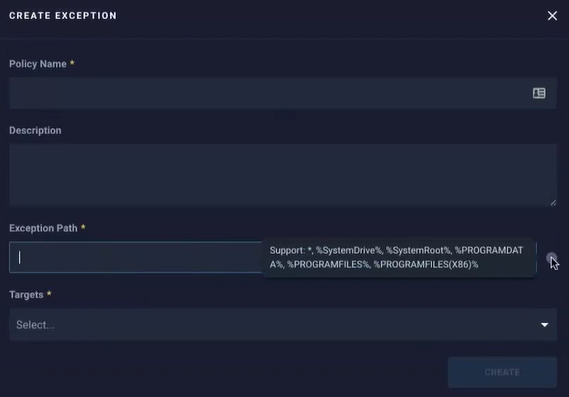
- Directory based.
Example: C:\Temp\*
- Specific process based. Add the following into the path for the exception <process><PATH>\<processname>
Example: <process>C:\ProgramFiles\Viruses\maliciousvirus.exe
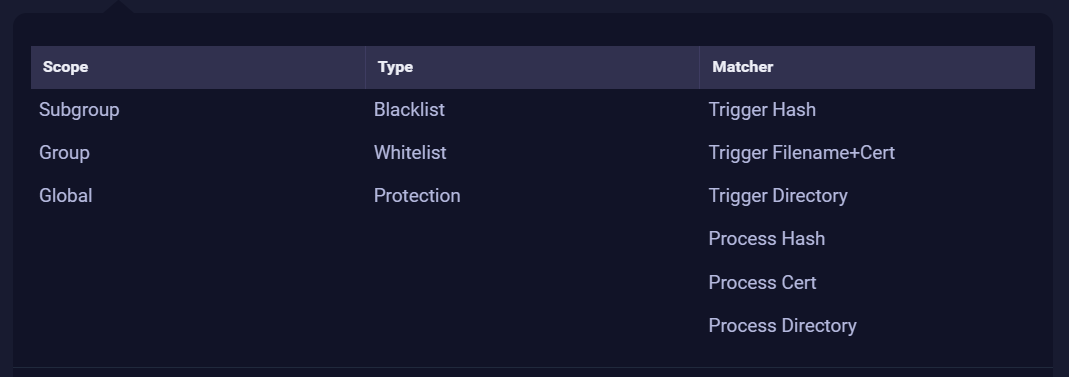
Policy Priority Matrix
It defines how the policies are applied based on order and priority during ReaQta execution.
What order does it use to process the different policies?
- Scope: Subgroup > Group > Global.
- Type: Blocklist > Allowlist > Protection
- Matcher: Trigger Hash (higher) to Process Directory (lower)
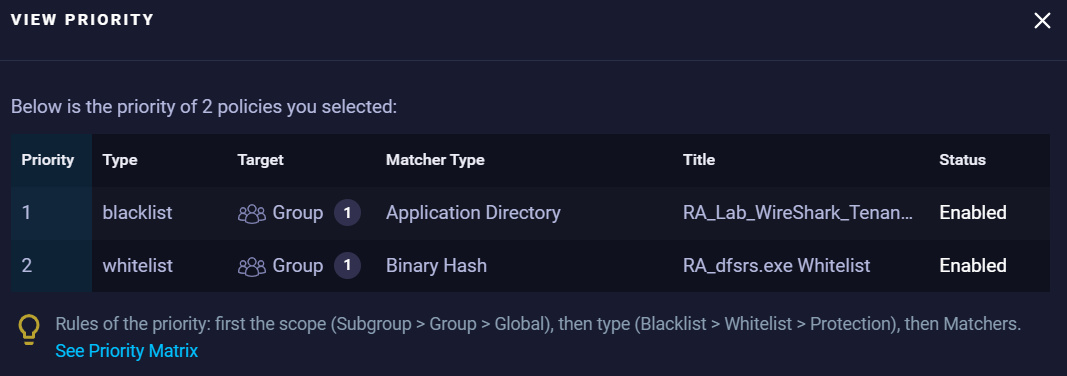
- From the Policies page, hover on the wanted policy. A check box is displayed on the left of the policy entry.

- Check the box next to the policy or policies and a blue bar is displayed at the very end of the screen with the option to view priority.
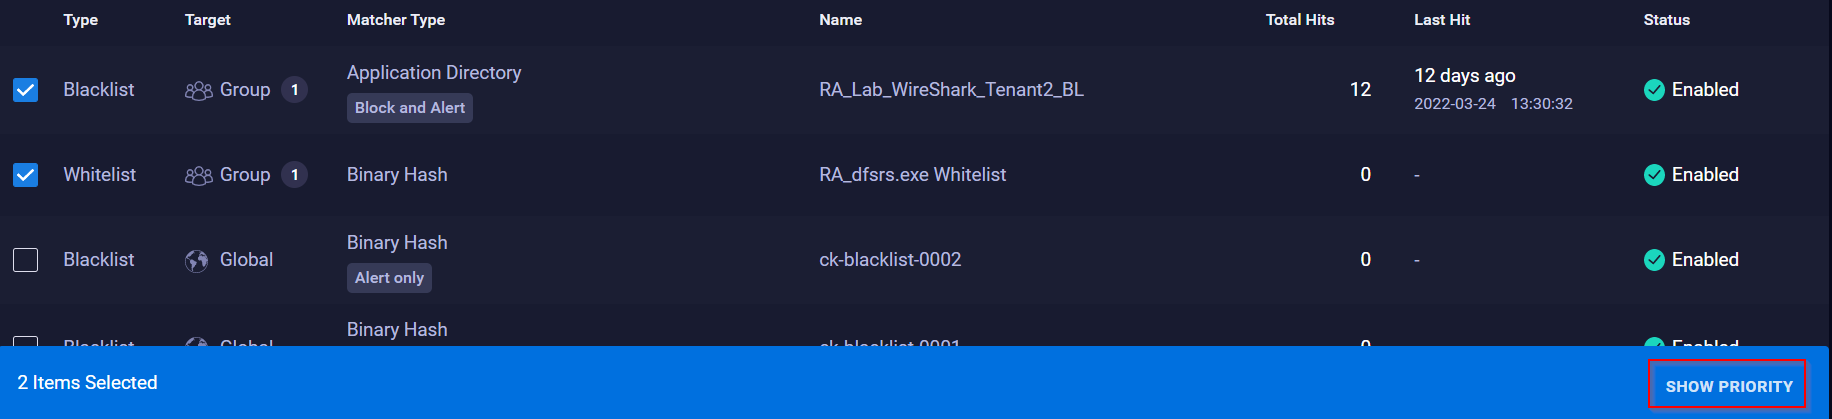
- Click Show Priority to open the View Priority window.
Policy FAQ
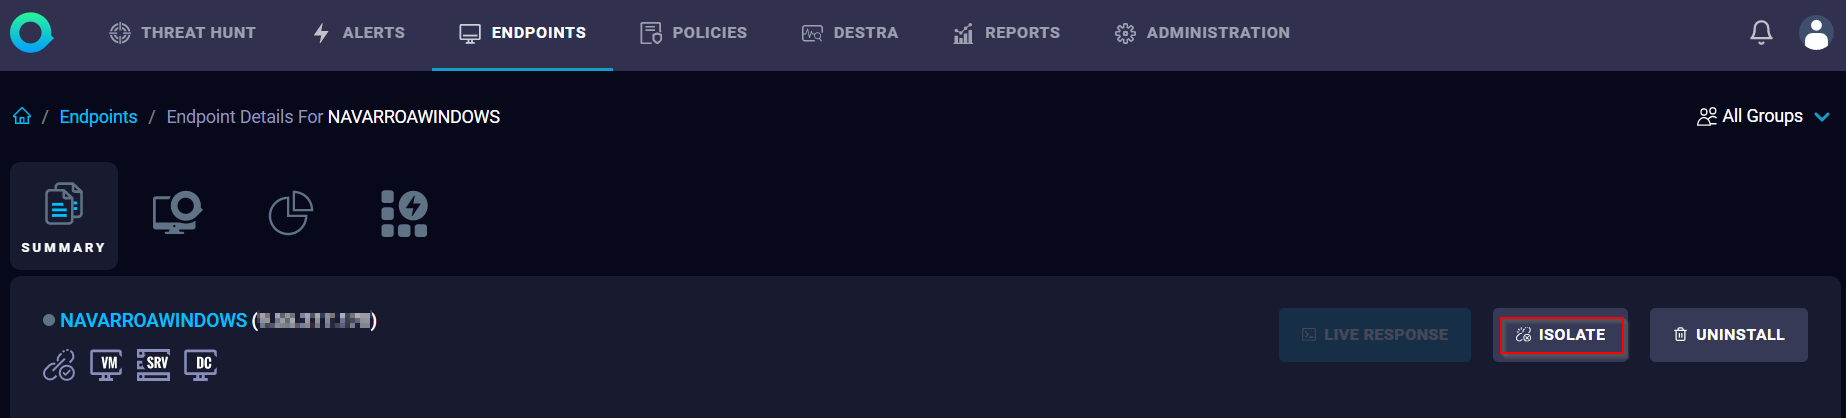
Agent Isolation allows the Analyst to isolate the endpoint by stopping all network connections on the endpoint except the connection to the ReaQta-Hive Brain. It uses OS firewall to stop all traffic to and from agent.
How to isolate an endpoint?
From the Hive dashboard, go to Endpoints > Select the Endpoint > Select the ‘ISOLATE’ button.
Product Synonym
ReaQta
Was this topic helpful?
Document Information
Modified date:
17 May 2023
UID
ibm16564717