Troubleshooting
Problem
This document explains the usage of a node status trap in QMGTOOLS.
Resolving The Problem
Explaination of a node
A cluster consists of nodes (systems). The normal status of the nodes in the cluster should be active (Example DSPCLUINF) :
Work with Cluster Nodes
Local node . . . . . . . . . . . . . . . : SYSTEMA
Consistent information in cluster . . . : Yes
Type options, press Enter.
1=Add 2=Change 4=Remove 8=Start 9=End 20=Dump trace
Potential
Node Mod
Opt Node Status Vers Level -------Interface Addresses-------
SYSTEMA Active 6 0 1.1.1.5
SYSTEMB Active 6 0 1.1.1.7
If the node becomes inactive, then that node is not participating in the cluster. Cluster functions will fail.
How does the node status trap work
Sometimes IBM technical support will want to capture trace data to understand why a node became Inactive or Partition. Using QMGTOOLS utility "Node status trap" will accomplish this.
When installed on a node (system), the node status trap will start up a LIC trace capturing TCP, cluster, and sockets data. It will then check every xx seconds for the statuses of the nodes that it knows about (what is contained in DSPCLUINF command for example). If it detects that a node is not in an Active status, then it will stop the trace and put the data into a file. It is recommended that this trap run on all nodes in the cluster to get a complete picture with the data.
Note : To prevent a false trigger, all nodes must be active before running the trap.
Step 1
Obtain and install a copy of QMGTOOLS library from IBM. Follow the below URL for information.
http://www-01.ibm.com/support/docview.wss?uid=nas8N1010441
Step 2
Once installed, add QMGTOOLS to your library list via ADDLIBLE command. Run command GO MG to bring up the QMGTOOLS main menu. In the screen below, option 1 is the HA data collection option. Take that option.

Step 3
In the HA data collection menu, select the option for node status trap. In the following screen shot, it is option 9.

Step 4
Here is the node status trap command (NODESTSTRP). Definitions of parameters are listed after the screen shot.
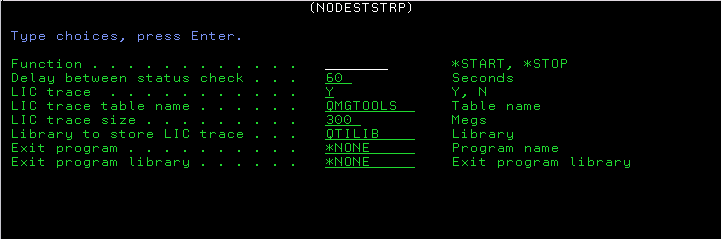
| Function | *START - start up the trap *STOP - stop the trap, if the LIC trace parameter was specified during the start, that LIC trace would be held (suspend). The user dump can dump the trace manually via this command : TRCINT SET(*OFF) TRCTBL(QMGTOOLS) |
| Delay between status check | Delay between checking the status of the nodes in the cluster. Default is 60 seconds. |
| LIC trace | Y (yes) or N (no) to start a LIC trace. If Y, a LIC trace will be started and tracing will be for TCP, cluster, and sockets data. If no is specified, then no trace is started. The reason for using this option is if the user has an exit program that will be called when the trap is triggered. So this program only acts as a monitor and when a node is not active, it calls an exit program. |
| LIC trace table name | The name of the LIC trace table if running a LIC trace. |
| LIC trace size | The size of the LIC trace if running a LIC trace. Size in megabytes. |
| Library to store LIC trace | This is the library where the LIC trace can be stored. It is stored into a file. The file is LICTRCxxx where xxx is a number. |
| Exit program/Exit program library | The location of the exit program. This program is called when either a tirggered (a node was not active) a start of the node status job, or an end of the staus job. A parameter is passed to the program with these values: *START - start of the reulgar session *STOP - stop the node status trap, LIC trace if started, will be held in SST *ERROR - a trigger has occured, meaning a node is seen as partitioned. |
After the Node status trap has started, there will be a job called NODESTSTRP running in QSYSNOMAX until the trap has stopped.
Once the trace data has been captured, proceed to send the data to IBM for analysis using the following instructions.
Collecting and sending diagnostic information to IBM Support
Method 1
http://www-01.ibm.com/support/docview.wss?uid=nas8N1019738
Method 2
http://www-01.ibm.com/support/docview.wss?uid=nas8N1019224
Was this topic helpful?
Document Information
Modified date:
18 December 2019
UID
nas8N1019805