Product Documentation
Abstract
Installing and removing the PCI adapter
Content
Hot-Plug PCI Adapter Installation
Use the following information for installing a hot-plug PCI adapter. If you want to remove a hot-plug adapter, reverse the steps. If your operating system supports hot-replace PCI adapters, you can replace a failing hot-plug PCI adapter with a new adapter of the same type without turning off power to the server. If your operating system and adapter also support the hot-add feature, you can install a new adapter without turning off the power to the server.
| Note You do not need to turn the server off to install or remove a hot-plug PCI adapter. |
Before you begin:
- Read "Safety Information"in the HMM.
- Read the documentation that comes with your adapter for any special requirements or restrictions.
- Read the documentation that comes with your operating system.
| Attention Do not remove a hot-plug adapter before performing the operating-system-defined procedure for disabling the hot-plug PCI slot that contains the adapter. Failure to do so might cause your system to lock up. |
Refer to your operating system documentation.
Refer to the following illustrations while you perform the steps in this procedure.
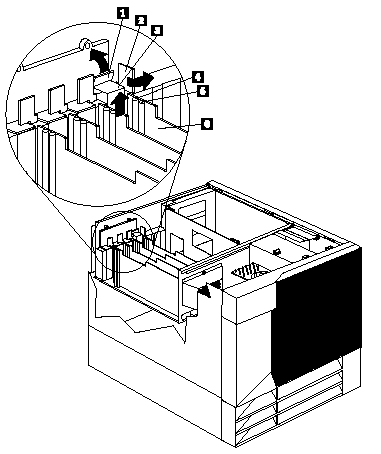
1 Tab
2 Adapter retention latch
3 Expansion-slot cover
4 Attention light
5 Power light
6 Plastic divider
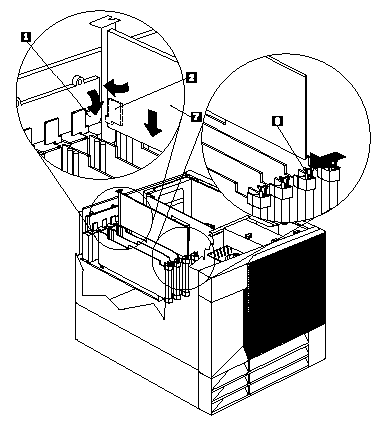
1 Tab
2 Adapter retention latch
7 Adapter
8 Adapter retention latch
To install a hot-plug PCI adapter
1. Remove the top cover (see "Top Cover Removal" in the HMM).
2. Determine which expansion slot you will use for the adapter.
| Note Only PCI slots 1- 4 can be used for hot-plug PCI adapters. |
3. Disable the selected PCI slot from your operating system. (Refer to the documentation that comes with your operating system for information about disabling a hot-plug PCI slot.) Disabling the PCI slot turns off the Power light for that PCI slot.
| Attention Make sure the Power light 5 for the hot-plug PCI slot is off before you continue to the next step. |
4. Remove the expansion-slot cover 3 :
a. Rotate the adapter retention latch 2 counterclockwise.
b. Lift the tab 1 covering the top of the expansion-slot cover 3 and remove expansion-slot cover from the server. Store it in a safe place for future use.
| Attention Expansion-slot covers must be installed on all vacant slots. This maintains the electromagnetic emissions characteristics of the system and ensures proper cooling of system components. |
5. Refer to the documentation that comes with your adapter for any cabling instructions. It might be easier for you to route any cables before you install the adapter.
6. Remove the adapter from the static-protective package.
| Note Avoid touching the components and gold-edge connectors on the adapter. |
7. Place the adapter, component-side up, on a flat, static-protective surface.
8. Install the adapter 7 :
a. Carefully grasp the adapter 7 by its top edge or upper corners, and align it with the expansion slot on the system board.
b. Press the adapter firmly into the expansion slot.
| Attention When you install an adapter in the server, be sure that it is completely and correctly seated in the system-board connector. Incomplete insertion might cause damage to the system board or the adapter. |
c. Lower the tab 1 over the tab on the top corner of adapter. Rotate the adapter retention latch 2 clockwise until it snaps into place.
| Note The expansion slot also has an adapter retention latch 8 at the end of the slot toward the middle of the server. To remove the adapter, you need to push this adapter retention latch 8 away from the adapter until the top edge of the adapter is past the latch. |
9. Connect any needed cables to the adapter.
10. Enable the PCI slot from your operating system. (Refer to the documentation that comes with your operating system for information about enabling a hot-plug PCI slot.) Make sure that the Power light 5 for the hot-plug PCI slot is on.
11. If you have other options to install or remove, do so now; otherwise, go to "Completing the Installation".
Installing a Non-Hot-Plug Adapter
Use the following procedures for installing a non-hot-plug adapter. If you want to remove a non-hot-plug adapter, reverse the steps.
Before you begin:
- Read "Safety Information" in the HMM.
- Read the documentation that comes with your option.
Refer to the following illustration while you perform the steps in this procedure.
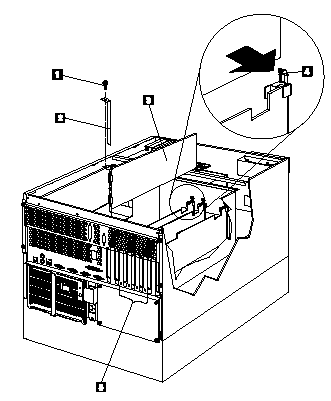
1 Expansion-slot cover screw
2 Expansion-slot cover
3 Adapter
4 Adapter retention latch
To install a non-hot-plug adapter
1. Turn off the server and peripheral devices and disconnect all external cables and power cords (see "Preparing to Install Options" in the HMM); then remove the top cover (see "Top Cover Removal" in the HMM).
2. Determine which expansion slot you will use for the adapter.
| Note Check the instructions that come with the adapter for any requirements or restrictions. |
3. Remove the expansion-slot cover 2 :
- If you are installing an adapter in PCI slot 1, 2, 3, or 4:
a. See the illustration in "Hot-Plug PCI Adapter Installation" for operation of the adapter retention latch on the end of the slot near the rear of the server.
b. Rotate the adapter retention latch counterclockwise.
c. Lift the tab covering the top of the expansion-slot cover and remove expansion-slot cover from the server. Store it in a
safe place for future use.
- If you are installing an adapter in PCI slot 5 or 6 or in the ISA slot:
a. Remove the screw 1 on the top of the expansion-slot cover 2 .
b. Slide the expansion-slot cover out of the server.
c. Store these items in a safe place for future use.
| Attention Expansion-slot covers must be installed on all vacant slots. This maintains the electromagnetic emissions characteristics of the system and ensures proper cooling of system components. |
4. Refer to the documentation that comes with your adapter for any cabling instructions. It might be easier for you to route any cables before you install the adapter.
5. Remove the adapter from the static-protective package.
| Note Avoid touching the components and gold-edge connectors on the adapter. |
6. Place the adapter, component-side up, on a flat, static-protective surface.
7. Set any jumpers or switches as described by the adapter manufacturer.
8. Install the adapter:
a. Carefully grasp the adapter 3 by its top edge or upper corners, and align it with the expansion slot on the system board.
b. Press the adapter firmly into the expansion slot.
| Attention When you install an adapter in the server, be sure that it is completely and correctly seated in the system-board connector before you apply power. Incomplete insertion might cause damage to the system board or the adapter. |
9. If you are installing an adapter in PCI slots 1, 2, 3, or 4:
a. Refer to the illustration in "Hot-Plug PCI Adapter Installation" for operation of the adapter retention latch on the end of the slot near the rear of the server.
b. Lower the tab on the adapter guide over the tab on the top corner of the adapter. Rotate the adapter retention latch clockwise until it snaps into place.
If you are installing an adapter in PCI slots 5 or 6 or in the ISA slot:
a. Align the rounded notch in the retaining bracket with the threaded hole in the expansion-slot frame. The retaining bracket on the adapter fits into the space that was occupied by the expansion-slot cover.
b. Insert the expansion-slot screw 3 that you removed earlier into the threaded hole, and push the rounded notch up against the screw.
c. Tighten the expansion-slot screw firmly.
| Note The expansion slot also has an adapter retention latch 4 at the end of the slot toward the middle of the server. To remove the adapter, you need to push this adapter retention latch 4 away from the adapter until the top edge of the adapter is past the latch. |
10. Connect any needed cables to the adapter.
11. If you have other options to install or remove, do so now; otherwise, go to "Completing the Installation" in the HMM.
Verifying Compatibility between Network Adapters and Device Drivers: Your server supports several types of network adapters. If you are having trouble with the installation or operation of a network adapter or network operating system, ensure that the network-adapter device driver supports dual processors. Refer to your network-adapter documentation for additional information about adapter compatibility requirements.
Document Location
Worldwide
Was this topic helpful?
Document Information
Modified date:
23 January 2019
UID
ibm1MCGN-432JEU