Troubleshooting
Problem
Using the status LEDs to diagnose problems
Resolving The Problem
This document is intended for trained servicers who are familiar with IBM server products. Use this document along with advanced diagnostic tests to troubleshoot problems effectively. Before servicing an IBM product, be sure to review the safety information. Click here to review safety information.
| Operator information panel | |
| Controls and indicators | |
| Power supply LEDs | |
| Diagnostics panel LED |
The operator information panel on the front of the server contains status lights.

| Index | Status light | Description |
|---|---|---|
| 1 | System power light | When this green light is on, system power is present in the server. When this light flashes, the server is in standby mode (the system power supply is turned off and AC current is present). When this light is off, either a power supply, AC power, or a light has failed. WARNING: If this light is off, it does not mean there is no electrical current present in the server. The light might be burned out. To remove all electrical current from the server, you must unplug the server power cords from the electrical outlets. |
| 2 | System POST complete light | This green light is on when the power-on self-test (POST) completes without any errors. |
| 3 | SCSI hard disk drive activity light | This green light is on when there is activity on a hard disk drive. |
| 4 | Processor 1 activity light | This green light is on when there is microprocessor 1 activity. |
| 5 | Processor 2 activity light | This green light is on when there is microprocessor 2 activity. |
| 6 | Information light | This amber light is on when the information log contains information about certain conditions in the server that might affect performance. For example, the light will be on if the server does not have redundant power. A light on the diagnostic LED panel will also be on. |
| 7 | System error light | This amber light is on when a system error occurs. A light on the diagnostic LED panel will also be on to further isolate the error. |
| 8 | Ethernet Transmit/Receive activity light | When this green light is on, there is transmit or receive activity to or from the server. |
| 9 | Ethernet link status light | When this green light is on, there is an active connection on the Ethernet port. |
| 10 | Ethernet speed 100 Mbps | When this green light is on, the Ethernet speed is 100 Mbps. When the light is off, the Ethernet speed is 10 Mbps. |
The most commonly used controls and indicators on the front of the server appear in the following illustrations.
Tower model

Rack model
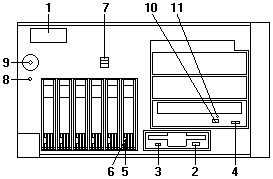
| Index | Controls and indicators | Description |
|---|---|---|
| 1 | Operator information panel | The lights on this panel give status information for the server. |
| 2 | Diskette eject button | Press this button to eject a diskette from the drive. |
| 3 | Diskette drive in-use light | When this light is on, the diskette drive is being accessed. |
| 4 | CD-ROM eject/load button | Press this button to eject or retract the CD-ROM tray so that you can insert or remove a CD. |
| 5 | Hard disk status light | Each of the hot-swap drive bays has a Hard Disk Status light. When this amber light is on continuously, the drive has failed. When the light flashes slowly (one flash per second), the drive is being rebuilt. When the light flashes rapidly (three flashes per second), the controller is identifying the drive. |
| 6 | Hard disk activity light | Each of the hot-swap drive bays has a Hard Disk Activity light. When this green light is flashing, the drive is being accessed. |
| 7 | Cover release lever | Use this lever to release the left-side cover on the tower model or the top cover on the rack model. |
| 8 | Reset button | Press this button to reset the server and run the power-on self-test (POST). |
| 9 | Power control button | Press this button to manually turn the server on or off. WARNING: The power control button on the device and the power switch on the power supply do not turn off the electrical current supplied to the device. The device also might have more than one power cord. To remove all electrical current from the device, ensure that all power cords are disconnected from the power source. |
| 10 | CD-ROM drive in-use light | When this light is on, the CD-ROM drive is being accessed. |
| 11 | CD-ROM manual tray release opening | Insert a straightened paper clip in the opening to release the CD-ROM tray when using the CD-ROM eject button is not successful. |
| AC power LED | DC power LED | Description and action |
|---|---|---|
| On | On | The power supply is on and operating correctly. |
| On | Off | There is a DC power problem. Possible cause Action |
| Off | Off | There is an AC power problem. Possible cause Possible cause Action |
: 
| System error LED (information LED panel) | Lit diagnostics panel LED | Cause | Action |
|---|---|---|---|
| On A system error was detected. Check to see | None | The system error log is 75% or more full or a PFA alert was logged. | Check the system error log and correct any problems. about clearing the error log. Disconnecting the server from all power sources for at least 20 seconds will turn off the System Error LED. |
| . | CPU | One of the microprocessors has failed or a microprocessor is installed in the wrong connector. |
|
| . | VRM | One of the voltage regulator modules on the processor board has failed. |
|
| . | MEMORY | A memory error occured. |
|
| . | PCI BUS A | An error occured on PCI bus A. An adapter in PCI slot 1 or 2 on the system board caused the error. |
|
| . | PCI BUS B | An error occured on PCI bus B. An adapter in PCI slot 3, 4, or 5 or the system board caused the error. |
|
| . | HDD | A hot-swap hard disk drive has failed on bus 1. |
|
| . | NMI | A nonmaskable interrupt occurred. |
|
| . | SMI | A system management event occured. | Restart the server |
| . | SERVICE PROCESSOR BUS | An error has occurred on the service processor bus. | Disconnect all power from the server for 30 seconds. Reconnect the power to the server, then, restart the server. |
| . | POWER SUPPLY 1 | Power supply 1 has failed | Replace power supply 1. |
| . | POWER SUPPLY 2 | Power supply 2 has failed | Replace power supply 2. |
| . | POWER SUPPLY 3 | Power supply 3 has failed | Replace power supply 3. |
| . | POWER SUPPLY NON REDUNDANT | Power supply redundancy has been lost. |
|
| . | FAN 1 | Fan 1 has failed or is operating too slowly.
| Replace fan 1. |
| . | FAN 2 | Fan 2 has failed or is operating too slowly. Notes:
| Replace fan 2. |
| . | FAN 3 | Fan 3 has failed or is operating too slowly. Notes:
| Replace fan 3. |
| . | TEMPERATURE | The system temperature has exceeded a threshold level. |
|
| Off | None | The light path diagnostics have not detected a system error. | None |
Document Location
Worldwide
Was this topic helpful?
Document Information
Modified date:
28 January 2019
UID
ibm1MIGR-45350