How To
Summary
This document will go through the steps to enable NGINX for SSL on the IBM i with support for the following protocols:
TLSv1.3
TLSv1.2
TLSv1.1
NGINX uses OpenSSL for its' SSL implementation and OpenSSL 1.1.1+ natively allows for TLSv1.3. As of this writing (12/6/18) TLSv1.3 is not available in IBM i System SSL.
Environment
Requirements
- The OS must be at V7R2 or higher
- NGINX must be installed
- OpenSSL 1.1.1+ must be installed
NGINX Installation instructions:
https://www-01.ibm.com/support/docview.wss?uid=ibm10743711
NOTE: If you need to update the existing version of OpenSSL or NGINX we can use the following documentation to access the Open Source Package Management utility and update the products:
Steps
The NGINX server requires two files to enable SSL, one file with a '.key' extension contains the private key for the certificate, the other file with a '.pem' file extension hold the public key. The server can use either locally generated certificates or one from a well known Certificate Authority (CA).
1) The first step is to obtain the SSL certificate we would like to use for the server. This can be either a locally generated certificate from OpenSSL or one exported from Digital Certificate Manager (DCM):
OpenSSL Generated Local Certificate
A) On the IBM i command line type STRQSH
B) Type the following:
cd /QOpenSys/pkgs/bin
C) Paste the following to generate the local certificate:
openssl req -newkey rsa:2048 -nodes -keyout /path/cert.key -x509 -days 365 -out /path/cert.pem
You can customize the -keyout and -out paths and the expiration date -days parameter. In this example we will use '/home/cert.key' and '/home/cert.pem'.
D) When you hit ENTER on the command above it will prompt you to enter the certificate information (see screenshots below):
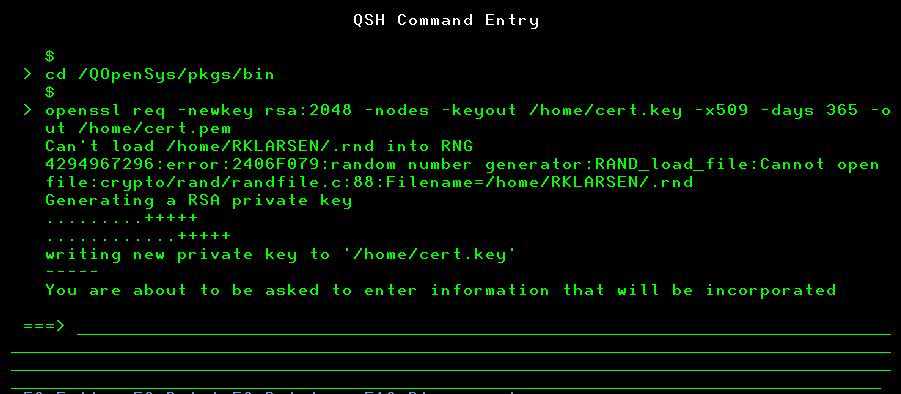

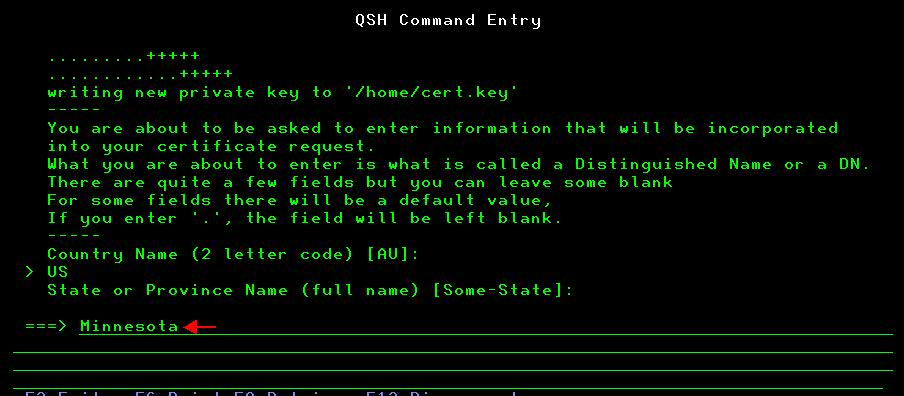


After going through the prompts it will create the '.key' and '.pem' files we need for the NGINX configuration.
Exported from DCM
B) On the main Digital Certificate Manager (DCM) screen click the 'Select a certificate store' button and select '*SYSTEM' and click CONTINUE:

C) Sign into the *SYSTEM store and click CONTINUE:

D) Click on 'Fast Path' on the left menu, then click on 'Work with server and client certificates' underneath it:

E) Select the radio button next to the SSL certificate you would like to use and click the 'Export' button at the bottom:

F) Select 'File' and click CONTINUE:

G) Specify an IFS path to receive the P12 certificate file and a Password for the file (you will be prompted for this password later) and click CONTINUE:

H) You should receive a confirmation that the certificate was exported:

I) Back on the IBM i command line type STRQSH and hit ENTER.
J) Type the following commands and hit ENTER after each line (After each OpenSSL command you will be prompted for the password you set on the P12 file when you exported it from DCM) NOTE: You can customize the -out path to output the file to the location you would like:
cd /QOpenSys/pkgs/bin openssl pkcs12 -nokeys -in /home/cert.p12 -out /home/cert.pem openssl pkcs12 -nocerts -nodes -in /home/cert.p12 -out /home/cert.key
K) You now should have two files for use with NGINX:
/home/cert.pem
/home/cert.key
2) Now that we have our '.pem' and '.key' file we need to edit the NGINX configuration to have the following lines inside the server{} block:
ssl_certificate /home/cert.pem;
ssl_certificate_key /home/cert.key;
ssl_session_cache shared:SSL:1m;
ssl_session_timeout 5m;
ssl_protocols TLSV1.1 TLSV1.2 TLSV1.3;
ssl_ciphers HIGH:!aNULL:!MD5;
ssl_prefer_server_ciphers on;
For example:
server {
listen 443 ssl;
ssl_certificate /home/cert.pem;
ssl_certificate_key /home/cert.key;
ssl_session_cache shared:SSL:1m;
ssl_session_timeout 5m;
ssl_protocols TLSV1.1 TLSV1.2 TLSV1.3;
ssl_ciphers HIGH:!aNULL:!MD5;
ssl_prefer_server_ciphers on;
root "/QOpenSys/etc/nginx/html/";
location / {
index index.html index.htm;
}
}
3) Once the NGINX configuration has been updated we need to either stop/start the server, or perform a reload operation:
A) On the IBM i command line type STRQSH
B) Type the following commands to stop/start the server:
cd /QOpenSys/pkgs/bin nginx -s stop
nginx
NOTE: If you want to use a different configuration than the default '/QOpenSys/etc/nginx/nginx.conf' you would use this command to start it instead:
nginx -c /path/nginx.conf
If you would like to perform a reload instead of a stop/start run the following command:
nginx -s reload
The reload will gracefully end the existing worker processes and start new ones, which will pick up the new configuration changes.
4) You now should be able to access the site with SSL and be able to view the SSL certificate and see the connection information.
Additional Information
NGINX Product Documentation:
https://www-prd-trops.events.ibm.com/node/how-configure-nginx-ssl-ibm-i
Was this topic helpful?
Document Information
Modified date:
18 December 2019
UID
ibm10744529