Release Notes
Abstract
This firmware update (V1.3.0) provided by IBM updates QRadar® M8 appliances with updates for UEFI, XCC, RAID controllers, and HDD software fixes and enhancements. This firmware can be used on all QRadar M8 appliances, but requires that the administrator configures their XClarity Controller (XCC) for remote management.
Content
Important: Select a tab to read each step of the firmware procedure.
Part 1: About the M8 firmware V1.3.0 update
The M8 firmware v1.3.0 ISO is intended to remotely update software through the XClarity Controller (XCC) user interface. Administrators must extract the EXE file and apply the uxz file to update their XClarity Controller, then the ISO can be mounted to apply the remainder of the firmware updates. The installation instructions are provided on tab named 'Part 2. Installing Firmware Updates'. These instructions guide customers through a remote upgrade of their firmware. If you are local to your appliances or have issues with your XClarity configuration.
Limitation: Due to changes in the bundled software, a USB firmware update method is not available on IBM Fix Central at this time. Administrators must use the XCC method to update their M8 firmware to the latest version.
Important: If your appliance is in a HA pair, there are configuration steps required to set the status properly for your primary and secondary high-availability appliances. For more information, see: http://www.ibm.com/support/docview.wss?uid=swg27047121#HA.
Supported appliances, types, and model information
This firmware update applies to the following IBM Security QRadar M8 (1U and 2U form factor) appliance types:
| Hardware | Details |
| Appliance and machine type model (MTM) | 1U IBM QRadar Network Insights Appliance 1901 (MTM 5840-N9G) IBM QRadar XX05 1U (MTM 5840-Q5R) IBM QRadar Event/QFlow Collector Appliance 1501/1201 1U (MTM 5840-Q2R) IBM QRadar XX48 1U (MTM 5840-Q8R) 2U IBM QRadar Network Insights 1920 2U (MTM 5840-N2G) |
| Server Type | M8 |
| Server Machine Type | SR630 V4 (7DG9)/ M8 1U SR650 V4 (7DGD) / M8 2U |
Table 1: List of appliances the M8 appliance firmware V1.3.0 can update.
Important information and prerequisites in this firmware update
Administrators must ensure that their M8 appliance includes the minimum version outlined in the Prerequisite version column. If your M8 appliance does not meet the prerequisite versions outlined in the table, the administrator must contact IBM QRadar Support to discuss a custom upgrade path for your M8 appliance.
| Component | Prerequisites | Firmware version in this update | File name |
| UEFI/BIOS | Minimum uEFI version: IHE110U/1.20 | ihe118b-1.41 | lnvgy_fw_uefi_ihe118b-1.41_anyos_comp |
| XCC | None | ihx430y-2.03 | lnvgy_fw_xcc_ihx430y-2.03_anyos_comp.uxz |
| LXPM | None | dfl110m-5.03.00 dfl210p-5.03.01 | lnvgy_fw_lxpm_dfl110m-5.03.00_anyos_comp lnvgy_fw_drvln_dfl210p-5.03.01_anyos_comp.zip
|
RAID controller
| None | mr3.5.940-52.36.0-6553 mr3.5.940-52.36.0-6553 mr3.5.b5xx-52.36.0-6552 | lnvgy_fw_raid_mr3.5.940-52.36.0-6553-ja98i-03a2_anyos_comp lnvgy_fw_raid_mr3.5.940-52.36.0-6553-ja98i-03a2_anyos_comp lnvgy_fw_raid_mr3.5.b5xx-52.36.0-6552-ja98i-0362_anyos_comp |
NIC
| e610-1.30-1.3863.0 nxe-237.1.148.0 nx1-237.0.4.2 | 4.30-1.3518.0-2 9.52-6.50-1.3684.0-4 | intc-lnvgy_fw_nic_net.e610-1.30-1.3863.0-ja08t-03c2_anyos_comp brcm-lnvgy_fw_nic_nxe-237.1.148.0-ja9hu-05c2_anyos_comp.zip brcm-lnvgy_fw_nic_nx1-237.0.4.2-ja9hu-0542_anyos_comp.zip |
| Emulex | None | lp.37-14.4.725.11 | elx-lnvgy_fw_fc_lp.37-14.4.725.11-ja0f8-0262_anyos_comp |
| HDD | None | 2.10.04.2 | lnvgy_fw_drives_all-2.10.04.2-ja9f7-0b22_anyos_comp.zip |
Table 2: Firmware versions and any prerequisite for each component are provided in this table.
- A number of hard disk drives can be installed in this appliance. The HDD update tool examines the hard disk drives that are present and selects the latest firmware version that is available for your drive.
- The base system pack might contain other firmware packages that are not present in QRadar appliances. Firmware updates from the base system pack might be displayed with a status of "undetected" when the tool compares available firmware to the hardware in the appliance.
- For general firmware questions and information, see our FAQ page at http://ibm.biz/qradarfirmware.
Security issues resolved in this firmware update
The table lists the software versions and CVEs addressed in the firmware release.
| Component | File name | Updates |
| UEFI/BIOS | lnvgy_fw_uefi_ihe118b-1.41_anyos_comp | Resolved CVEs
Other fixes
Enhancements
Fixes
Limitations
|
| XCC | lnvgy_fw_xcc_ihx430y-2.03_anyos_comp.uxz | Resolved CVEs
Fixes
Enhancements
|
| LXPM | lnvgy_fw_lxpm_dfl110m-5.03.00_anyos_comp lnvgy_fw_drvln_dfl210p-5.03.01_anyos_comp.zip | None |
| RAID controller | lnvgy_fw_raid_mr3.5.940-52.36.0-6553-ja98i-03a2_anyos_comp lnvgy_fw_raid_mr3.5.b5xx-52.36.0-6552-ja98i-0362_anyos_comp | None |
| NIC | intc-lnvgy_fw_nic_net.e610-1.30-1.3863.0-ja08t-03c2_anyos_comp brcm-lnvgy_fw_nic_nxe-237.1.148.0-ja9hu-05c2_anyos_comp.zip brcm-lnvgy_fw_nic_nx1-237.0.4.2-ja9hu-0542_anyos_comp.zip | None |
| Emulex | elx-lnvgy_fw_fc_lp.37-14.4.725.11-ja0f8-0262_anyos_comp | None |
| HDD | lnvgy_fw_drives_all-2.10.04.2-ja9f7-0b22_anyos_comp.zip | Fixes Resolves issues where drives can incorrectly display errors. |
A. Before you begin
- This installation method uses the hardware's integrated XCC interface to remotely update firmware.
- If your appliances are in a HA pair, you must prepare your high-availability appliances by using the instructions found here: http://www.ibm.com/support/docview.wss?uid=swg27047121#HA .
- A number of hard disk drives can be installed in this appliance. The HDD update tool examines the hard disk drives that are present and selects the most current firmware level that is available.
Required UEFI Settings: Workload Profile → Custom , Processors → Uncore Frequency Scaling → Disabled , Processors → UPI Power Management (L0p) → Disabled
- Enable Ethernet over USB to support ISO image mounting during deployment
B. Downloading and extracting the firmware update
- Download the QRadar M8 appliance firmware from IBM Fix Central: M8 firmware 1.3.0 EXE download.
- Copy the M8 appliance firmware EXE to a directory on the Windows host.
- Double-click the file Qradar_EXE_M8_1U_SR630V4_7DG9_2U_SR650V4_7DGD_1_3_0.exe.
- Select or type a directory path for the firmware update and click Extract.

- The following files are extracted:

C. Updating the XCC firmware
- Log in to the XClarity interface on your QRadar M8 appliance.
- From the navigation sidebar, click Firmware Update.
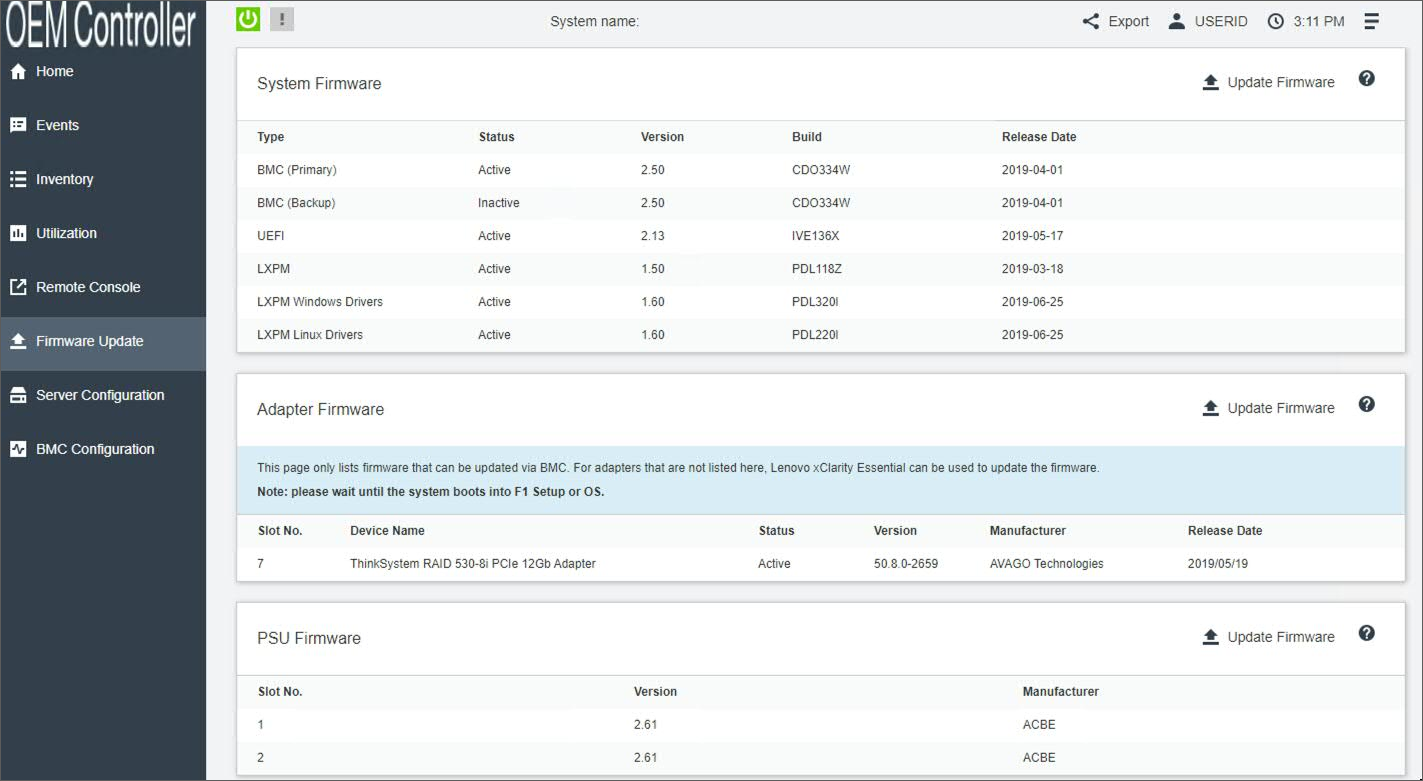
- Click Update Firmware.
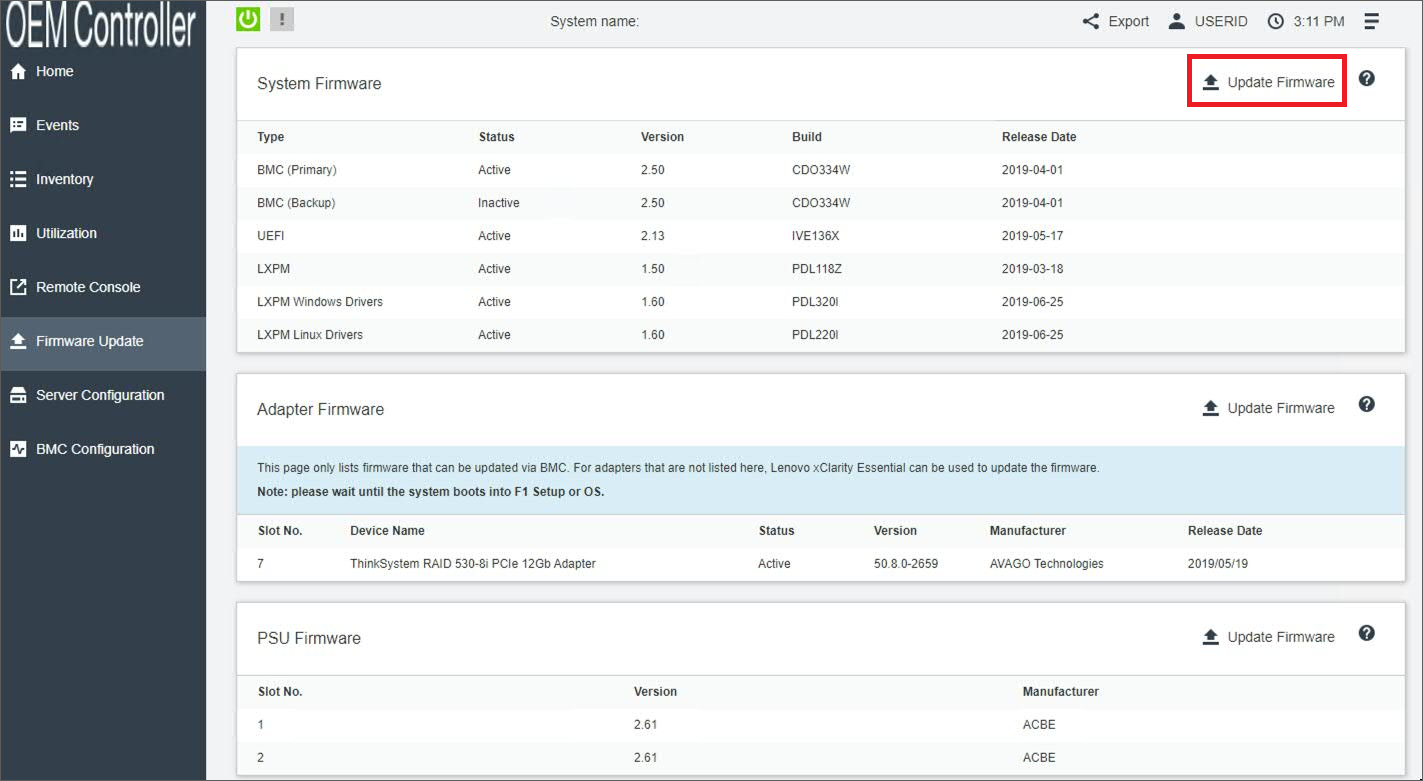
- Click Browse and choose the XClarity (XCC) firmware update lnvgy_fw_xcc_ihx430y-2.03_anyos_comp.uxz.
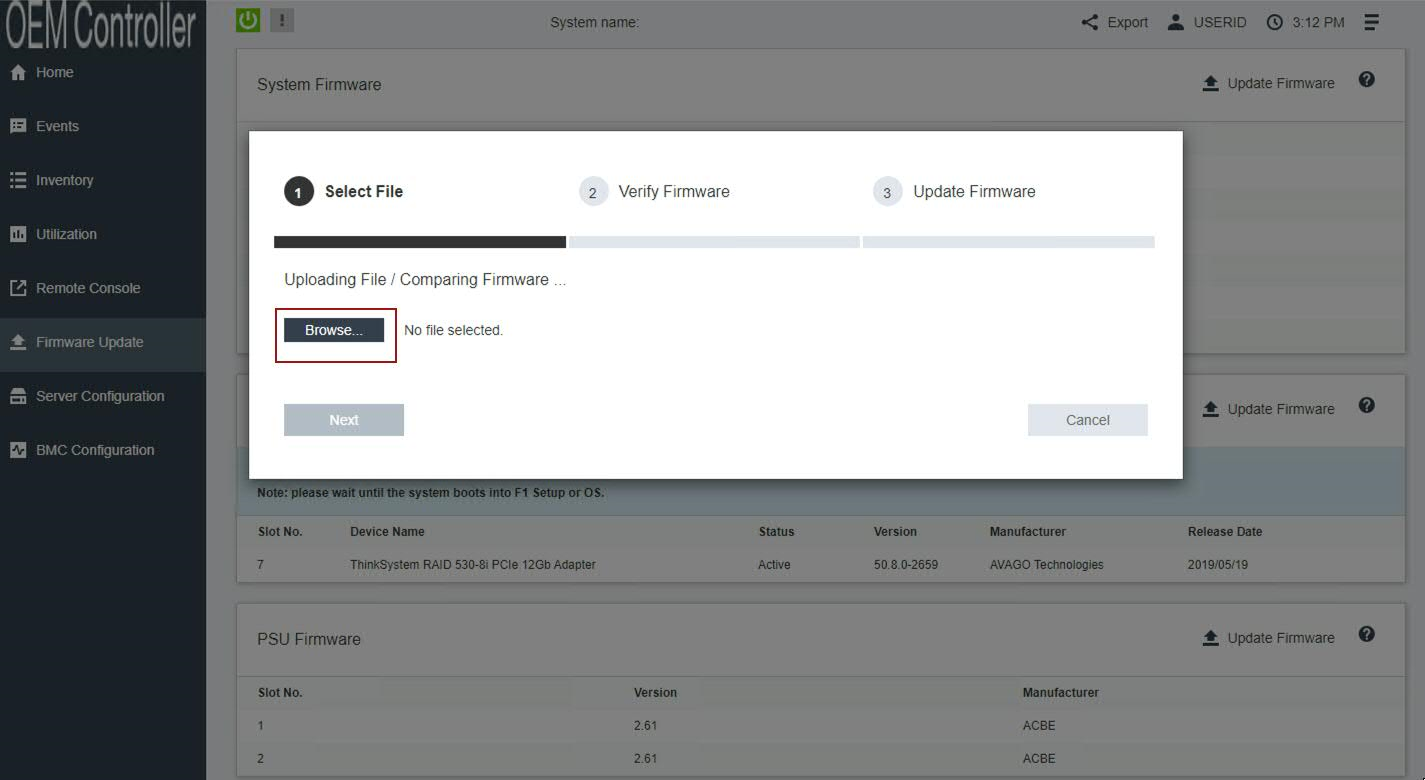
- Click Next to upload and verify the XCC firmware file.

- Select the BMC (Primary) check box and click Next.
Important: The backup firmware bank is automatically updated. Administrators must ensure the BMC (Backup) check box is cleared (not selected). Administrators who select both check boxes must reinstall their firmware to ensure the primary bank updates properly.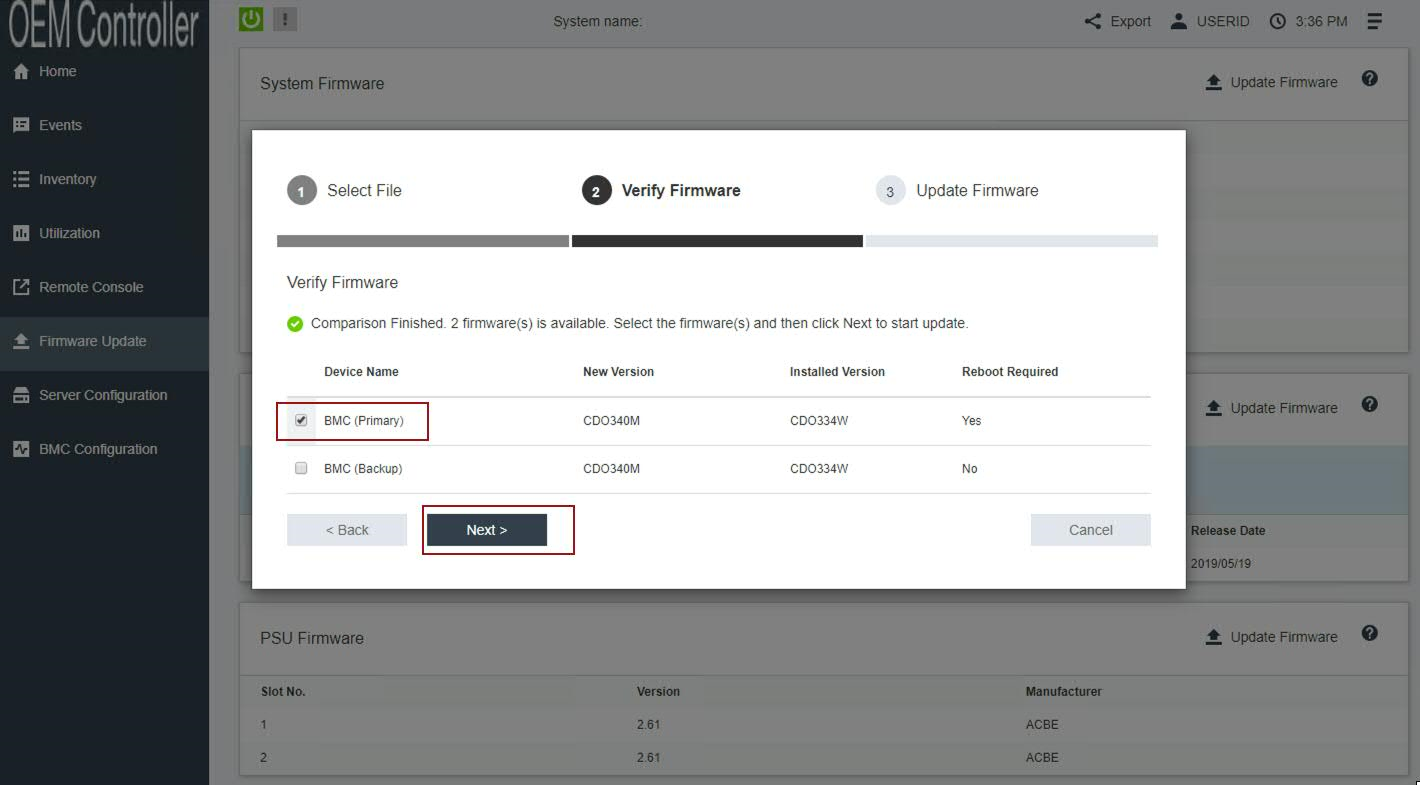
- Wait for the update the primary firmware banks to complete.

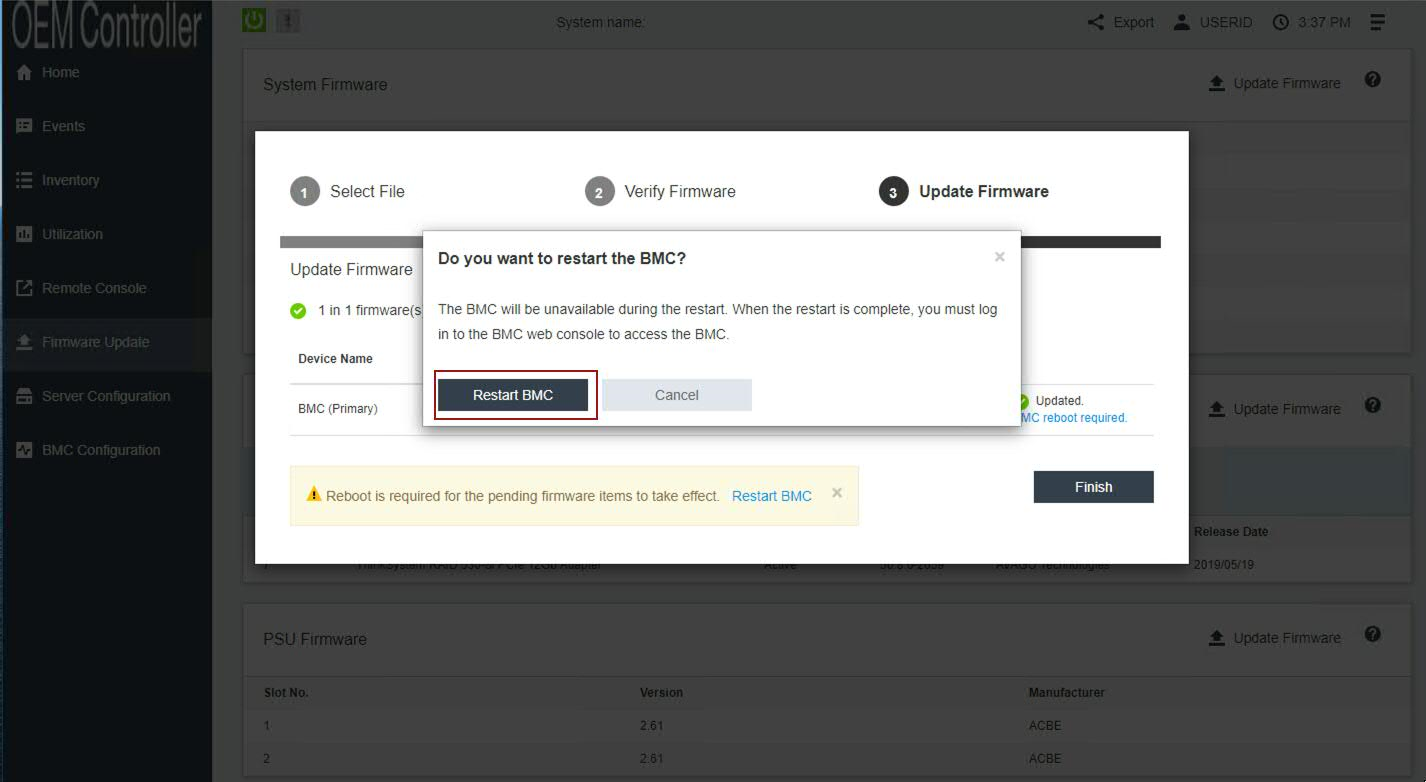
- Click Restart BMC and clear your browser cache.
Results
Wait for 5 minutes for the XCC interface to restart and log in. Continue to the next section to mount the firmware ISO and configure the boot options.
D. Mounting the M8 Firmware ISO
- From the OEM Controller menu, click Remote Console.
- Click Remote Console Preview.
IMPORTANT: Confirm the following parameters:
2a. Launch the session in Single User Mode.
2b. Clear the Allow others to request my remote session disconnect check box.
2c. Click Launch Remote Console to connect to the appliance.
- To boot to the QRadar firmware update package ISO, click Media to mount the ISO image.

- In the Mount Virtual Media window, click Activate.

- Click Browse to select Qradar_ISO_M8_1U_SR630V4_7DG9_2U_SR650V4_7DGD_1_3_0.iso.
- Click Mount all local media.
- Note: If successful, a checkmark appears next to the uploaded ISO file.
Click the X to close the Mount Virtual Media window.
- Select Power > Restart Server Normally

- When the machine powers back on, press F12 to select F12: One Time Boot Device.
Note: The field F12: One Time Boot Device displays with a blue background to indicate the virtual keyboard is selected.
- Optional. If the F12: One Time Boot Device field is not selected, launch the virtual keyboard to press the F12 key.

- From the Boot Devices Manager menu:
- In the Legacy Mode field, press the Space Bar to clear the value. Legacy Mode is selected by default and you must be clear the value before you continue.
- Select XCC Virtual Media and press Enter.

- The Lenovo XClarity Essentials UpdateXpress System Pack Installer is launched. This may take 15-20 minutes to boot.
- In the Target Server - Setting menu, verify that Input BMC access check boxes is cleared (not selected) and click Next.

- In the Update Setting menu, verify that all check boxes are cleared (not selected) and click Next.

- From the Update Recommendation menu, click Begin.

- The Lenovo XClarity Essentials UpdateXpress System Pack Installer compares the current package with the installed firmware.
- Review the list of updates.
Important: In the next step, administrators must confirm that all recommended updates are CHECKED, and also keep UEFI, FPGA, RAID controllers, Adapters, and Drives checked except for Lenovo/XClarity Controller XCC as this firmware was updated manually by the administrator in previous steps. - Confirm the Lenovo Storage Linux Firmware Update is selected (checked). Users reported an issue were the New Version column displays an update from the Installed Version column, but the check box was not selected by default.

- Verify the check box for Lenovo/XClarity Controller (XCC) is clear (not selected).

- Click Next.
- If you manually selected the Lenovo Storage Linux Firmware update, a confirmation is displayed. Select the Proceed anyway check box and click Proceed.
Note: The pop-up message states there is a missing prerequisite for the fw_drives_all-1.50.58.0 package. However, this is a false alert for the Lenovo Storage Linux Firmware update.
- Wait for the firmware updates to load.

- Click Begin Update to install the firmware.

- At the update confirmation dialogue window, click Yes to continue.

- Confirm all updates completed successfully and click Next.

- Click Close to exit.

- The appliance must reboot to complete the firmware installation.
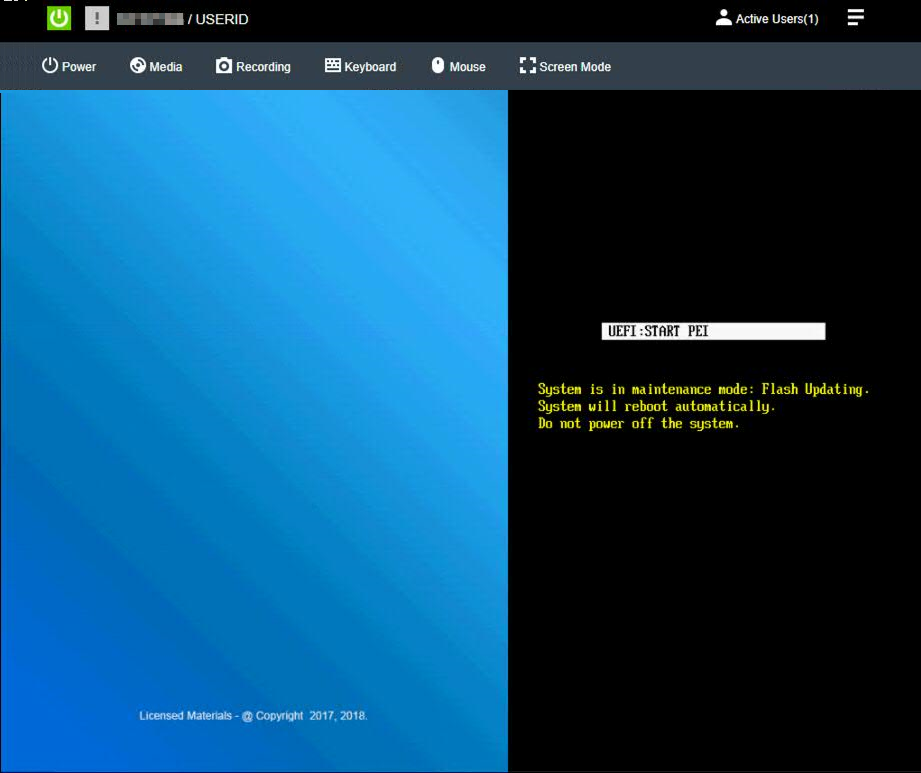
- Click Media to open the Mount Virtual Media window, and click Unmount.

Results
After the ISO file is unmounted, the administrator can log out and complete this procedure on other QRadar appliances. If you experience any installation issues, you can contact QRadar Support for assistance and open a software support case for your appliance. The support representative can request the firmware logs for review to determine the root cause of the issue or if replacement hardware is required. If the issue is hardware-related, the support representative can change the case type and involve the proper teams to schedule replacement parts.
- A green screen is not indicative of failure by itself, press CTRL on your keyboard to wake up the screen saver. If CTRL does not wake up the screensaver, you might need to press ENTER key. After ENTER key is pressed, if the Green background screen remains, check the power state of the XCC by going to the OEM Controller home page to view the power status in the upper left screen.
Note: If you can't reconnect to the IMM or XCC, you need to send someone to the site to check on the machine status. In some rare circumstances, IMM can disconnect and server maybe waiting for someone to press ENTER key locally.
Was this topic helpful?
Document Information
Modified date:
19 August 2026
UID
ibm17283947