How To
Summary
This document includes two sections that cover how to perform AIX upgrades and Power server migrations in the Power Virtual Server (PowerVS) environment:
• Migrating to a supported AIX version for Power Virtual Server
• Migrating a PowerVS AIX instance to new Power server hardware
The first section covers the steps for migrating an unsupported version of AIX, on an existing PowerVS instance, to a supported version of AIX. The second section covers the procedures for migrating a PowerVS instance (running on a supported version of AIX) to a new generation of Power server hardware, in the PowerVS environment.
Steps
In addition to this support article two videos have been published which provide demonstrations of how to perform both AIX and Power migrations in PowerVS. These videos, along with this support article provide information that can be used to plan and perform these types of migrations in PowerVS environments. The videos can be found by following this link, https://community.ibm.com/community/user/blogs/chris-gibson1/2026/05/27/aix-and-power-migrations-in-powervs.
Table of Contents
AIX and Power migrations in PowerVS
Section 1: Migrating to a supported AIX version for Power Virtual Server
Migrating AIX versions by using NIM on Power Virtual Server
Unsupported AIX version considerations
Deploy new AIX 7.3 VM for NIM server
AIX Migration Completed Successfully
Fall back to previous AIX version
Section 2: Migrating a PowerVS AIX instance to new Power server hardware
Deploy new VM using captured image
Section 1: Migrating to a supported AIX version for Power Virtual Server
For AIX, Power Virtual Server (PowerVS) supports only AIX 7.1, or later. If you use an unsupported version, it is subject to outages during planned maintenance windows with no advanced notification given. See https://cloud.ibm.com/docs/power-iaas?topic=power-iaas-system-migration.
Migrating AIX versions by using NIM on Power Virtual Server
You can configure a Network Installation Management (NIM) server on a Power Virtual Server and migrate an AIX virtual server instance from a previous AIX version to AIX 7.2 or 7.3, and other operations. See https://www.ibm.com/support/pages/migrating-clients-using-nim-powervs.
Customers can migrate their existing PowerVS instance, running an unsupported AIX release, to a supported AIX version using NIM. You can provision an AIX virtual machine (VM) and use it as a NIM server in PowerVS.
The steps to configure NIM in the PowerVS environment and then use it to migrate to a supported AIX version are covered in detail in this document.
Unsupported AIX version considerations
In this example scenario the customer has an existing PowerVS instance running AIX version 6.1. This version of AIX is unsupported. The customer needs to upgrade (migrate) the AIX operating system to a supported version.
The VM is currently on a POWER9 server in the PowerVS environment. From the PowerVS Virtual server instances panel we observe the VMs configuration (the VM in this example is named CG61). We note that the status of the instance is showing Warning; this is a likely indicator (though not definitive) that the VM is running an operating system that is not supported in PowerVS.

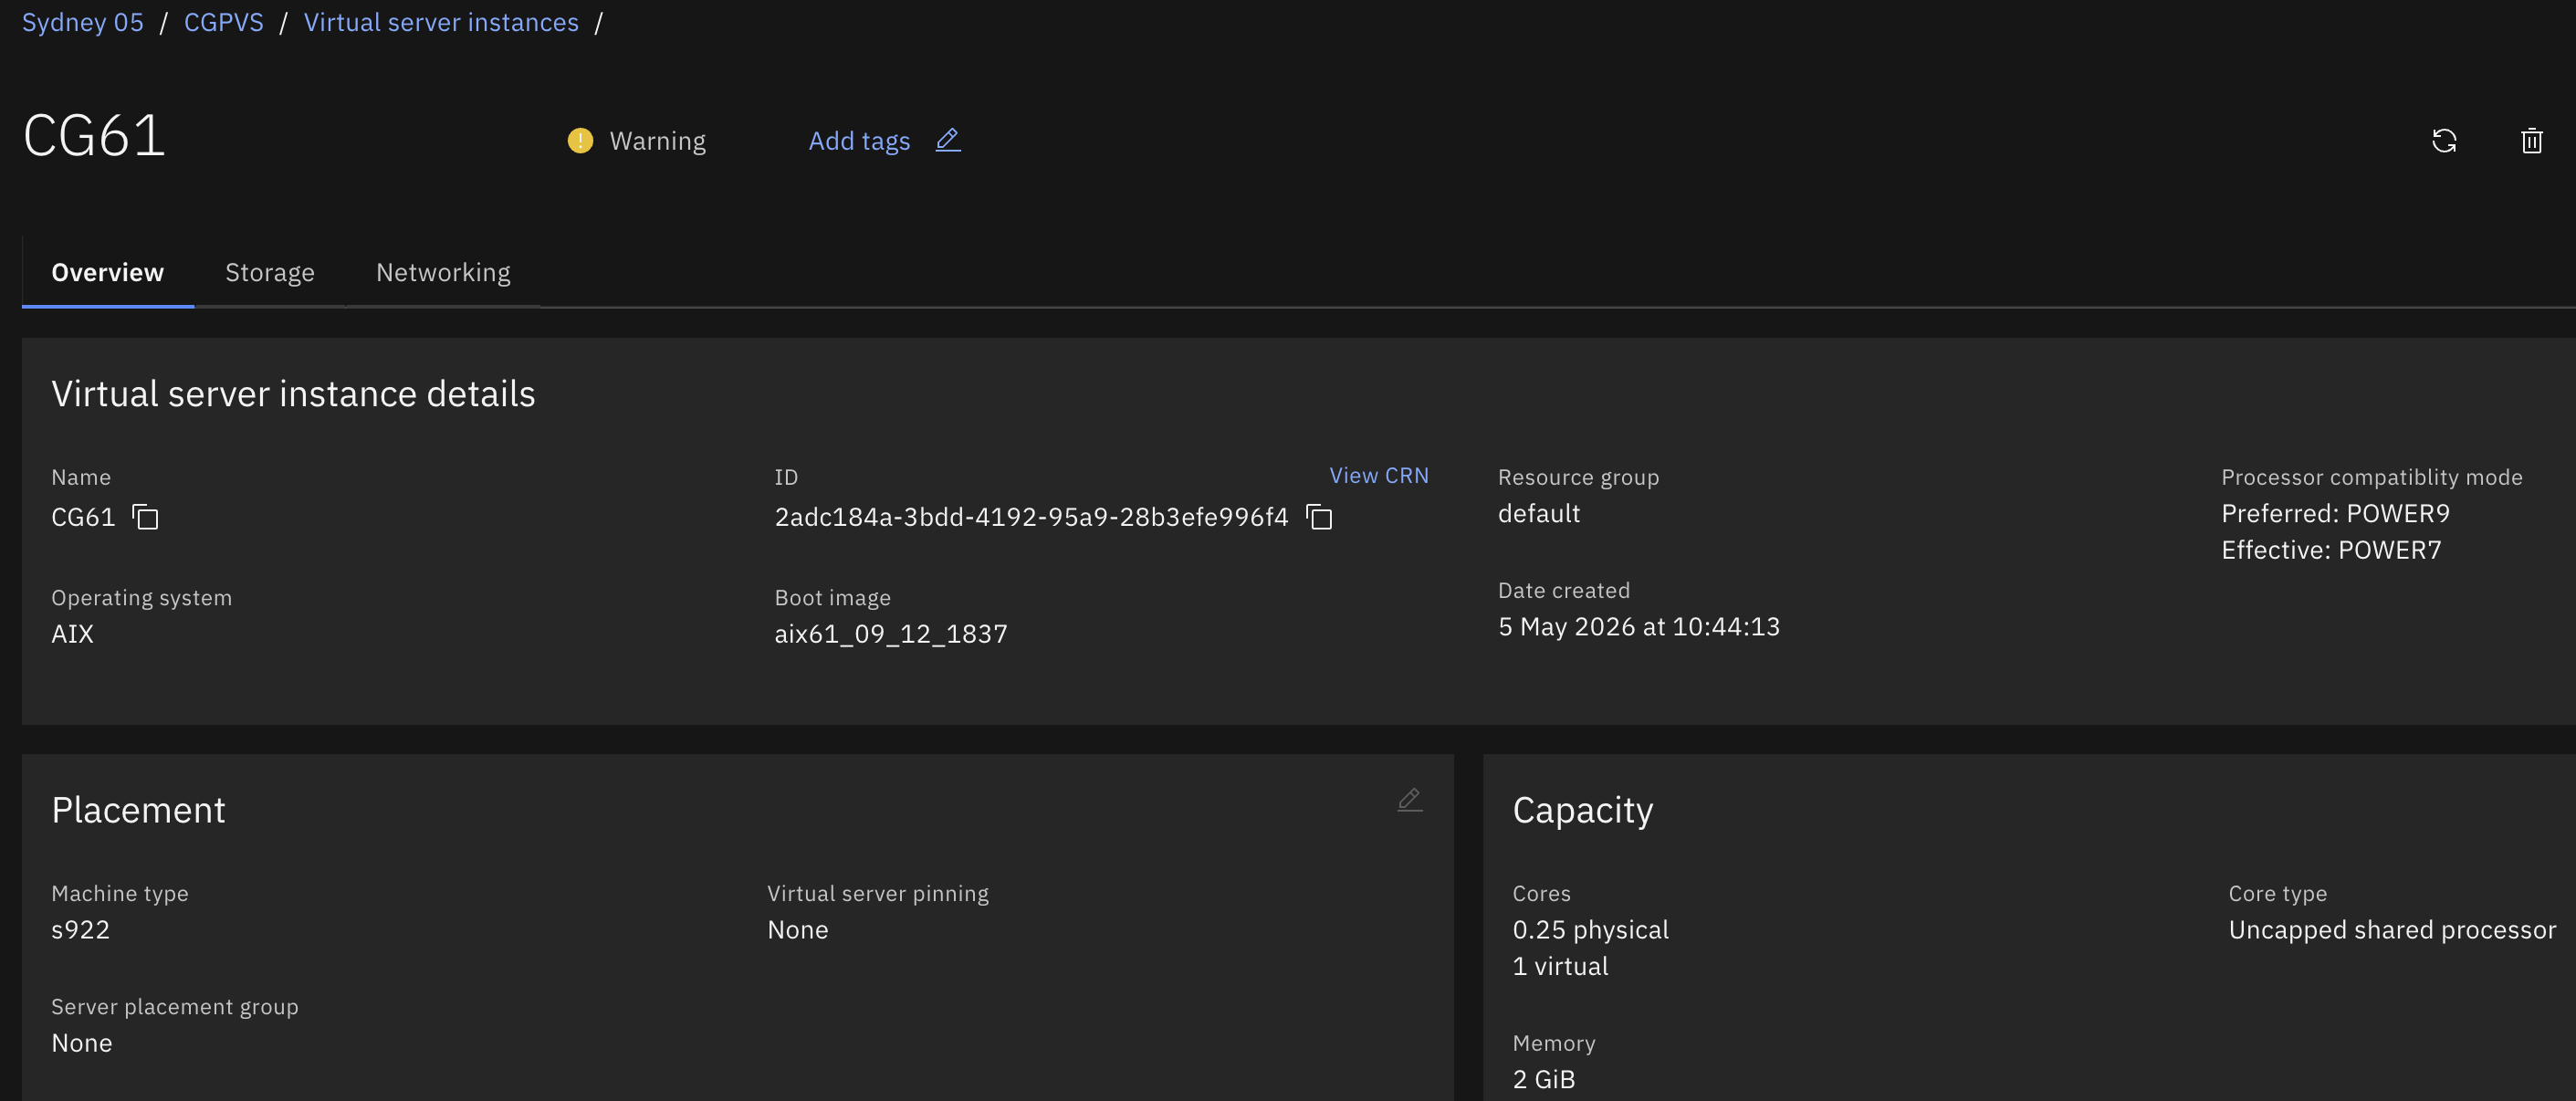
The oslevel and lsconf commands confirm that the AIX 6.1 instance is running on a POWER9 S922 server. It is running in POWER7 mode. This is a known configuration (and while this is technically possible it is not supported in PowerVS), see https://www.ibm.com/support/pages/node/6022378#AIX-6.1.
root@cg61 / # oslevel -s ; echo ; lsconf | head -10
6100-09-12-1837
System Model: IBM,9009-22A
Machine Serial Number: 78937E0
Processor Type: PowerPC_POWER9
Processor Implementation Mode: POWER 7
Processor Version: PV_7_Compat
Number Of Processors: 1
Processor Clock Speed: 2500 MHz
CPU Type: 64-bit
Kernel Type: 64-bit
LPAR Info: 21 CG61-2adc184a-0006ee95
A Java application is running on this VM.
root@cg61 / # ps -ef | grep -i java
root 5111822 1 22 14:07:59 pts/0 0:00 java -Xmx150m -Dmy_java_app.home=/var/my_java_app -Dmy_java_app.host=0.0.0.0 -Dmy_java_app.port=4040 -Dmy_java_app.httpsPort=0 -Dmy_java_app.contextPath=/ -Dmy_java_app.db= -Dmy_java_app.defaultMusicFolder=/var/music -Dmy_java_app.defaultPodcastFolder=/var/music/Podcast -Dmy_java_app.defaultPlaylistFolder=/var/playlists -Djava.awt.headless=true -verbose:gc -jar my_java_app-booter-jar-with-dependencies.jar
In this example the VM is running successfully and the application within the VM is also up and available. Despite the lack of OS support in the PowerVS landscape, from the customer's perspective their application workload is running as expected in PowerVS. There are a few considerations, however for AIX 6.1 (and older releases of AIX) in PowerVS.
PowerVS is a multi-tenant offering. AIX 7.1 and above are supported and AIX OS licenses are included as part of the offering. Clients can choose to bring AIX 6.1 (and older) OS images to PowerVS as-is and without support for the operating systems; with some known limitations (see below). Any AIX 6.1 operating systems issues that may be encountered would require an update to either AIX 7.1, 7.2 or 7.3 to receive operating system support.
Known limitations for running AIX 6.1 in PowerVS:
- AIX 6.1 VMs cannot be migrated to other servers in the PowerVS infrastructure non-disruptively with Live Partition Mobility (LPM) if IBM needs to perform maintenance to the server where the VM resides and as such there will be downtime required for any VMs running AIX 6.1. This means that any AIX 6.1 VM is subject to outages during planned maintenance windows.
- The PowerVS management portal will show a warning status of any AIX 6.1 VMs indicating that the LPAR is in attention mode and hence could be confusing to the administrator about the true health of the VM. The technical reason is that 6.1 doesn’t have the right level of the RSCT filesets to communicate with PowerVS infrastructure (NovaLink) for RMC. See https://cloud.ibm.com/docs/power-iaas?topic=power-iaas-recommended-rsct-package.
- Any operations to add/remove resources to an AIX 6.1 VM such as storage, CPU and memory cannot be done non-disruptively and will require the VM to be powered off and then restarted for the changes to take effect.
In this example scenario the customer has reviewed the limitations outlined above and decided it is time for them to migrate their PowerVS VM to a supported version of AIX, that is, AIX 7.1 or higher. In this scenario the customer chose to migrate from AIX 6.1 to AIX 7.3. Migrating will allow them access to a supported AIX version and avoid any potential limitations in the PowerVS environment.
The steps that follow provide a step-by-step description of how the migration can be performed.
Deploy new AIX 7.3 VM for NIM server
The first step requires a new PowerVS VM to be provisioned. From the Virtual server instances panel, select Create instance.

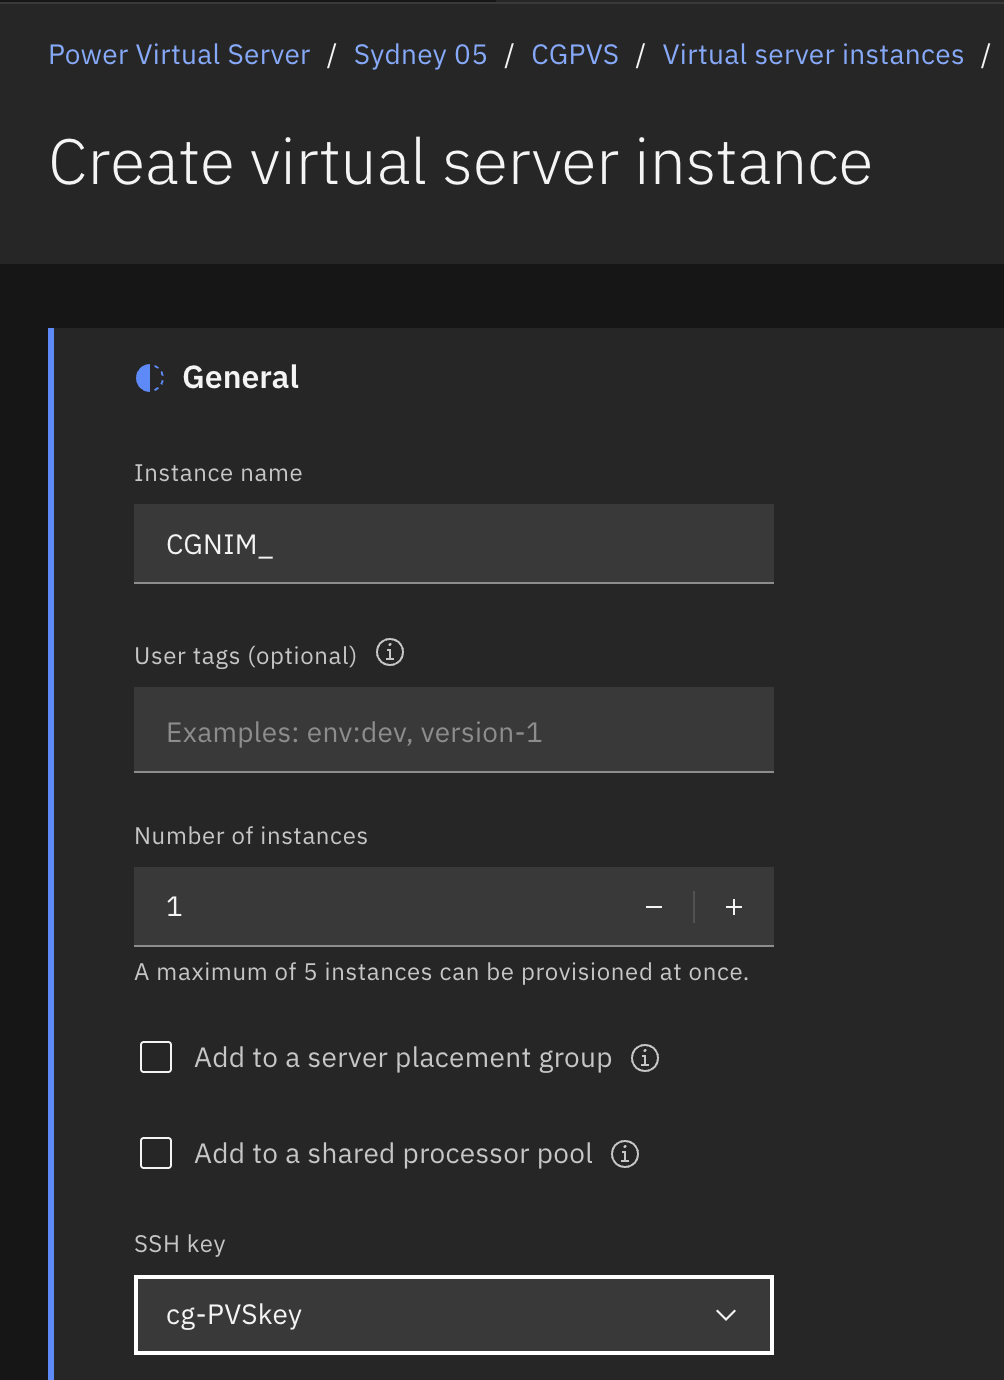
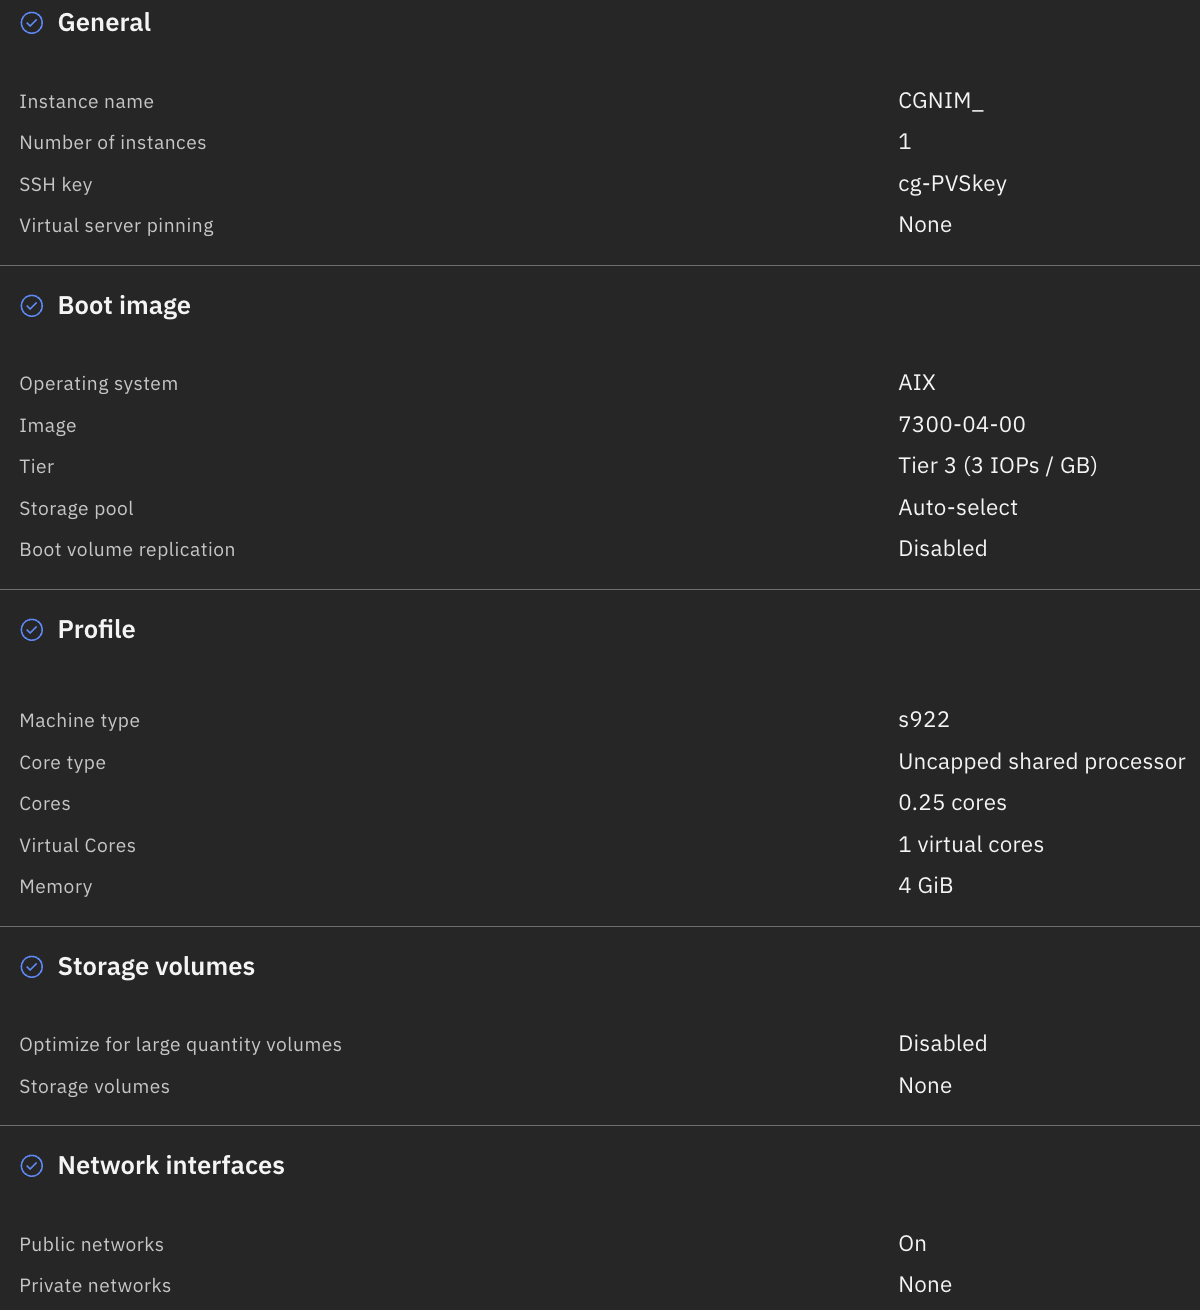
Enter the name of the new VM. In this example the VM is named CGNIM. If you have a SSH key configured (recommended, see https://cloud.ibm.com/docs/power-iaas?topic=power-iaas-creating-SSH-key) be sure to select it under SSH key so you can log into the VM after deployment is complete. Then select Continue.
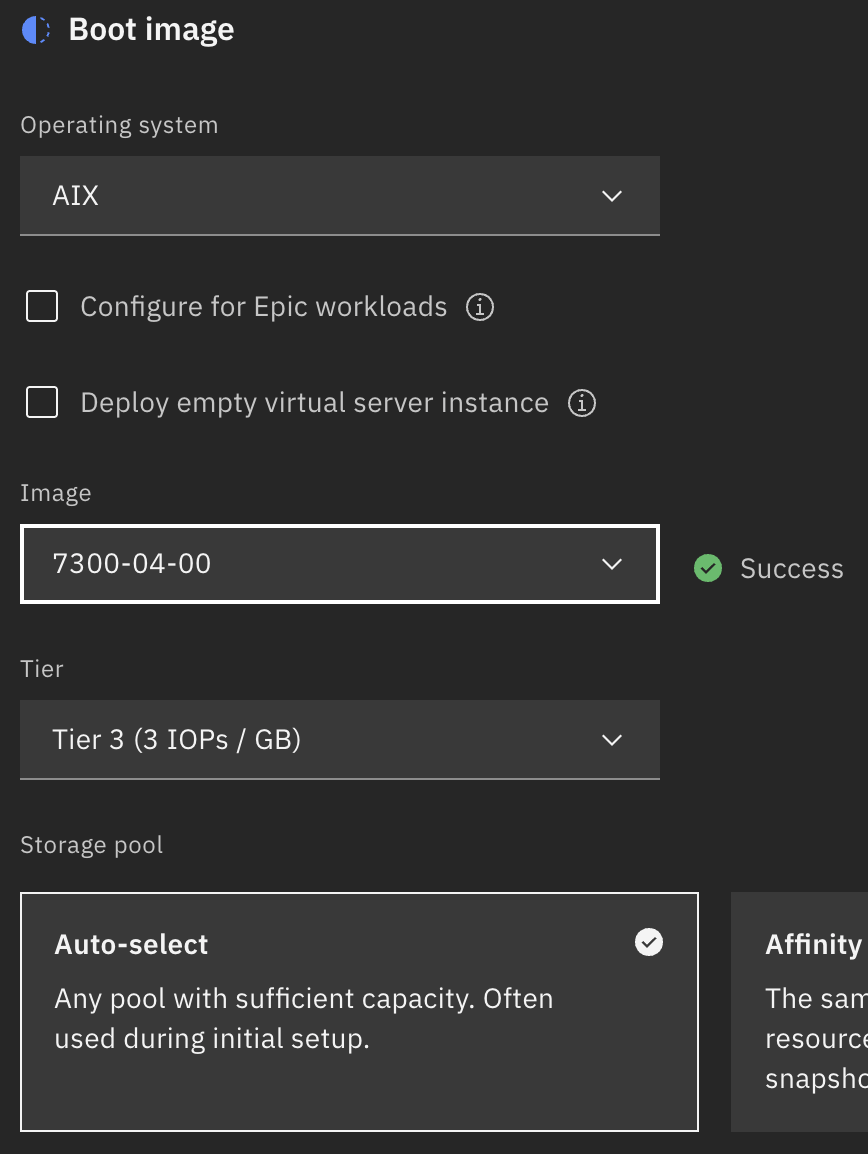
In the Boot image section, under Operating system select AIX. Select the AIX version and level required. In this example AIX 7.3 TL4 SP0 (7300-04-00-2546) was the latest version and level available (at the time of writing). A NIM server must always be running at the same or higher level as the migration target; however, best practice dictates that the NIM server should be at the latest and highest version and level of AIX available. In this example 7300-04-00 was selected from the list of available AIX images. Then select Continue.
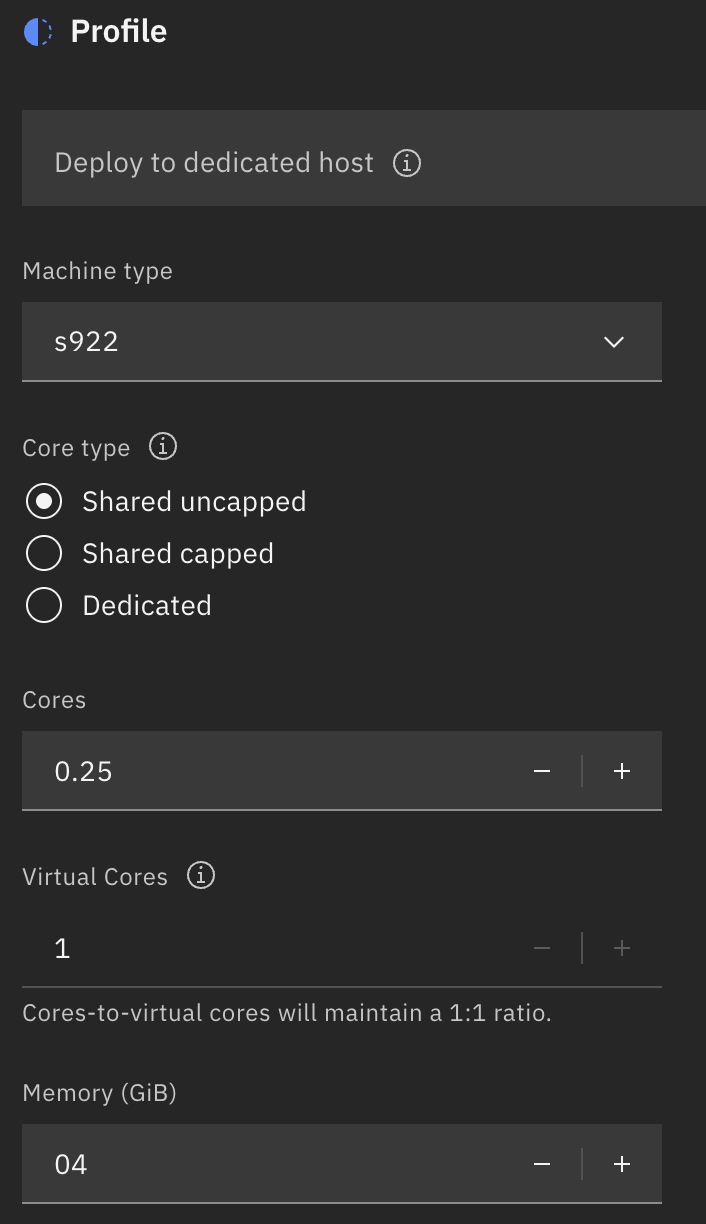
In the Profile section, select the desired Power server type where the VM will be deployed. In this example, under Machine type, s922 was selected (which is a POWER9 server). Under Memory (GiB), 4GB was entered. Then select Continue.
In the Storage volumes section, select Continue. We will assign additional storage volumes to this VM later.
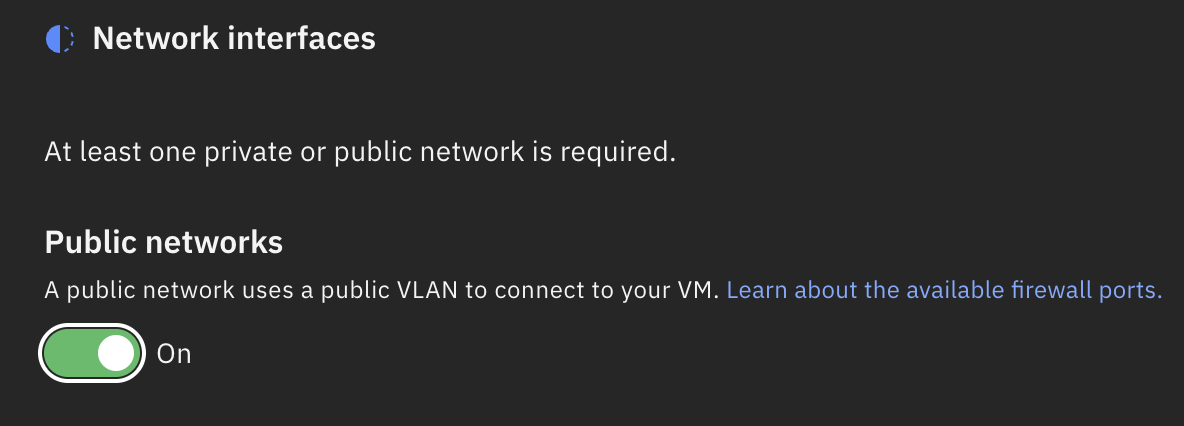
In the Network interfaces section, select Public networks On. Then select Finish.
Review the NIM server VM configuration summary.
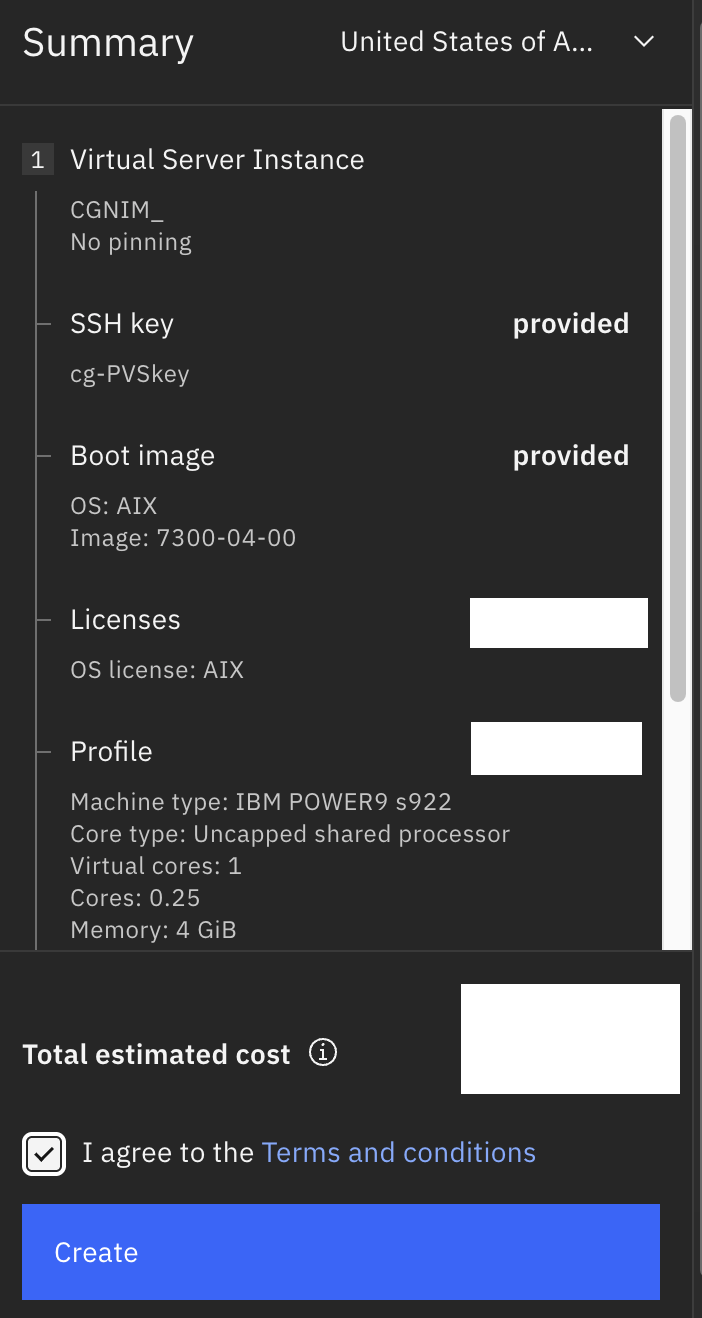
On the right-hand side of the page under Summary, select the checkbox to agree to the terms and conditions. Then select Create.
Return to the Virtual server instance panel. After several minutes the new NIM server VM will appear in the list. The VM is ready when its status shows Active.

From the list of VMs, select the NIM server (in this case CGNIM). Select the Networking tab and review the assigned IP addresses (both internal and external).
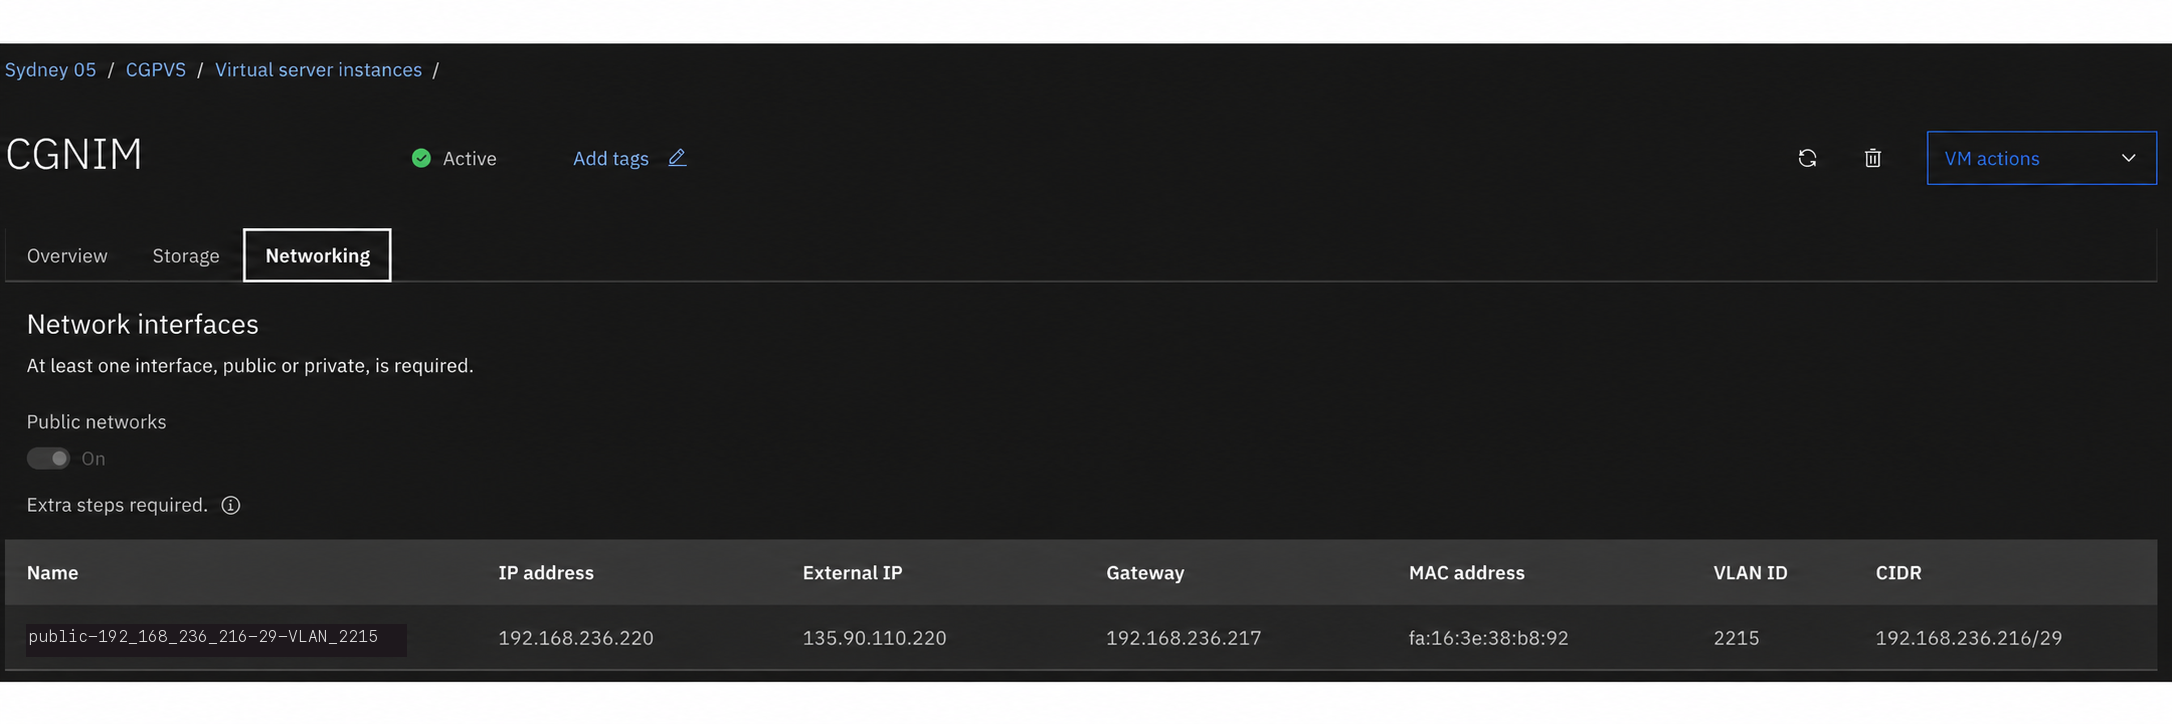
Ensure that you can log into the new VM with SSH and confirm the AIX version. For example (the public, external IP address was used to connect to the VM over SSH):
$ ssh root@135.90.110.220
…
*******************************************************************************
* *
* *
* Welcome to AIX Version 7.3! *
* *
* *
* Please see the README file in /usr/lpp/bos for information pertinent to *
* this release of the AIX Operating System. *
* *
* *
*******************************************************************************
root@cgnim / # oslevel -s
7300-04-00-2546
Return to the Virtual server instance panel. Select your existing AIX 6.1 VM (CG61 in this example). Select the Networking tab and review the assigned IP addresses (both internal and external). Note that the NIM server (CGNIM) and the NIM client (CG61) are on the same subnet in this example.
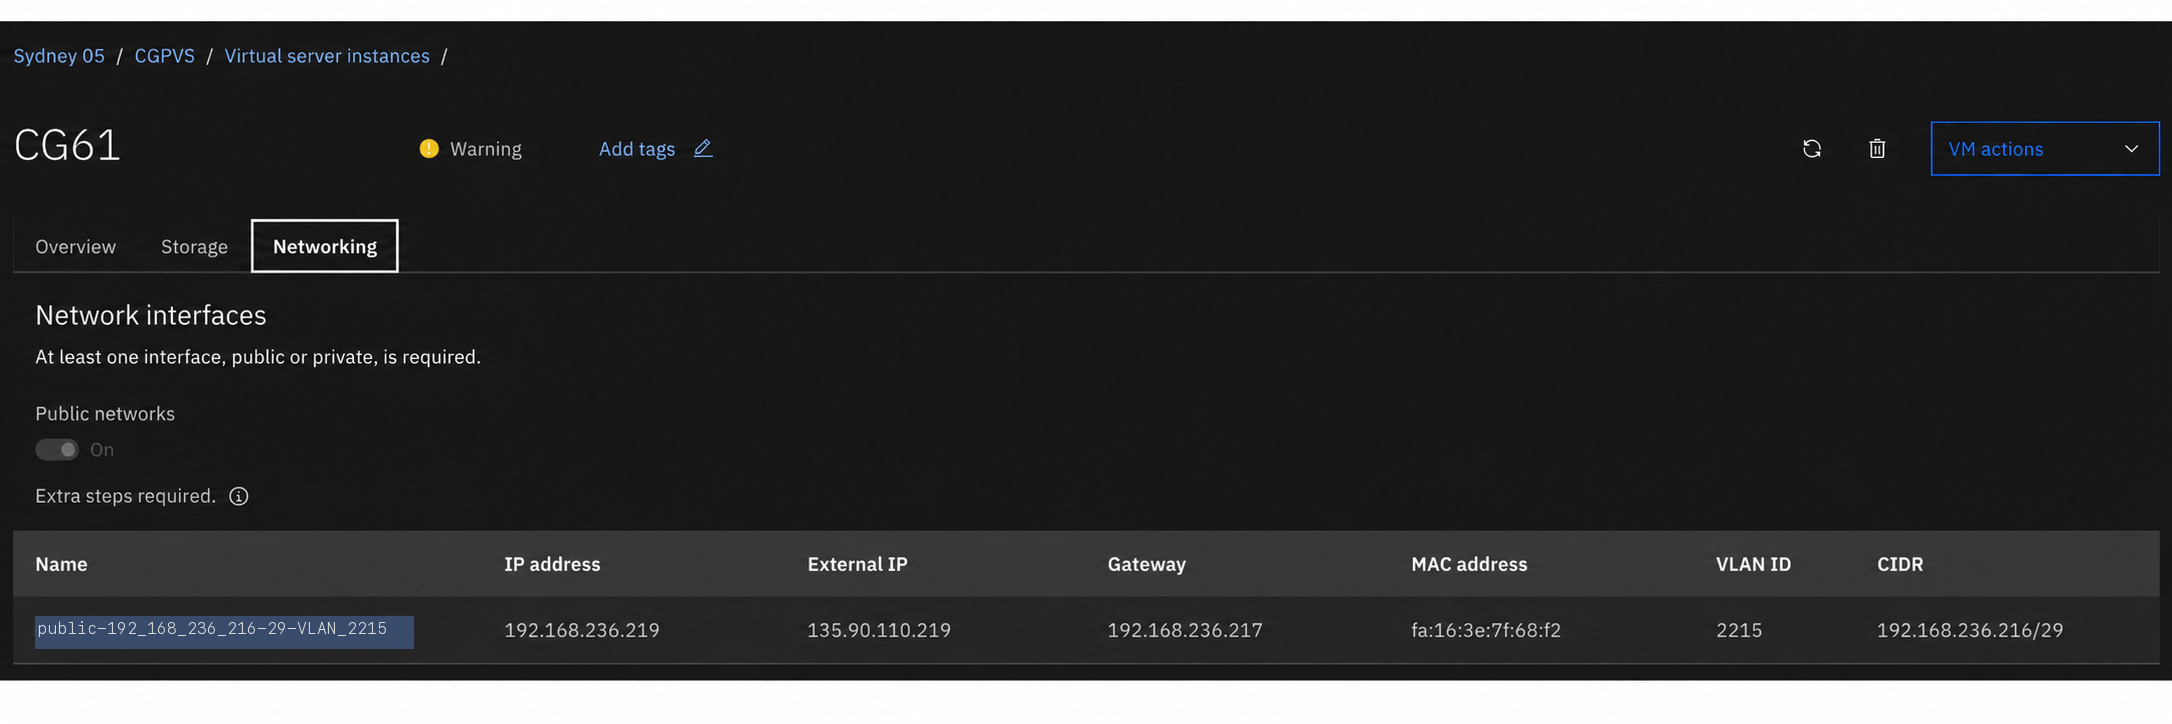
On both the NIM server and the client, add the internal IP addresses to the /etc/hosts file. For example:
# cat /etc/hosts
…
192.168.236.220 cgnim
192.168.236.219 cg61
Configure the NIM server
The default PowerVS AIX 7.3 image is deployed with the AIX 7.3 install filesets available in a separate file system. These filesets can be used to install and configure the NIM server. The AIX installation filesets are located in /usr/sys/inst.images on the VM.
root@cgnim / # df -g /usr/sys/inst.images
Filesystem GB blocks Free %Used Iused %Iused Mounted on
/dev/rep00 8.09 0.04 100% 2229 18% /usr/sys/inst.images
Install the fileset bos.sysmgt.nim.master on the NIM server.
installp -d /usr/sys/inst.images -a -Y bos.sysmgt.nim.master
Define and configure the NIM server. Specify a netname of network1 and use the en0 interface (where the internal IPv4 address is configured).
nimconfig -a pif_name=en0 -a netname=network1 -a cable_type=N/A
Assign two new storage volumes (disks) to the NIM server VM (CGNIM). These will be used to house various NIM resources in later steps.
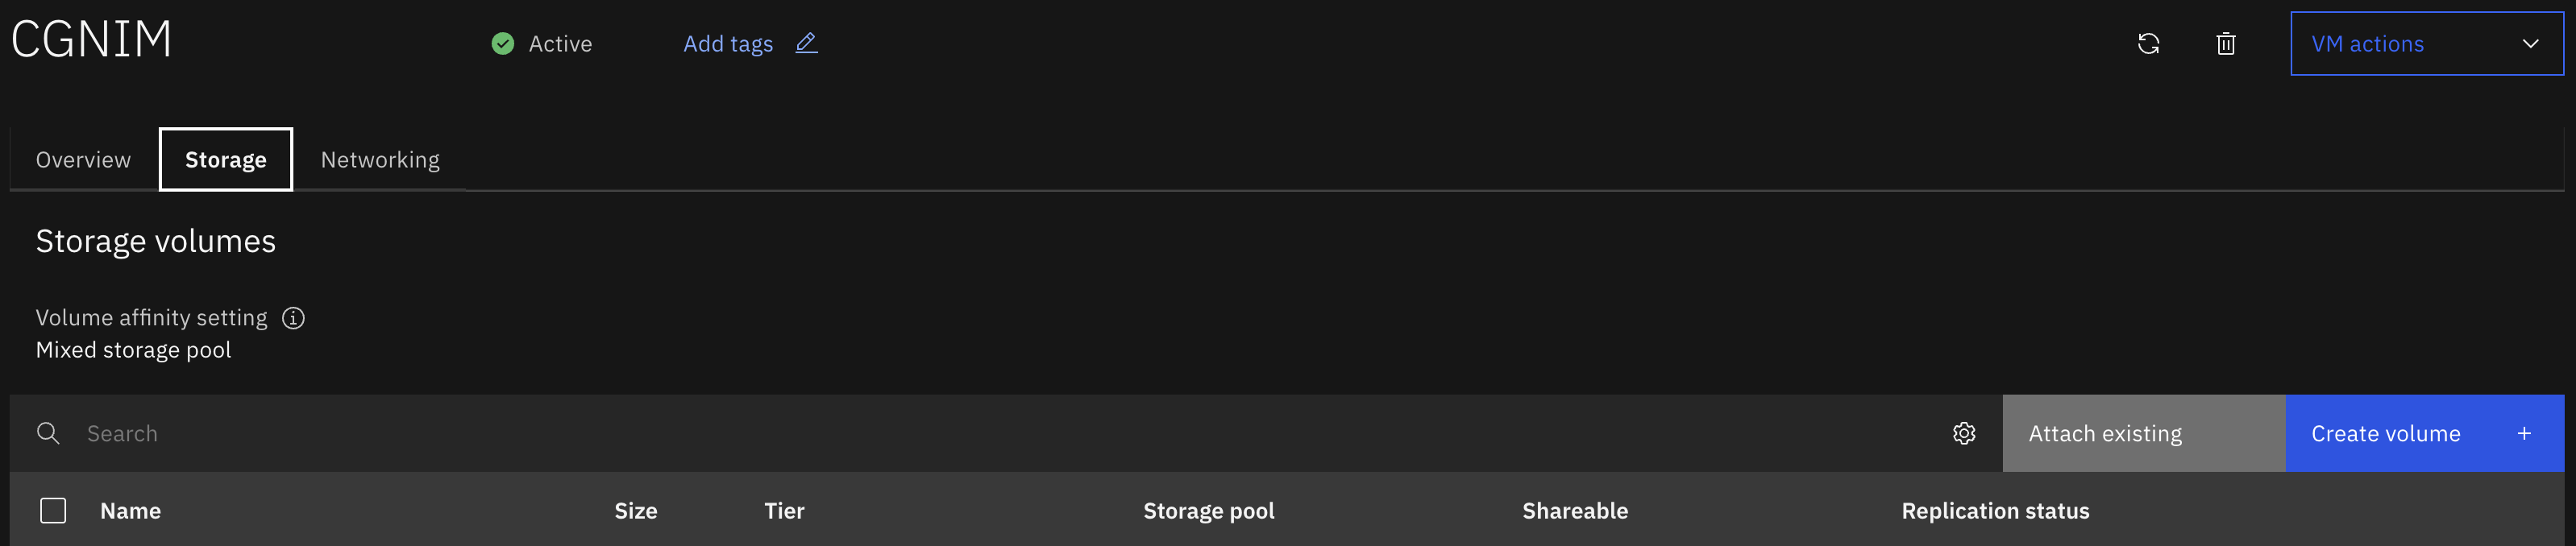
From the Virtual server instances panel select the NIM server (CGNIM). Select the Storage tab. Select Create volume.
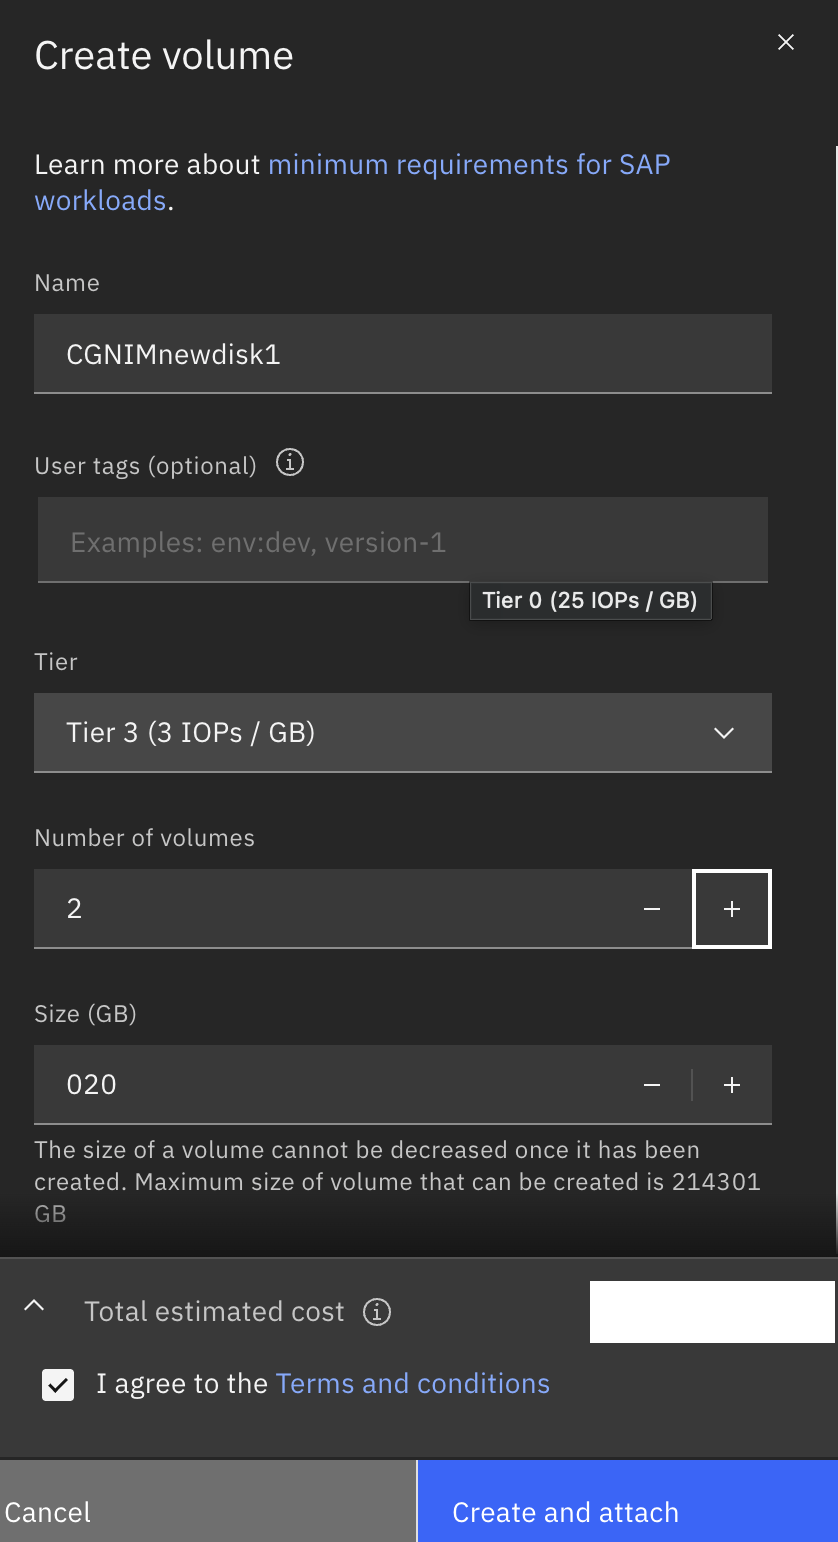
Enter a name for the new disks under Name. Under Number of volumes select 2. Enter the desired size of the new disks under Size (GB); in this example we entered 20GB. Note: the disks need to be large enough to hold (at least) a complete copy of the AIX installation files (in /usr/sys/inst.images, roughly 8-9GB) and a complete copy of the existing AIX 6.1 root volume group (rootvg, which in our example is about 20GB; yours will likely be different). Select the checkbox to agree to the terms and conditions. Then select Create and attach.
After a few minutes the new volumes will appear for the NIM server VM (CGNIM).
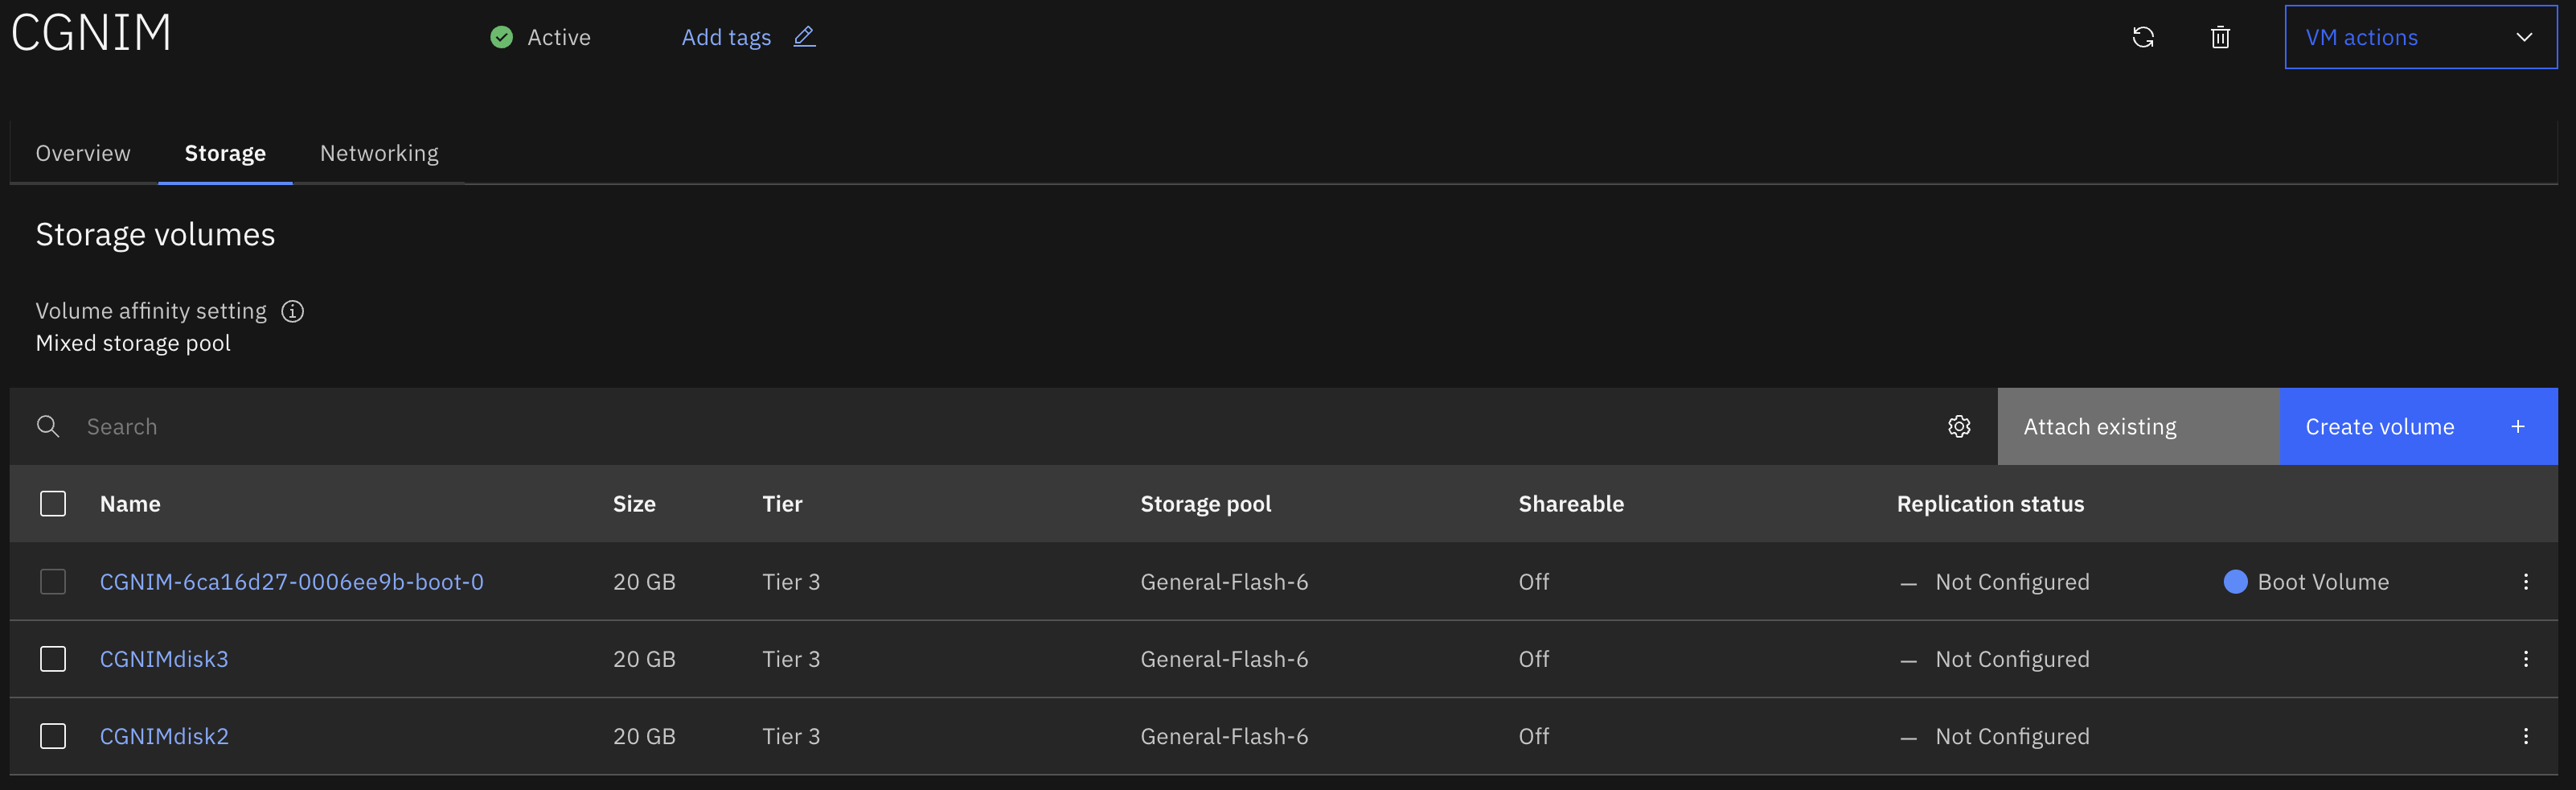
Return to your SSH session on the NIM server VM (CGNIM). Discover the newly assigned disks now. Disks hdisk1 and hdisk2 should appear.
root@cgnim / # cfgmgr
root@cgnim / # lspv
hdisk0 00c937e0f5b35b99 rootvg active
hdisk1 00c937e0f62c4d29 None None
hdisk2 00c937e0f62e000e None None
root@cgnim / # lsmpio -q
Device Vendor Id Product Id Size Volume Name
---------------------------------------------------------------------------------
hdisk0 IBM 2145 20.00GiB volume-CGNIM-6ca16d27-0006ee9b-
hdisk1 IBM 2145 20.00GiB volume-CGNIMdisk2-38aa8c4b-ceb9
hdisk2 IBM 2145 20.00GiB volume-CGNIMdisk3-8cfe86d3-1e2d
Create two new volumes groups named nimvg and nimadmvg, using the newly configured disks. The disk hdisk1 should be assigned to nimvg and hdisk2 to nimadmvg.
mkvg -y nimvg hdisk1
mkvg -y nimadmvg hdisk2
root@cgnim / # lsvg
rootvg
nimvg
nimadmvg
Create a new file system named /export in the nimvg volume group. Make it 10GB in size. Then mount it.
crfs -v jfs2 -g nimvg -a size=10G -Ayes -m /export
mount /export
Create two new directories in /export named AIX73TL4SP0 and spot.
mkdir /export/AIX73TL4SP0
mkdir /export/spot
Copy the AIX installation filesets from /usr/sys/inst.images to /export/AIX73TL4SP0.
cp -pr /usr/sys/inst.images /export/AIX73TL4SP0
Define an AIX 7.3 TL4 LPP source under /export. The LPP source will be named AIX73TL4SP0.
nim -o define -t lpp_source -a server=master -a location=/export/AIX73TL4SP0 AIX73TL4SP0
Define an AIX 7.3 SPOT resource. The SPOT will be named spotAIX73TL4SP0.
nim -o define -t spot -a server=master -a source=AIX73TL4SP0 -a location=/export/spot spotAIX73TL4SP0
Install the bos.alt_disk_install.rte fileset into the AIX 7.3 SPOT.
nim -o cust -a filesets=bos.alt_disk_install.rte -a lpp_source=AIX73TL4SP0 spotAIX73TL4SP0
Define the NIM client (CG61). Specify network1 and cg61 (the name of the NIM client).
nim -o define -t standalone -a platform=chrp -a if1="network1 cg61 0" -a netboot_kernel=mp cg61
Edit the /etc/niminfo file and change NIM_SSL_STATUS from enabled to disabled. Stop and start the nimesis daemon for the change to take effect. This step is required to work around a known issue with the version and level of AIX used in this example; it is documented here: https://www.ibm.com/support/pages/nim-related-functions-producing-errors-after-upgrade-or-update-build-date-2520-7300-03-01-7200-05-10, future AIX TL/SP releases may not be impacted by this issue and may not require this step.
root@cgnim / # vi /etc/niminfo
;edit and save the file here...
root@cgnim / # stopsrc -s nimesis
root@cgnim / # startsrc -s nimesis
root@cgnim / # cat /etc/niminfo
export NIM_NAME=master
export NIM_CONFIGURATION=master
export NIM_MASTER_PORT=1058
export NIM_REGISTRATION_PORT=1059
export NIM_SSL_STATUS=disabled
export NIM_MASTER_HOSTNAME=cgnim
Configure the NIM client
Start a SSH session with the NIM client (in this example the AIX 6.1 VM named CG61). Configure the NIM client (name=cg61) to register and communicate with the NIM server (master=cgnim). Use en0 for pif_name. Use nimsh for connect and chrp for platform.
niminit -a name=cg61 -a pif_name=en0 -a master=cgnim -a connect=nimsh -a platform=chrp
Return to the SSH session on your NIM server and confirm the NIM server can now communicate with the NIM client (cg61). The command should return the fileset level for the bos.rte fileset in the client.
root@cgnim / # nim -o lslpp cg61 | grep -w "bos.rte " | sort -u
bos.rte 6.1.9.400 COMMITTED Base Operating System Runtime
Assign a new storage volume (disk) to the NIM client VM (CG61). This will be used for the migration to AIX 7.3. As mentioned previously because the version of AIX is unsupported we cannot dynamically assign the new disks to the VM while it is up and running. It must be stopped first.
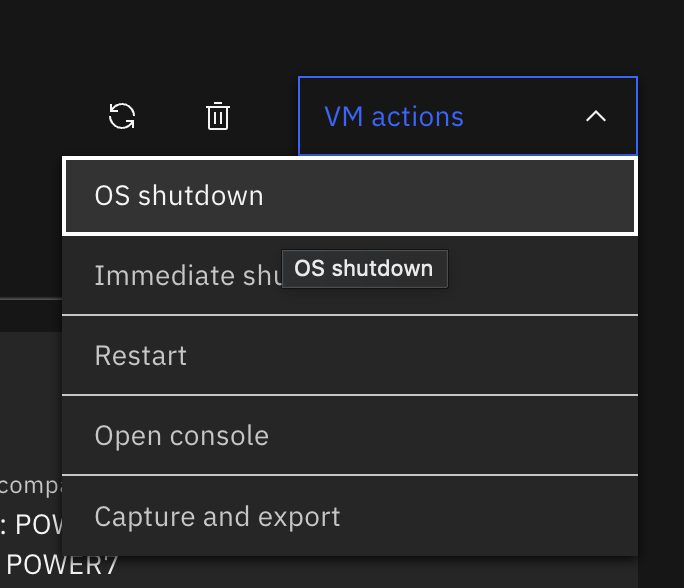
From the Virtual server instances panel select the NIM client (CG61). From the VM actions drop-down list (to the right of the panel), select OS shutdown.
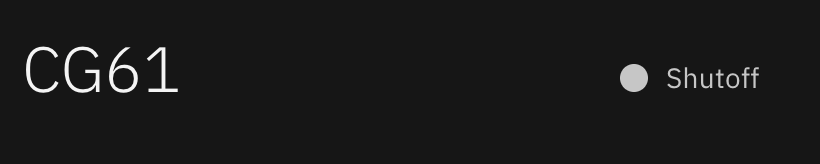
Once the VM is in the Shutoff state, select the Storage tab.
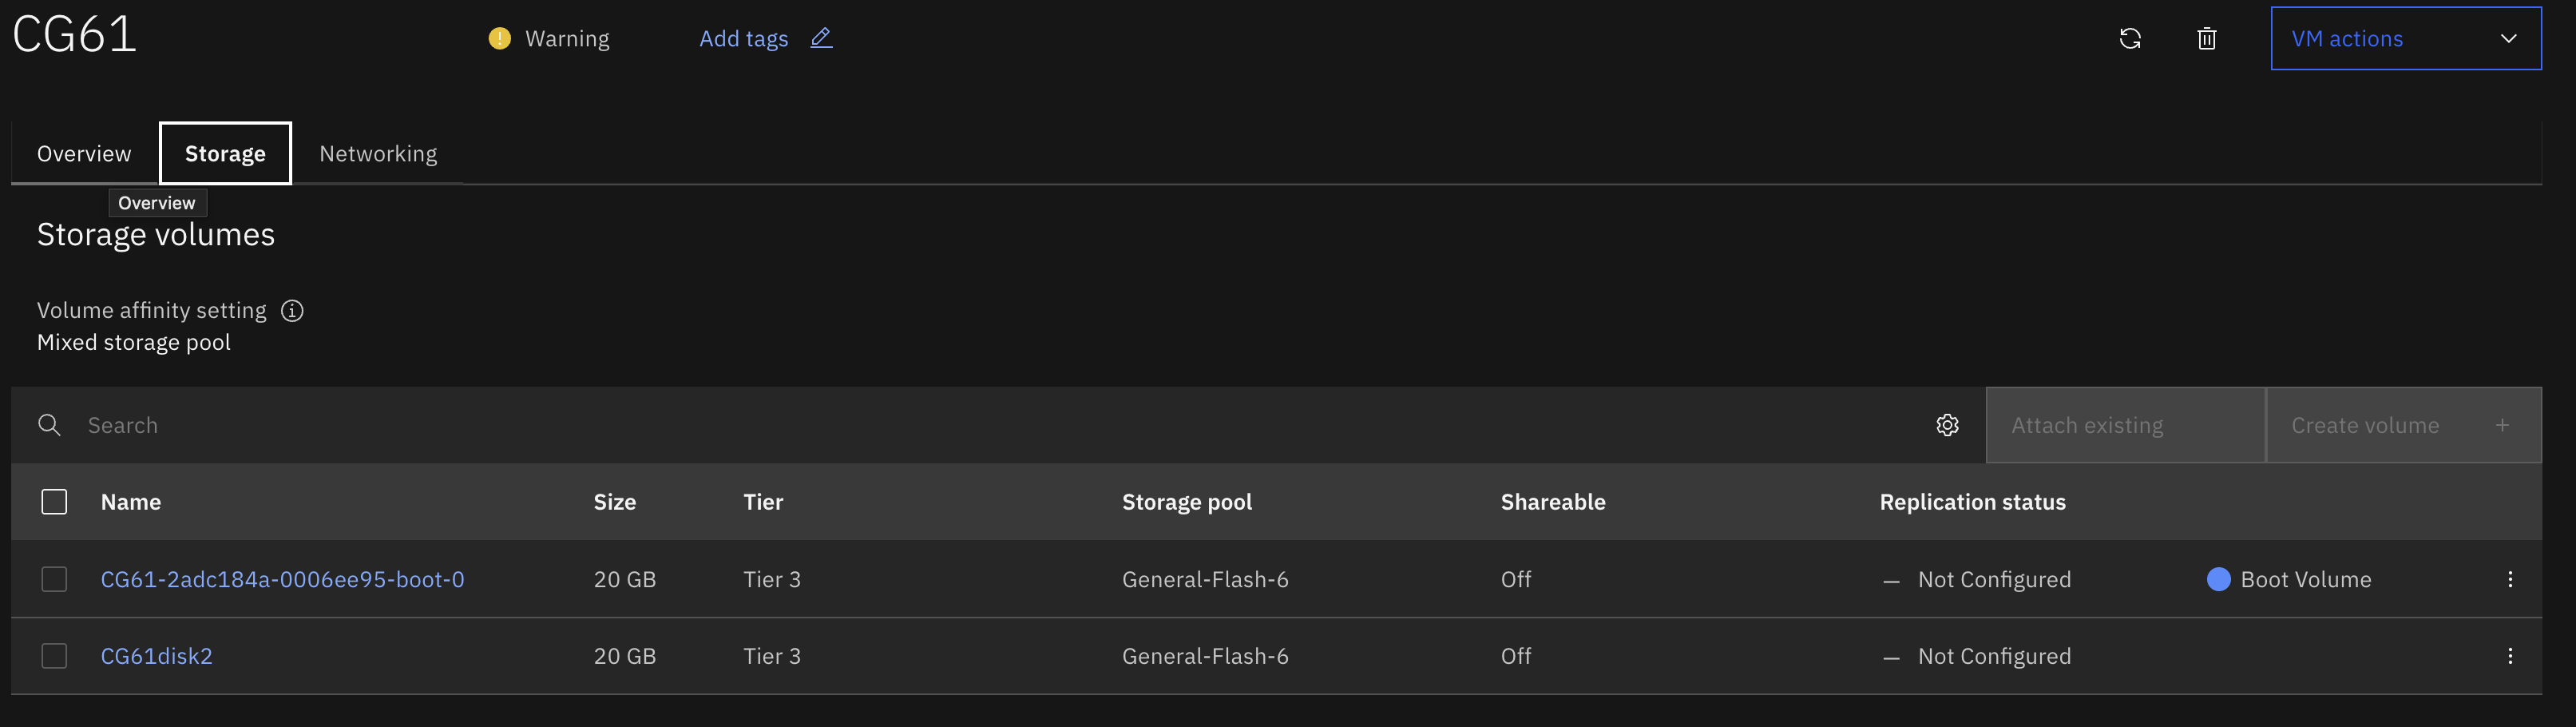
The Create volume button should no longer be greyed out.

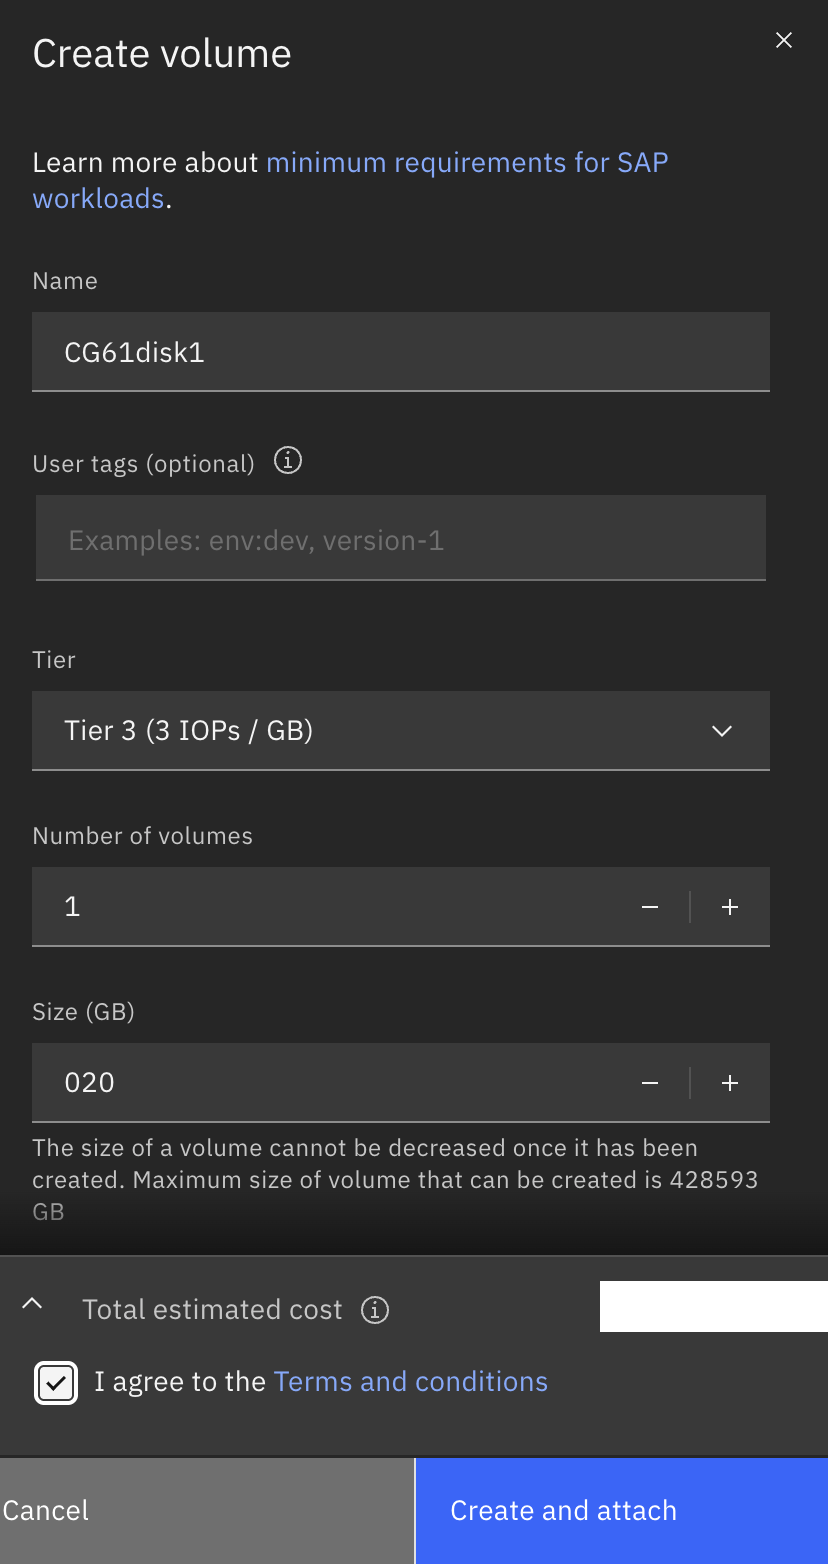
Select Create volume. Enter a name for the new disk under Name. Enter the desired size of the new disk under Size (GB); in this example we entered 20GB. Note: the disk needs to be large enough to hold (at least) a complete copy of the existing AIX 6.1 root volume group (rootvg, which is in our example is about 20GB, yours will likely be different). Select the checkbox to agree to the terms and conditions. Then select Create and attach.
After a few minutes the new volume will appear for the NIM client VM (CG61).

Start the NIM client VM now. Select VM actions, then select Start.

Once the VM is running, start a SSH session to the NIM client (CG61). Discover the newly assigned disk now. In this example the new disk is named hdisk1.
root@cg61 / # lspv
hdisk0 00f94f559ec54b56 rootvg active
hdisk1 00c937e0f676dc43 None None
root@cg61 / # lsmpio -q
Device Vendor Id Product Id Size Volume Name
---------------------------------------------------------------------------------
hdisk0 IBM 2145 20.00GiB volume-CG61-2adc184a-0006ee95-b
hdisk1 IBM 2145 20.00GiB volume-CG61disk2-f3714b3c-7b89
Migrate to AIX 7.3
Use the NIM alternate disk migration tool (nimadm) to migrate the NIM client (cg61) from AIX 6.1 to AIX 7.3.
From the NIM server, run the following command.
nimadm -j nimadmvg -c cg61 -s spotAIX73TL4SP0 -l AIX73TL4SP0 -d hdisk1 -Y -A
- -j nimadmvg: specifies that a cache volume group named nimadmvg on the NIM server will be used to migrate the clients OS
- -c: specifies the name of the NIM client that will be migrated
- -s: flag specifies the name of the AIX 7.3 TL4 SPOT
- -l: flag specifies the name of the AIX 7.3 TL4 LPP source
- -d: flag specifies the name of the alternate rootvg disk that will be used on the NIM client
- -Y: agrees to the required software license agreements for software to be installed
- -A: adds a timestamp at the start of each phase of the nimadm operation, the timestamp is displayed in MM-DD-YYYY HH-MM-SS format
The nimadm utility offers several advantages over a conventional migration. For instance, a system administrator can use nimadm to create a copy of a NIM client's rootvg (on a spare disk on the client, similar to a standard alternate disk install alt_disk_install) and migrate the disk to a newer version or release of AIX. All of this can be done without disruption to the client (there is no outage required to perform the migration). After the migration is finished, the only down time required will be a scheduled reboot of the system.
This method also allows for quick recovery from migration failures. All changes are performed on the rootvg copy (altinst_rootvg). If there are any serious problems with the migration, the original rootvg is still available and the system has not been impacted. If a migration fails or terminates at any stage, nimadm is able to quickly recover from the event and clean up afterwards. There is little for the administrator to do except determine why the migration failed, rectify the situation, and attempt the nimadm process again. If the migration completed but issues are discovered after the reboot, then the administrator can back out easily by booting from the original rootvg disk. See https://www.ibm.com/support/pages/using-nim-alternate-disk-migration-nimadm.
The nimadm process will take time to complete. Wait for all 12 phases to complete successfully.
cgnim / # nimadm -j nimadmvg -c cg61 -s spotAIX73TL4SP0 -l AIX73TL4SP0 -d hdisk1 -Y -A
…
+-----------------------------------------------------------------------------+
05-04-2026 23:47:20 Executing nimadm phase 1.
+-----------------------------------------------------------------------------+
Cloning altinst_rootvg on client, Phase 1.
Client alt_disk_install command: alt_disk_copy -j -M 7.3 -P1 -d "hdisk1"
Calling mkszfile to create new /image.data file.
Checking disk sizes.
LOGICAL_VOLUME= hd11admin
FS_LV= /dev/hd11admin
Creating cloned rootvg volume group and associated logical volumes.
Creating logical volume alt_hd5
Creating logical volume alt_hd6
Creating logical volume alt_hd8
Creating logical volume alt_hd4
Creating logical volume alt_hd2
Creating logical volume alt_hd9var
Creating logical volume alt_hd3
Creating logical volume alt_hd1
Creating logical volume alt_hd10opt
Creating logical volume alt_hd11admin
Creating logical volume alt_lg_dumplv
Creating logical volume alt_livedump
Creating logical volume alt_auditlv
Creating /alt_inst/ file system.
Creating /alt_inst/admin file system.
Creating /alt_inst/audit file system.
Creating /alt_inst/home file system.
Creating /alt_inst/opt file system.
Creating /alt_inst/tmp file system.
Creating /alt_inst/usr file system.
Creating /alt_inst/var file system.
Creating /alt_inst/var/adm/ras/livedump file system.
Generating a list of files
for backup and restore into the alternate file system...
Phase 1 complete.
...
...Phases 2 to 11 here...
...
+-----------------------------------------------------------------------------+
05-05-2026 03:16:38 Executing nimadm phase 12.
+-----------------------------------------------------------------------------+
Cleaning up alt_disk_migration on the NIM master.
Cleaning up alt_disk_migration on client cg61.
Once the migration has completed successfully return to the SSH session on the NIM client (cg61). Then initiate a reboot from the NIM client VM using the alternate rootvg disk (hdisk1 in this example). Verify the bootlist is set to the alternate rootvg.
root@cg61 / # lspv
hdisk0 00f94f559ec54b56 rootvg active
hdisk1 00c937e0f676dc43 altinst_rootvg
root@cg61 / # bootlist -m normal -o
hdisk1 blv=hd5 pathid=0
hdisk1 blv=hd5 pathid=1
hdisk1 blv=hd5 pathid=2
hdisk1 blv=hd5 pathid=3
hdisk1 blv=hd5 pathid=4
After the reboot, log into the VM and confirm the AIX version has been migrated to 7.3. The oslevel -s command should return 7300-04-00-2546.
$ ssh root@135.90.110.219
Last unsuccessful login: Wed May 6 13:38:50 AEST 2026 on SSH from 2.57.122.189
Last login: Wed May 6 16:01:51 AEST 2026 on /dev/vty0
*******************************************************************************
* *
* *
* Welcome to AIX Version 7.3! *
* *
* *
* Please see the README file in /usr/lpp/bos for information pertinent to *
* this release of the AIX Operating System. *
* *
* *
*******************************************************************************
root@cg61 / # oslevel -s
7300-04-00-2546
In our example we were able to start our Java application successfully after the migration.
root@cg61 / # oslevel -s
7300-04-00-2546
root@cg61 / # ./my_java_app.sh
Started My_java_app [PID 8192282, /var/my_java_app/my_java_app_sh.log]
root@cg61 / # ps -ef | grep java
root 8192282 1 5 16:03:49 pts/0 0:00 java -Xmx150m -Dmy_java_app.home=/var/my_java_app -Dmy_java_app.host=0.0.0.0 -Dmy_java_app.port=4040 -Dmy_java_app.httpsPort=0 -Dmy_java_app.contextPath=/ -Dmy_java_app.db= -Dmy_java_app.defaultMusicFolder=/var/music -Dmy_java_app.defaultPodcastFolder=/var/music/Podcast -Dmy_java_app.defaultPlaylistFolder=/var/playlists -Djava.awt.headless=true -verbose:gc -jar my_java_app-booter-jar-with-dependencies.jar
AIX Migration Completed Successfully
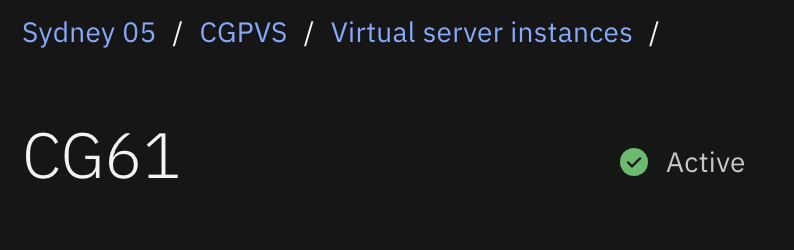
From the Virtual server instances panel, after some period of time, you will observe that the newly migrated VM will now show a status of Active. Recall that when the VM was running an unsupported version of AIX the status was Warning.

Selecting the VM, and displaying its details, also shows the Active status.
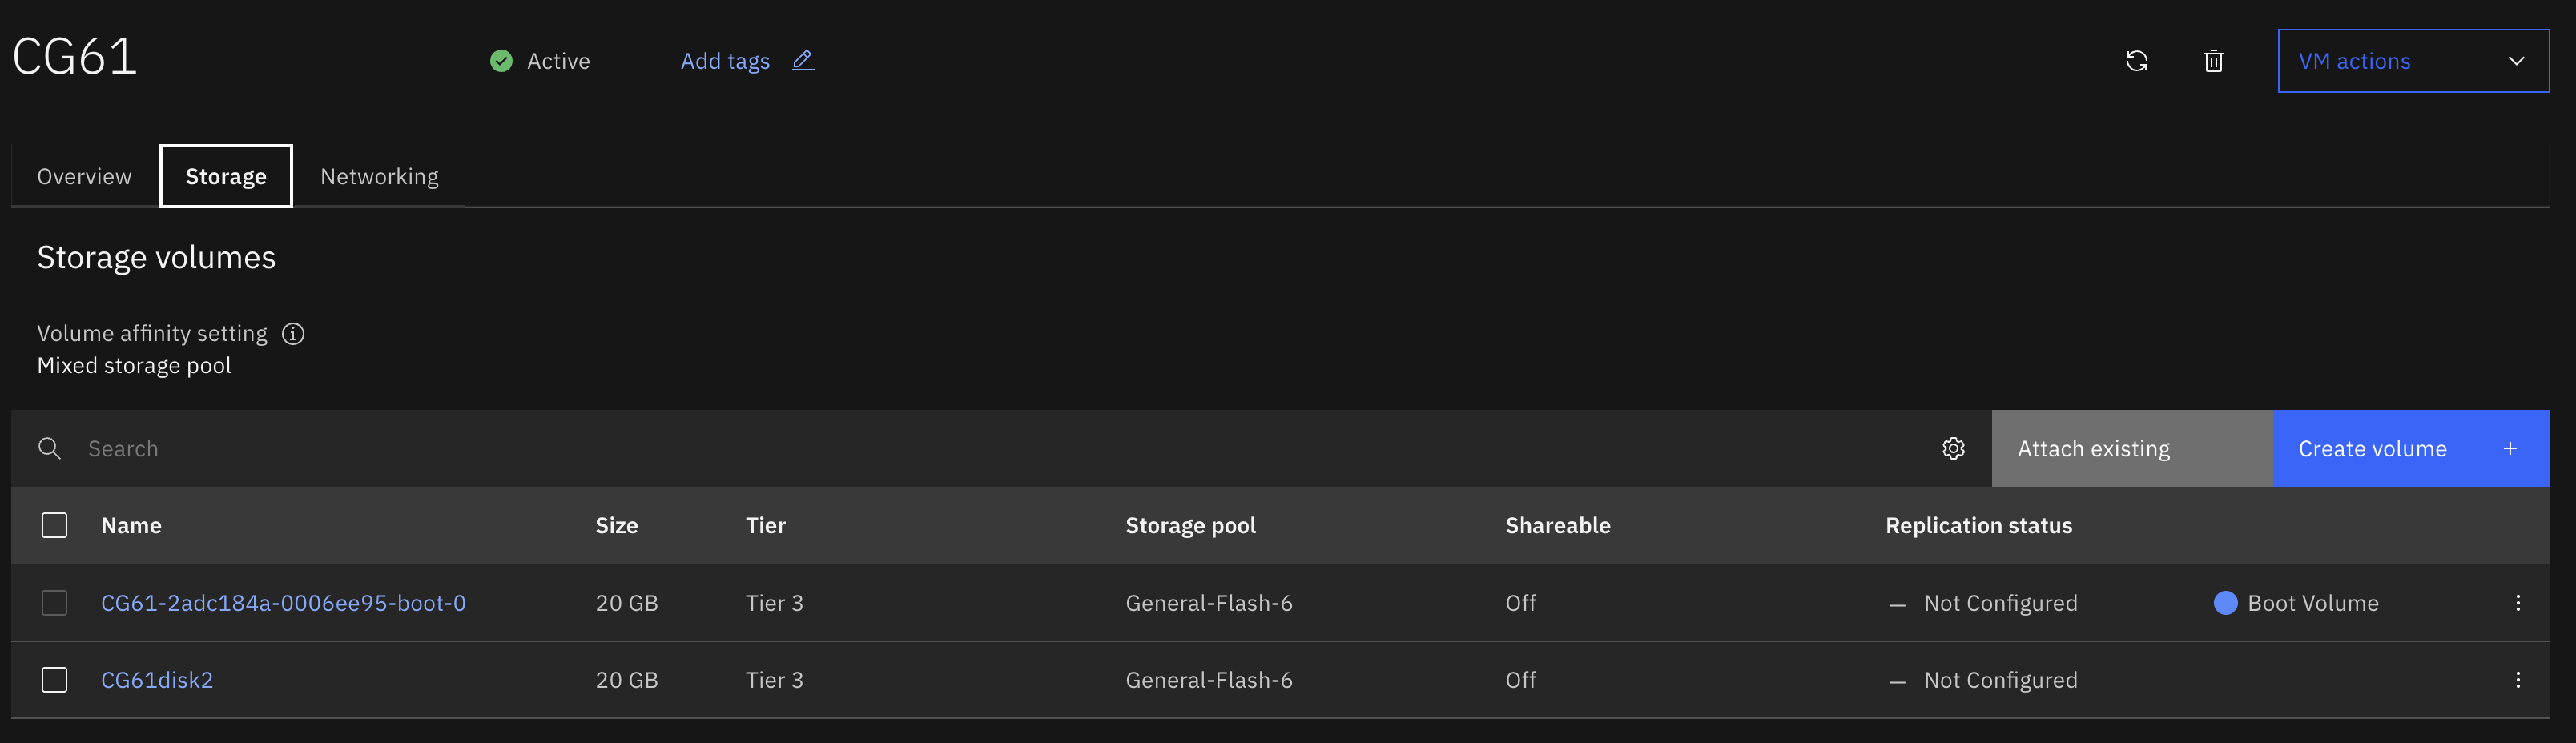
Selecting the Storage tab now shows that volumes can be assigned dynamically while the VM is active and running (this was not possible prior to the migration to AIX 7.3).
If the AIX upgrade is considered successful the additional disk that was assigned to the VM can now be removed as it is no longer required.
Warning: Do not perform the steps below until you have confirmed the migration has been completed successfully. Otherwise you will remove the ability to fall back to the previous version of AIX if issues arise later (see the Fall back to previous AIX version section).
To remove the disk you must first remove it from the AIX configuration. In this scenario you need to remove the disk assigned to the old_rootvg volume group (hdisk0). You must also identify the LUN id for the disk, as you need this to find the correct disk to remove from the VM in PowerVS. In the example below the LUN id ends in DE70.
root@cg61 / # lsmpio -ql hdisk0 | grep Vol
Volume Name: volume-CG61-2adc184a-0006ee95-boot-0-5e658131-07d9
Volume Serial: 600507681381028B500000000001DE70 (Page 83 NAA)
root@cg61 / # lspv
hdisk0 00f94f559ec54b56 old_rootvg
hdisk1 00c937e0f676dc43 rootvg active
root@cg61 / # alt_rootvg_op -X old_rootvg
Bootlist is set to the boot disk: hdisk1 blv=hd5
root@cg61 / # rmdev -dl hdisk0
Identify the LUN id for the remaining boot disk next. In this example the LUN id ends in DE74.
root@cg61 / # lsmpio -ql hdisk1 | grep Vol
Volume Name: volume-CG61disk2-f3714b3c-7b89
Volume Serial: 600507681381028B500000000001DE74 (Page 83 NAA)
Warning: Follow the steps carefully to ensure you remove the disk for the old rootvg only.
From the Storage tab under the VM details, change the boot volume to this disk. Select the three dots at the end of the line for the correct boot volume, then select Set as boot volume.

Now remove the unused volume from the VM. Select Detach. Then select Detach again.


Once the volume has been detached only one volume is displayed now. You may have many more volumes attached to the VM in your environment (this is just an example).

At this point the volume has only been detached from the VM. It has not yet been deleted from the PowerVS SAN storage pool. To delete the volume select Storage volumes from the left-hand side Storage menu.
A list of all of your storage volumes is shown.
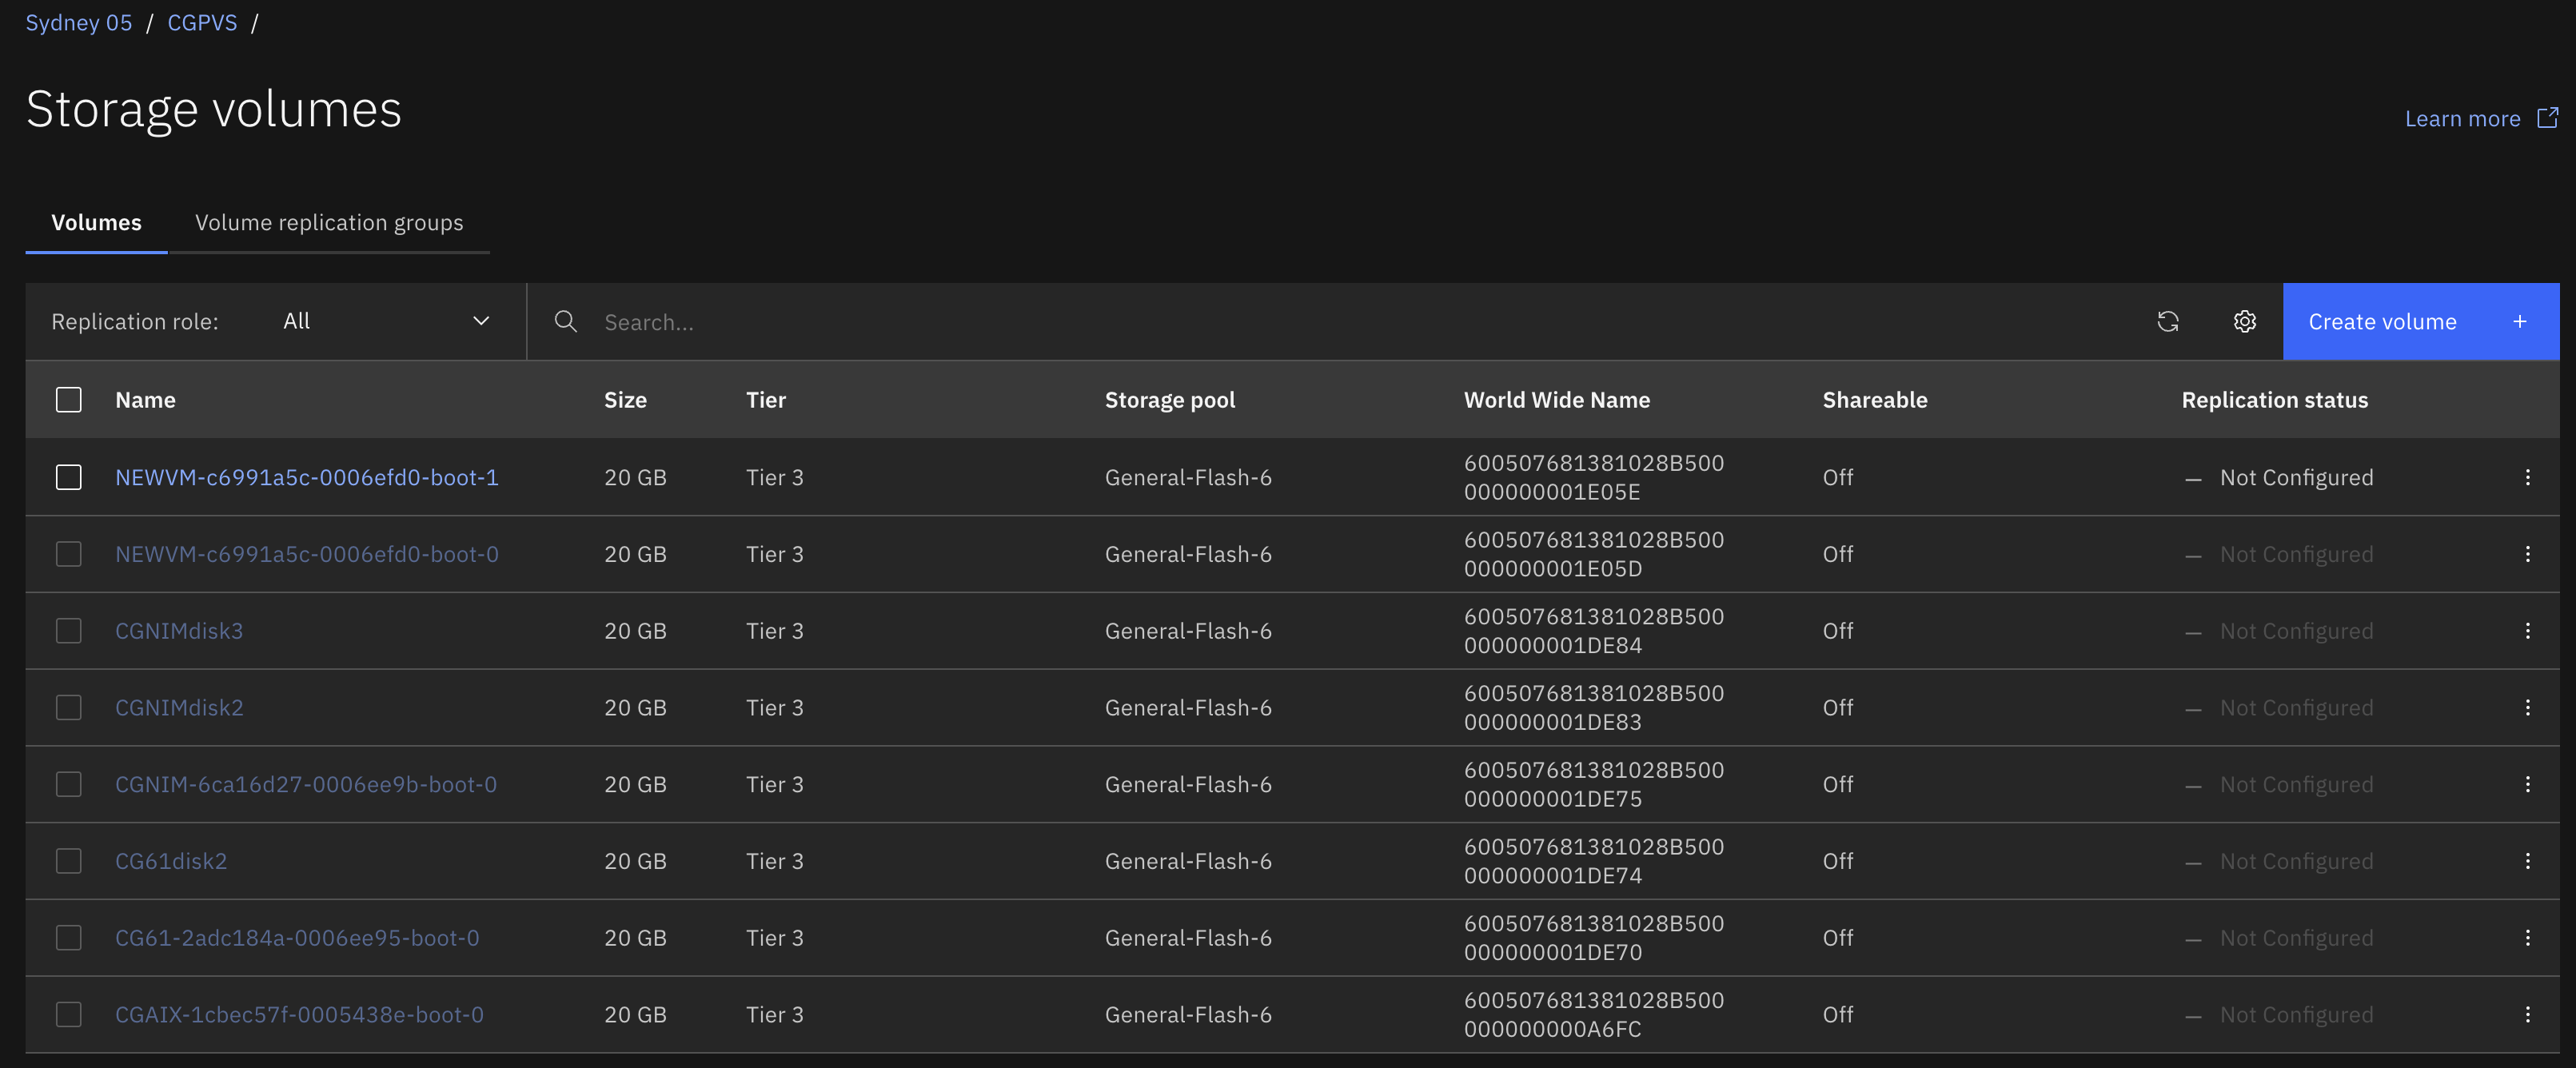
Note that most of the volumes are greyed out, however there is one volume that is not. This is the volume that was just detached from the VM in the previous step. Select this volume (in this example it is NEWVM-c6991a5c-0006efd0-boot-1).
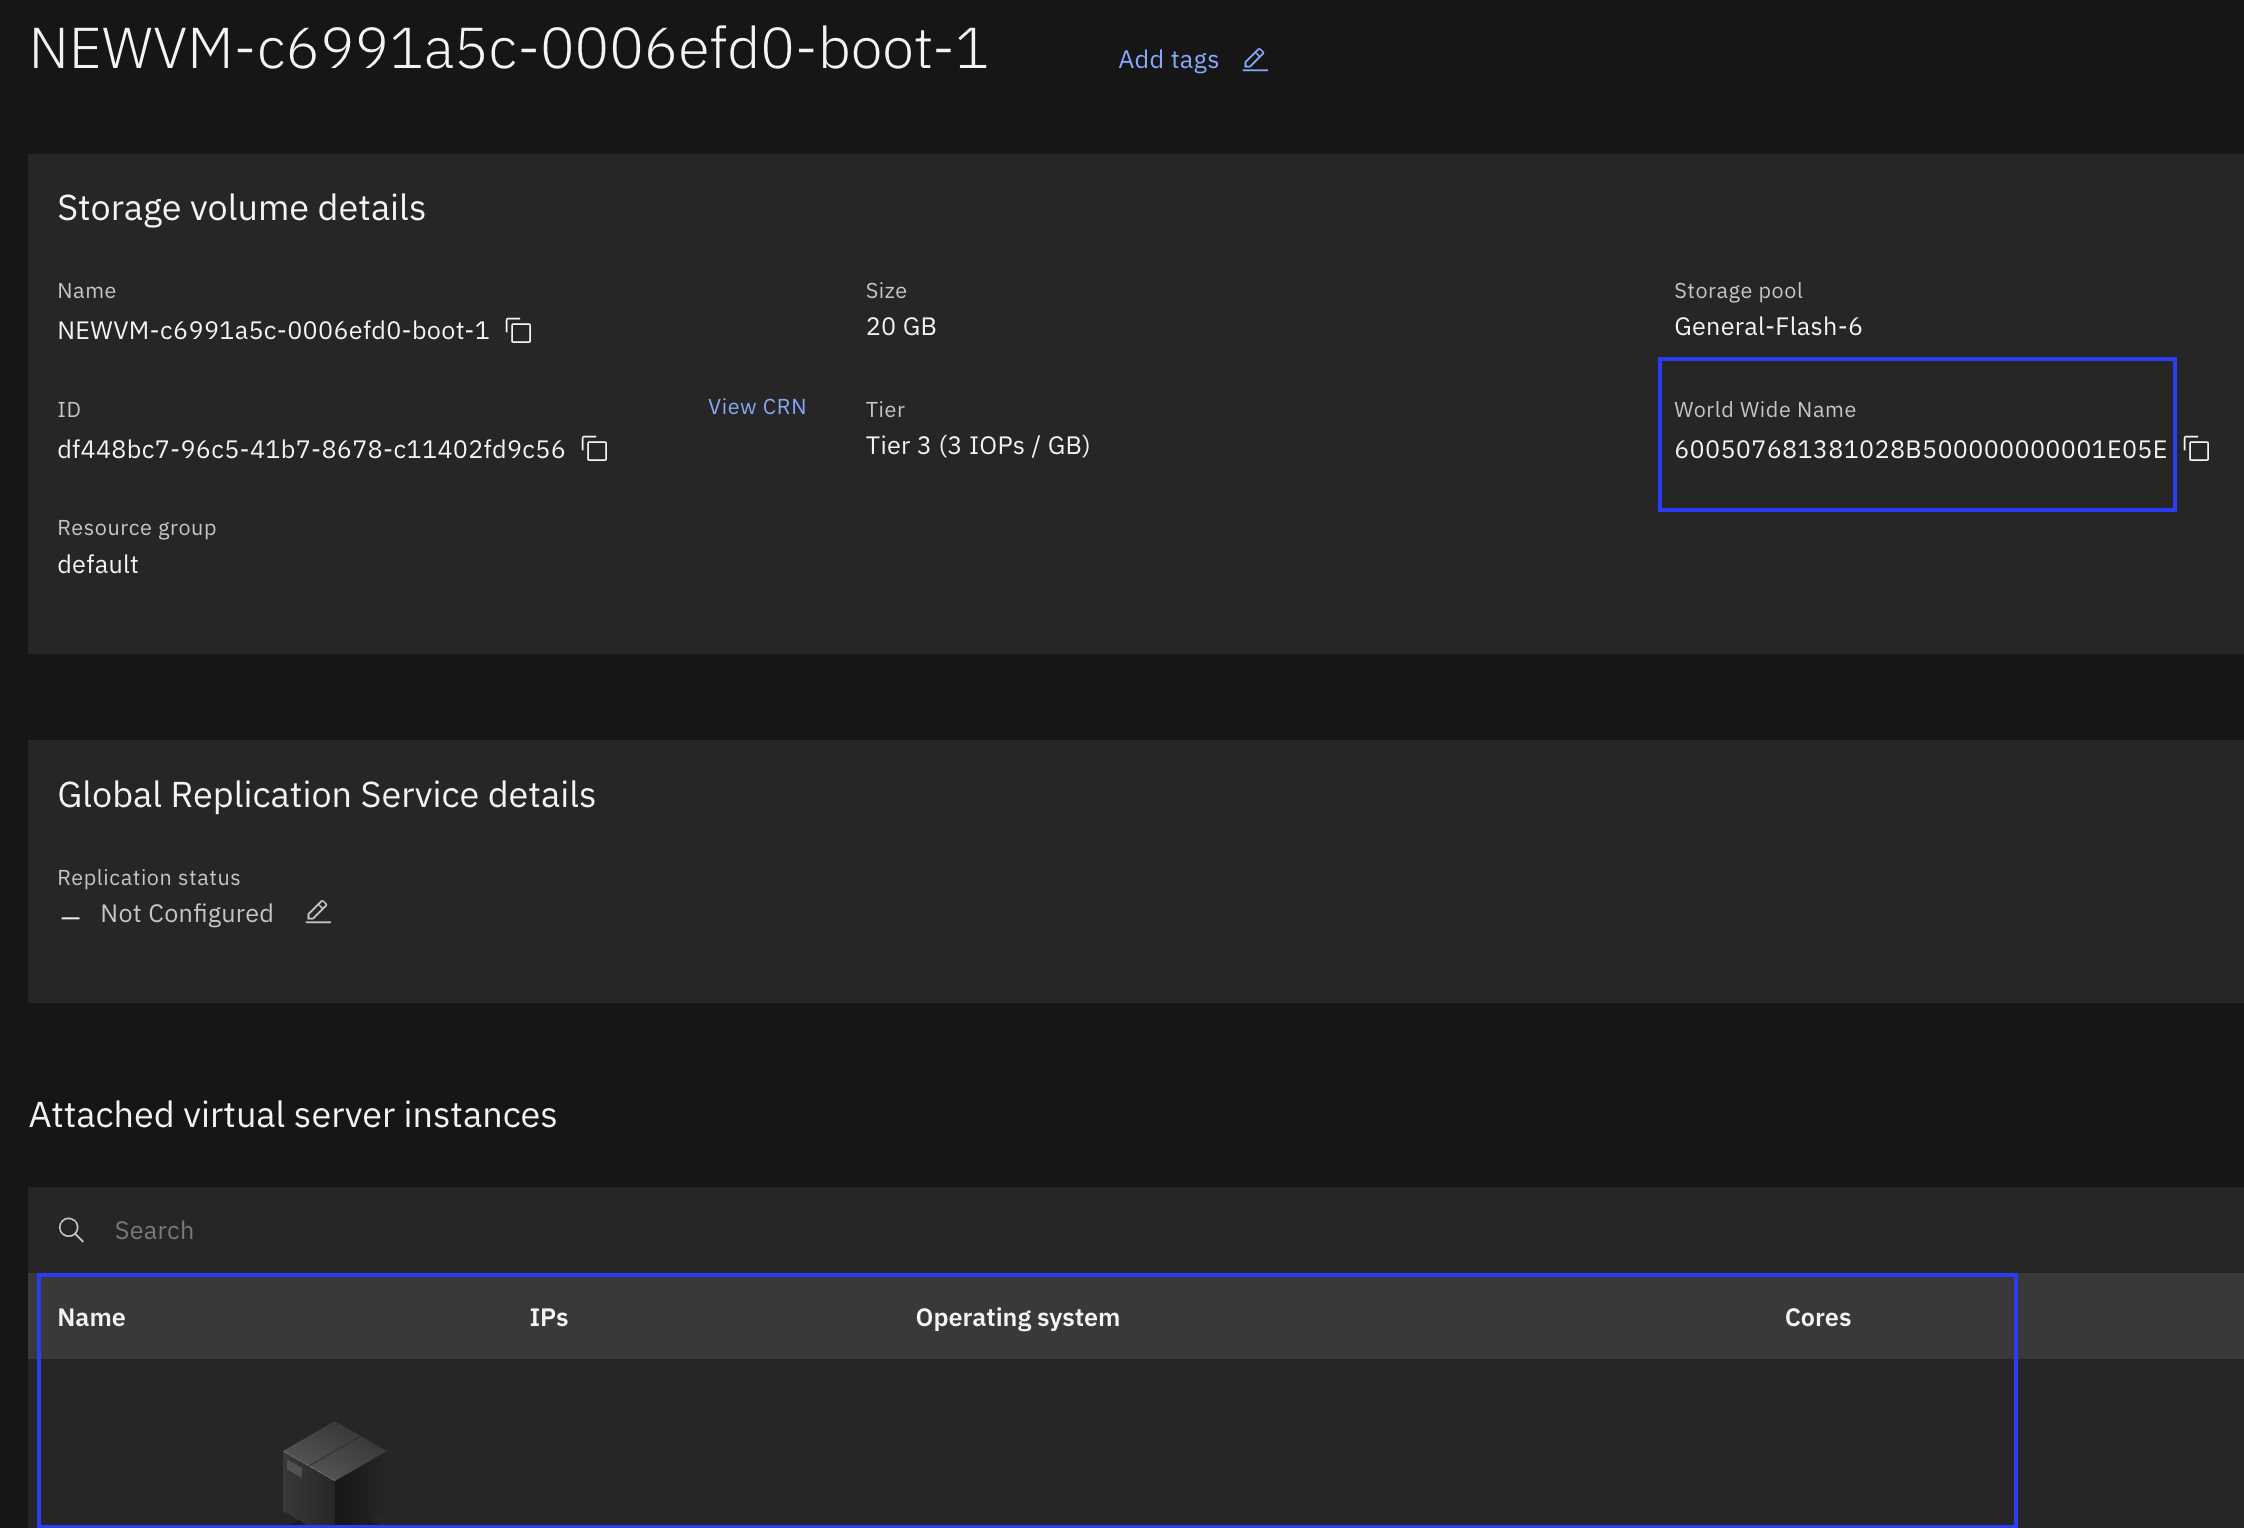
Note that this volume is not attached to any VM. You can determine this by looking under the Attached virtual server instances table (it’s empty).
In the top right corner of the Storage volume details panel is the delete button. Select it now to permanently delete the volume from the storage pool.
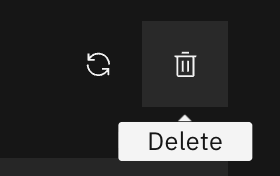
Note: If the volume was still in use by a VM the delete button would be greyed out.

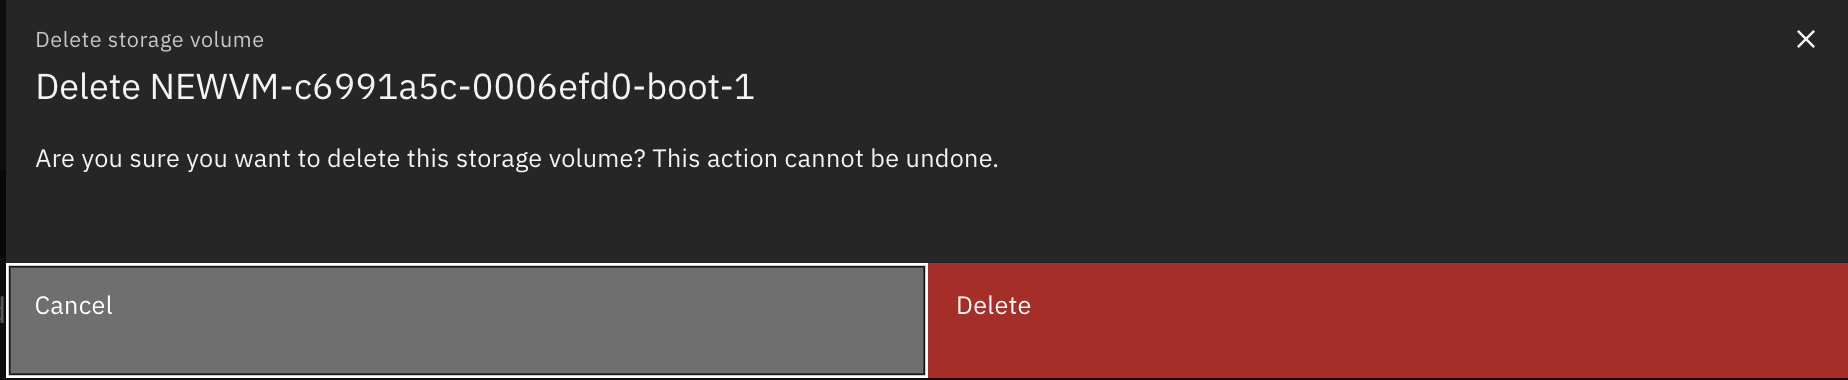
To confirm the deletion of the VM select Delete.
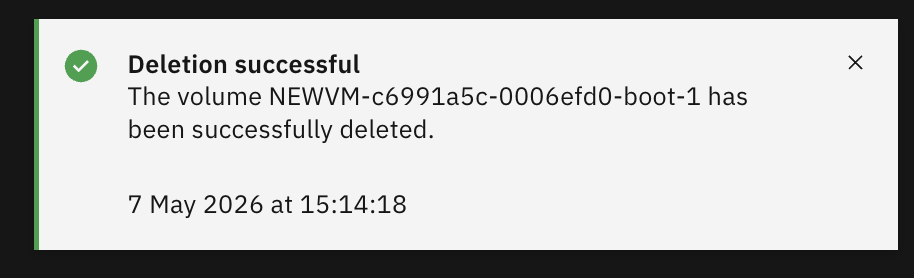
A pop-up message will appear when the volume has been successfully deleted.
Fall back to previous AIX version
If a problem is found with the system after the migration, and post the reboot to AIX 7.3, you can simply fall back to the previous version of AIX by rebooting from the old rootvg disk. Note: This assumes that you have not prematurely detached and deleted the old rootvg storage volume from the VM.
Set the bootlist to hdisk0, old_rootvg.
root@cg61 / # lspv
hdisk0 00f94f559ec54b56 old_rootvg
hdisk1 00c937e0f676dc43 rootvg active
bootlist -m normal hdisk0
bootlist -m normal -o
Reboot the VM now.
shutdown -Fr
When the VM has rebooted, log in as root and display the AIX version; it should be the previous version of AIX now, which in this example is 6.1.
oslevel -s
root@cg61 / # oslevel -s
6100-09-12-1837
Display the disks on the system again.
lspv
root@cg61 / # lspv
hdisk0 00f94f559ec54b56 rootvg active
hdisk1 00c937e0f676dc43 altinst_rootvg
- hdisk0 is the current rootvg, running AIX 6.1. The pre-migration state.
- hdisk1 is the alternate rootvg, running AIX 7.3. This VG could be removed (with alt_rootvg_op -X altinst_rootvg) and the disk reused for another migration attempt if required.
The AIX migration fall back procedure is complete.
Section 2: Migrating a PowerVS AIX instance to new Power server hardware
In the previous section we demonstrated how to migrate a PowerVS AIX VM from an unsupported AIX version to a version that is supported with PowerVS. We also discussed some of the reasons why you might need to upgrade AIX, such as being able to receive operating system support. Another reason why customers may choose to upgrade AIX version is if they need to run their workload on newer generations of IBM Power server processors.
For example, a customer is running AIX 6.1 on POWER9, however they need to run this same workload on a Power10 (or Power11) server in PowerVS. AIX 6.1 is not supported on Power10 (it will not boot).
This document will cover details for migrating workloads to newer Power server hardware.
The first step the customer must perform is to migrate their existing PowerVS AIX VM to a supported AIX version, such as AIX 7.3. This was discussed in detail in the previous section of this document.
Once the VM has been migrated to a supported AIX version the customer can use the PowerVS VM capture feature to create an image of their PowerVS instance. With the image captured the customer can deploy a new VM using the image on a newer generation of Power server hardware.
In the example discussed in the first section of this document the customer has a VM running on a POWER9 server in PowerVS. They upgraded the VM from AIX 6.1 to AIX 7.3. They are now running an AIX version that is supported with newer Power processors. They can now capture an image of the server and then deploy it to a Power10 (or Power11) server in PowerVS.
Once the new VM has been deployed successfully on the new server, they can power down (and delete) the old VM and start their workload on the new VM. This essentially allows the customer to migrate their VM to a new Power server hardware type; in this example from POWER9 to Power10.
Planning
Before migrating a VM to a new generation of Power server hardware in PowerVS, review the System Software Maps site first. See, https://www.ibm.com/support/pages/system-software-maps. Use this site to confirm that the AIX operating system version and the target Power server hardware are compatible.
For example, if you currently have an existing PowerVS VM running on a POWER9 server, and you would like to migrate it to a Power10 server (an S1022), start by first checking the version and level of AIX installed. In our example, the installed AIX version is AIX 7.3 TL4. Referring to the System software maps for AIX section, it confirms that this version of AIX is supported on the S1022 (Power10).
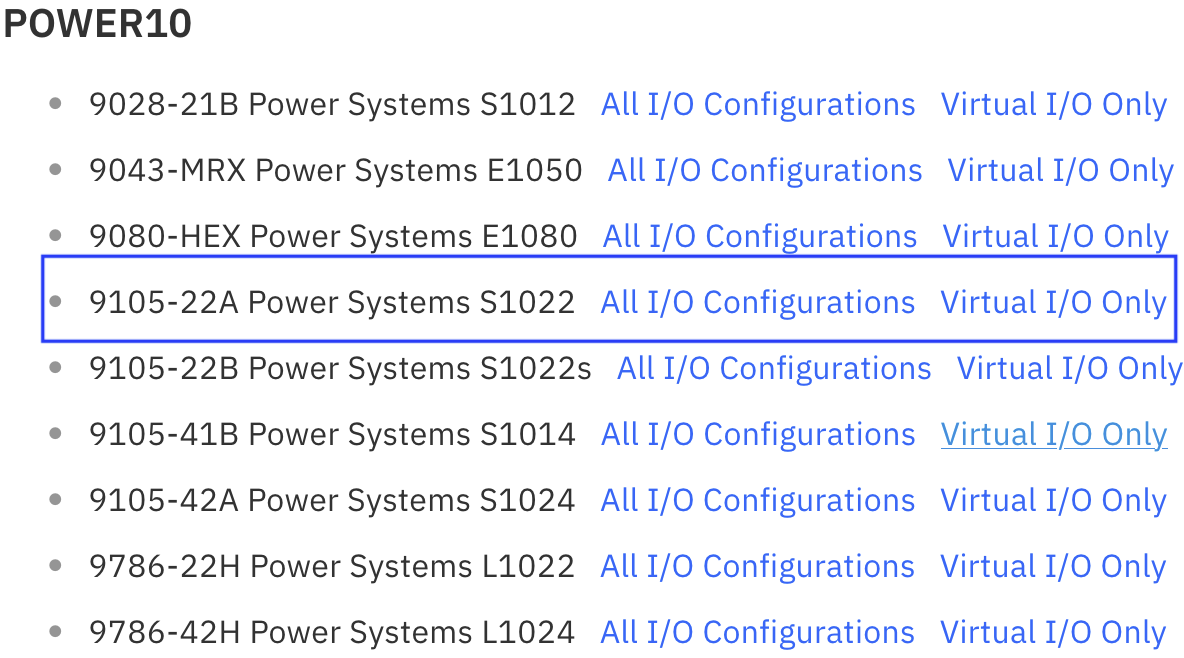
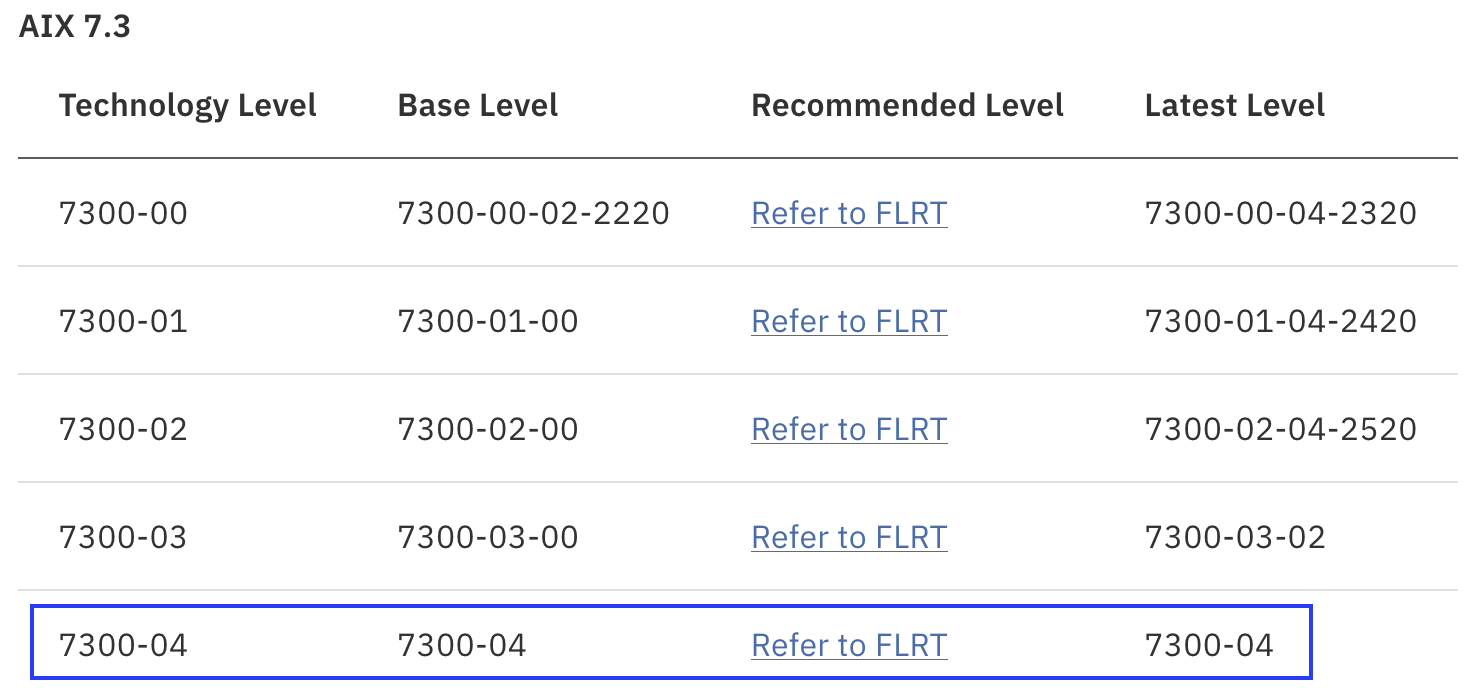
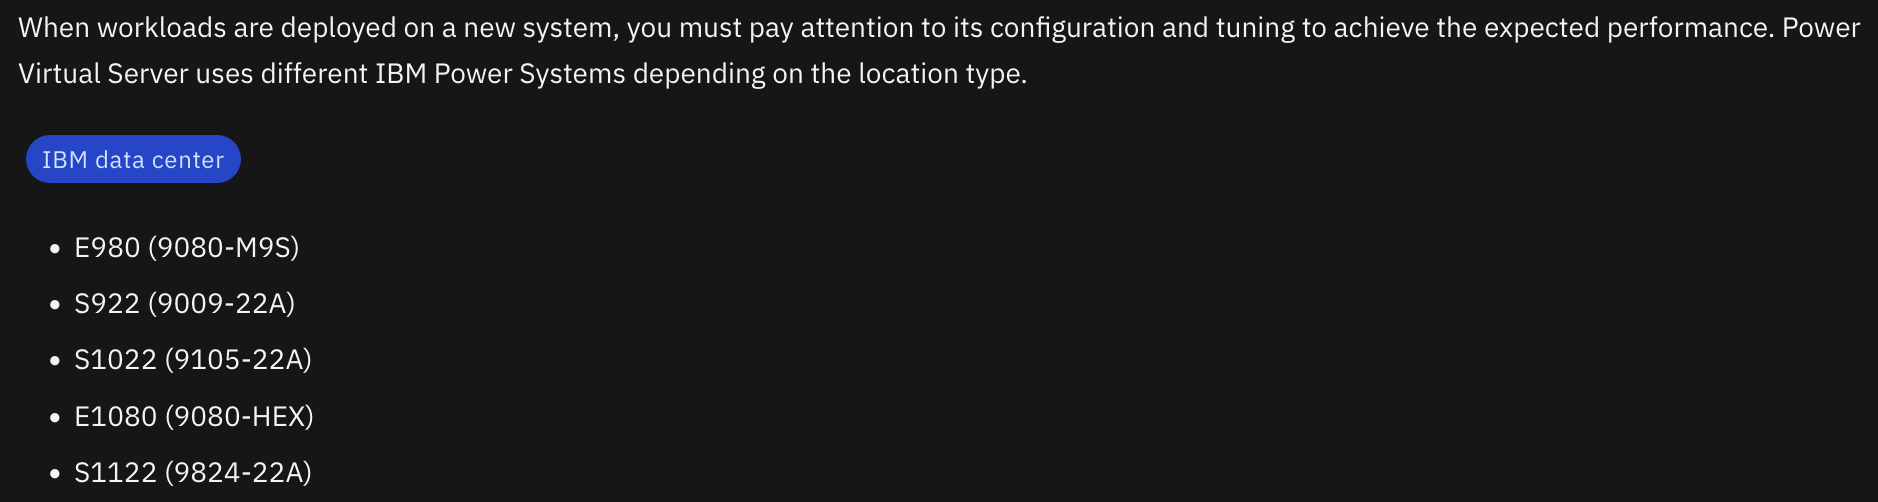
Also, when selecting which Power server type to migrate to, refer to the PowerVS Planning a workload migration page for details of available Power server types. See, https://cloud.ibm.com/docs/power-iaas?topic=power-iaas-system-migration. For example (the S1022, 9105-22A Power10 server is available in PowerVS):
The PowerVS Operating systems supported in IBM Power Virtual Server site also provides details on supported OS and Power hardware combinations. See, https://cloud.ibm.com/docs/power-iaas?topic=power-iaas-operating-systems-powervs#os-matrix-public-private. For example:
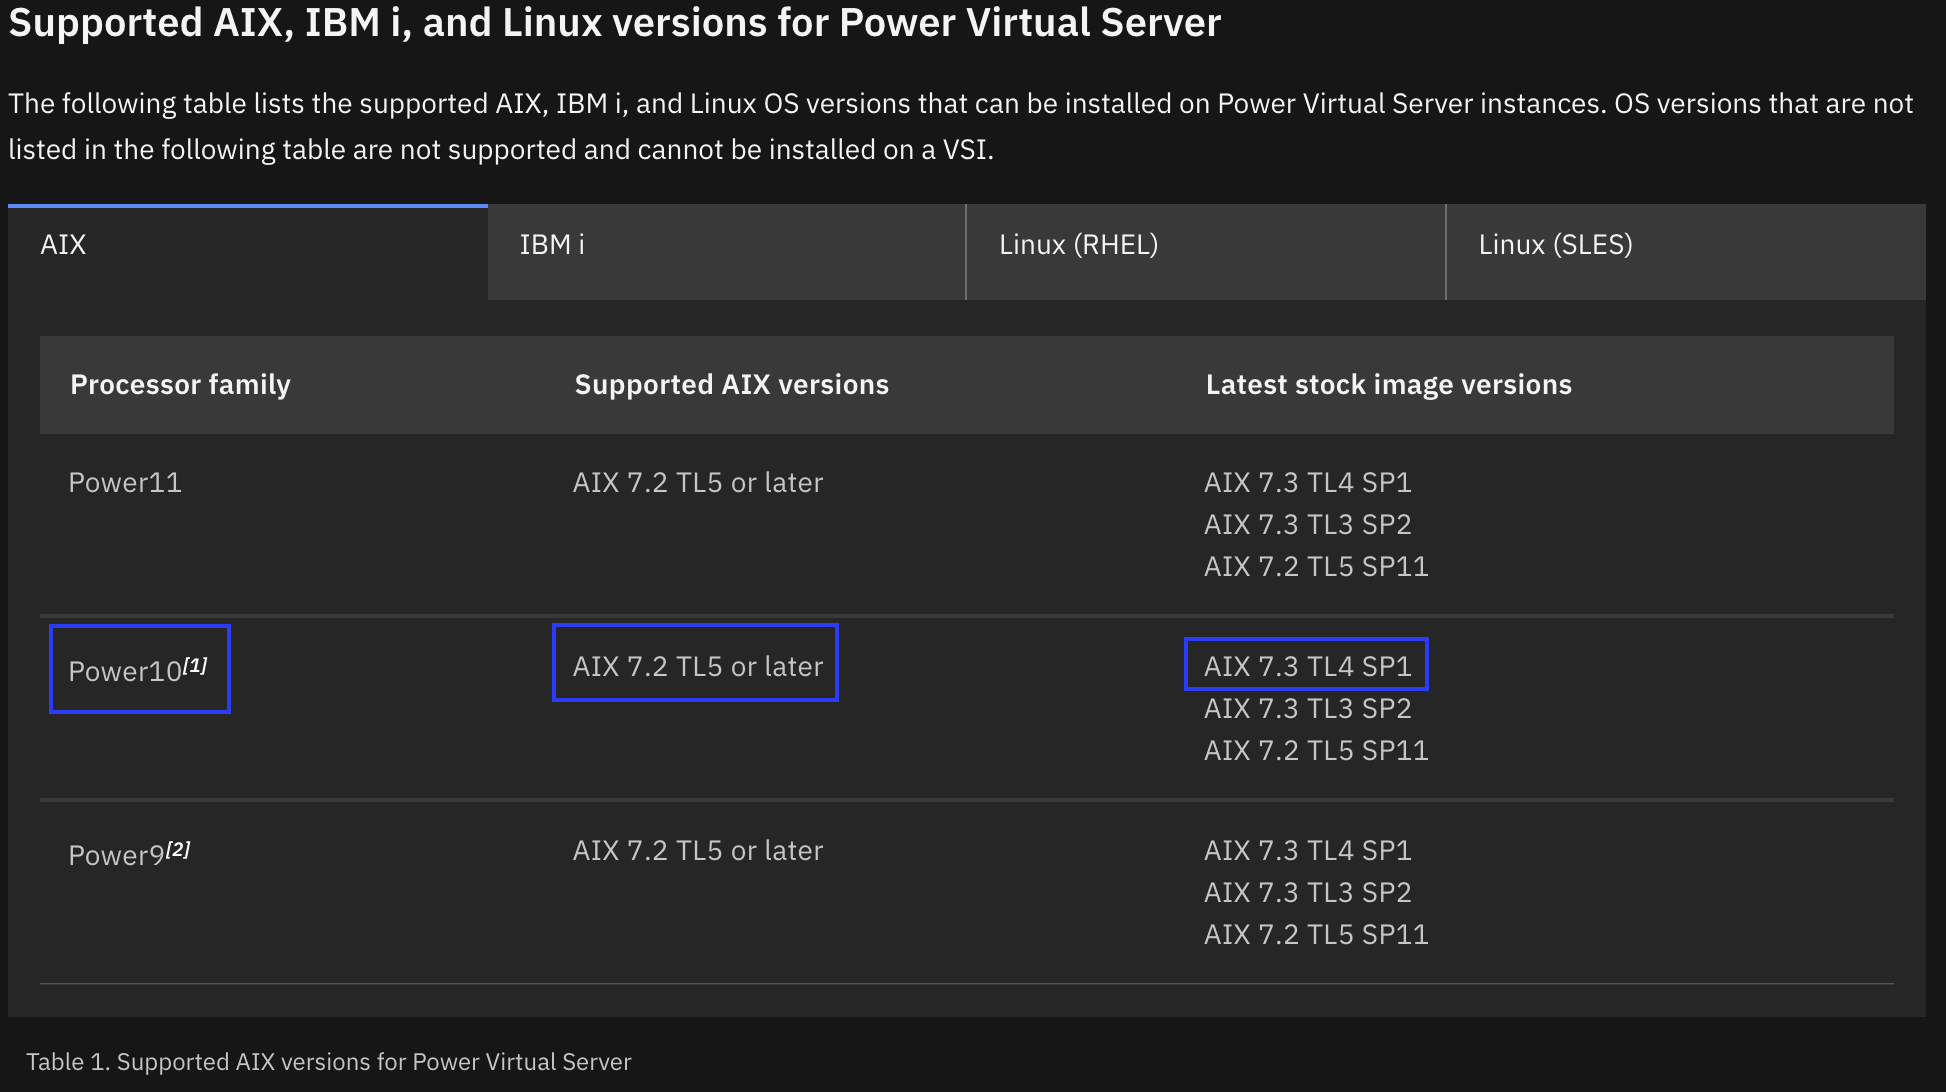
The table confirms that our current AIX version is compatible with our desired Power server hardware type, Power10.
Note: The table has tabs for AIX, IBM i, RHEL and SLES. There’s a small error in the table, AIX 7.3 TL4 SP1 should be SP0, as at the time of writing, SP1 had not been released.
Capture the VM
In this scenario the AIX VM has already been upgraded to AIX 7.3. The old rootvg disk containing the old version of AIX has been removed from the VM. The VM is currently running on a POWER9 server in PowerVS. The customer wants to move this VM to a Power10 server in PowerVS. The customer has chosen to perform a live capture of the VM and then use the captured image to deploy a new clone of the VM to a new Power server. For a more consistent image capture the VM should be powered off prior to capture. See https://cloud.ibm.com/docs/power-iaas?topic=power-iaas-capturing-exporting-vm.
root@cg61 / # oslevel -s ; lsconf | head -8
7300-04-00-2546
System Model: IBM,9009-22A
Machine Serial Number: 78937E0
Processor Type: PowerPC_POWER9
Processor Implementation Mode: POWER 9
Processor Version: PV_9_Compat
Number Of Processors: 1
Processor Clock Speed: 2500 MHz
CPU Type: 64-bit
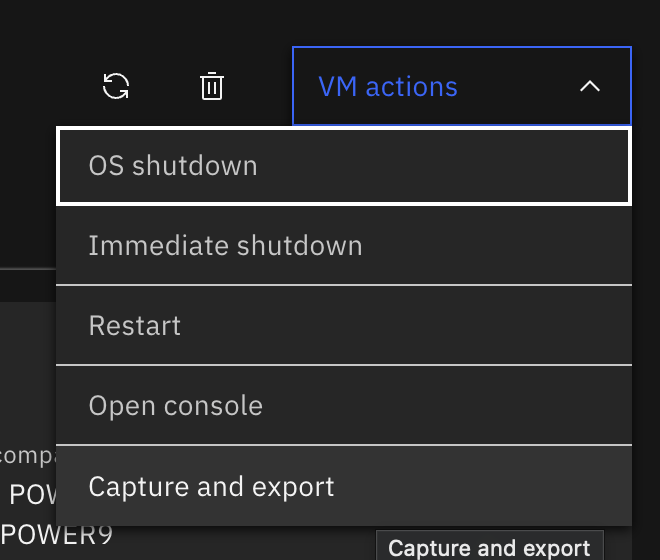
From the Virtual server instances panel select the VM. In this example the VM is named CG61. From the Virtual server instance details panel select VM actions. Then select Capture and export.
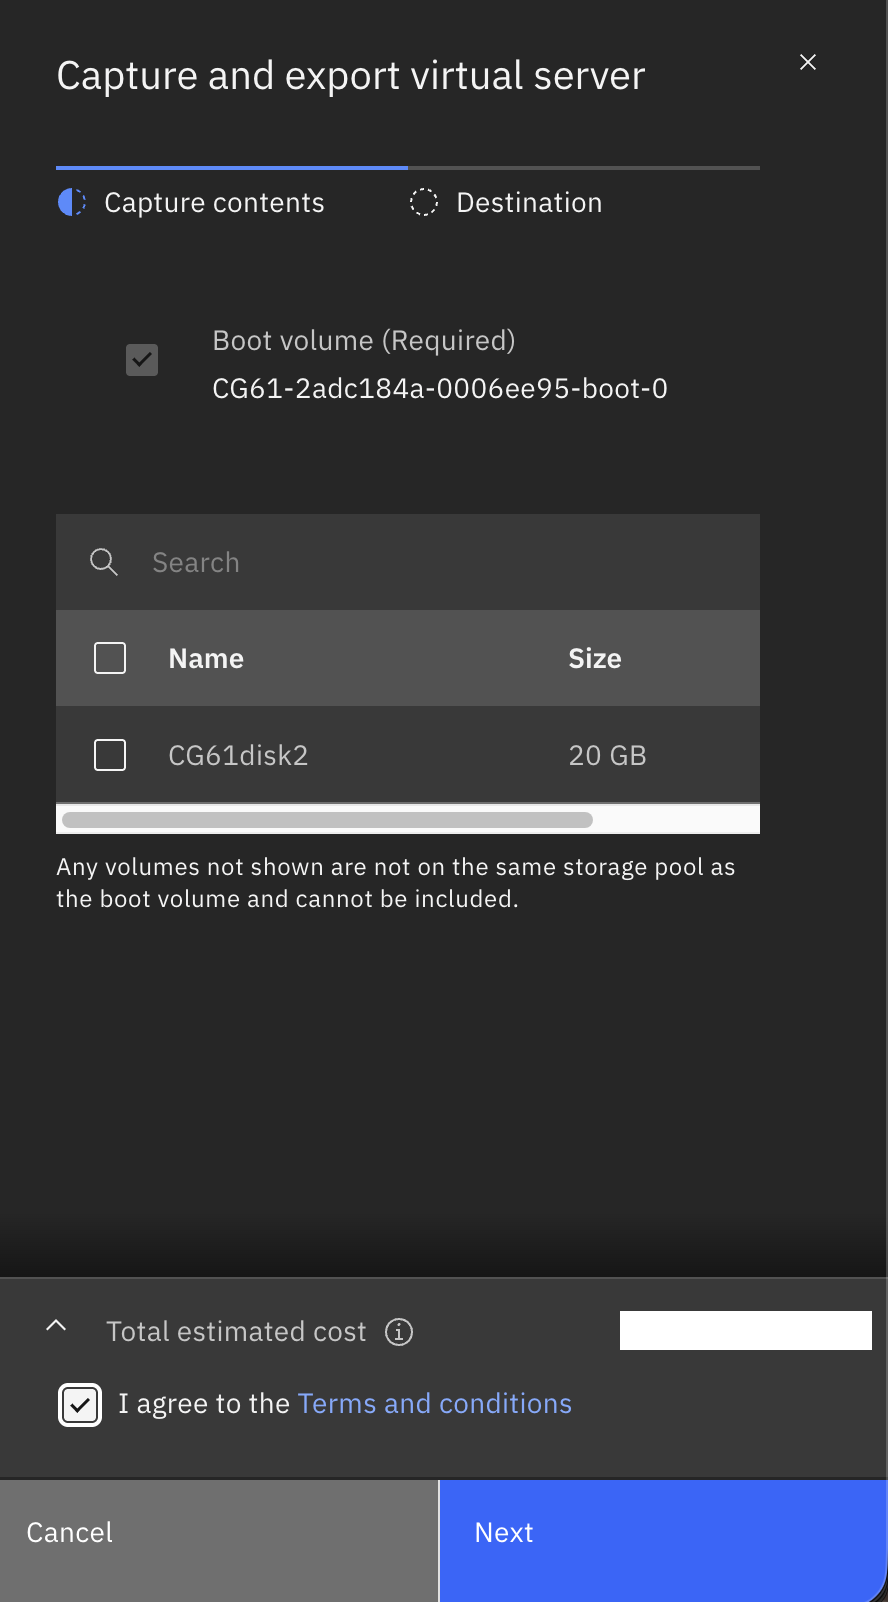
On the Capture and export virtual server panel the Boot volume is already selected. Select all disks that are required to capture the VM. Select the checkbox to agree to the terms and conditions. Then select Next.
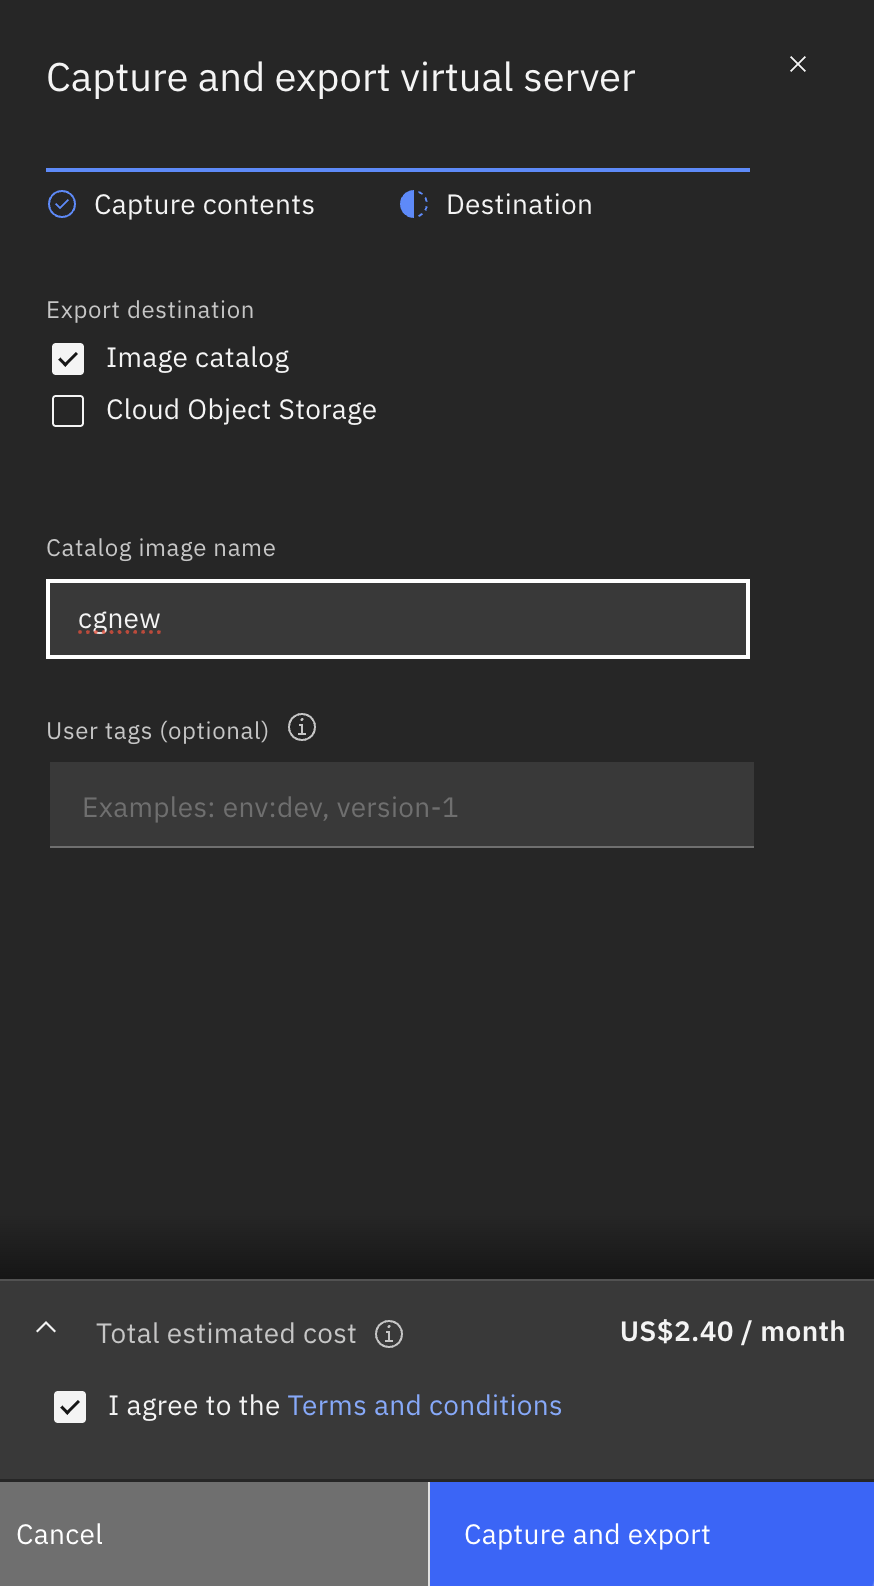
Ensure that the checkbox is selected for Image catalog. Under Catalog image name enter a name for the image capture. In this example the capture will be named cgnew. Then select Capture and export.
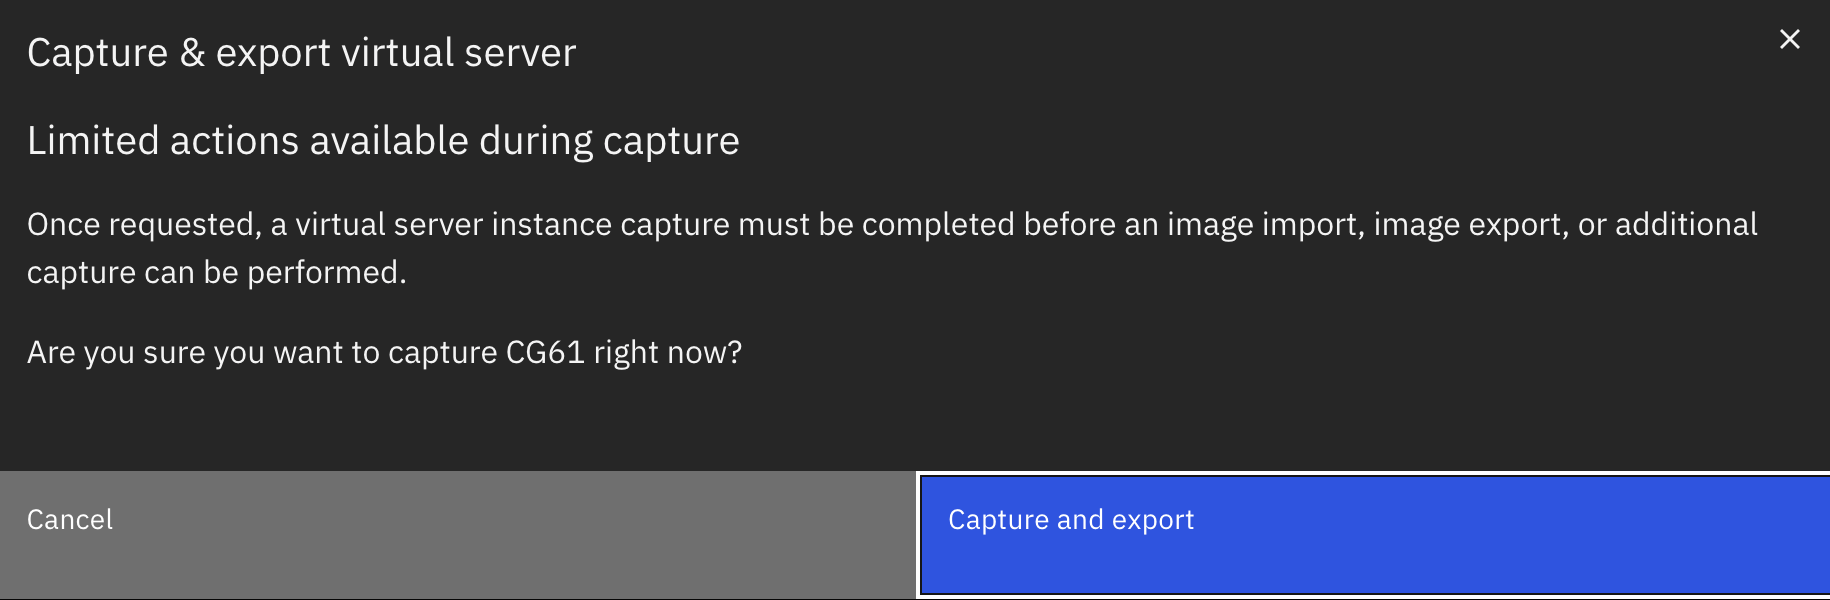
Review the limited actions notification, then select Capture and export.
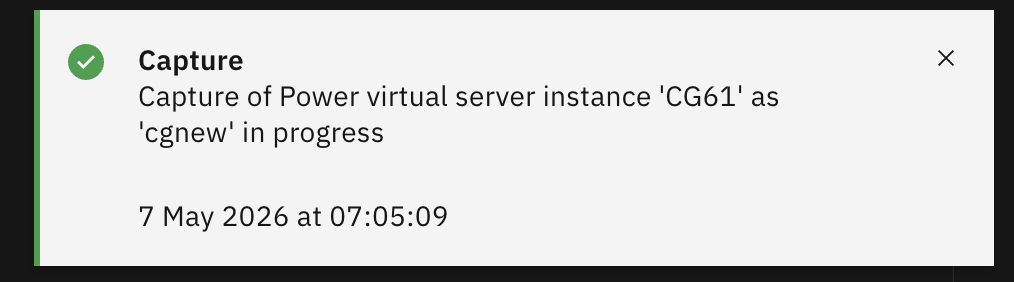
You may notice several pop-up messages indicating the capture of the VM has been initiated.
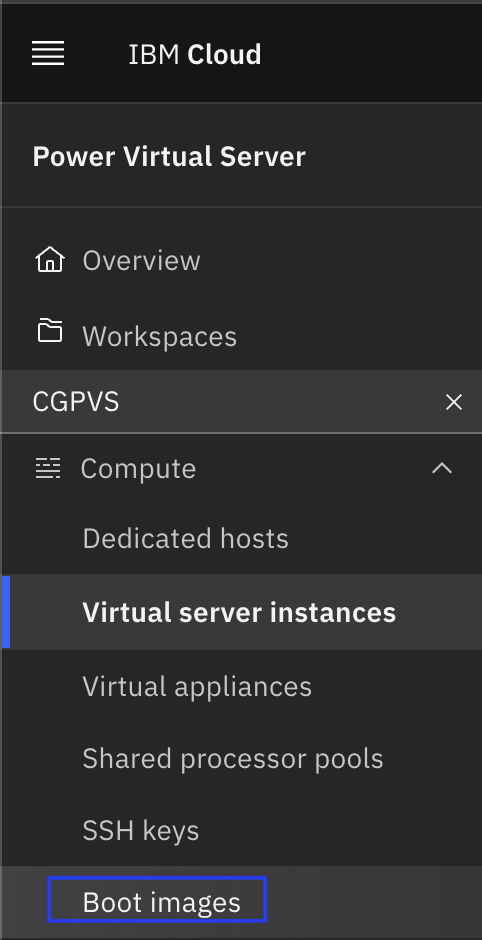
Select Boot images from the left-hand side Compute menu.
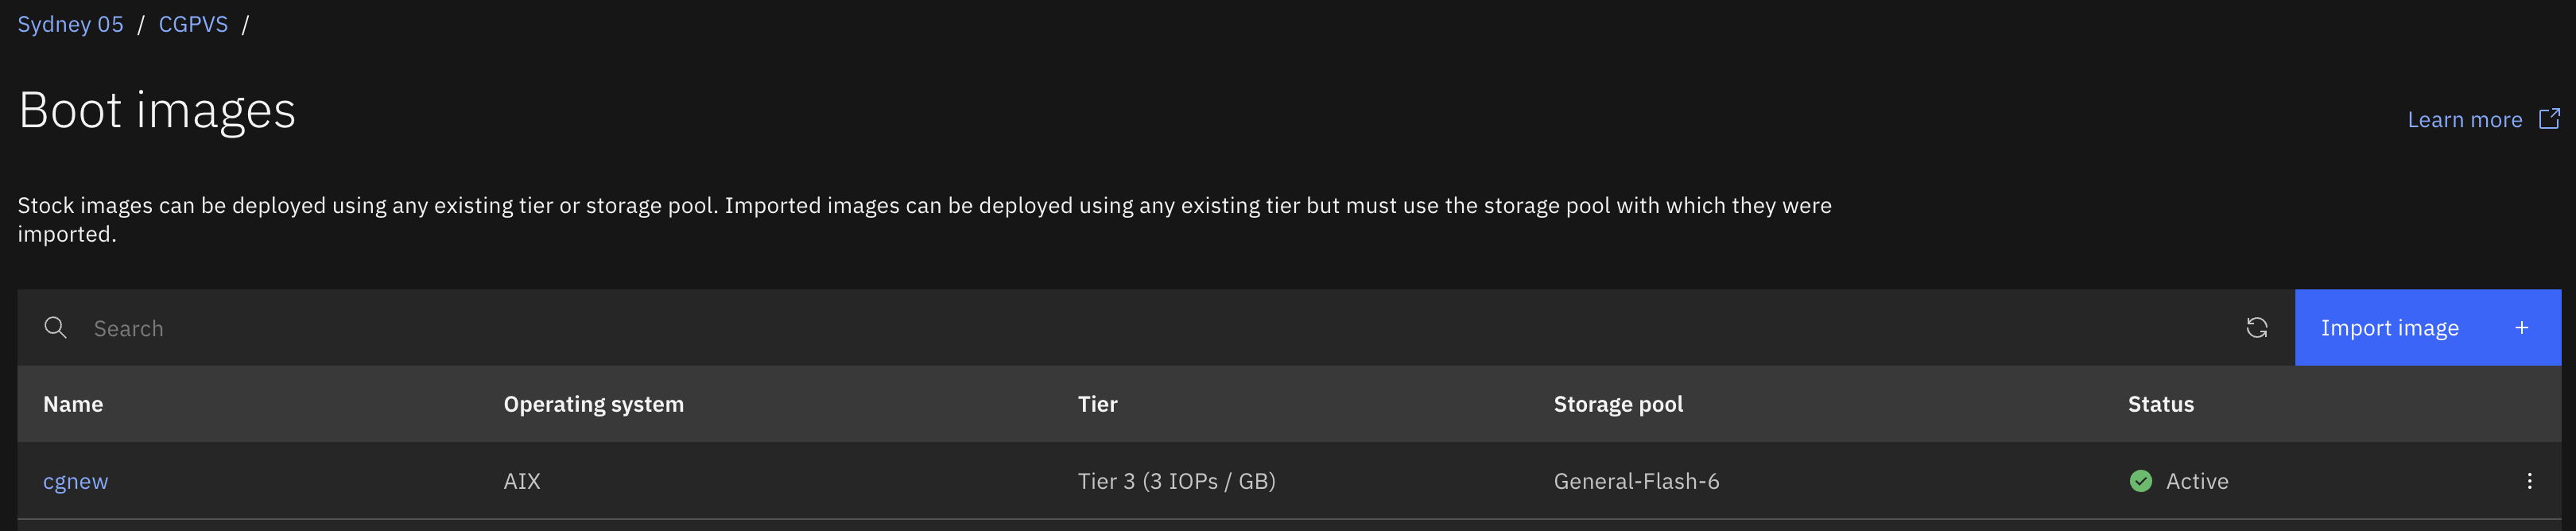
After several minutes the new image capture of the VM will appear in the list.
Deploy new VM using captured image
In this scenario a new VM will be deployed to a Power10 server using the image captured in the previous step.
From the Virtual server instances panel select Create instance.

In the Create virtual server instance panel enter a name for the new VM under Instance name. In this example the instance name is NEWVM. If you have a SSH key configured (recommended) be sure to select it under SSH key so you can log into the VM after deployment is complete. Then select Continue.
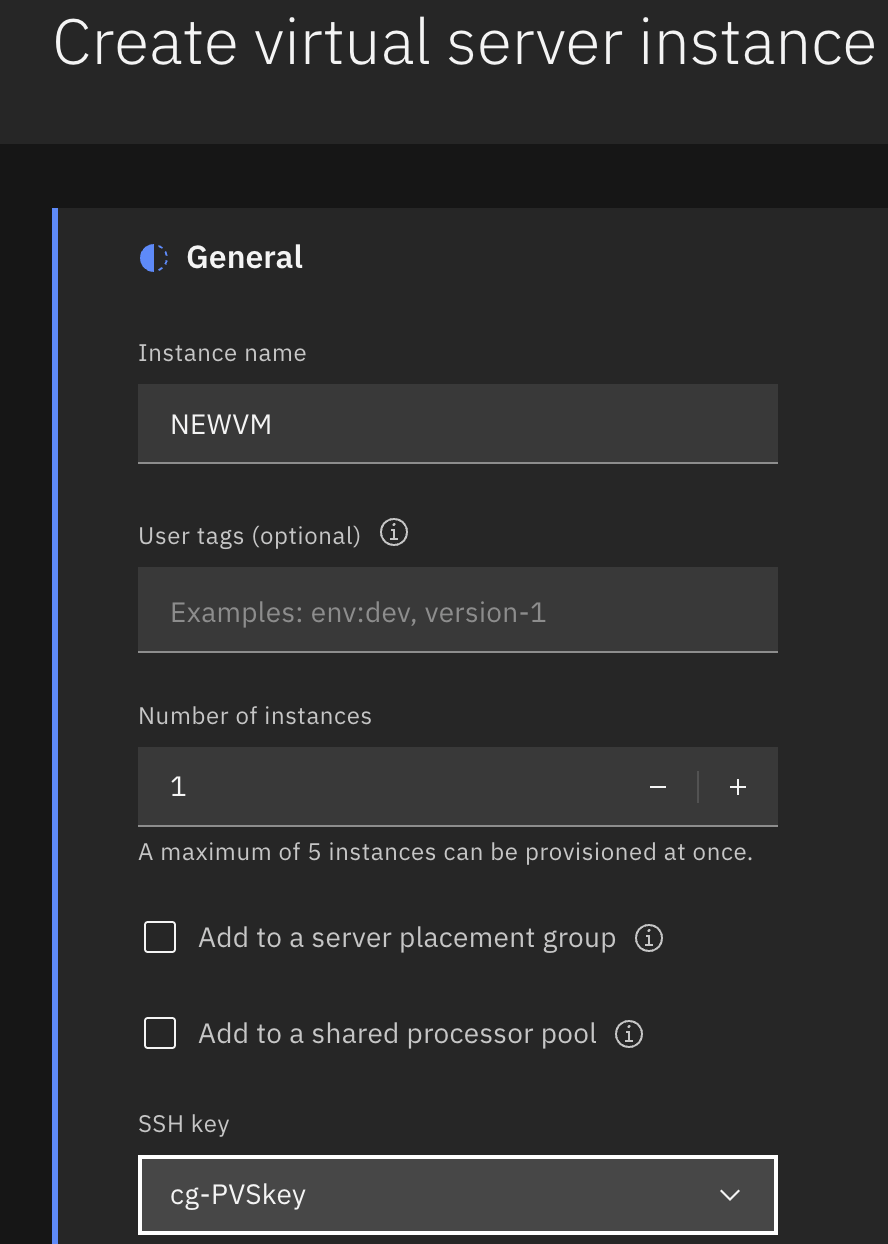
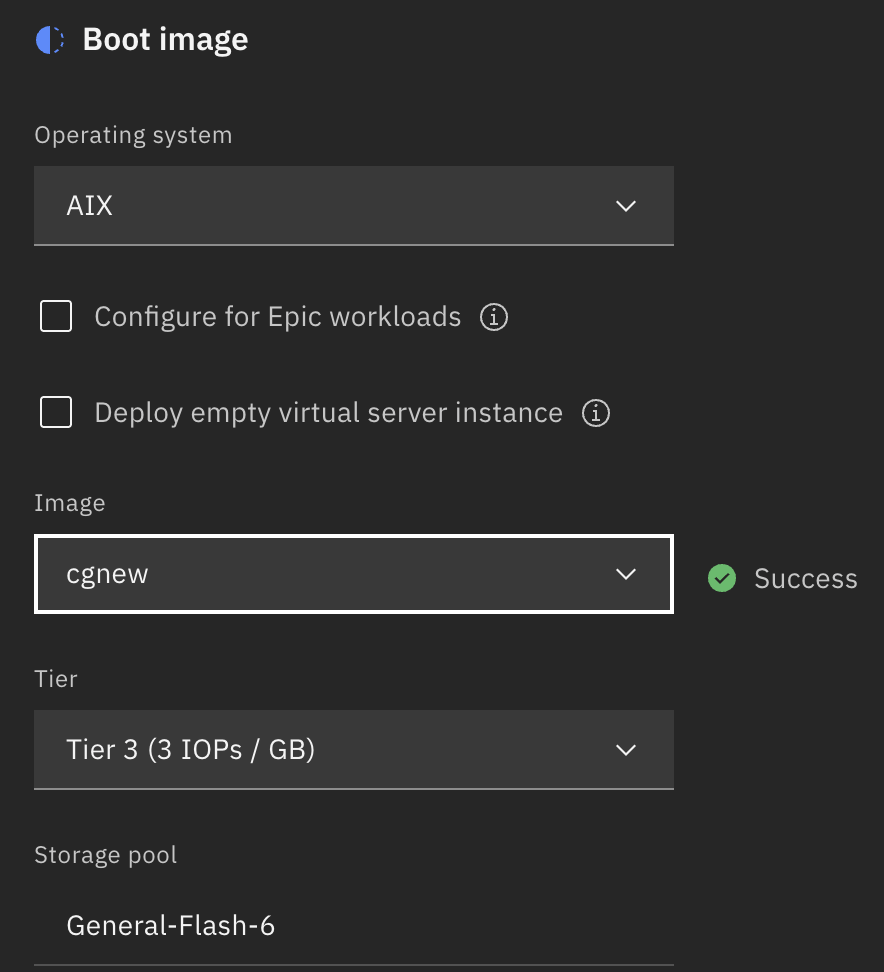
In the Boot image section under Operating system select AIX. Under Image select the name of image capture you created in the previous step. In this example it is cgnew. Then select Continue.
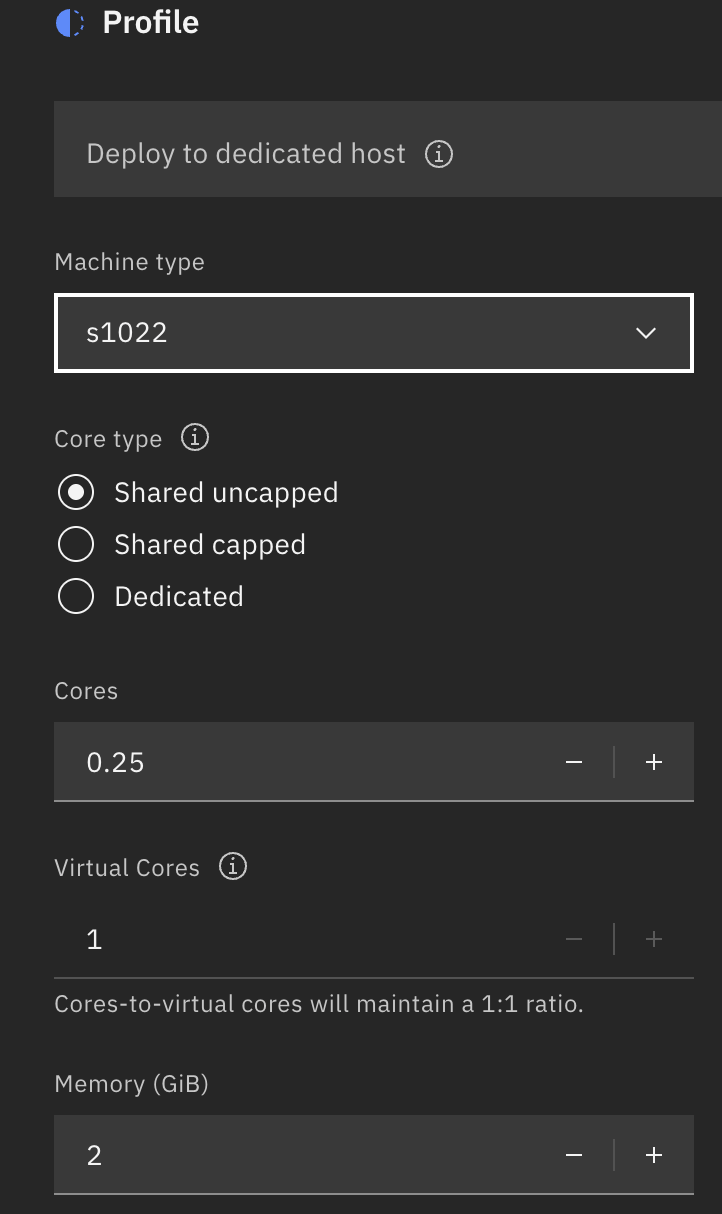
In the Profile section under Machine type select the desired hardware type. In this example we wish to migrate from POWER9 to Power10, so we selected s1022. Select your desired Core type. In this example we will continue with the default of Shared uncapped. Review the desired Cores, Virtual Cores and Memory (GiB), and make any adjustments you need. Then select Continue.
In the Storage volume section select Continue.
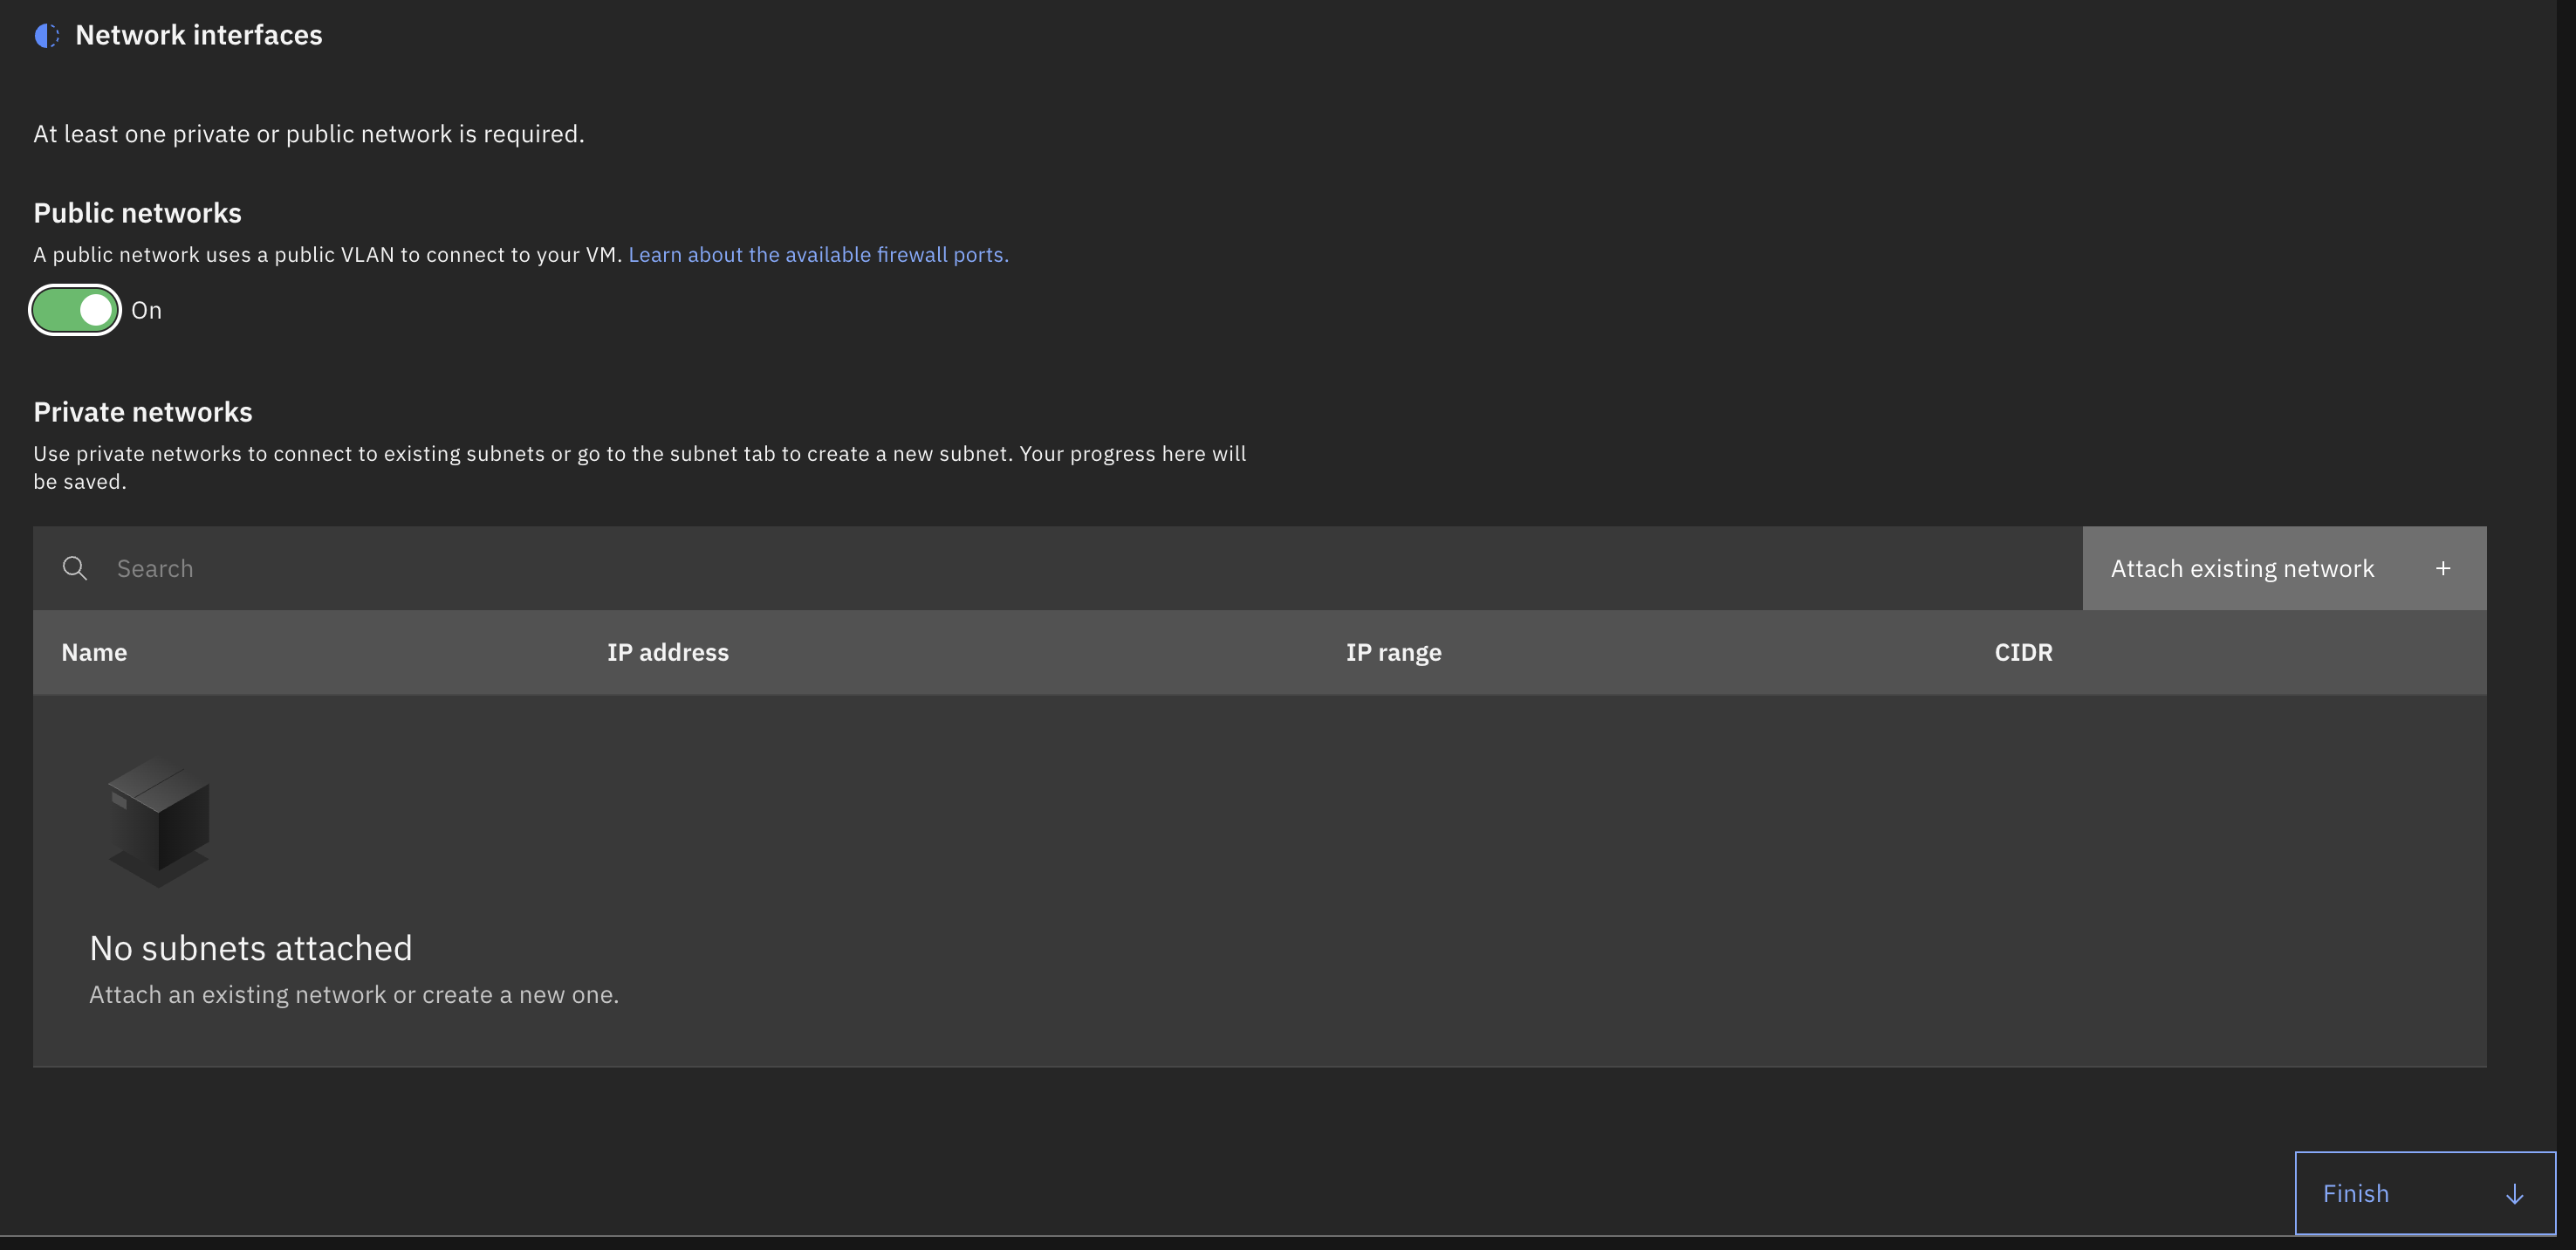
In the Network interfaces section choose to either turn on or off Public networks and/or attach any desired Private networks you may have configured. In this example we are turning on the public network for the VM. Then select Finish.
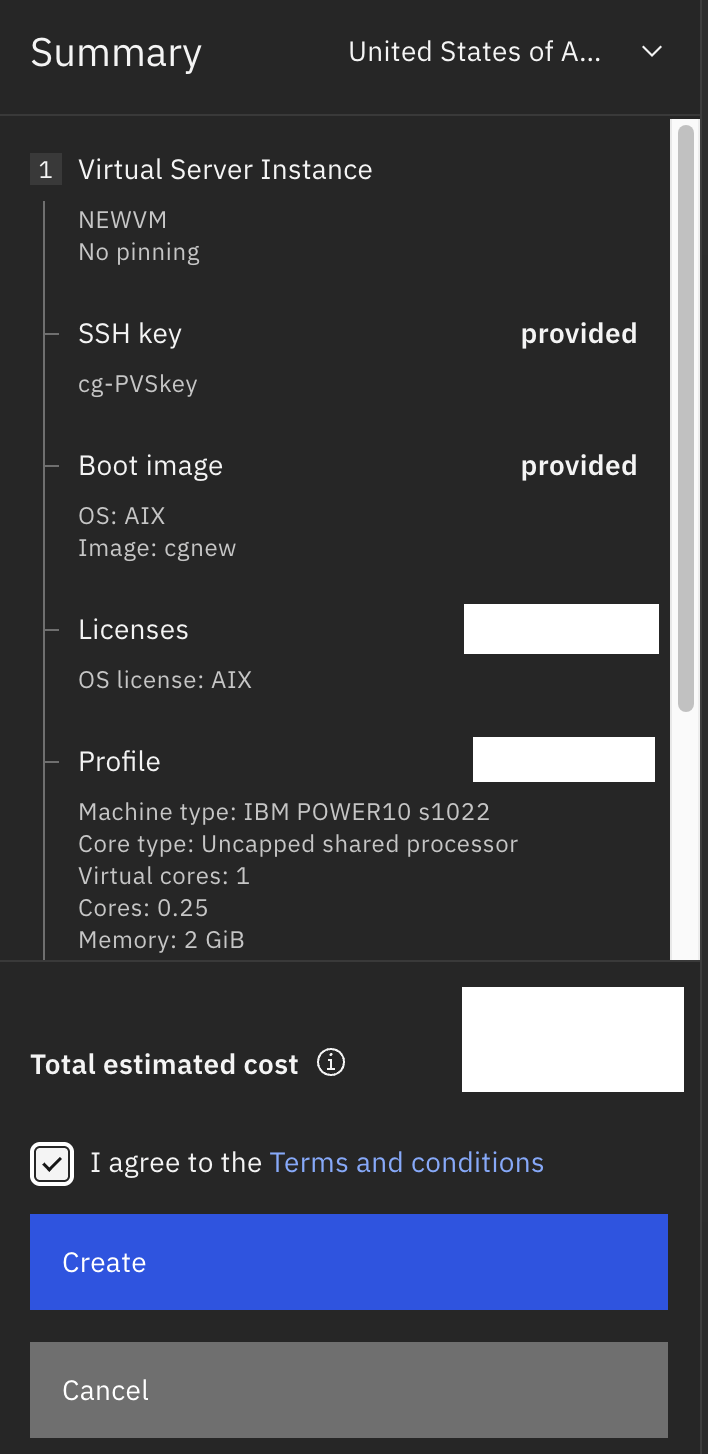
Review the Create virtual server instance configuration details.
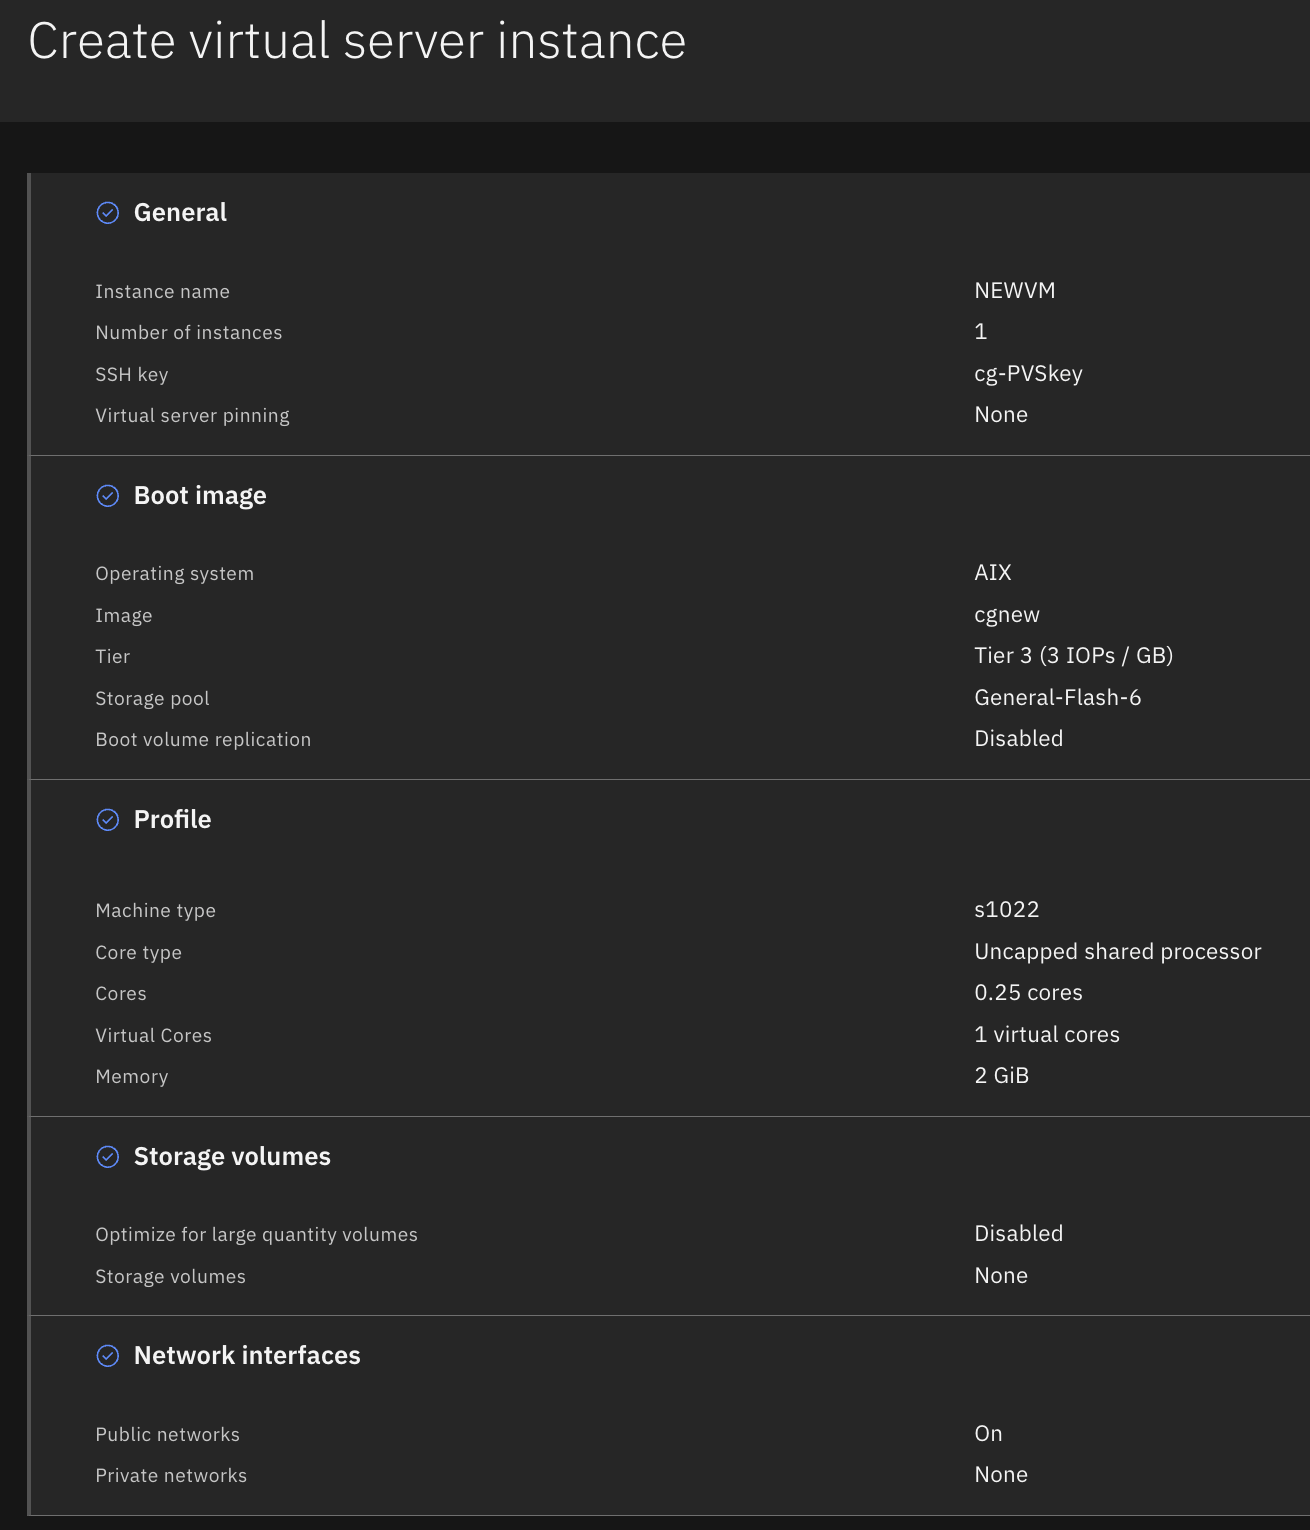
On the right-hand side of the panel, under Summary, select the checkbox to agree to the terms and conditions, then select Create to deploy the new VM.
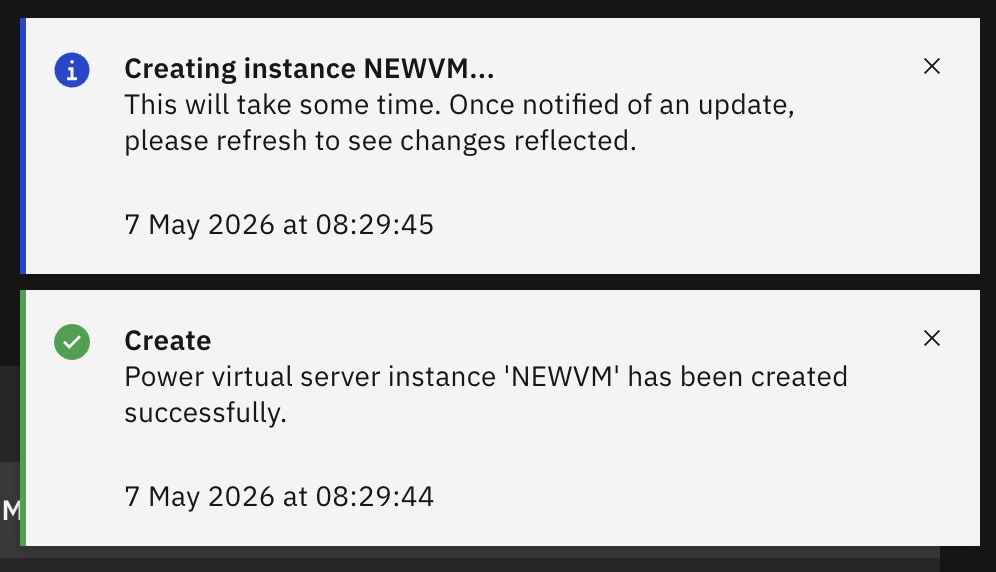
Return to the Virtual server instances panel. After several minutes the new VM will appear in the list. Wait for the instance status to change to Active.


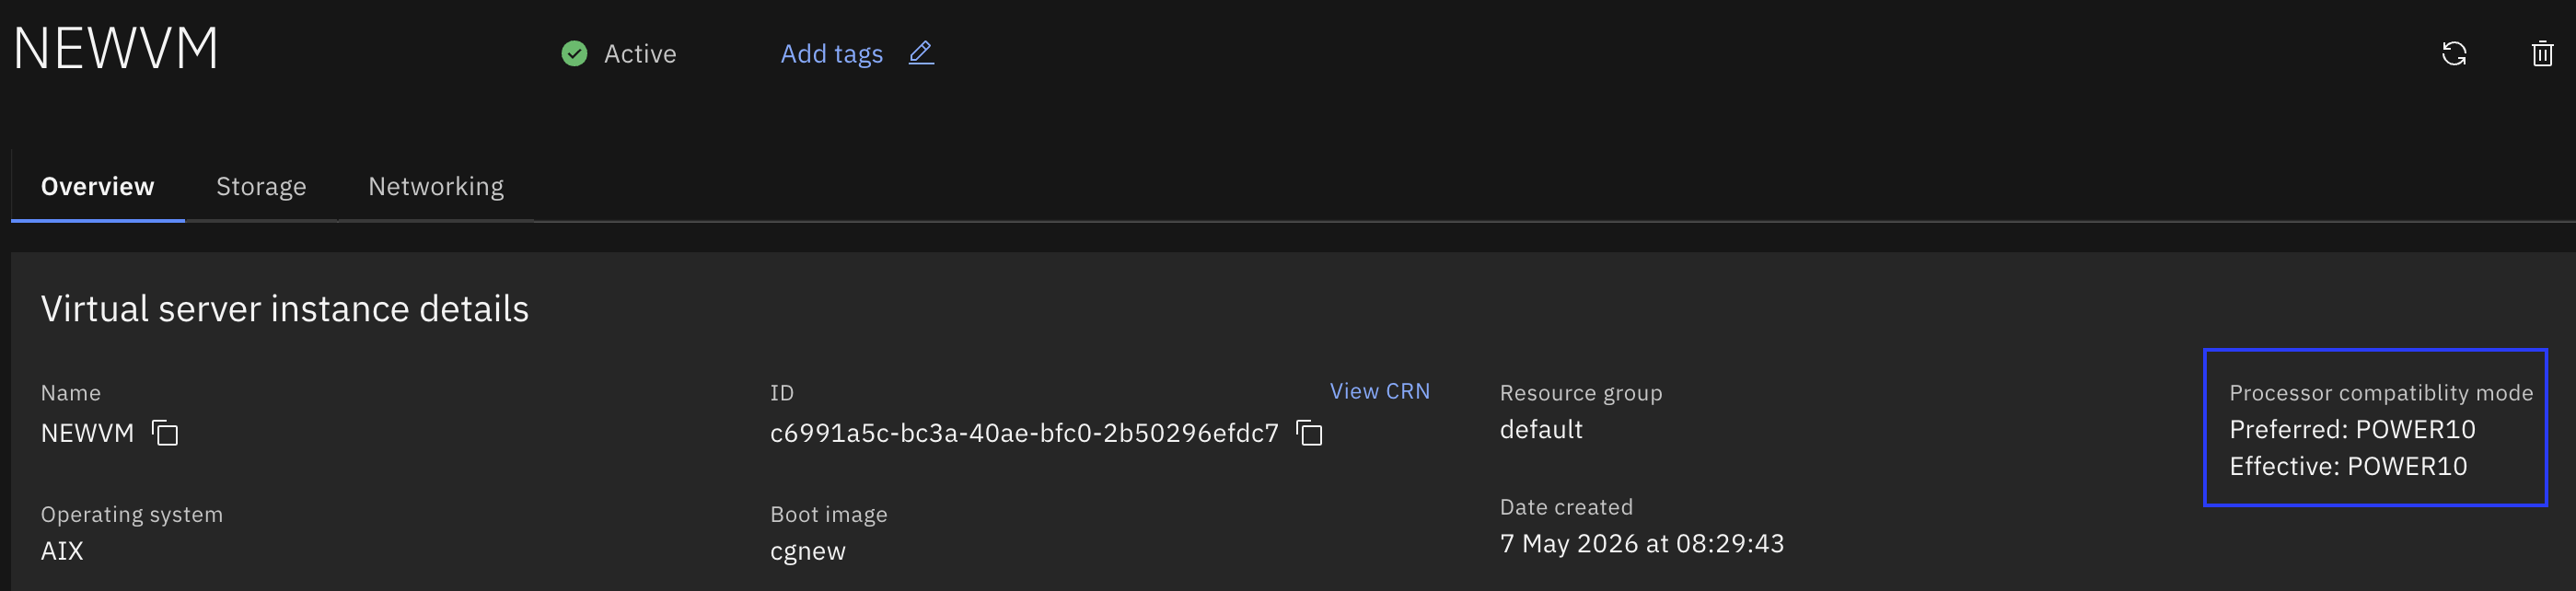
Select the VM and view the Processor compatibility mode, it is POWER10.
Log into the new VM with SSH and confirm (again) that the VM is now running on a Power10 S1022 server.
root@cgnew / # lsconf | head -8
System Model: IBM,9105-22A
Machine Serial Number: 78A7F31
Processor Type: PowerPC_POWER10
Processor Implementation Mode: POWER 10
Processor Version: PV_10_Compat
Number Of Processors: 1
Processor Clock Speed: 2450 MHz
CPU Type: 64-bit
In this example the customer was able to start their application on the new Power10 VM.
root@cgnew / # ./my_java_app.sh
Started My_java_app [PID 5701984, /var/my_java_app/my_java_app_sh.log]
root@cgnew / # ps -ef | grep java
root 5701984 1 2 08:51:07 pts/0 0:00 java -Xmx150m -Dmy_java_app.home=/var/my_java_app -Dmy_java_app.host=0.0.0.0 -Dmy_java_app.port=4040 -Dmy_java_app.httpsPort=0 -Dmy_java_app.contextPath=/ -Dmy_java_app.db= -Dmy_java_app.defaultMusicFolder=/var/music -Dmy_java_app.defaultPodcastFolder=/var/music/Podcast -Dmy_java_app.defaultPlaylistFolder=/var/playlists -Djava.awt.headless=true -verbose:gc -jar my_java_app-booter-jar-with-dependencies.jar
The customer can now delete the old VM (CG61) running on the POWER9 server.
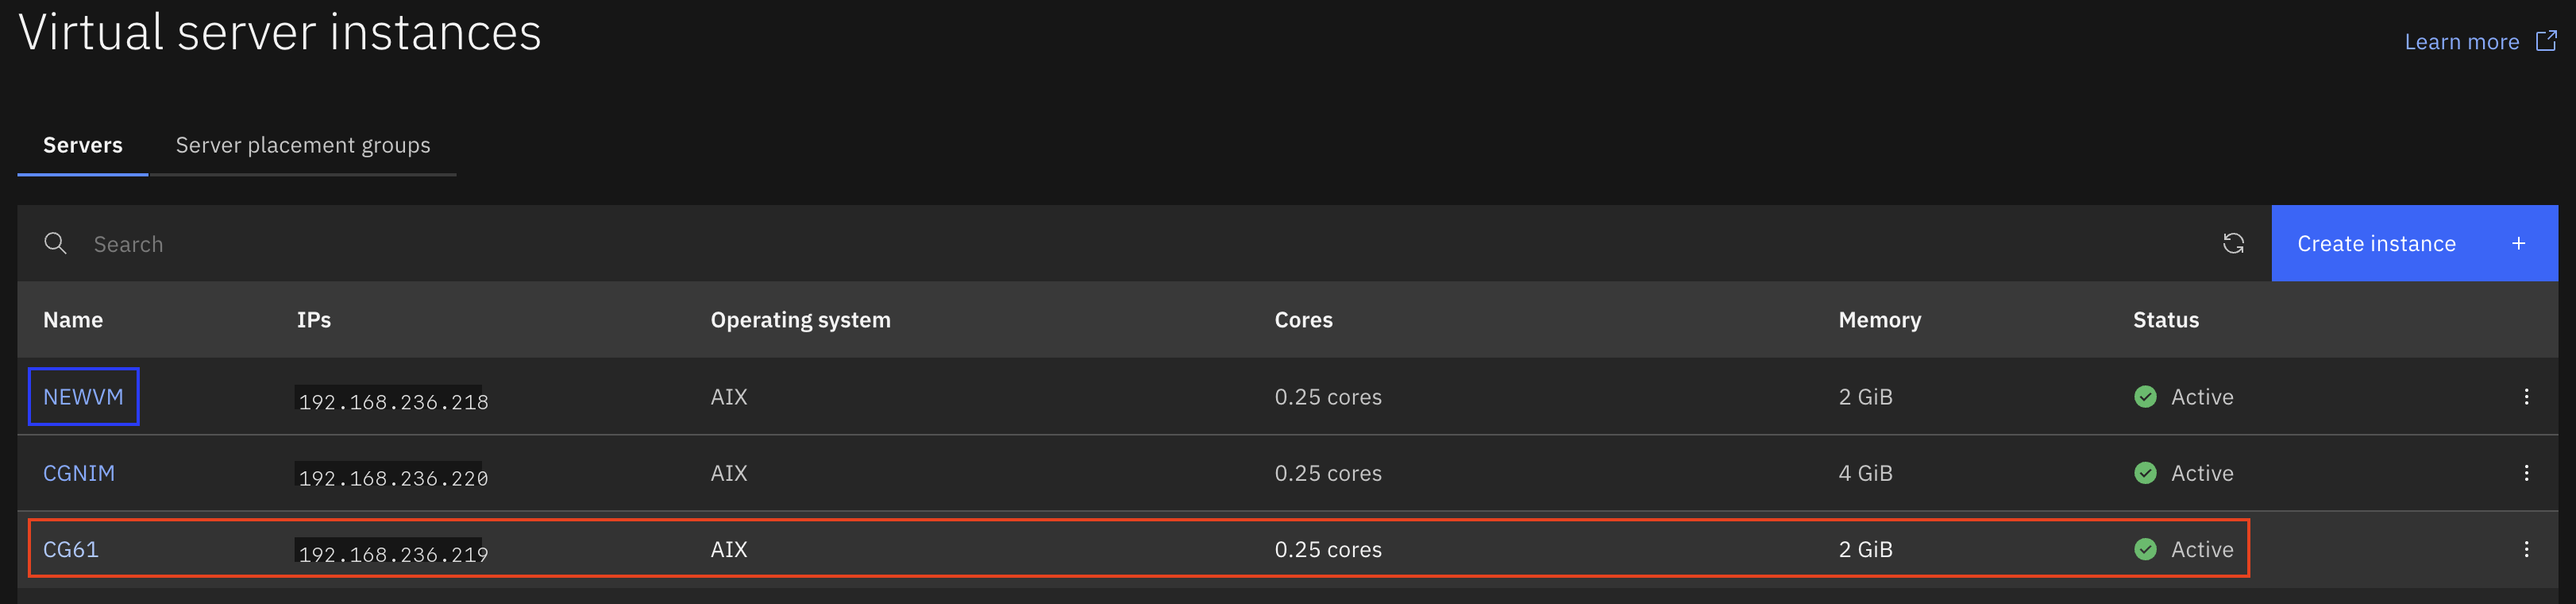
The migration of the customer workload to Power10 is complete.
Troubleshooting
Change boot volume in PowerVS
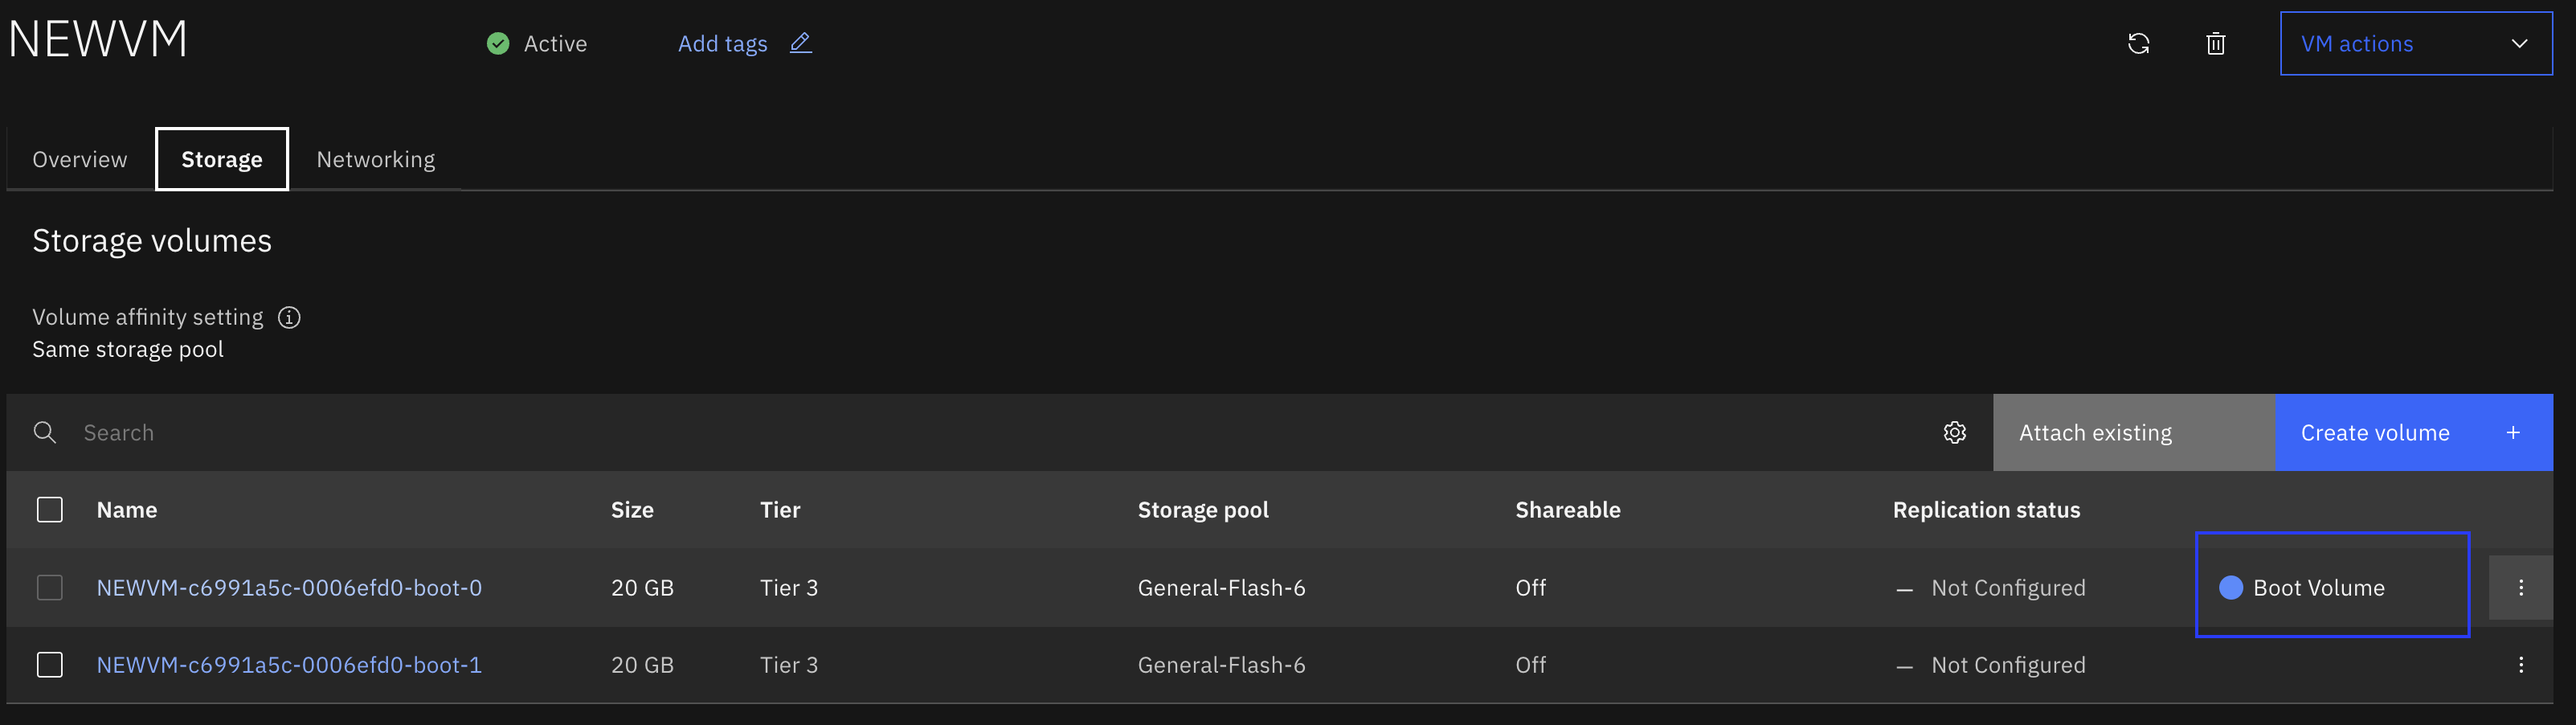
If the incorrect storage volume is marked as the Boot volume this can cause issues when booting VM.
In the example below the disk ending in boot-0 is marked as the boot volume by PowerVS.
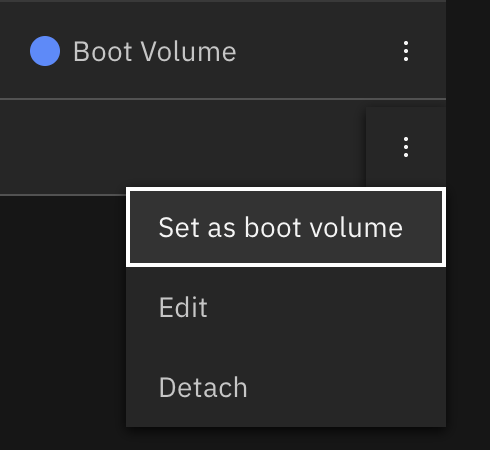
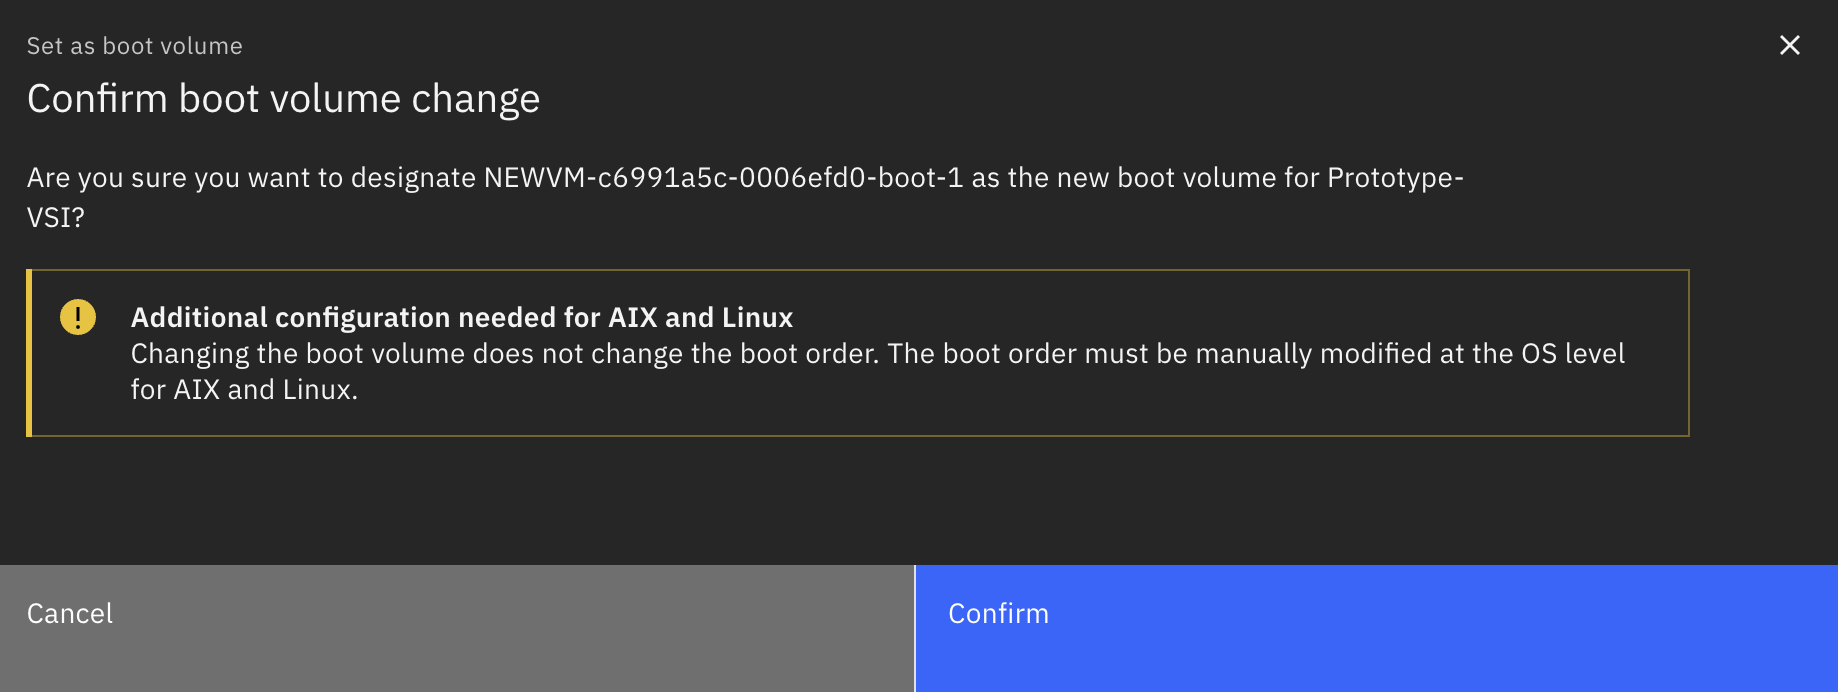
If this is incorrect you can set the correct disk by selecting the three dots next to the volume and selecting Set as boot volume and then selecting Confirm.
You can confirm which storage volume corresponds to the disk in the AIX VM by reviewing the LUN ids assigned to each disk. In the example below the AIX VM has two disks, hdisk0 and 1. The AIX lsmpio command confirms that hdisk0 has a LUN id ending E05D and hdisk1 ending in E05E.
root@cgnew / # lspv
hdisk0 00c937e0f676dc43 rootvg active
hdisk1 00f94f559ec54b56 altinst_rootvg
root@cgnew / # lsmpio -ql hdisk0 | grep Vol
Volume Name: volume-NEWVM-c6991a5c-0006efd0-boot-0-f92ed41e-1fdb
Volume Serial: 600507681381028B500000000001E05D (Page 83 NAA)
root@cgnew / # lsmpio -ql hdisk1 | grep Vol
Volume Name: volume-NEWVM-c6991a5c-0006efd0-boot-1-df448bc7-96c5
Volume Serial: 600507681381028B500000000001E05E (Page 83 NAA)
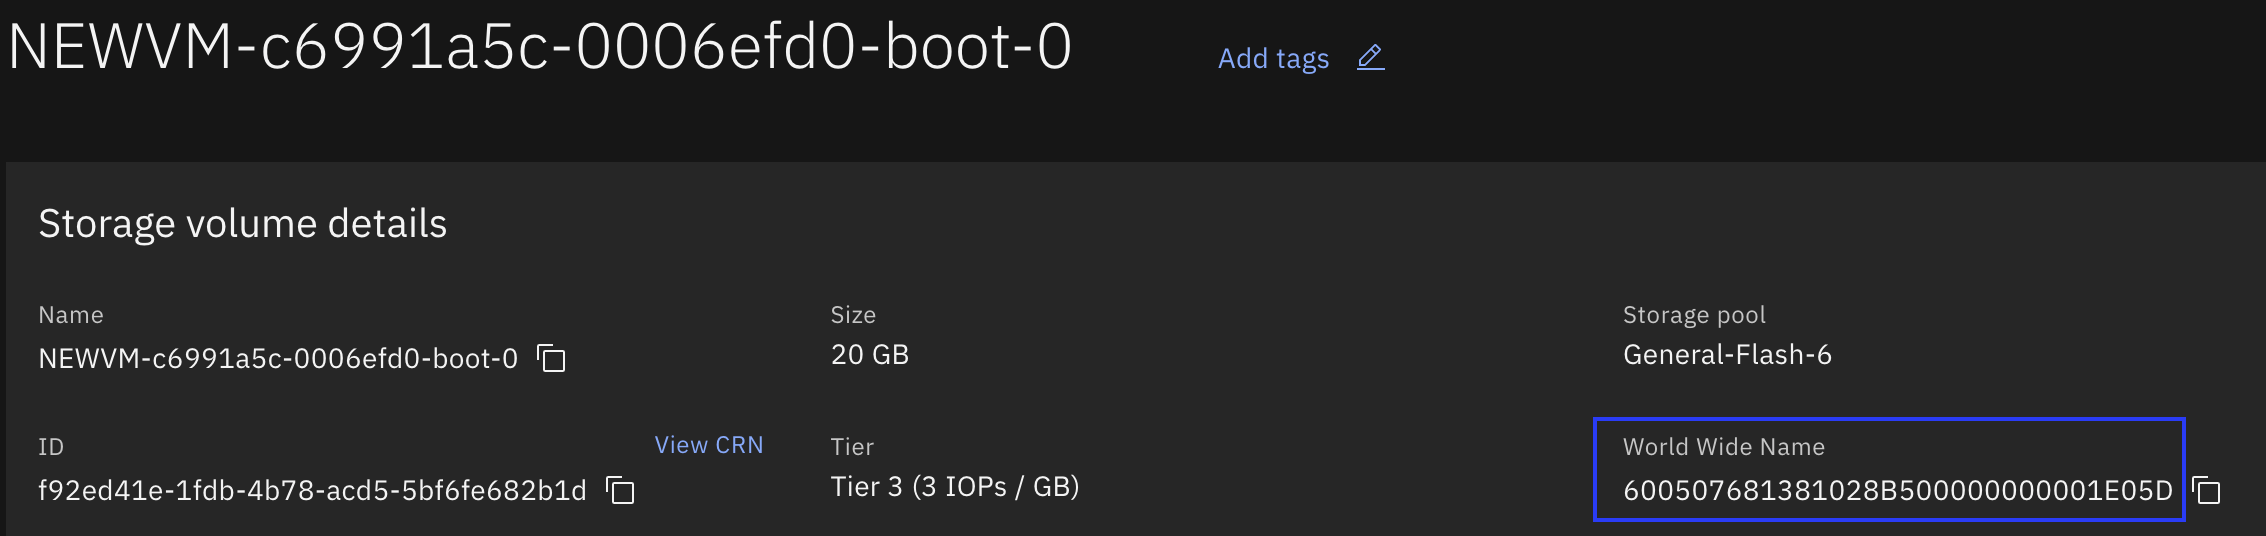
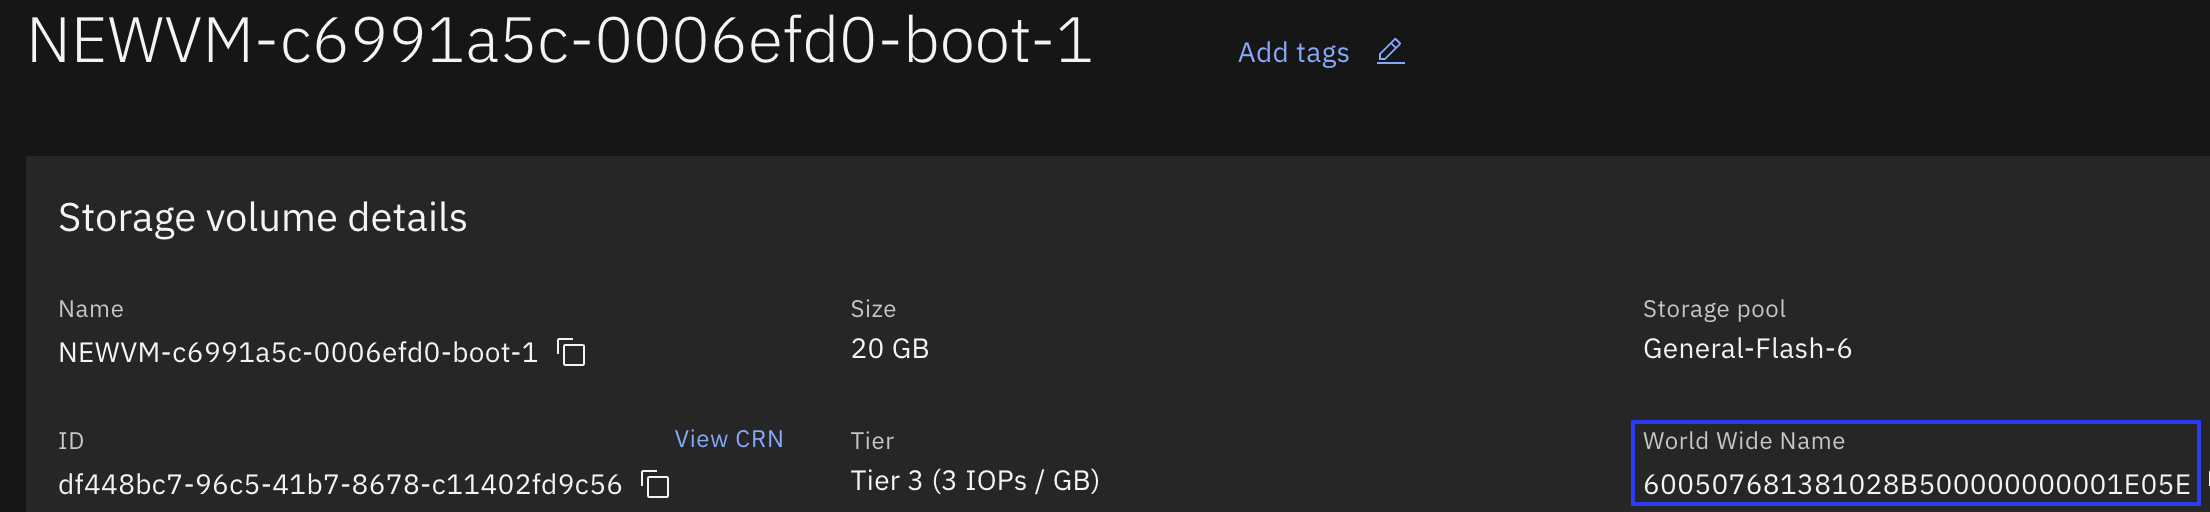
Returning to the Storage tab in the VM instance detail panel. We can immediately determine that the volume ending in boot-0 is hdisk0, and the disk ending in boot-1 is hdisk1.
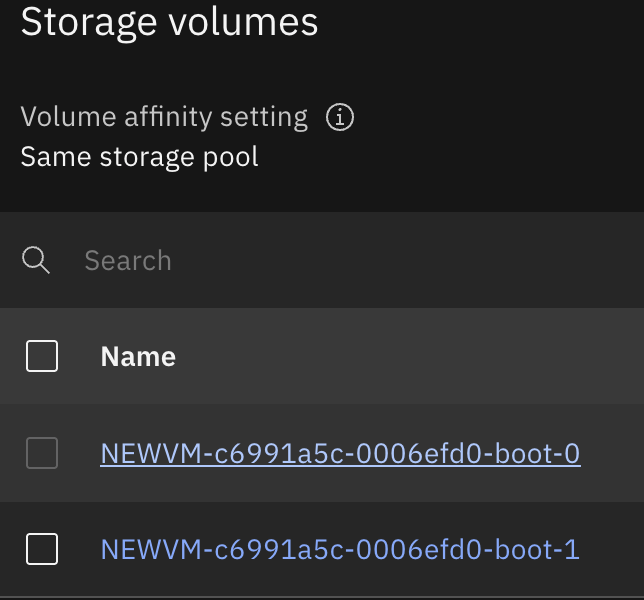
Selecting each volume we can view additional details, and identify the World Wide Names (the LUN ids) for each volume. This also confirms that the WWN ending in E-05D is hdisk0 and the WWN ending in E05E is hdisk1.
Confirm the AIX bootlist is correct
In addition to ensuring the correct storage volume is set as the boot volume in PowerVS, you must also ensure the AIX bootlist is set to the correct disk (hdisk) at the OS level. An incorrect bootlist can lead to unexpected issues when booting the VM.
In the example below the bootlist is set to boot from a CD device first, then hdisk0 (using one path only) and then a network adapter. This is very likely incorrect.
# bootlist -m normal -o
cd0
hdisk0 pathid=1
ent0 speed=auto duplex=auto bserver=000.000.000.000 client=000.000.000.000 gateway=000.000.000.000 vlan_tag=5
To resolve the issue, set the bootlist to the disk assigned to rootvg with the bootlist command.
# lspv | grep rootvg
hdisk0 00c937e0f676dc43 rootvg active
# bootlist -m normal hdisk0
# bootlist -m normal -o
hdisk0 blv=hd5 pathid=0
hdisk0 blv=hd5 pathid=1
hdisk0 blv=hd5 pathid=2
hdisk0 blv=hd5 pathid=3
hdisk0 blv=hd5 pathid=4
Network configuration
After migrating a VM to a new server it may be required (depending on the configuration) to re-configure the IPv4 network interface on the AIX LPAR. For example if you notice that the hostname of your VM is set to localhost immediately after deployment from a captured image, then you may need to configure a network interface. In this scenario the VM status will also likely show as Warning.

To resolve the issue, select the VM from the Virtual server instances panel. Then select the Networking tab. Take note of the VMs IP address, Gateway , VLAN id and CIDR information.

In this example the IP address is 192.168.236.222, the gateway address is 192.168.236.217, the VLAN ID is 2215, and the netmask is 255.255.255.248 (in /29 CIDR form).
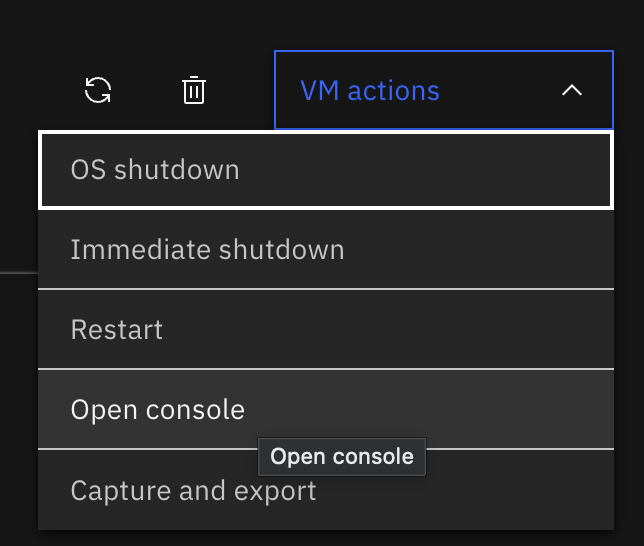
The next step requires you to open the console to the VM. Select VM actions, then select Open console.
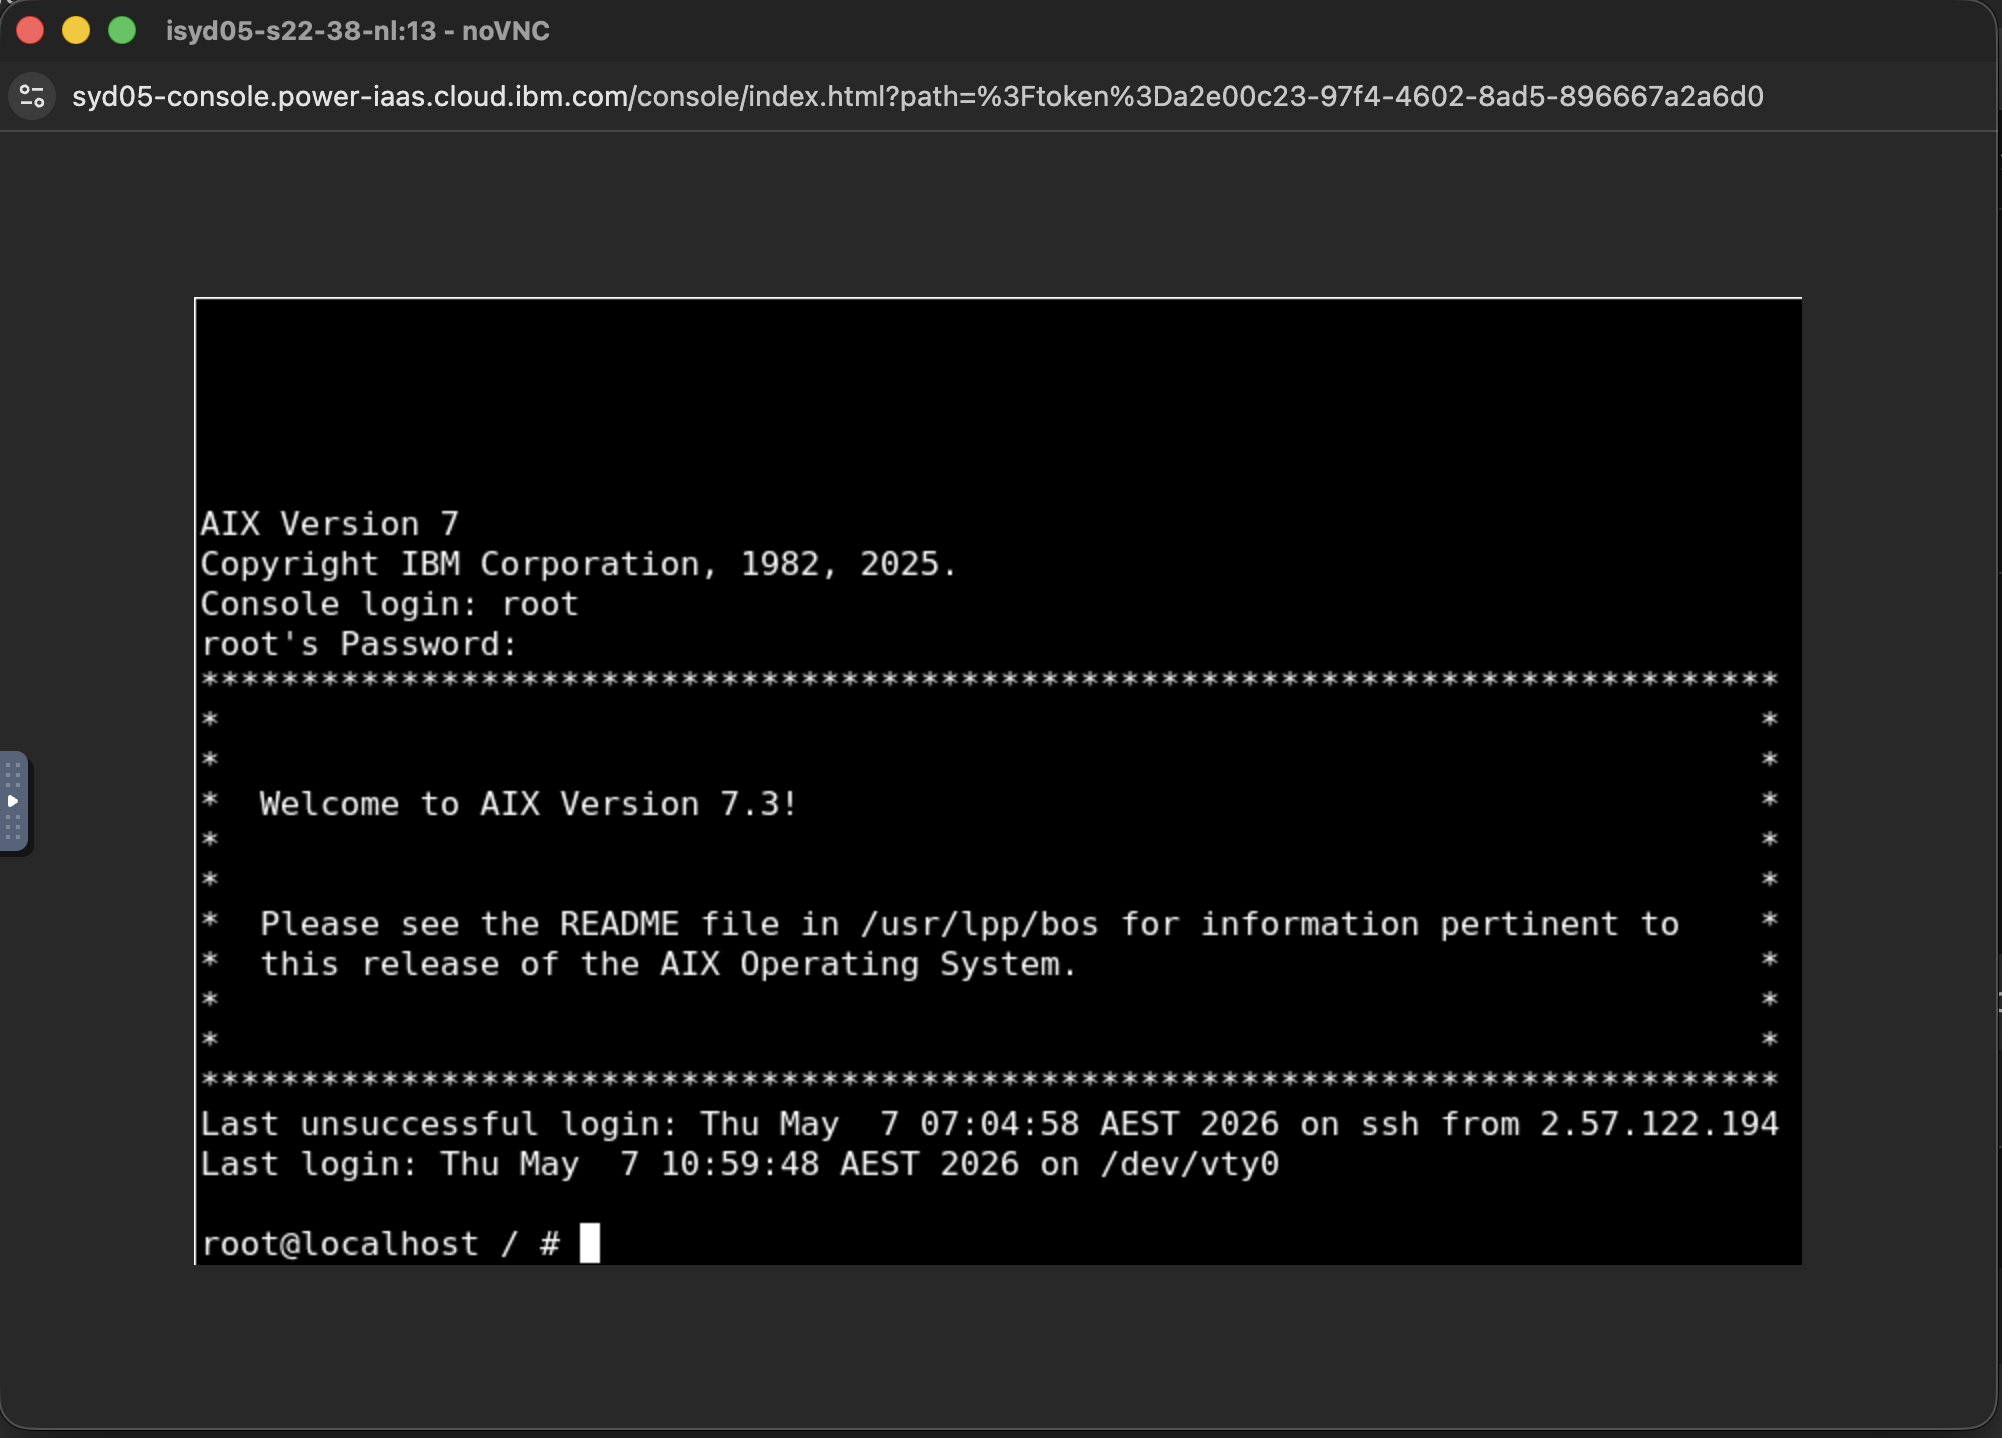
Log in as root from the console.
Note: In the output below the hostname for the VM is localhost; as indicated by the root user’s shell prompt. This is common when networking has not yet been configured on an AIX system.
The VM will have at least two network interfaces. In this example there are two network interfaces, of which only one is currently configured with an IPv4 address. In the output below the en1 interface is configured with an IPv6 address (this configured automatically in a PowerVS environment). There is another interface, en0, which is not currently configured.
root@localhost / # ifconfig -a
en1: flags=1e084863,81cc0<UP,BROADCAST,NOTRAILERS,RUNNING,SIMPLEX,MULTICAST,GROUPRT,64BIT,CHECKSUM_OFFLOAD(ACTIVE),LARGESEND,CHAIN>
inet6 fe80::48d:67ff:feb1:bfbd/64
sit0: flags=8100041<UP,RUNNING,LINK0>
inet6 ::192.168.236.222/96
lo0: flags=e08084b,c0<UP,BROADCAST,LOOPBACK,RUNNING,SIMPLEX,MULTICAST,GROUPRT,64BIT,LARGESEND,CHAIN>
inet 127.0.0.1 netmask 0xff000000 broadcast 127.255.255.255
inet6 ::1%1/128
tcp_sendspace 131072 tcp_recvspace 131072 rfc1323 1
root@localhost / # lsdev -Cc adapter | grep Eth
ent0 Available Virtual I/O Ethernet Adapter (l-lan)
ent1 Available Virtual I/O Ethernet Adapter (l-lan)
Confirm which network interface is configured for the assigned VLAN. In this example the VLAN id is 2215.
root@localhost / # entstat -d en0 | grep Port
Port VLAN ID: 2215
Configure the en0 interface using the information collected earlier.
chdev -l en0 -a netaddr=192.168.236.222 -a netmask=255.255.255.248 -a state=up
Configure the default gateway.
chdev -l inet0 -a route=net,-hopcount,0,,0,192.168.236.217
Set the VM hostname.
chdev -l inet0 -a hostname=cgnew
Confirm that the AIX network configuration for the VM is complete.
root@cgnew / # lsattr -El inet0
authm 65536 Authentication Methods True
bootup_option no Use BSD-style Network Configuration True
gateway Gateway True
hostname cgnew Host Name True
rout6 IPv6 Route True
route net,-hopcount,0,,0,192.168.236.217 Route True
root@cgnew / # lsattr -El en0
alias4 IPv4 Alias including Subnet Mask True
alias6 IPv6 Alias including Prefix Length True
arp on Address Resolution Protocol (ARP) True
authority Authorized Users True
broadcast Broadcast Address True
monitor off Enable/Disable monitor for virtual Ethernet True
mtu 1500 Maximum IP Packet Size for This Device True
mtu_bypass on Enable/Disable largesend for virtual Ethernet True
netaddr 192.168.236.222 Internet Address True
netaddr6 IPv6 Internet Address True
netmask 255.255.255.248 Subnet Mask True
prefixlen Prefix Length for IPv6 Internet Address True
remmtu 576 Maximum IP Packet Size for REMOTE Networks True
rfc1323 Enable/Disable TCP RFC 1323 Window Scaling True
security none Security Level True
state up Current Interface Status True
tcp_mssdflt Set TCP Maximum Segment Size True
tcp_nodelay Enable/Disable TCP_NODELAY Option True
tcp_recvspace Set Socket Buffer Space for Receiving True
tcp_sendspace Set Socket Buffer Space for Sending True
thread off Enable/Disable thread attribute True
You should now be able to connect to the VM using SSH. The VM status should change from Warning to Active after a few minutes.
Cannot boot unsupported AIX on newer Power servers
If you attempt to start a VM, that is using a version of AIX that is unsupported by the target Power server, the VM will fail to boot. The system reference code for the VM will report B700F120.
For example, if we attempt to boot AIX 6.1 on a Power10 server in PowerVS, the VM will stop booting and the B700F120 code is displayed under System reference code in the VM details.
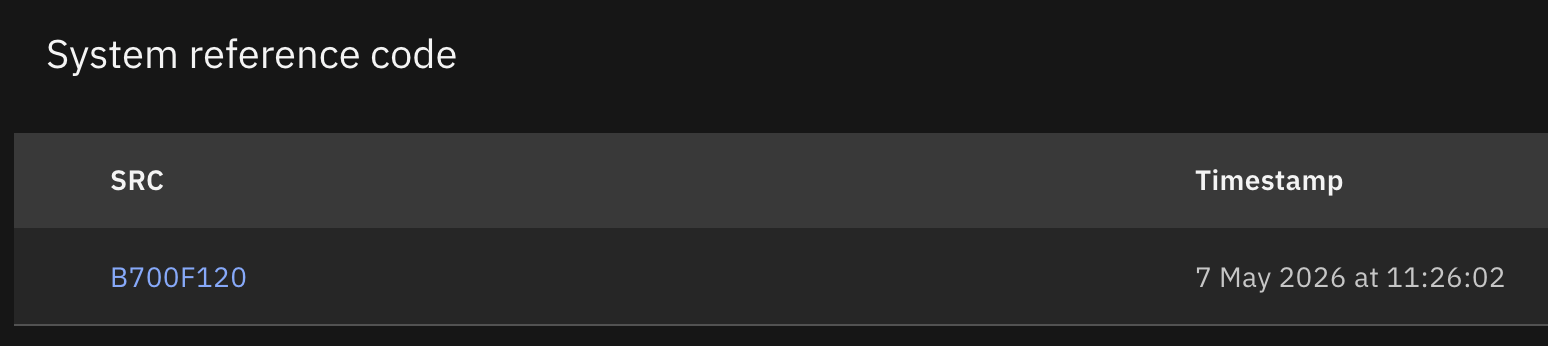
The B700F120 LED code indicates that the platform firmware detected an error, and that the platform is unable to support the requested architecture options requested by the operating system. See, https://www.ibm.com/docs/en/power10/0000-REF?topic=POWER10_REF/p10eai/B700F120.html.
This may happen if you have recently migrated a VM from an older version of AIX to a new version of AIX and used the image capture method to move the VM to a newer generation of Power server. In this case you may still have an alternate rootvg disk assigned to the system that contains the older version of AIX. If you accidentally boot from the wrong disk, that is for example, if you boot from your AIX 6.1 disk and not your AIX 7.3 disk, the VM will fail to boot and post B700F120. The VM will enter an Error state.
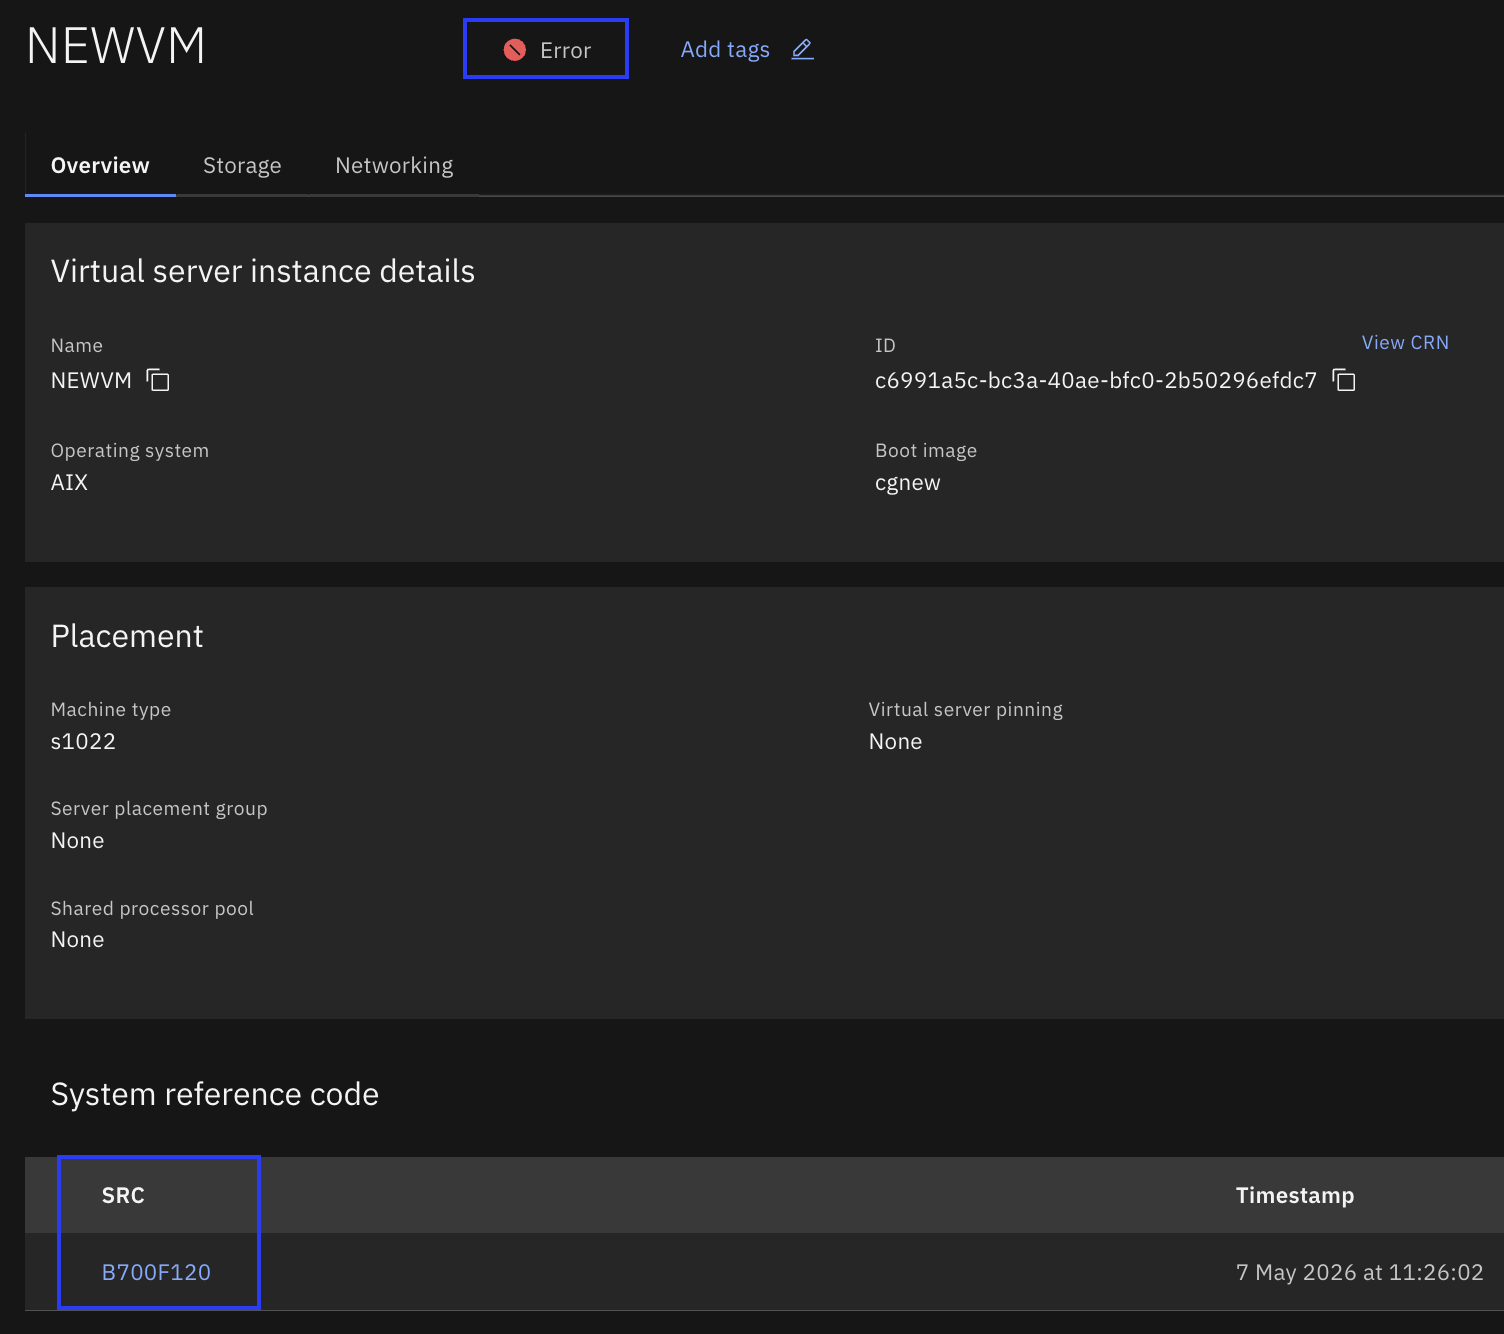
In this specific scenario, to resolve this issue, you must open the VM console and then restart the VM. However, you may need to reset the VM first.
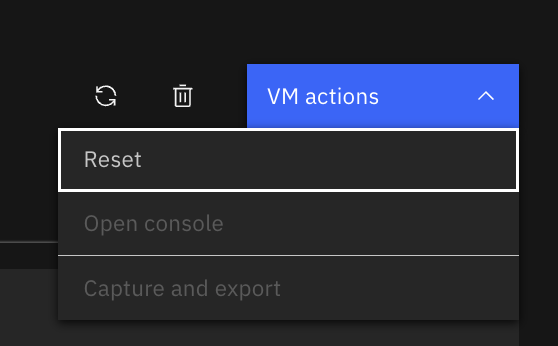
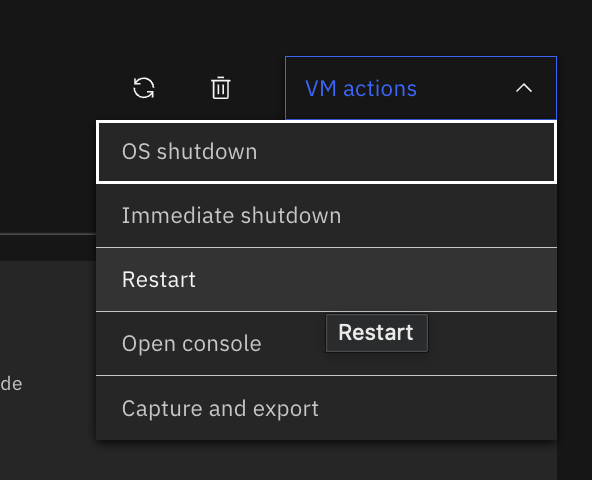
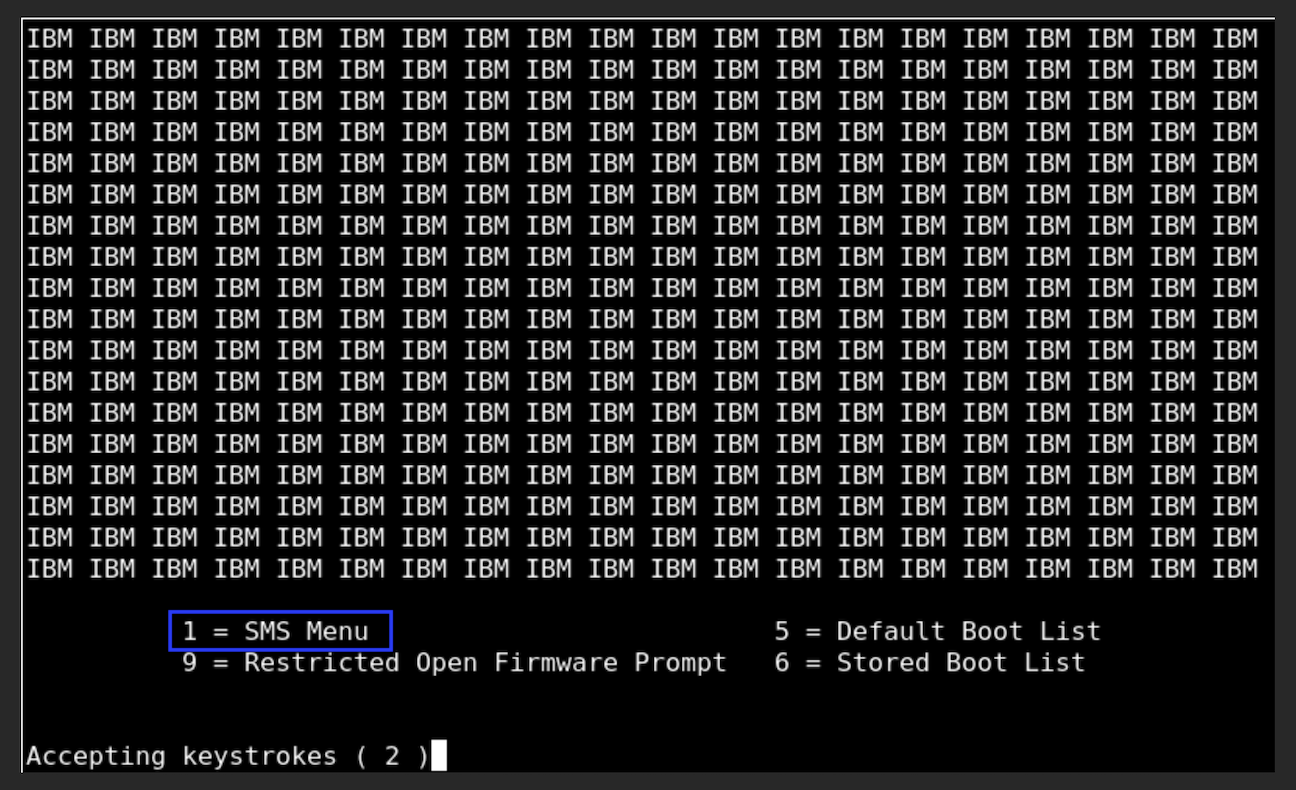
Monitor the VM console carefully and enter the SMS menu by pressing 1 when prompted.
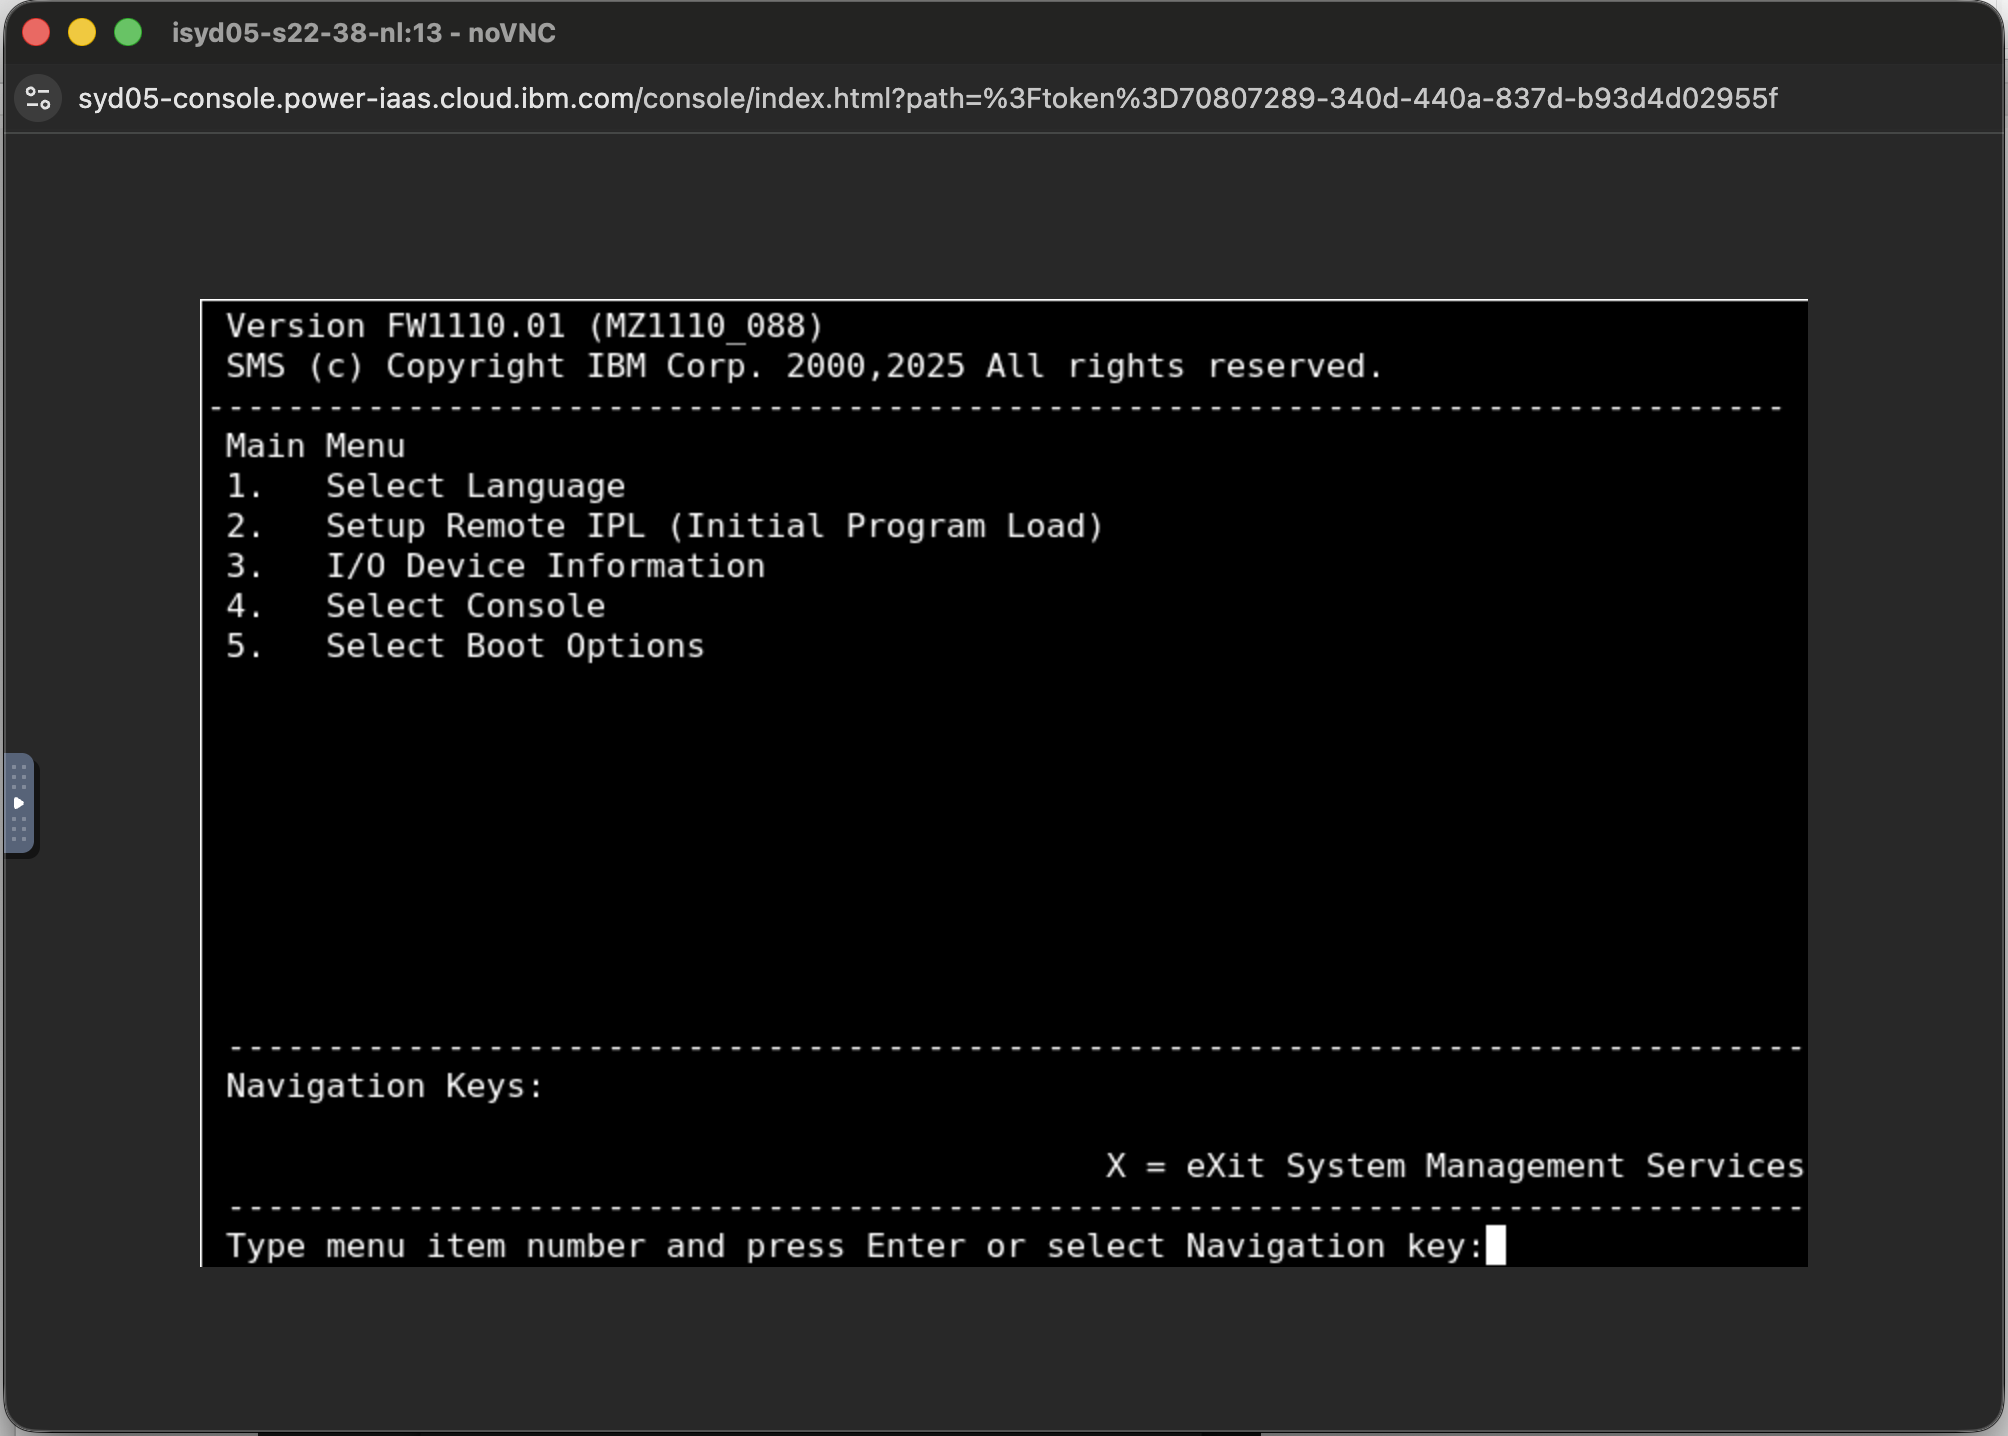
Enter 5 (Select Boot Options) from the SMS main menu.
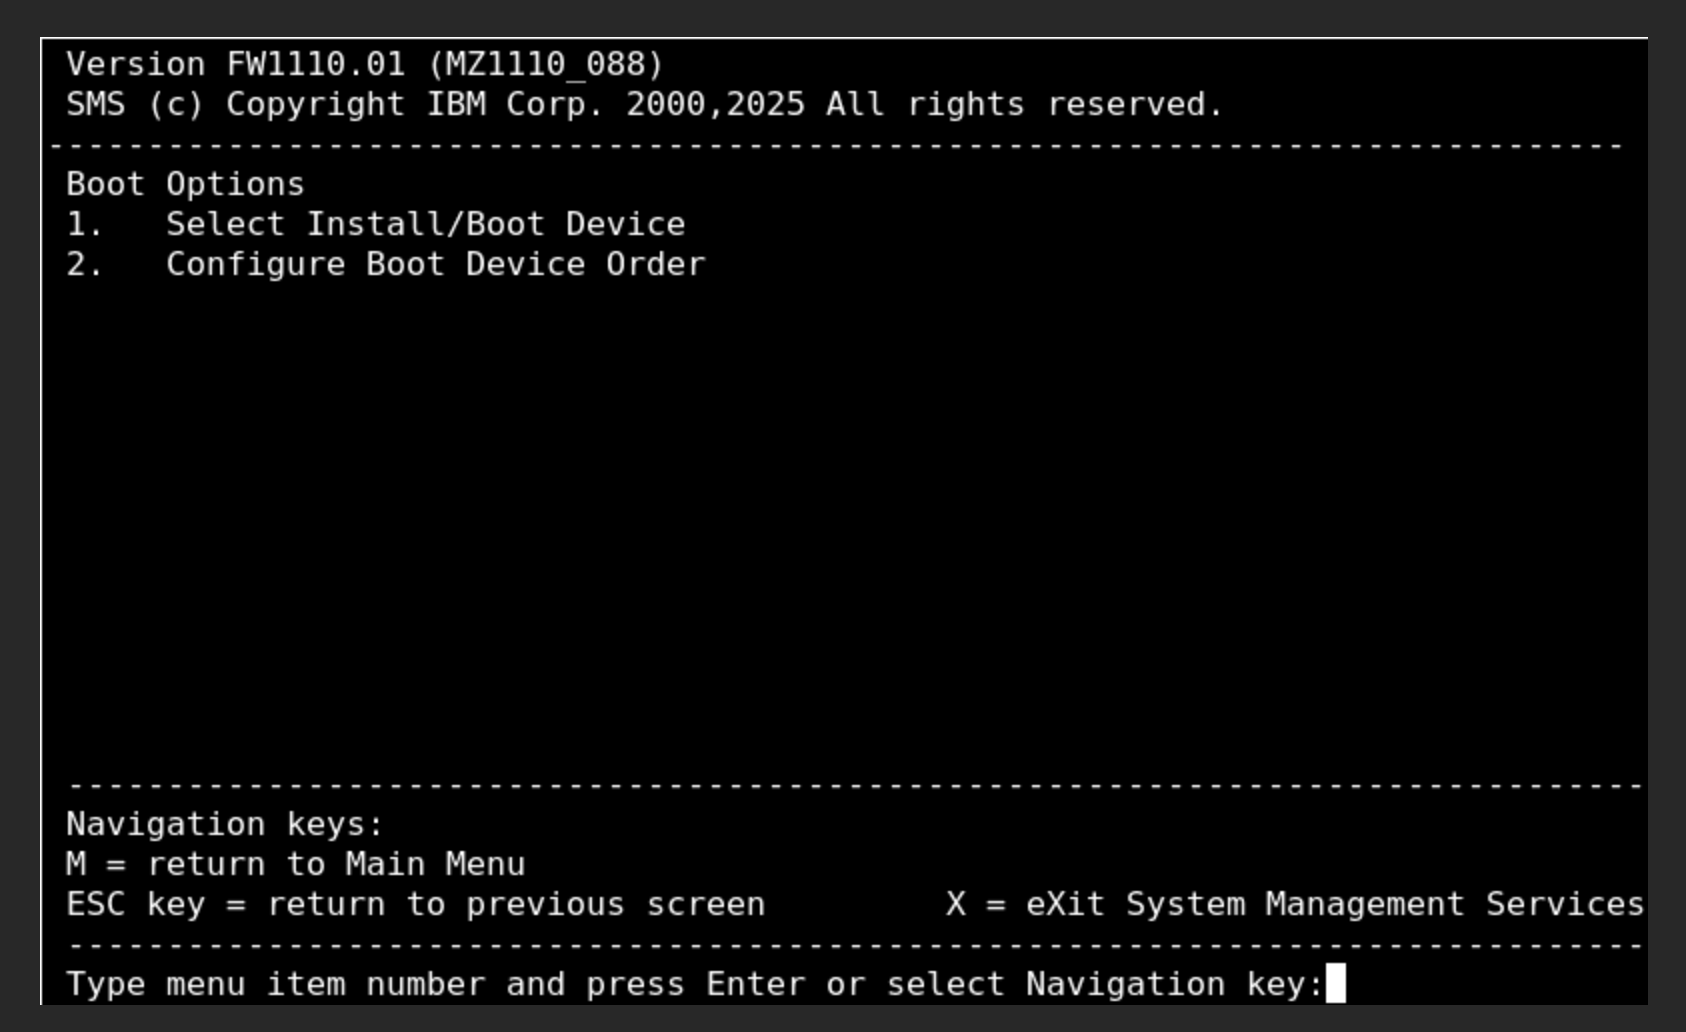
Enter 1 (Select Install/Boot device).
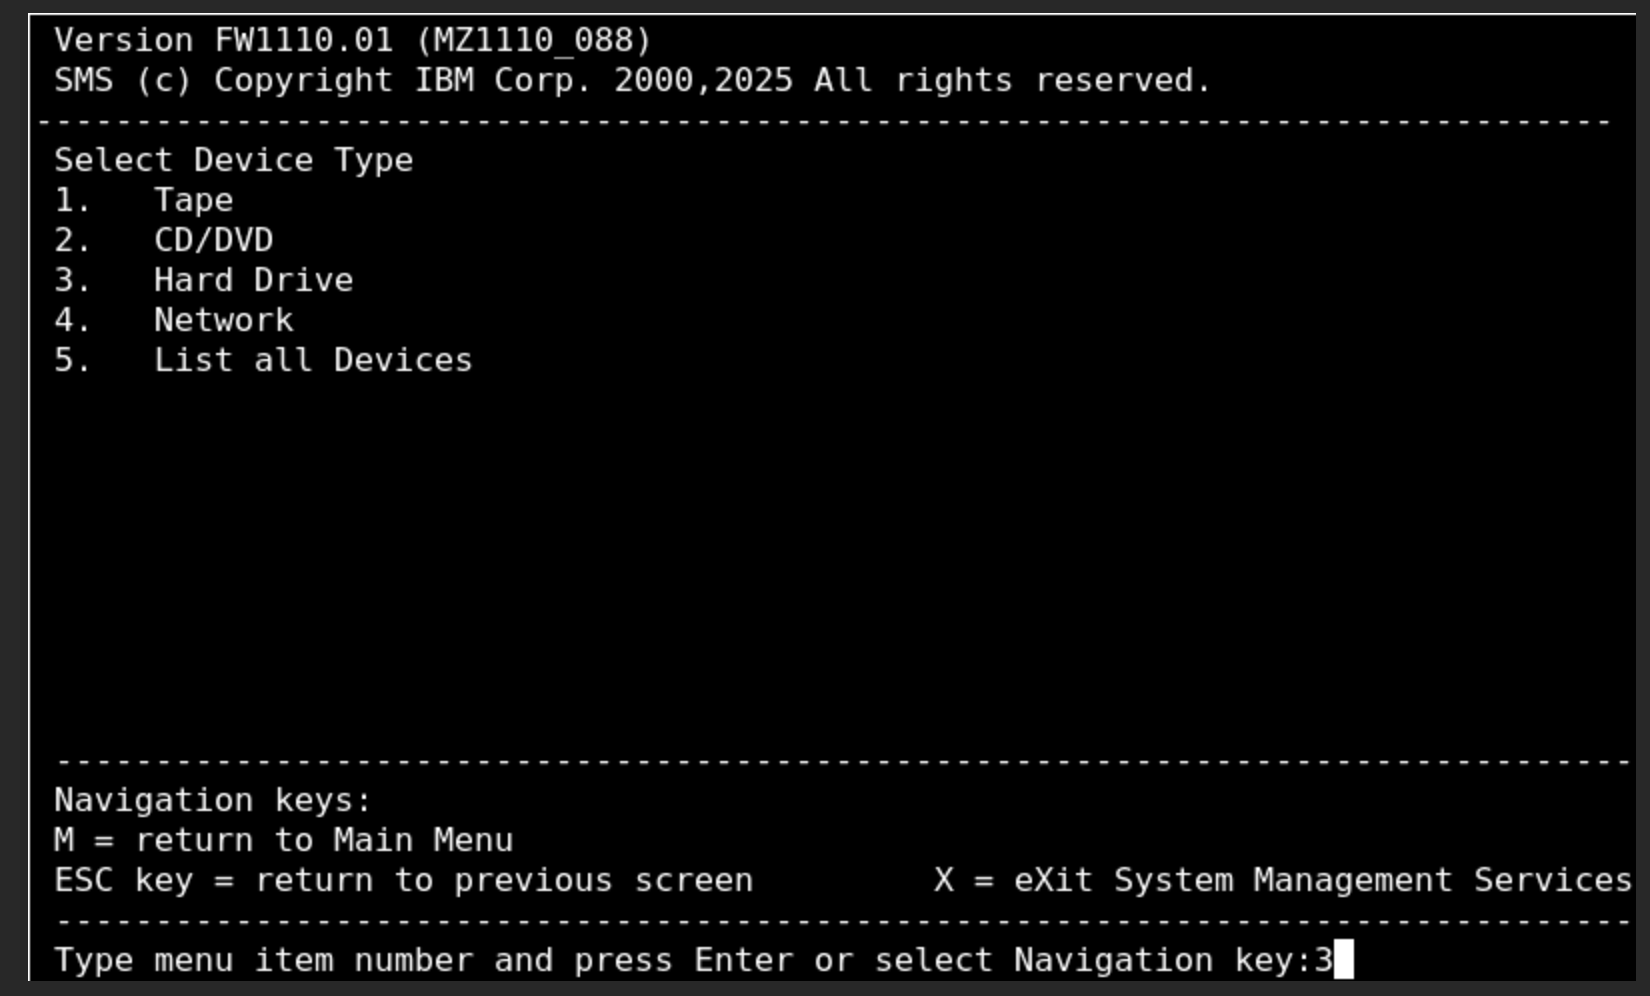
Enter 3 (Hard Drive).
Enter 2 (SAN).
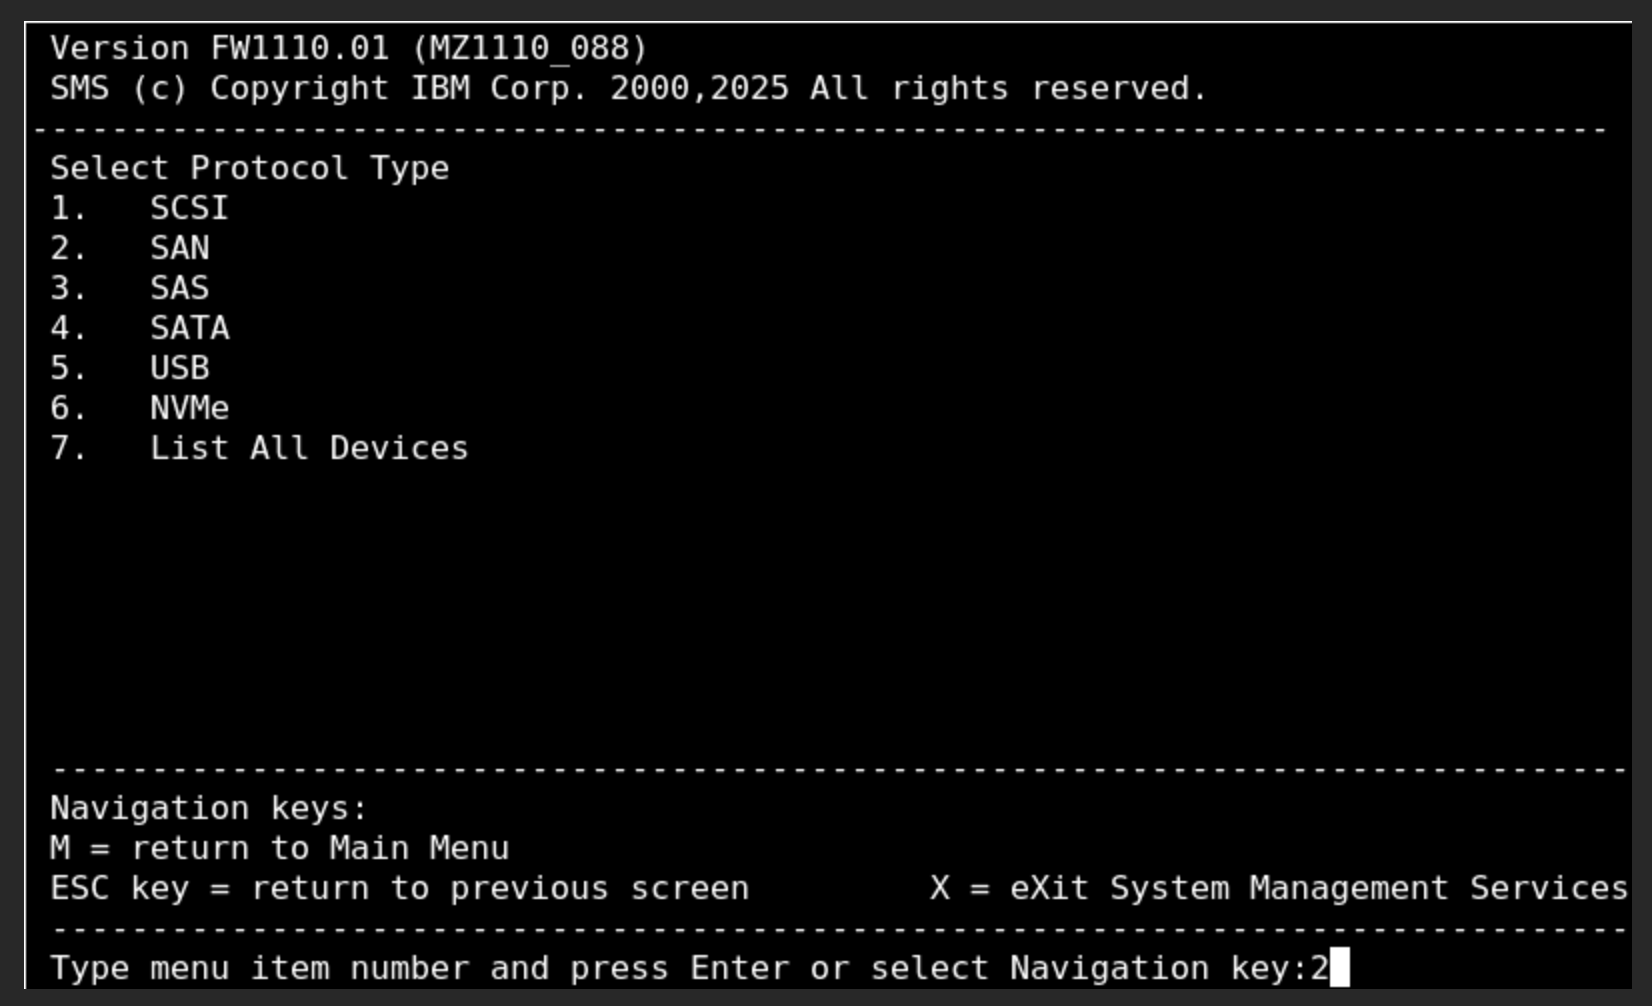
Enter 1 (FCP).
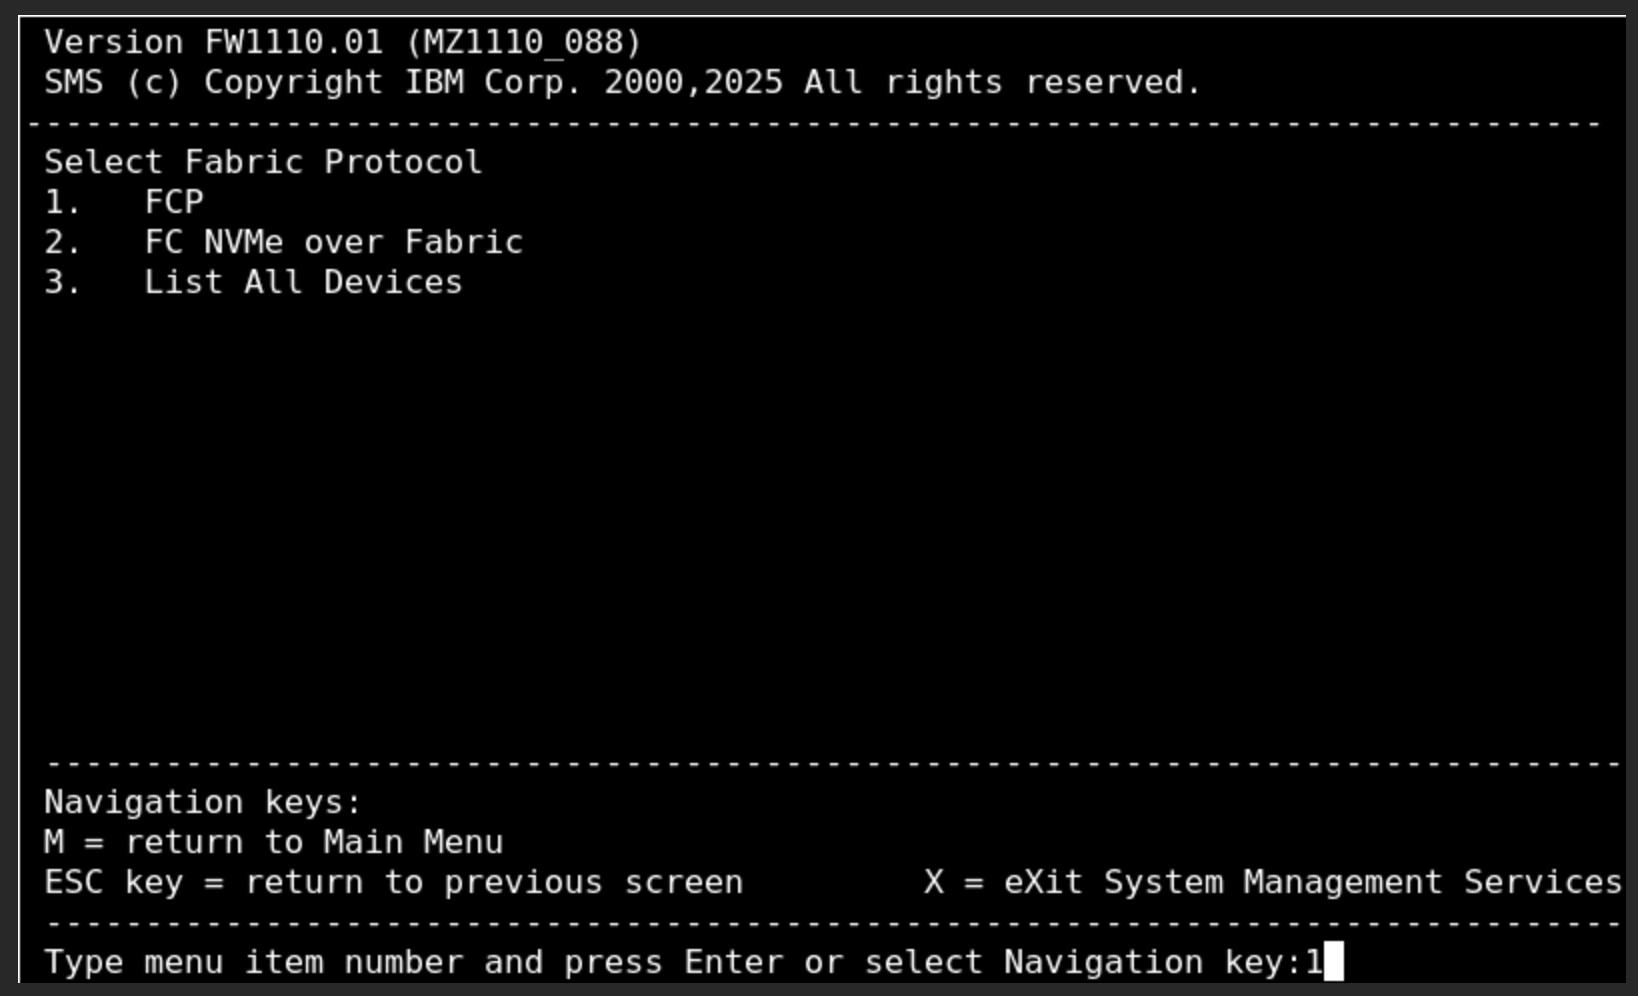
Enter 1 (the first VFC adapter).
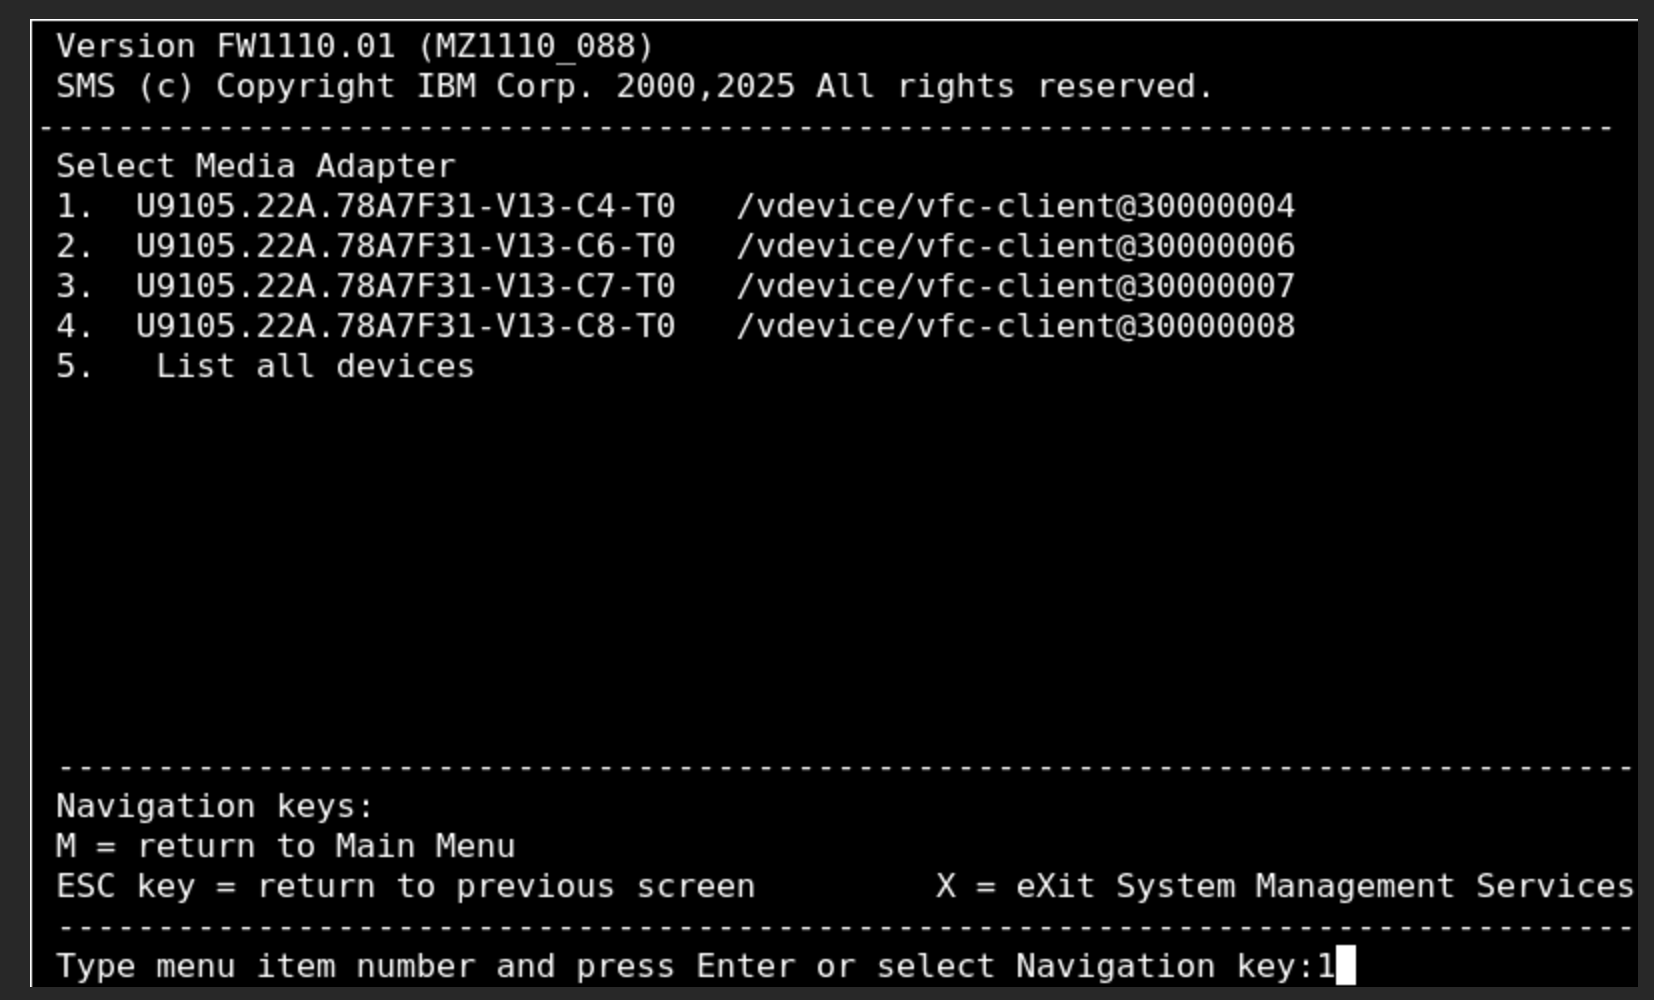
Enter 2 (Scan for available boot devices).
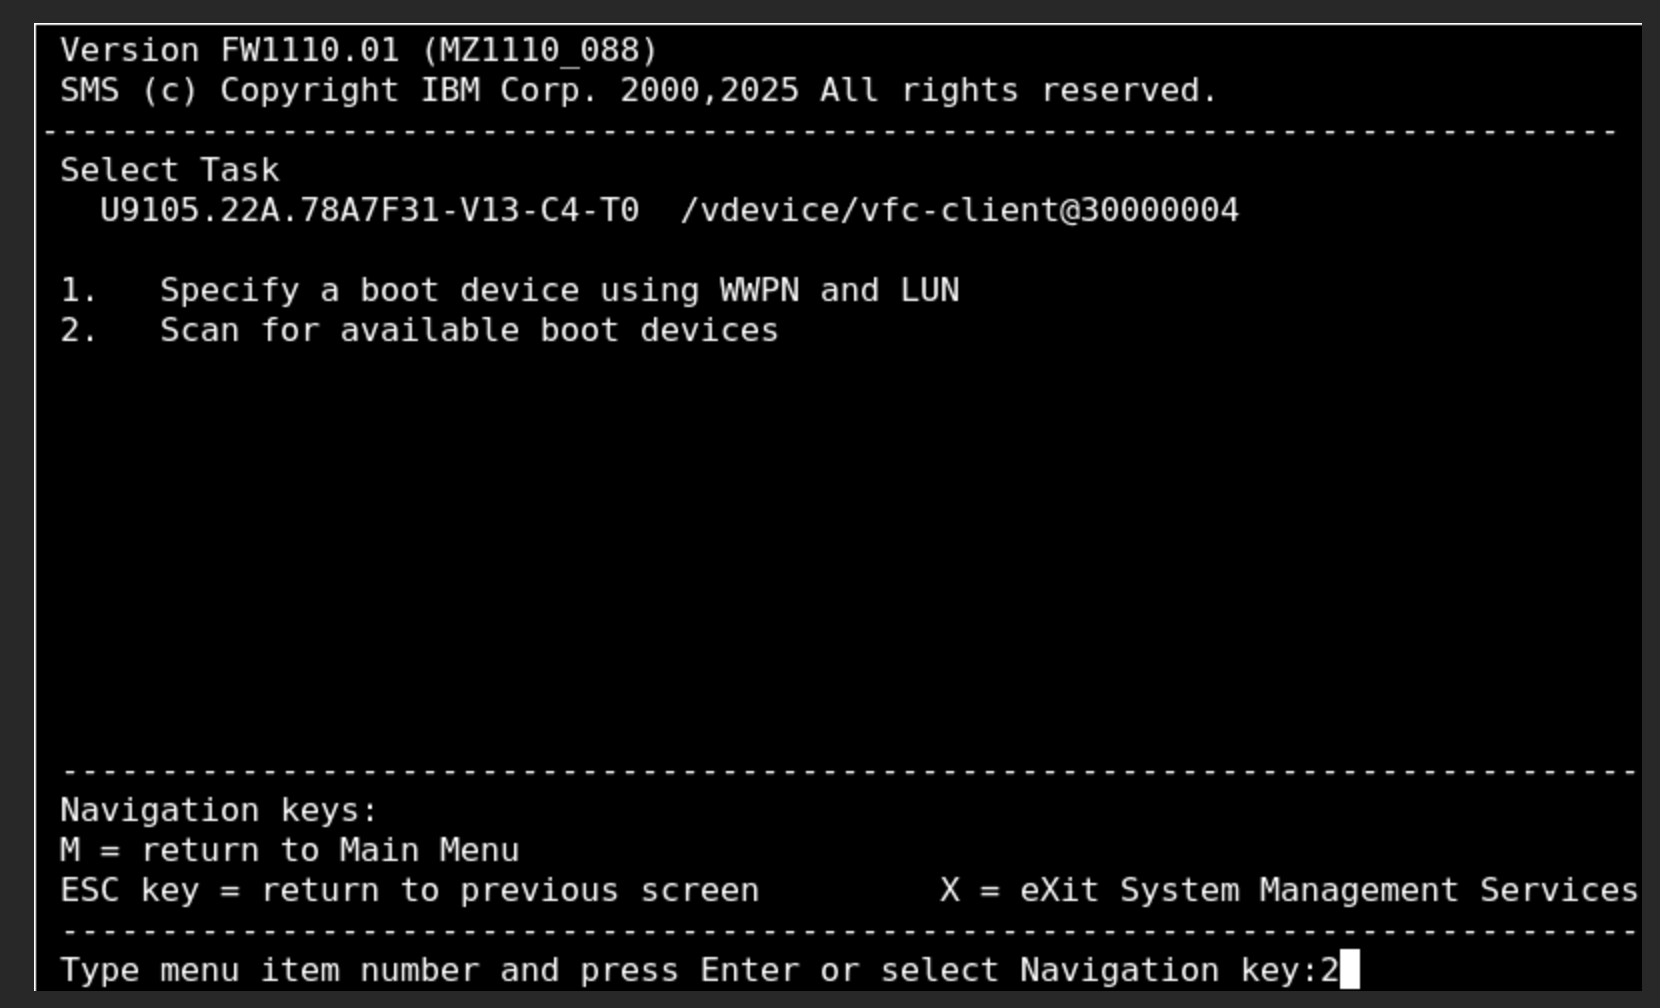
Enter 3 (Scan).
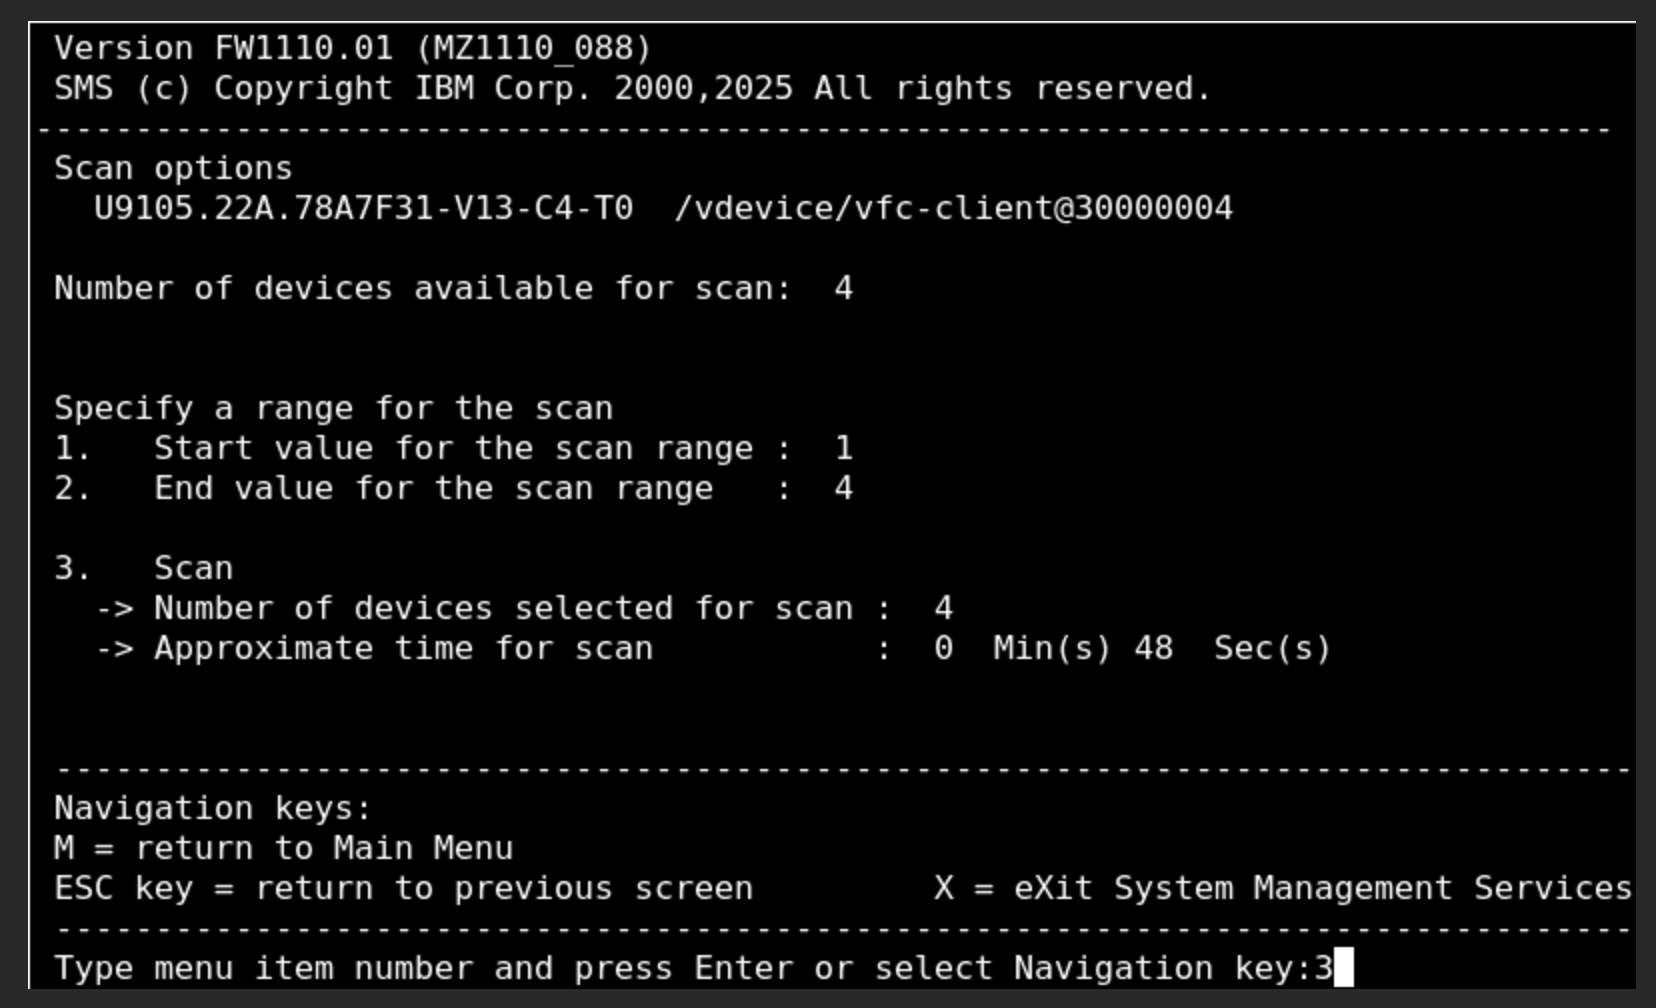
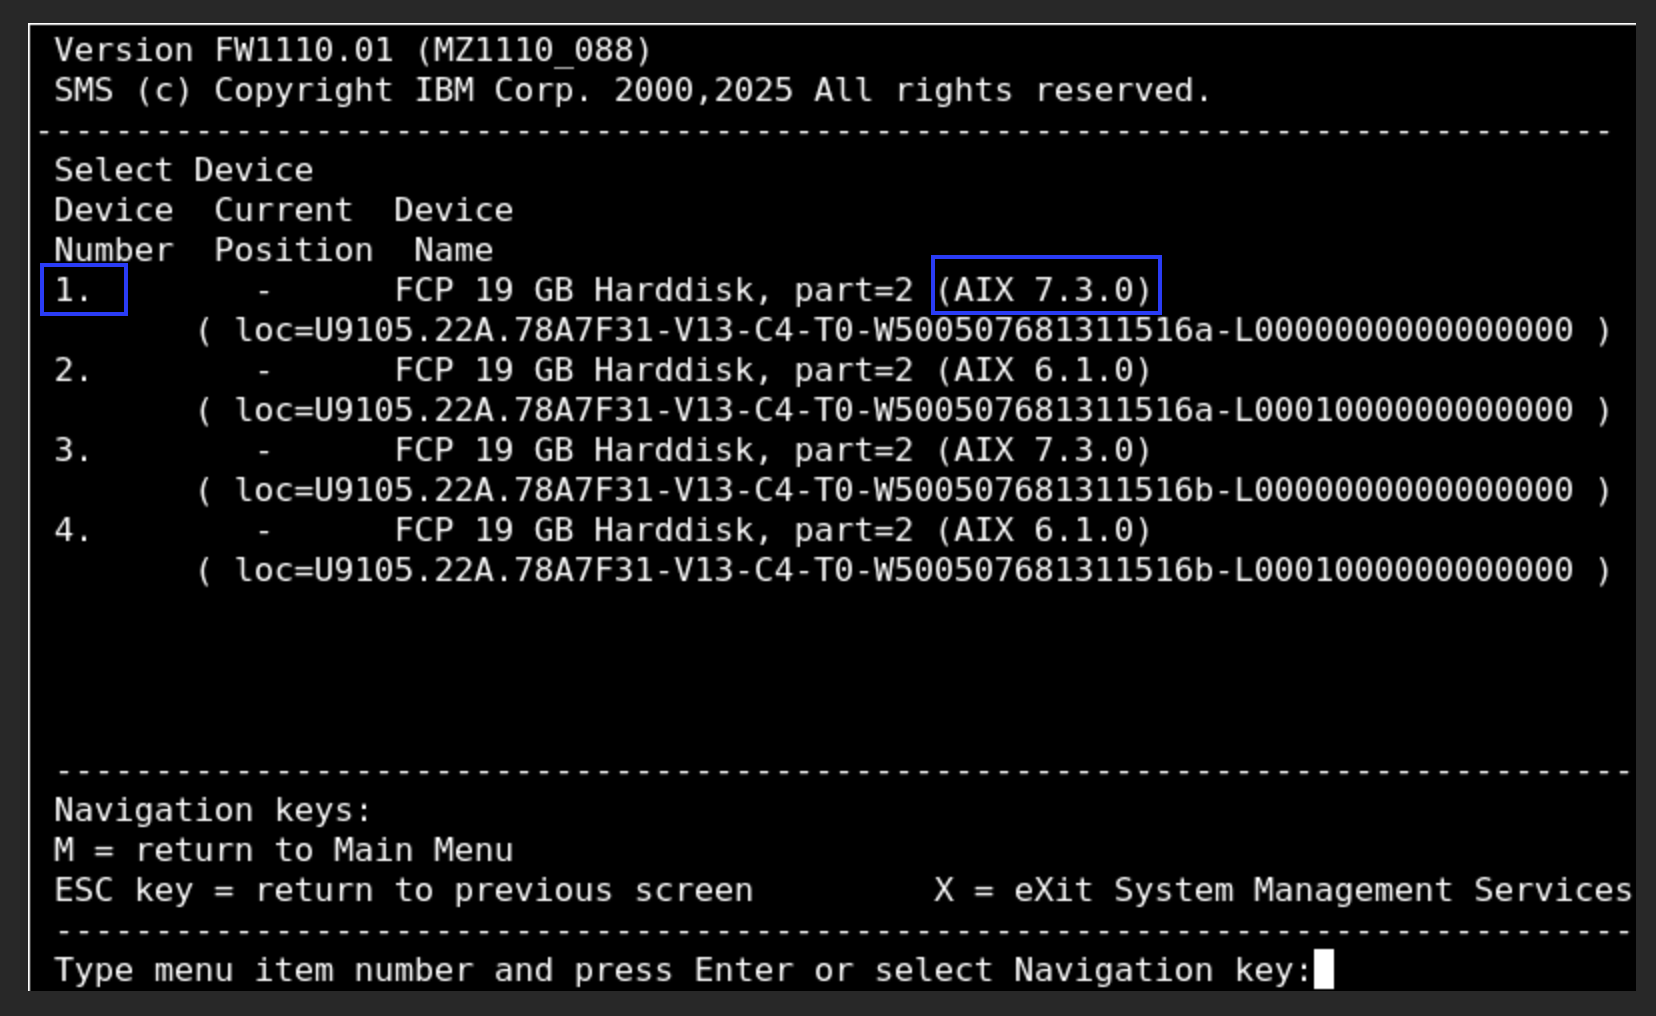
Enter the number that corresponds to the correct AIX boot disk. In this example it is 1, which is an AIX 7.3 boot disk.
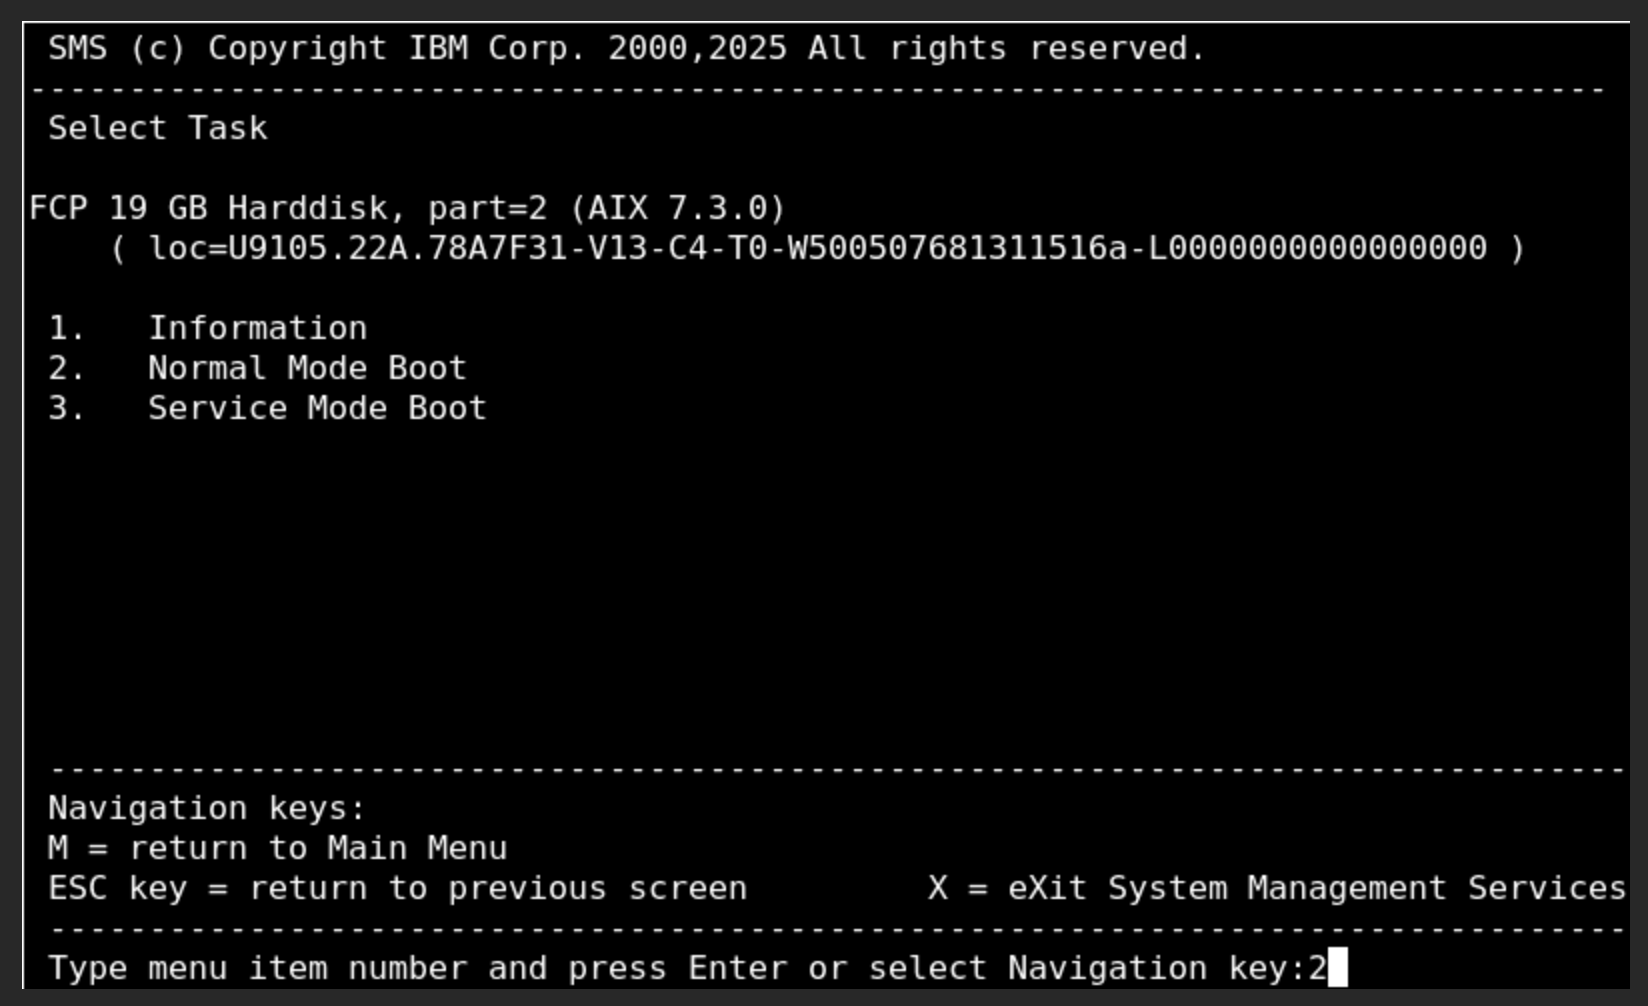
Enter 2 (Normal Mode Boot).
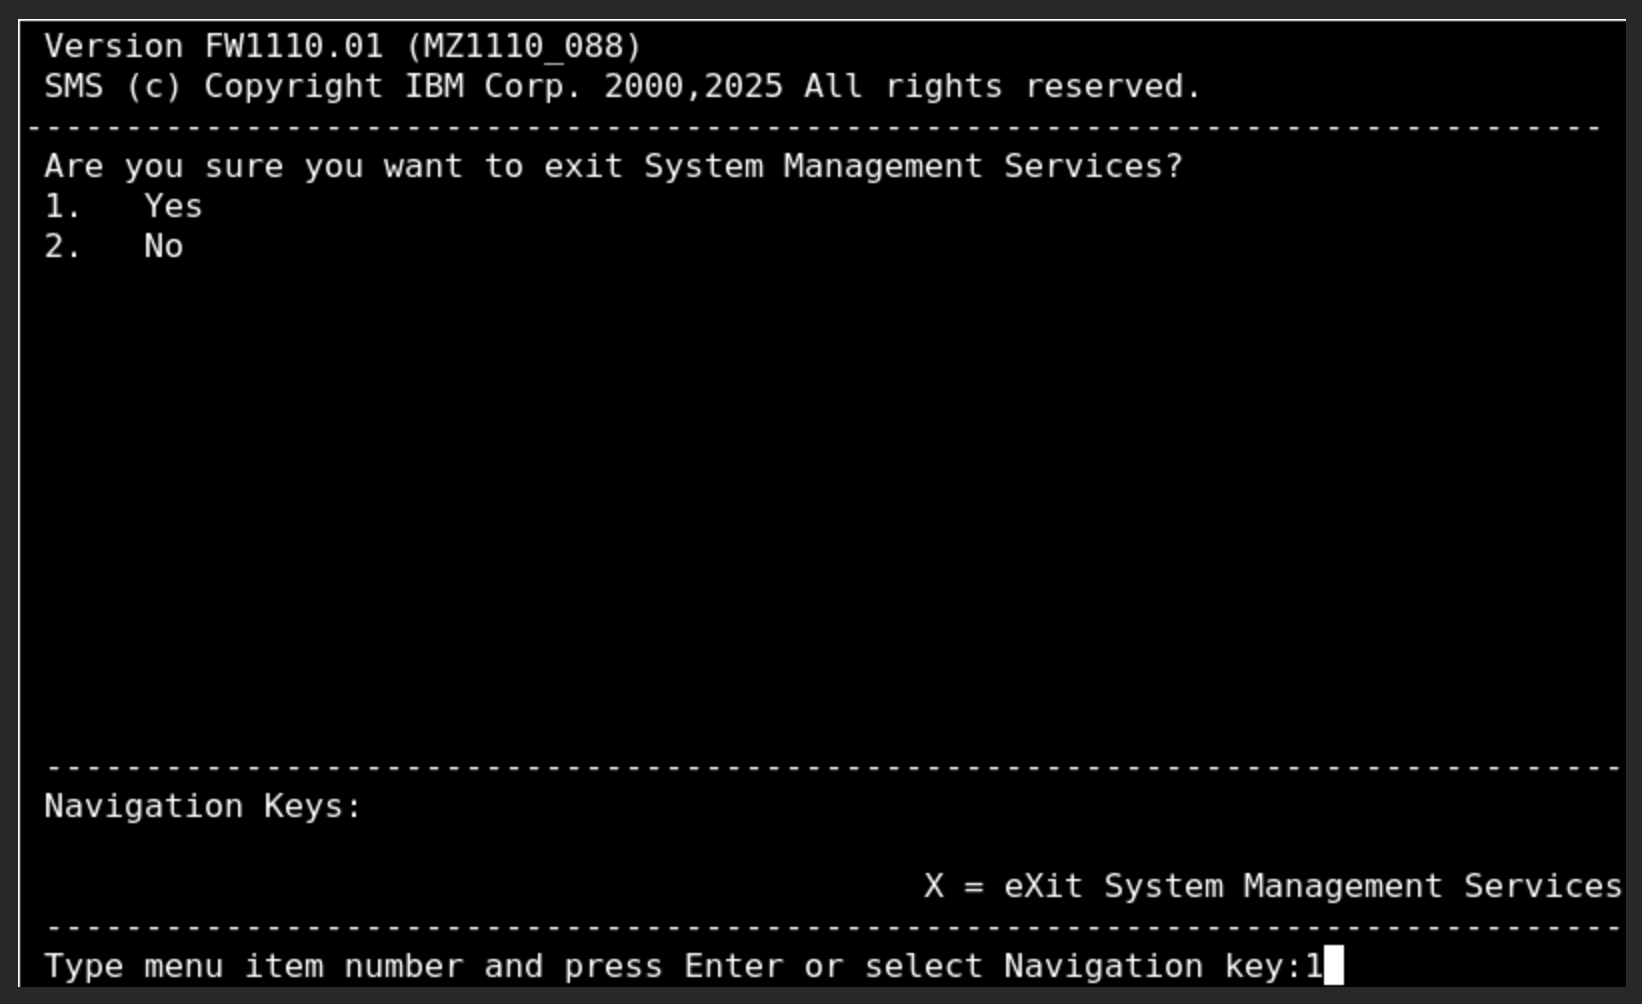
Enter 1 (Yes).
Now the VM will boot successfully.
Verify that the bootlist for the VM is correct and will boot from the correct disk in the future. In the example below the VM bootlist is set to the incorrect disk (hdisk1), and the bootlist is updated to point to the correct disk, hdisk0.
root@cgnew / # bootlist -m normal -o
hdisk1 blv=hd5 pathid=0
hdisk1 blv=hd5 pathid=1
hdisk1 blv=hd5 pathid=2
hdisk1 blv=hd5 pathid=3
hdisk1 blv=hd5 pathid=4
root@cgnew / # lspv
hdisk0 00c937e0f676dc43 rootvg active
hdisk1 00f94f559ec54b56 altinst_rootvg
root@cgnew / # bootlist -m normal hdisk0
root@cgnew / # bootlist -m normal -o
hdisk0 blv=hd5 pathid=0
hdisk0 blv=hd5 pathid=1
hdisk0 blv=hd5 pathid=2
hdisk0 blv=hd5 pathid=3
hdisk0 blv=hd5 pathid=4
References
Supported AIX, IBM i, and Linux versions for Power Virtual Server
Planning a workload migration to IBM® Power® Virtual Server
https://cloud.ibm.com/docs/power-iaas?topic=power-iaas-system-migration
Migrating Clients using NIM on PowerVS
https://www.ibm.com/support/pages/migrating-clients-using-nim-powervs
Setting up a Network Installation Management (NIM) server
https://cloud.ibm.com/docs/power-iaas?topic=power-iaas-provisioning-nim
Recommended Reliable Scalable Cluster Technology (RSCT) package levels for imported AIX images
https://cloud.ibm.com/docs/power-iaas?topic=power-iaas-recommended-rsct-package
Using NIM Alternate Disk Migration (NIMADM)
https://www.ibm.com/support/pages/using-nim-alternate-disk-migration-nimadm
System Software Maps
https://www.ibm.com/support/pages/system-software-maps
Capturing and exporting a virtual server instance (VSI)
https://cloud.ibm.com/docs/power-iaas?topic=power-iaas-capturing-exporting-vm
Free hands-on technical training course: IBM PowerVS Workshop
https://www.ibm.com/training/course/ibm-powervs-workshop-DL06014G
Free Hands-on IBM PowerVS Training for Clients, Business Partners and IBMers
https://community.ibm.com/community/user/blogs/upendra-rajan/2025/10/23/powervs-training
Hands-on technical training course: Mastering IBM AIX Upgrades/Migrations
https://www.ibm.com/training/course/mastering-ibm-aix-upgradesmigrations-AN39DG
Author: Chris Gibson (cgibson@au1.ibm.com) - IBM Power Tech Training
Document Location
Worldwide
Was this topic helpful?
Document Information
Modified date:
03 July 2026
UID
ibm17272622