Release Notes
Abstract
This firmware update provided by IBM is a republish of a prior firmware for your IBM® Security QRadar® M4 appliances with easier to follow installations procedures. Administrators who have already updated their M4 firmware do not need to install this re-published version.
Content
Tab navigation
- About M4 Firmware Updates-selected tab,
- IBM Bootable Media Creator (BoMC)
This article covers the installation process for v1.1 firmware on QRadar M4 appliances. There is a newer version of QRadar appliance firmware available, which is v2.0.3. Administrators looking for the latest M4 appliance firmware upgrade should see http://ibm.biz/qradarfirmware.
Installation method
To update the firmware on an M4 appliance, administrators can use a Windows host with the Bootable Media Creator (BoMC) software tool to create a USB drive that is suitable for applying firmware updates. Administrators must be on-site (on premise) with the appliance to complete this firmware update using a USB flash drive.
Supported appliances, types, and model information
This firmware update applies to the following IBM Security QRadar M4 (2U form factor) appliances, server type, or Machine type models:| Hardware | Details |
| Appliance | IBM Security QRadar xx05 G2 IBM Security QRadar xx28 G2 IBM Security QRadar Incident Forensics xx28 IBM Security QRadar Packet Capture xx28 IBM Security QRadar Packet Capture Data Node xx28 |
| Server Type | x3650 M4 BD |
| Server Machine Type | 5466 |
| Appliance Machine type models (MTM) | 4380-Q1E 4380-Q2E 4531-G1E 4531-G2E 4531-G3E |
Base software files
The table shows the Base System Pack and any additional packages that make up the recommended firmware update:| Package | Name |
| Base System Pack | ibm_utl_uxsp_yoib12p-2.00_rhel_32-64 |
Important file changes and pre-requisites in this firmware update
The table below lists important updates in the Base System Pack and HDD update. Administrators must ensure that their M4 appliance includes the minimum version outlined in the Pre-requisite version column. If your M4 appliance does not meet the pre-requisite versions outlined in the table below, the administrator will need to contact IBM QRadar Support to have a custom upgrade path defined for the M4 appliance.| Component | Pre-requisite version | Firmware version in this update | File name |
| IMM2 | 3.74 or later | 1aoo66m-4.97 | ibm_fw_imm2_1aoo66m-4.97_anyos_noarch |
| UEFI/BIOS | None | yoe106c-1.20 | ibm_fw_uefi_yoe106c-1.20_anyos_32-64 |
| DSA | None | dsyte2l-9.63 | ibm_fw_dsa_dsyte2l-9.63_anyos_32-64 |
| RAID Controller M5210 | None | 24.7.0-0052 | ibm_fw_sraidmr_5200-24.7.0-0052_linux_32-64 |
| RAID Controller M5110 | None | 23.33.0-0018 | ibm_fw_sraidmr_5100-23.33.0-0018_linux_32-64 |
| HDD Update | None | 1.16.05 | ibm_fw_hdd_sas-1.16.05_linux_32-64 |
Notes:
- Administrators MUST enable IMM.Over.LAN on the xSeries appliance BEFORE the firmware update is applied. For information on how to enable this setting, see: http://www.ibm.com/support/docview.wss?uid=swg21982944.
- A number of hard disk drives can be installed in this appliance. The HDD update tool examines the hard disk drives that are present and selects the most current firmware level that is available.
- The base system pack contains other firmware packages that are not in QRadar appliances. Therefore, these packages appear when the tool runs, but have a status of "undetected" and not selected to be updated.
- This firmware update installs IMM firmware version 4.97. Administrators should be aware that IMM v4.97 requires Java version 8 to function properly. If administrators are not on Java version 8 or are unable to install Java version 8, then they might need to postpone this M4 appliance firmware update.
Installing firmware with the IBM Bootable Media Creator (BoMC)
This installation method uses the IBM Bootable media creator (BOMC) tool on a Windows host to create a bootable USB drive that is capable of installing the M4 firmware update for QRadar 2U appliances. The firmware update can take up to 60 minutes for each host. Use a USB drive of 4GB or larger to ensure enough free space to successfully create the bootable media. You can use the IBM Bootable Media Creator to update the firmware on the following QRadar appliances:
| Hardware | Details |
| Appliance | IBM Security QRadar xx05 G2 IBM Security QRadar xx28 G2 IBM Security QRadar Incident Forensics xx28 IBM Security QRadar Packet Capture xx28 IBM Security QRadar Packet Capture Data Node xx28 |
| Server Type | x3650 M4 BD |
| Server Machine Type | 5466 |
| Appliance Machine type models (MTM) | 4380-Q1E 4380-Q2E 4531-G1E 4531-G2E 4531-G3E |
Before you begin
Creating your USB flash drive for the firmware update requires a Windows host and the administrator or USB drive must be on-site with the appliance. The firmware update can take up to 60 minutes complete per appliance and the administrator will be required to reboot the appliance after the firmware install completes. The firmware upgrade procedures should only be done during a change window or during maintenance time for your QRadar appliances. A 4GB USB key is required to complete the procedure outlined below.**IMPORTANT**: Administrators MUST enable IMM.Over.LAN on the xSeries appliance BEFORE the firmware update is applied. For information on how to enable this setting, see: http://www.ibm.com/support/docview.wss?uid=swg21982944.
Required files
Download the QRadar M4 appliance firmware update (2U form factor appliances) from IBM Fix Central: http://www.ibm.com/support/fixcentral/swg/quickorder?product=ibm/Other+software/IBM+Security+QRadar+SIEM&release=7.2.0&platform=Linux&function=fixId&fixids=7.2.0-QRADAR-FIRMWARE-M4-xx05-xx28-QVM-QRM-QIF-PCAP-1.1&includeRequisites=1&includeSupersedes=0&downloadMethod=ddp&source=fc
Preparing
- Copy the M4 appliance firmware EXE to a directory on the Windows host.
- Double-click on the Qradar_2U_M4_MT5466_xx05_xx28_QIF_PCAP_Firmware_Update_1_1.exe file.
- Select or type a directory path for the M4 firmware update and click Extract.

(Click to enlarge image) - A folder is extracted from the exe with the firmware update files.
Creating your USB key
- Navigate to the directory containing the extracted M4 Firmware files.
For example: C:\Qradar_M4_MT5466_xx05_xx28_QIF_PCAP_Firmware_Update_1_1\BootableMediaCreatorv9_64\ - Right-click ibm_utl_bomc_9.64_windows_i386.exe and select Run As Administrator.

(Click to enlarge image)
NOTE: Depending on your current permissions, you might be required to type the username and password for the local administrator account. - On the Welcome page, click Next.
- IMPORTANT: Do NOT select the Check for the latest version of this tool check box. These instructions are specific to IBM Bootable Media Creator 9.64, which is packaged with the EXE file.

(Click to enlarge image)
- On the Media Purpose page, select the Updates check box and click Next.
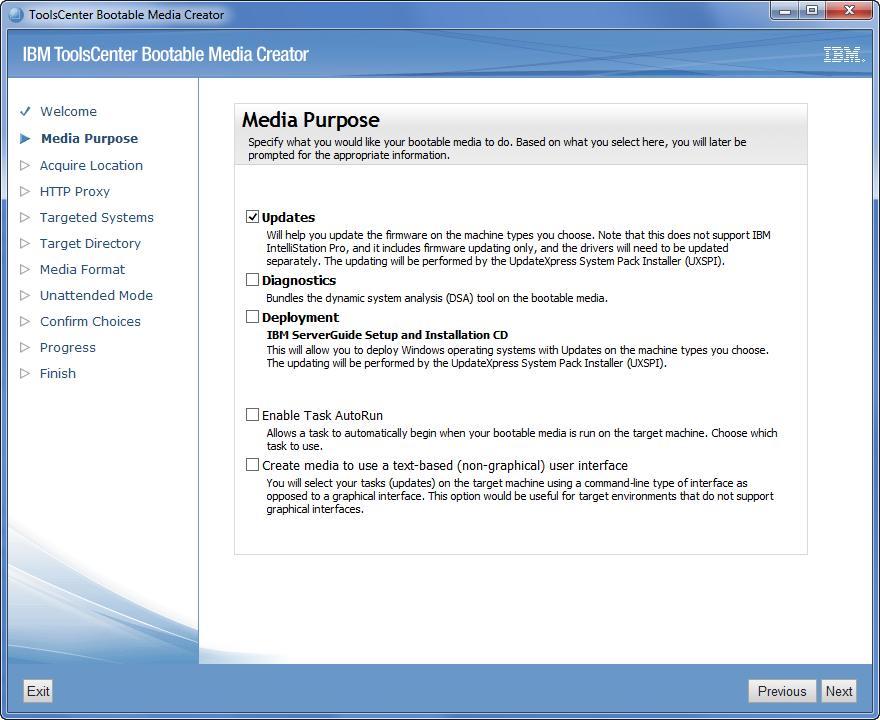
(Click to enlarge image) - Select Look in a local directory.
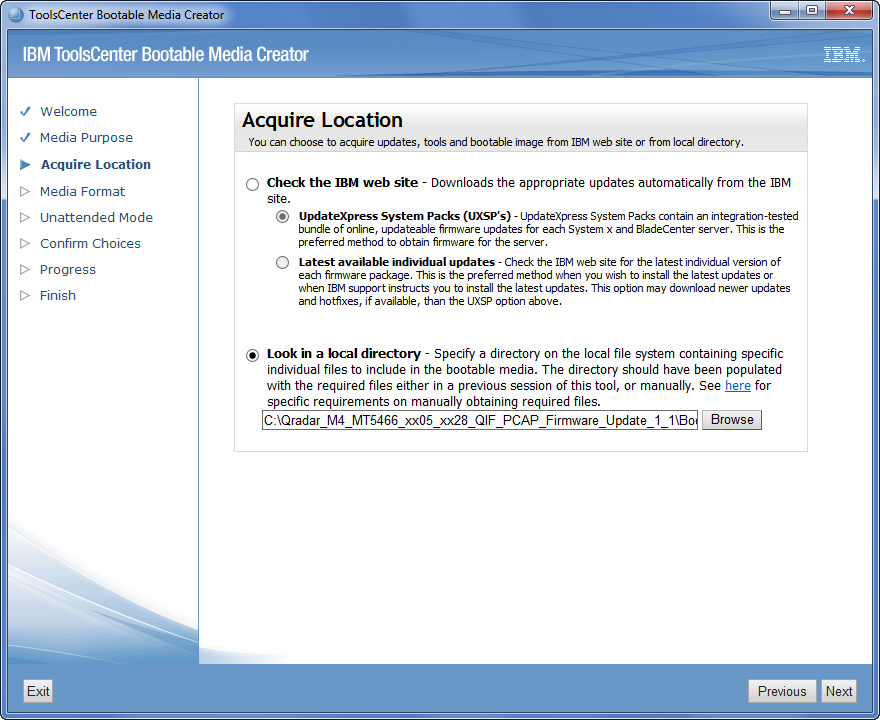
NOTE: The path to the workingdir should be inserted automatically when you select Look in a local directory. If the path is not populated, the default local directory should be the "Extract to path"\Qradar_M4_MT5466_xx05_xx28_QIF_PCAP_Firmware_Update_1_1\BootableMediaCreatorv9_64\workingdir. - Verify the USB drive has 4 GB of available space for the media format page and that your USB drive is inserted in to the Windows host.
- On the Media Format page, select USB as the Device Type, the Disk, select the Write directly to device option, and click Next.

(Click to enlarge image) -
Select Do not use unattended mode option when prompted and click Next.

(Click to enlarge image) -
Confirm the configuration for the USB drive and click Next.
Important: Do NOT remove the USB device until the bootable media creation displays a notification that the process is complete. You might be prompted to erase the USB drive before you continue.
(Click to enlarge image) -
If any previous data is detected, you are prompted to format the drive.

(Click to enlarge image) -
When complete, you are prompted to safely eject the USB drive, click Next, then click Finish.


Results
You are ready to install the firmware update on your M4 appliance.
Booting from the USB drive
The instructions below are intended for M4 appliances that are not configured as HA (high-availability) pairs. If your appliance is in a HA pair, you must use the High-Availability update instructions found here: http://www.ibm.com/support/docview.wss?uid=swg27047121#HA.- Insert the USB drive that has the bootable image into the QRadar appliance.
- From the terminal of the KVM switch for the appliance, log in by using the root credentials.
- From the command prompt, type: reboot.
- As the appliance is rebooting, press the F12 key to select a boot device.

- Select the bootable firmware image, for example, USB Storage and Press Enter.

Results
The IBM ToolsCenter software is booted.
Installing M4 firmware using the IBM Bootable Media Creator Tool
- The IBM ToolsCenter Welcome page is displayed.
IMPORTANT: Do not remove the USB flash drive until the IBM ToolsCenter completes the firmware installation. - When prompted, select the Updates option.

- Verify that the bootable media shows the correct machine type for the appliance.
NOTE: Verify that the Updates list contains x3650 M4 BD -- machine type 5466 in the updates list.Hardware Details Server Type x3650 M4 BD Server Machine Type 5466 - To start the update link, select Click here to start update.

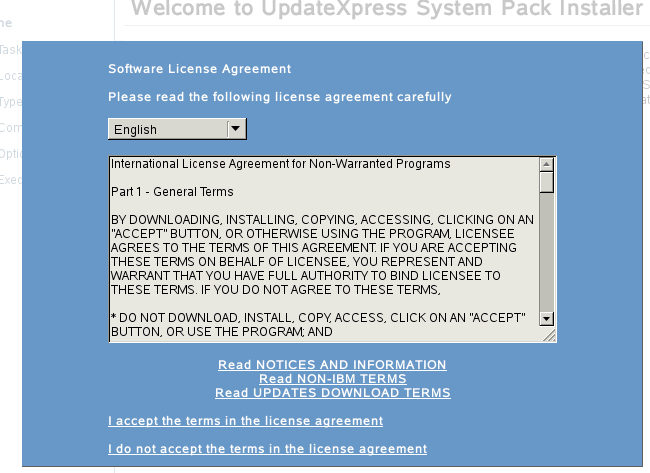
- Select your language and click I accept the terms in the license agreement to continue.
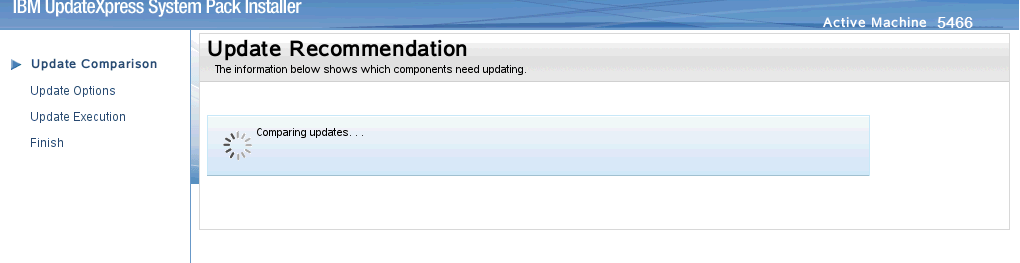
(Click to enlarge image) - The IBM UpdateXpress System Pack Installer compares the current package with the installed firmware.
(Click to enlarge image) -
From the list of selected firmware items, verify that the selected items match the firmware items to update.

(Click to enlarge image) - To start applying the updates, click Next on the Update Options page.
- The bootable media creator starts to install firmware on the M4 appliance.

- Verify that all the firmware updates are applied, and click Next to complete the update.
- After the update is complete, click Save Log to save the installation log to the USB flash drive. This file can be provided to support in case any issues occurred during the update.
- Select the USB flash drive and click OK.

(Click to enlarge image - When all updates are complete, click Finish to reboot the appliance.
Results
The appliance reboots and starts up normally. If you experience any installation issues or questions with your appliance firmware install, contact QRadar Support and upload the logs stored on the USB key to your case.
Was this topic helpful?
Document Information
Modified date:
20 September 2022
UID
swg27048389