General Page
Configuring LDAP Directory Service
Below is the configuration screen where you can set up your LDAP connection. Let’s walk through each field to understand what it does and how to fill it.
1. Use Directory Service (LDAP) Checkbox
- Description: Enable this to authenticate users through an external directory (LDAP).
- When to use: Always check this if you plan to connect with IBM LDAP, OpenLDAP, or Microsoft AD.
2. LDAP Type
- Options: IBM LDAP, OpenLDAP, Microsoft AD
- Choose based on your existing LDAP infrastructure. Refer to the Supported LDAP Types section for more info.
3. Destination Address
What it is:
The hostname or IP address of your LDAP server.
Examples:
- ldap.example.com
- 192.168.1.10
What to enter:
Enter the address where your directory server is running. Make sure it's reachable from the system you’re configuring this on.
Tips:
- Use FQDN (fully qualified domain name) in production for better DNS resolution.
- Ensure firewall rules allow access to this server on the selected port.
4. Destination Port
- What it is:
The network port through which your application will communicate with the LDAP server. - Common Values:
- 389 → for standard, unencrypted or StartTLS LDAP communication.
- 636 → for secure LDAP (LDAPS), which uses SSL/TLS.
- When to use which:
- Use 389 if you're not enabling SSL or using StartTLS.
- Use 636 if SSL/TLS is enabled in the configuration.
- Tip:
Make sure the LDAP server is listening on this port (you can test with tools like telnet or nmap).
Optional Add-On (for advanced users):
If you're connecting over LDAPS (port 636), ensure that the LDAP server’s certificate is trusted by the client machine (you may need to import it into a truststore).
5. Administrator Distinguished Name (Bind DN)
What it is:
The full LDAP path (DN) of a user that the system will use to bind (log in) to the LDAP server.
What to enter:
You must provide the complete distinguished name (DN) of a user with permission to search the directory.
Format Examples:
|
LDAP Type |
Example DN |
|
OpenLDAP |
cn=Manager,dc=example,dc=com |
|
ApacheDS |
uid=admin,ou=system |
|
Microsoft AD |
cn=Administrator,cn=Users,dc=company,dc=local |
Tip: You can find this value using an LDAP browser (like Apache Directory Studio) or from your LDAP admin.
Important Notes:
- The user must have read/write access.
- This is sometimes called the Bind DN.
6. Administrator Password
What it is:
The password associated with the Administrator DN you just entered.
What to enter:
Provide the password of the user account you used in the Administrator Distinguished Name field.
Security Tip: Ensure the password is stored securely and is not shared. If the password is incorrect, the application will fail to bind to the LDAP server.
7. Distinguished Name Suffix (Base DN)
What it is:
This is the starting point in the LDAP tree (called the Base DN) from where the system will search for users, groups, and other entries.
What to enter:
The DN of the organizational unit or domain under which your users and groups are organized.
Format Examples:
|
LDAP Type |
Example Base DN |
|
OpenLDAP |
dc=example,dc=com |
|
ApacheDS |
dc=apacheds,dc=com |
|
Microsoft AD |
dc=company,dc=local |
|
|
Tip: The Distinguished Name Suffix must match the structure of your LDAP directory. You can verify this using tool like ldapsearch.
Important Notes:
- This value restricts the search scope for LDAP queries.
- If it's incorrect, no users or groups will be found, even if the bind is successful.
- This value is case-sensitive. Please use the same suffix as configured on the server.
8. SSL/TLS Option
What it is:
This setting controls whether the application communicates with the LDAP server over a secure (encrypted) connection.
Options:
- Yes → Use SSL/TLS for encrypted LDAP (LDAPS).
- No → Use standard, unencrypted LDAP.
When to use:
- Select Yes if your server supports LDAPS (usually on port 636).
- Select No for non-secure LDAP (usually port 389).
For SSL/TLS Connection:
As part of the SSL configuration, please add the keystore details and set up the SSL certificate on the LDAP server. Kindly confirm which server is being used for the LDAP connection. Additionally, place the client keystore file in the HOD publish directory under the \bin\ folder with the name HODServerKeyStore.jks.
Note: This option is disabled for IBM LDAP, as we do not support secure connections for IBM LDAP.
Workflow Example
After entering all the connection details of LDAP, it will connect to the LDAP server based on the details.
Please refer below screenshot: -
After successful connection, it will create a below directory hierarchy in LDAP. Please refer below screenshot: -
Note: When you are choosing OpenLDAP option (that includes both ApacheDS and OpenLDAP), then the directory hierarchy will create as shown in above image.
While you are connecting with Microsoft AD then the hierarchy will create as shown in below image:
Here, in this example Distinguished suffix for Microsoft AD is “DC=hodtest,DC=com”
Now, you can add group, user and sessions etc.
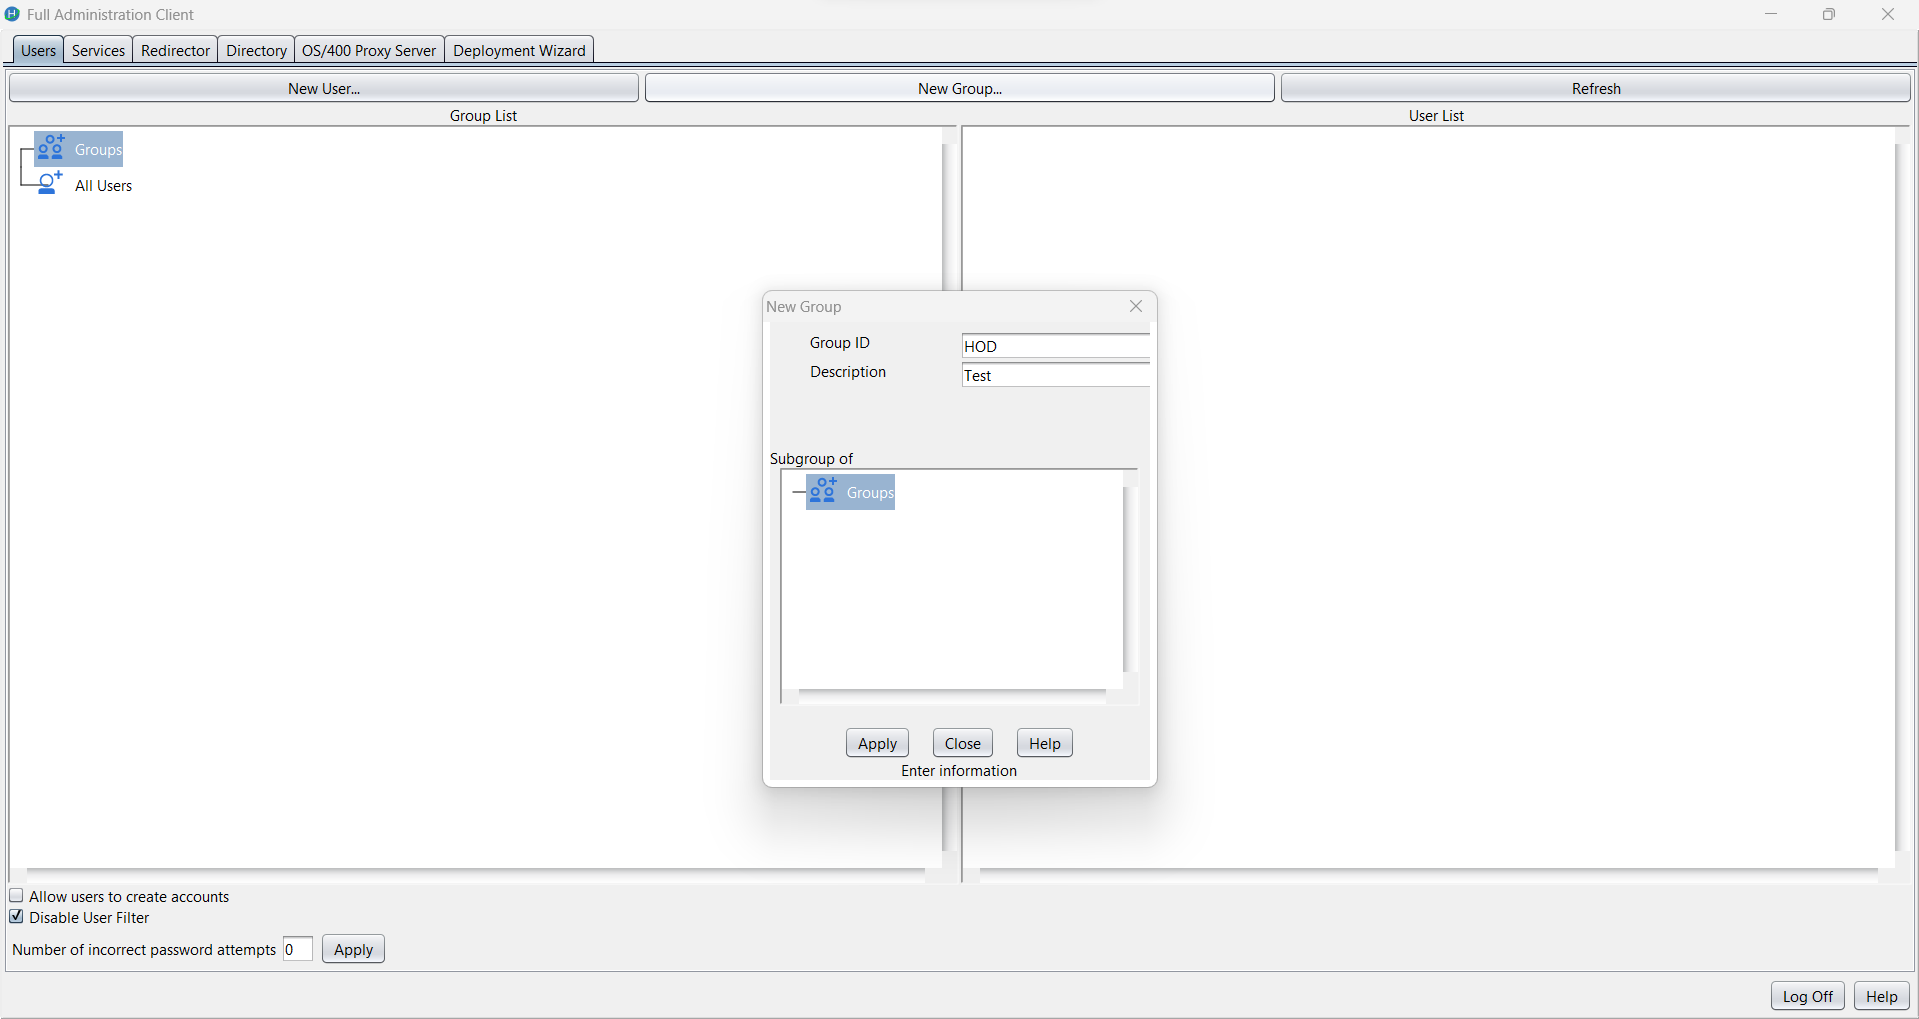
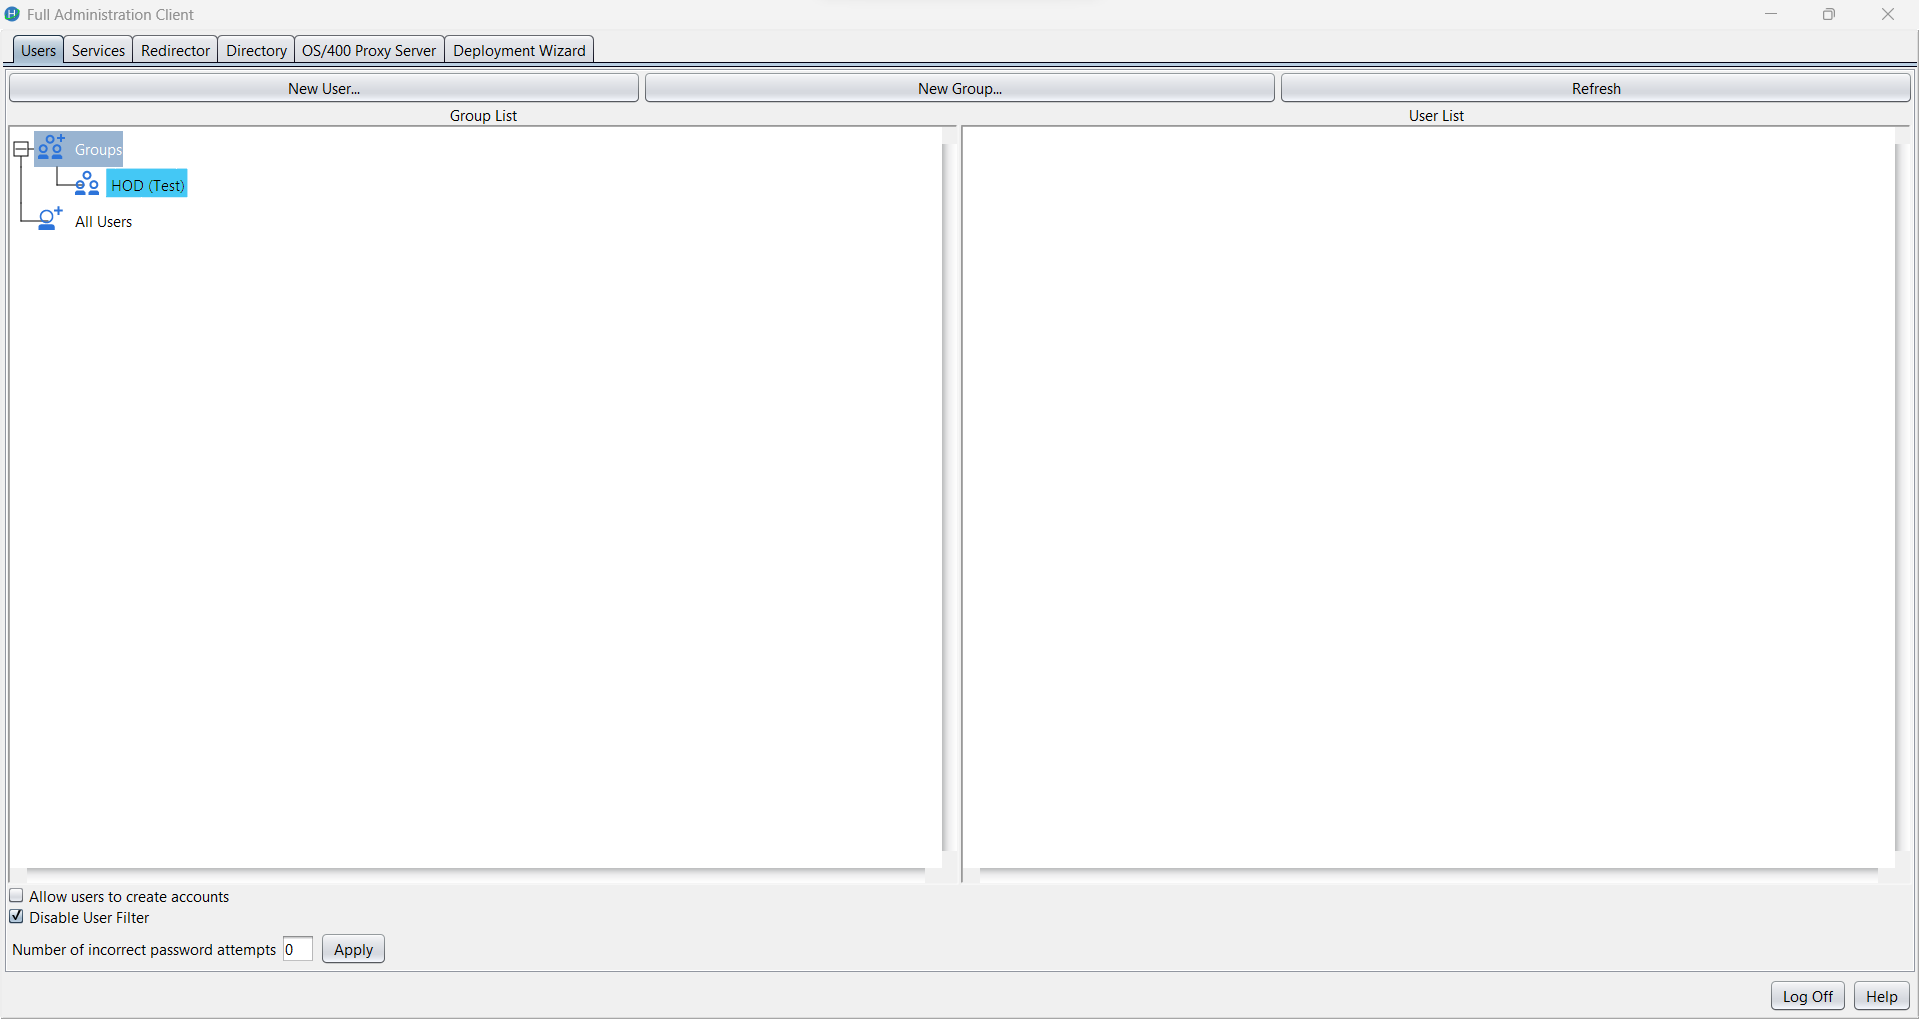
1. Group creation: -
2. User creation: -
Note: When the admin is connected to any LDAP server, the password field is mandatory for user entries.
If a user is created with a blank password in the HOD server and during migration to LDAP directory, the application may enforce a default password policy, such as assigning a default password i.e ‘changeit’ to ensure the migrated entry remains valid for authentication.
All the above operations details are saved in LDAP directory. Please refer below screenshot:
Migration functionality
We can perform the migration by selecting the ‘Migrate Configuration to Directory Service’ checkbox. This action will migrate groups, users, and their associated session data into the LDAP directory.
Please note that there are certain implications and limitations involved in migrating to LDAP. For more details, please refer to the documentation at the provided link.
DIRECTORY UTILITY
Alternatively, users and groups can also be created using the Directory Utility.
For more information about Directory Utility, please refer to the documentation at the provided link.
Supported LDAP TYPES
1. IBM LDAP (IBM Tivoli Directory Server)
IBM LDAP, often referred to as IBM Tivoli Directory Server (TDS), is a commercial, enterprise-grade LDAP server from IBM.
Key Features:
- High scalability and performance.
- Enterprise-level replication, failover, and load-balancing support.
2. OpenLDAP (Includes ApacheDS and OpenLDAP)
The "OpenLDAP" option in the UI refers to open-source LDAP implementations, and this supports both:
a. OpenLDAP
OpenLDAP is the most widely used open-source LDAP server.
🔹 Key Features:
- Lightweight and highly configurable.
- Runs on most Unix/Linux systems.
- Fully supports LDAPv3 standards.
b. ApacheDS (Apache Directory Server)
ApacheDS is another open-source LDAP server developed under the Apache Software Foundation.
🔹 Key Features:
- Pure Java implementation.
- Comes with Apache Directory Studio for easy schema and data management.
Note: Both OpenLDAP and ApacheDS are selected via the same "OpenLDAP" dropdown option in the UI. The backend will treat them similarly from a protocol and schema standpoint, though certain advanced features may differ.
3. Microsoft Active Directory (AD)
Microsoft AD is a directory service developed by Microsoft for Windows domain networks. It is widely used in enterprise IT environments.
🔹 Key Features:
- Combines LDAP for directory access and Kerberos for authentication.
- Supports domain-based structure with Group Policy Objects (GPOs).
- Built-in support for user, computer, and group management.
Post-installation ldap schema configuration
1. IBM LDAP (IBM Tivoli Directory Server)
If you are running a version of LDAP that does not support the schema for Host On-Demand, install the Host On-Demand schema extension files as described in Installing the schema extensions. (The schema extension files are not required for IBM LDAP Version 3.x or later.)
2. OpenLDAP (Includes ApacheDS and OpenLDAP)
a. OpenLDAP
Include below schema files in slapd.conf file, if not loaded by default in configuration: -
include /usr/local/etc/openldap/schema/core.schema
include /usr/local/etc/openldap/schema/cosine.schema
include /usr/local/etc/openldap/schema/java.schema
Stop the slapd process then start with updated schemas: -
Get slapd process
- ps aux | grep slapd
Kill process id
- sudo kill 84630
Start slapd process
- sudo /usr/local/libexec/slapd -f /usr/local/etc/openldap/slapd.conf
Note: Check all above directory locations according to your installation directory
b. ApacheDS (Apache Directory Server)
No schema updation required.
Note: Below object class and attribute should be available in schema.
3. Microsoft Active Directory (AD)
Please do all the below schema changes while login with ‘Administrator’ user in windows server.
Note: All below steps are performed in Windows Server 2022 Standard
1. Open Run (Win + R), type:
mmc.exe
2. Go to File → Add/Remove Snap-in.
3. Select Active Directory Schema → Click Add → Click OK.
Note: If ‘Active Directory Schema’ not found then run below command in cmd (run as administrator).
regsvr32 schmmgmt.dll
Change 1:
1. Expand Classes.
2. Find document object -> right click open properties -> go to Relationship tab.
3. In Possible Superior section below object should be there (if not please add missing objects from clicking “Add superior”):
container, device, document, groupOfNames, organizationalPerson, organizationalUnit.
4. After adding above objects, click on apply and ok and close the window.
Change 2:
1. Right click on Attributes from left pane.
2. Create New Attribute: -
3. Add below details: -
- Common Name: javaSerializedData
- LDAP Display Name: javaSerializedData
- Unique X500 Object Id: 1.2.840.113556.1.4.7000.500.2
- Description: Custom attribute to store large binary data
- Syntax: Octet String
- Minimum: 0
- Maximum: 2147483647
Note: Please don’t select multi-valued checkbox
4. Click on OK, this attribute should be added and visible on attributes list. This attribute status should be active.
Change 3:
1. Right click on Classes from left pane.
2. Create New Class and add below details: -
3. Add below details: -
- Common Name: extensibleObject
- LDAP Display Name: extensibleObject
- Unique X500 Object Id: 1.2.840.113556.1.8000.1000.1.3
- Description: Custom auxiliary object class for additional attributes
- Parent class: <empty>
- Class Type: Auxiliary
4. Click on Next.
5. In Optional text field: -
Add javaSerializedData attribute
6. Click on finish, this class should be added and visible on classes list. This class status should be active.
7. After all the schema changes, you can check the schema changes in LDAP client after making a connection of Microsoft AD
8. If schema changes are not visible:
- Run below command in CMD using administrator user:
- net stop ntds
- net start ntds
Helpful ldap Resources
Was this topic helpful?
Document Information
Modified date:
14 October 2025
UID
ibm17238822