Troubleshooting
Problem
This document describes how to set up a PC as temporary AOS gateway with AOS 3
Resolving The Problem
This section describes, how to set up a customer's PC or the IBM service representative's ThinkPad as AOS gateway in an unattended computer room. The basic steps are:
- HTTP link creation for software download.
- Port forwarding configuration.
- Port forwarding usage.
1. SSR / IBM service representative Tasks: It is required that a PC is connected to the Internet (IBM intranet is not required) and to the IBM device at the same time. For example, 3G and wired Ethernet.

2. Support Center Task: Start your AOS Client and log-in. Then, click "Create HTTP Link". This action needs to be done on the support center's PC.

3. Support Center Task: Complete the form and click "OK" to continue. This action needs to be done on the support center's PC.

4. Support Center Task: AOS provides you a URL. This URL must be sent to the Customer and the IBM service representative (Notice the Connection Code) as needed. This action needs to be done on the support center's PC.
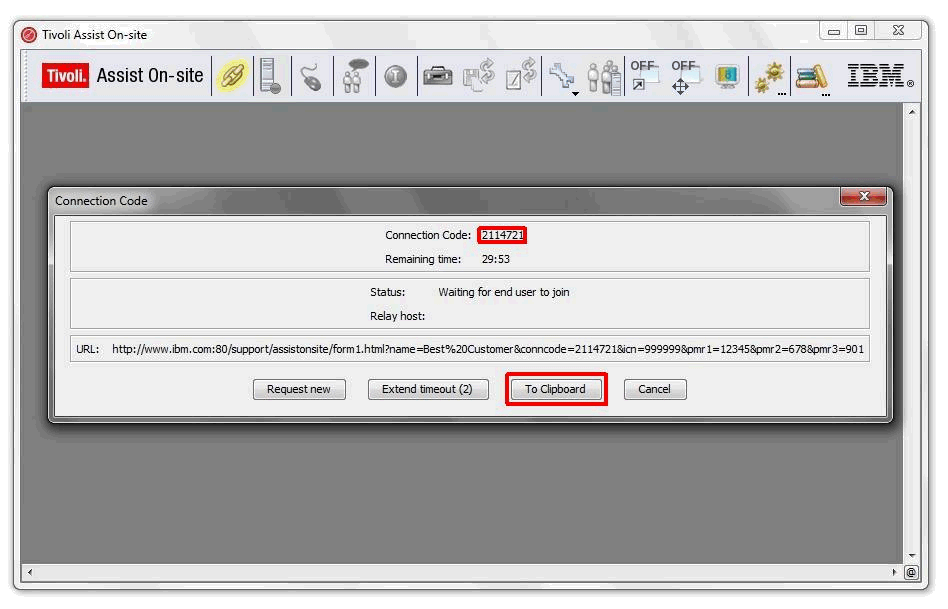
5. SSR / IBM service representative Tasks: Have the IBM service representative or Customer open the link. Your provided Information is displayed for verification. Note the Connection Code. It is required in a later step. The customer or the IBM service representative needs to agree. This action needs to be done on the customer's or the IBM service representative's PC.

6. SSR / IBM service representative Tasks: After the agreement, a file download is started. You can run the file from there or save and run it. This action needs to be done on the customer's or the IBM service representative's PC.

7. SSR / IBM service representative Tasks: Type in the Connection Code you´ve noticed. This action needs to be done on the customer's or the IBM service representative's PC.

8. SSR / IBM service representative Tasks: A window is displayed, which states that somebody wants to connect your PC. Click "Accept". This action needs to be done on the customer's or the IBM service representative's PC.

9. SSR / IBM service representative and Support Center Tasks: By default you receive a Chat Window.

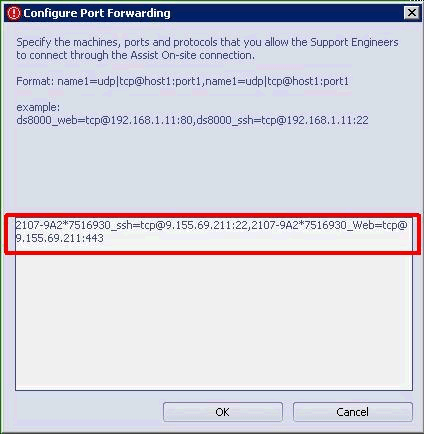
10. SSR / IBM service representative Tasks: The IBM service representative must now configure port forwarding on their Laptop. It is required to have the HMCs internal IP addresses.

Depending which IP range, which microcode the machine is running, which HMC you want to connect to and which network the customer's or the IBM service representative's PC is connected, it is one of the following:
Bold = Release 3 and lower
Normal = Release 4 and higher
| Black NW | Gray NW | |
| HMCa | 172.16.0.1 | 172.17.0.2 |
| HMCb | 172.16.0.2 | 172.17.0.1 |
| HMCa | 172.16.0.3 | 172.17.0.4 |
| HMCb | 172.16.0.4 | 172.17.0.3 |
| HMCa | 10.235.158.1 | 10.236.158.2 |
| HMCb | 10.235.158.2 | 10.236.158.1 |
| HMCa | 10.235.158.3 | 10.236.158.4 |
| HMCb | 10.235.158.4 | 10.236.158.3 |
| HMCa | 192.168.162.1 | 192.168.164.2 |
| HMCb | 192.168.162.2 | 192.168.164.1 |
| HMCa | 192.168.162.3 | 192.168.164.4 |
| HMCb | 192.168.162.4 | 192.168.164.3 |
| HMCa | 9.15.132.1 | 9.16.132.2 |
| HMCb | 9.15.132.2 | 9.16.132.1 |
| HMCa | 9.15.132.3 | 9.16.132.4 |
| HMCb | 9.15.132.4 | 9.16.132.3 |
Here are some examples for IBM FlashSystems.
| This is an example for FlashSystems 820: | |
| Config (You can use copy / paste, but keep an eye on the IP addresses) | Description |
FlashSystem_MCP1_ssh=tcp@192.168.1.101:22 | Configures port forwarding to MCP1 for SSH to use CLI |
FlashSystem_MCP2_ssh=tcp@192.168.1.102:22 | Configures port forwarding to MCP2 for SSH to use CLI |
FlashSystem_MCP1_https=tcp@192.168.1.101:443 | Configures port forwarding to MCP1 for SSL to use GUI |
FlashSystem_MCP2_https=tcp@192.168.1.102:443 | Configures port forwarding to MCP2 for SSL to use GUI |
| This is an example for FlashSystem 840/900: | |
| Config (You can use copy / paste, but keep an eye on the IP addresses) | Description |
FlashSystem_Clust_ssh=tcp@192.168.1.101:22 | Configures port forwarding to the Cluster IP for SSH to use CLI |
FlashSystem_SIP1_ssh=tcp@192.168.1.102:22 | Configures port forwarding to the Service IP1 for SSH to use CLI |
FlashSystem_SIP2_ssh=tcp@192.168.1.103:22 | Configures port forwarding to the Service IP2 for SSH to use CLI |
FlashSystem_Clust_https=tcp@192.168.1.101:443 | Configures port forwarding to the Cluster IP for SSL to use CLI |
FlashSystem_SIP1_https=tcp@192.168.1.102:443 | Configures port forwarding to the Service IP1 for SSL to use CLI |
FlashSystem_SIP2_https=tcp@192.168.1.103:443 | Configures port forwarding to the Service IP2 for SSL to use CLI |
11. SSR / IBM service representative Tasks: The syntax is "nickname=tcp@IPaddress:Port". For example: 2107-9A2*7516930_ssh=tcp@172.16.0.1:22
12. SSR / IBM service representative Tasks: After the IBM service representative saves the configuration, they change to Port Forwarding mode.
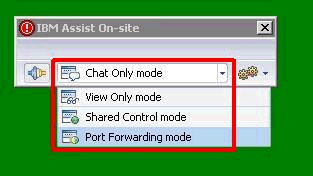
13. Support Center Task: Now the window is change from Chat Only to Port Forwarding and you see the previous configured connections in state "Disconnected".

14. Support Center Task: Confirm all informal messages and start the tunnel. Select a Port, which is free on your ThinkPad. If you have no SSH server running, port 22 is free to use.

15. Support Center Task: The status changes from "Disconnected" to "Connecting". Now you can ssh to your localhost address (127.0.0.1) with ZOC or PuTTY. The status is change to "Connected".
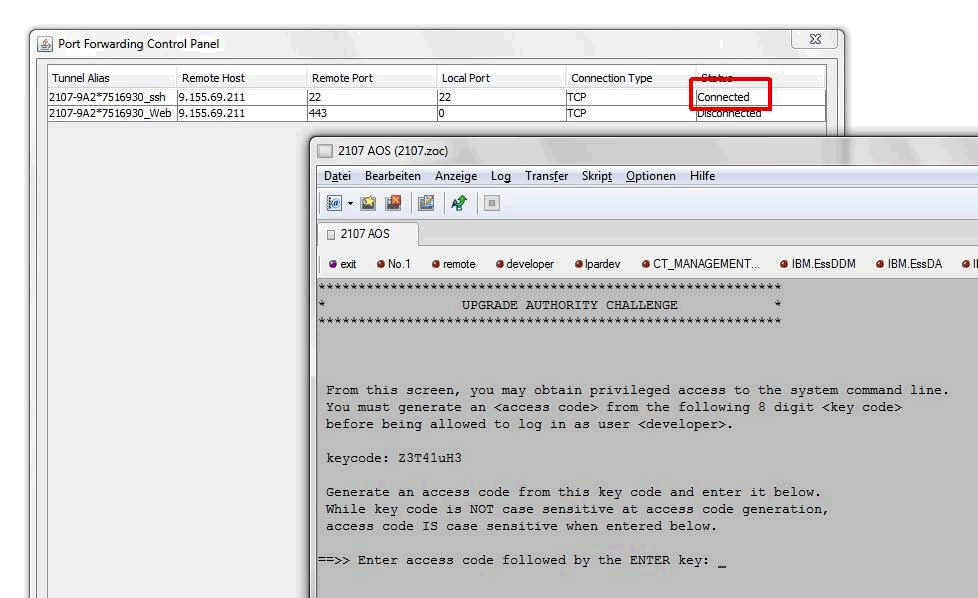
16. Support Center Task: Click "Disconnect Session" to disconnect.
Related Information
Was this topic helpful?
Document Information
Modified date:
17 February 2023
UID
ssg1S1010309