Question & Answer
Question
Answer
Options for Configuring a ACS Printer Session
The following ways can be used to configure a ACS printer session, each with its own benefits. The options are listed with the most common configuration listed first
| 1. | Configure the ACS printer session to use Host Print Transform (HPT): This is the most common configuration for PCL-capable and line printers. In using HPT, the conversion from the SCS or AFPDS printer data stream to the data stream for the PCL printer to be done on the operating system. This also provides control over how the output is printed by allowing you to retrieve, modify, and create your own Workstation Customization Table (WSCST). Note: If printing to a host-based HP LaserJet printer that also supports HP PCL5e, or a host-based HP OfficeJet that also supports PCL3, you may be able to still use Host Print Transform (HPT) with an ACS printer session. However, it is recommended that you configure a second instance that uses the HP Universal Print Driver for Windows, which you can download from hp.com. Your Windows applications can continue to use the printer driver supplied with the printer, but you can setup the ACS printer session to use the HP Universal Print Driver for Windows. |
| 2. | Configure the ACS printer session to use Java Print Service: This is referred to GDI printing, Windows Only or Host-Based printing. Note: Configuring the ACS printer session to use Java Print Service is the only option available for Host-based or Windows-only printers. Some users have had issues with the font selection when printing to a Host-based or Windows-only printer, however it may help to download, install and select a Universal Print Driver from the printer manufacturer, assuming a Universal Print Driver is available. |
| 3. | Configure the ACS printer session to use a Printer Definition Table (PDT): This gives you control over how the output is printed by allowing you to copy and modify a Printer Definition Source File (PDF) and then create your own PDT file. |
| 4. | Configure the ACS printer session to Print To File: At times it is necessary to generate a simple text file of the SCS spooled file. Use this option to print an SCS spooled file on the IBM i to an ASCII text file on the PC. |
- From ACS 5250 Session Manager, select the button on the right for NEW MULTIPLE SESSIONS.
- This brings up a list of the existing .hod files.
- Select the display session, then click ADD.
- Select the printer session, then click ADD.
- Add any other sessions as needed.
- Select FILE / SAVE and provide a name.
- This will be shown in the 5250 Session Manager.
- Right click on the icon and select COPY TO DESKTOP.
- The user would only need to double click the icon on the desktop to start the sessions.

- Some Information About Specifying a Workstation ID
ACS printer sessions support device naming (requesting a specific operating system device description name) by specifying a workstation ID. It is recommended that you specify a specific workstation ID for your ACS printer sessions so you can rely on it always having the same name. Otherwise, your printer session could connect with one device description name one day and a different device name the next day. If a specific name is used all the time, that name can be specified in a user profile or a printer file to direct output to that specific printer.
The workstation ID must follow the same rules as any other operating system device description:- Must be 10 characters or less
- Must start with an alphabetic character (A through Z)
- The remaining characters can be an alphabetic character (A through Z), a numeric character (0 through 9), "$", "#", "@", "_" or "."
If a Workstation ID is not specified, then the printer device name will be named using the default naming convention, QPADEVxxxx, where xxxx is a four character alphanumeric value. The Generate option for the Workstation ID allows you additional options to assign the workstation ID:- Use computer name. Use the name of the computer as defined on the Identification tab of the Network properties page of the Windows Control Panel.
- Use user name. Use your Windows logon user ID.
- Specify workstation ID. Provides a space for you to type the name of this workstation (up to 10 characters, must not start with a numeric and cannot contain a blank or any of the following characters: &, *, %, =, and +).
- Add prefix to indicate printer or display. Specify this option to append a P or an S to the beginning of the device name.
- Avoid duplicate names on this workstation. Specify this option to append a short session ID (A, B, C, and so on) to the end of the device name. This ensures that your workstation ID will not conflict on this workstation.
- Avoid duplicate names with other workstations. Specify this option to append a character in the range of 1 through 9 and A through Z to the end of the device name. This ensures that your workstation ID does not conflict with the workstation IDs from other workstations. If you specify Avoid duplicate names on this workstation in addition to this option, the short session ID is appended first.
Note: It is recommended that Avoid duplicate names on this workstation and Avoid duplicate names with other workstations not be used with printer sessions. These options can be very useful for display sessions because they allow a user to bring up several display sessions and to sign on multiple times to a single server. There is rarely ever a need to configure several printer sessions for a single printer to the same server. These options can cause the workstation ID to change each time the printer session is connected; therefore a user can not rely on their printer having the same name each time. It could also cause a specific workstation ID to be assigned to one user's printer on one day, and another user's printer the next day.
Printer Must First be Installed within WindowsTo configure an ACS printer session, the printer's print driver must first be installed and configured within Windows and the Windows PC must be able to successfully print to that printer.
For assistance with installing the print driver, please refer to the manufacturers instructions or contact the manufacturer or Windows support for assistance.
Note: When using Host Print Transform with a PCL-capable printer, the IBM i is sending a PCL 5 data stream. It may be sending a PCL 4 data stream depending on the Printer Model selected, however, PCL 5 is the most common. If the printer hardware is using PCL 6, ensure that the print driver is a STANDARD driver, which is backward compatible to PCL 5. Often, a PCL 6 print driver is listed only as PCL 6, which may be the ENHANCED driver, which is not backward compatible to PCL 5. If a PCL 6 Standard driver is not available for the printer, locate and download a Universal Print Driver (UPD) for the printer, which should be backward compatible to PCL 5. If unable to locate a PCL 5 or UPD for the printer you are using, contact the printer manufacturer to ask what PCL 5 driver will work with your printer.
PC print drivers may be automatically installed or can be installed using the Add Printer Wizard from the Windows Printers and Devices program folder.
After the print driver is installed, confirm that Windows is able to successfully print to the printer.
Create a New Printer Session
After the Windows print driver has been installed and confirmed that you are able to print a Windows Test Page to the printer, create a new ACS printer session by using the step-by-step instructions below. Not all configuration screens are included and are assumed will be left at the default settings. Not included are the Advanced, Backup Servers, TLS/SSL, SLP, Preferences, Start Options and Language settings. Though you may make changes to those settings, they are typically left as the default. Use HELP if you have further questions on settings not covered in this document.
| 1. | From the IBM i Access Client Solutions Welcome window, ensure the System is identified, then in the Management section, click on 5250 SESSION MANAGER. |
| 2. | From the Session Manager, click on NEW PRINTER SESSION |

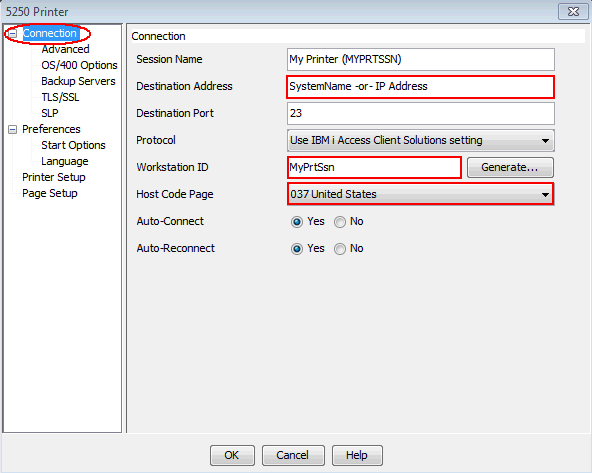
| 3. | On the CONNECTION settings, specify the DESTINATION ADDRESS as either the system name or IP address and WORKSTATION ID. Refer to the section titled Some Information About Specifying a Workstation ID for more information on the Workstation ID options. Set the Host Code Page accordingly. Optionally, you can provide a Session Name, which will be showed at the top or on the tab of the started printer session on the PC. A suggestion would be to set it to the same name as the Workstation ID. If using SSL for the connection, the Destination Port and Protocol can be changed accordingly. Leave the Auto-Connect and Auto-Reconnect as the default or optionally, change one or both to No. |
| 4. | Select one of the configuration options below based on the printer being configured |
- 1. Configuring a printer to use Host Print Transform (HPT)
1A. To configure a PCL-capable printer to use Host Print Transform (HPT):On the OS/400 Options settings:
Select Use HPT as Yes
Select the appropriate Printer Manufacturer and Printer Model.
Specify the Paper size (Source 1) as the paper size loaded in the printer. Do the same for Paper size (Source 2), if applicable.
Unless using a Workstation Customization Object (WSCST), Use Customizing Object would be No. If a WSCST object will be used, then select Yes and specify the Customizing Object Name and Library.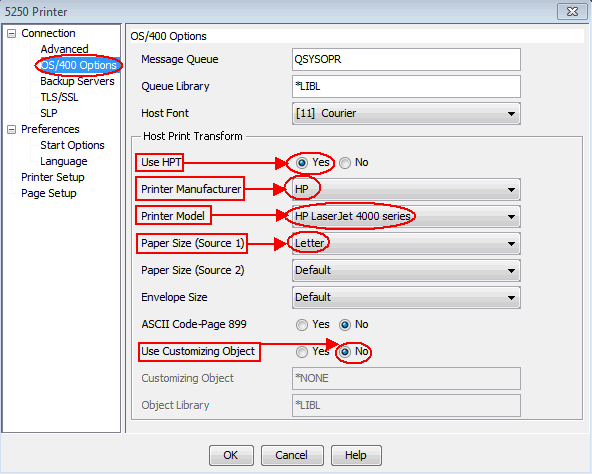 To configure a line printer to use Host Print Transform (HPT):On the OS/400 Options settings:
Select Use HPT as Yes
Note when selecting Use Customizing Object as Yes, the Printer Manufacturer and Printer Model fields are greyed out.
Specify the Paper size (Source 1) as the paper size loaded in the printer, such as Continuous sheet (80 columns) or Continuous sheet (132 columns).
Select Use Customizing Object as Yes.Specify the Customizing Object and Object Library names.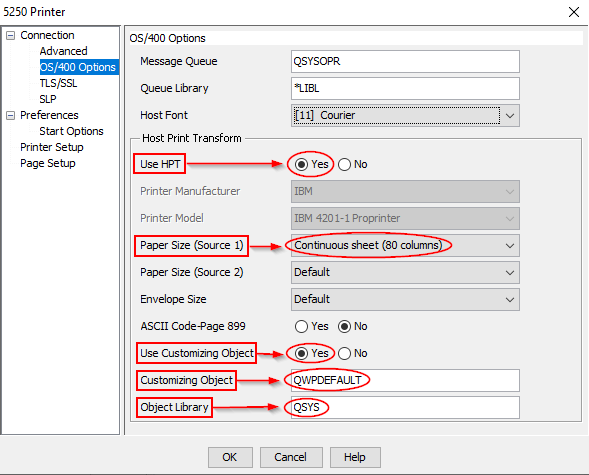 1B.
1B.On the Printer Setup settings:
NOTE: It is recommended that the Windows print driver that will be used for the printer session be assigned as the Windows Default print driver, which is how the following screen shows. To designate the Windows print driver as the default driver, right click on the print driver from the Devices and Printers program group and select Set as Default Printer. Once set as default, there will be a check mark by the image of the printer.
Specify Print To as Windows Printer
Specify Choose Windows Printer as Use Default (recommended)
NOTE: Refer to step 2B in the section titled 2. Configuring a Windows Only / Host-Based Printer to Use Java Print Service for an example of selection Other for the Windows print driver.
Specify Use Printer Definition Table as No
NOTE: This option will override the use of Host Print Transform on the OS/400 Options settings. Leave this set to No if intending to use HPT.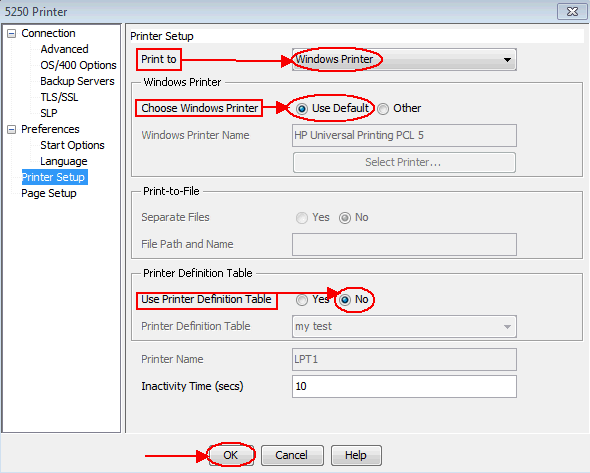
1C. Click on OK to create the printer session.
- 2. Configuring a Windows Only / Host-Based Printer to Use Java Print Service
Use this option only if using a Windows Only or Host-Based printer. Also known as GDI Printing.2A. On the OS/400 Options settings:
Select Use HPT as No
2B. On the Printer Setup settings
Specify Print To as Windows Printer
Specify Choose Windows Printer as Use Default (recommended), or in this example, select Other, then click on Select Printer to select from a list of Windows printers installed on the PC
Specify Use Printer Definition Table as No
Click on Select Printer...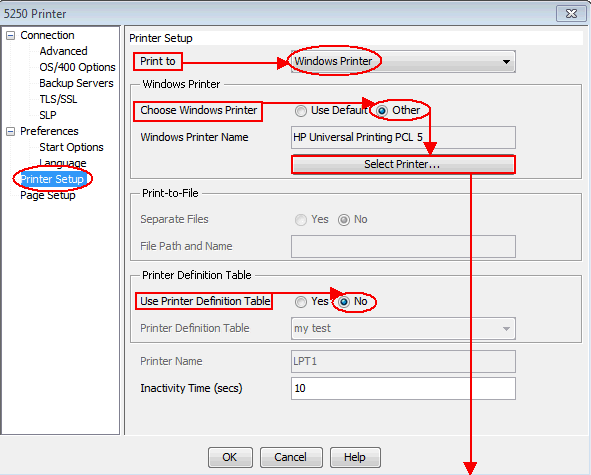
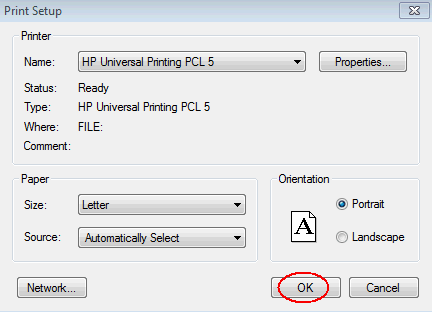
In the Print Setup window which is displayed after clicking the Select Printer ... button:
Use the pull down list to select the appropriate print driver
Note that the paper size and orientation can be set here also
Click on OK after making any selections
2C. On the Page Setup settings
Select User Java Print Service as Yes
Optionally, select if Automatic Page Orientation or Best Fit scaling is to be performed.
The recommendation is to set Best Fit to Yes
Note: Automatic Page Orientation will be performed for any spooled file that has a width greater than 80 columns. If the file is greater than 80 columns, the output is rotated 90 degrees for a landscape page. If Best Fit is also specified as Yes, the output will be scaled to fit on the page.
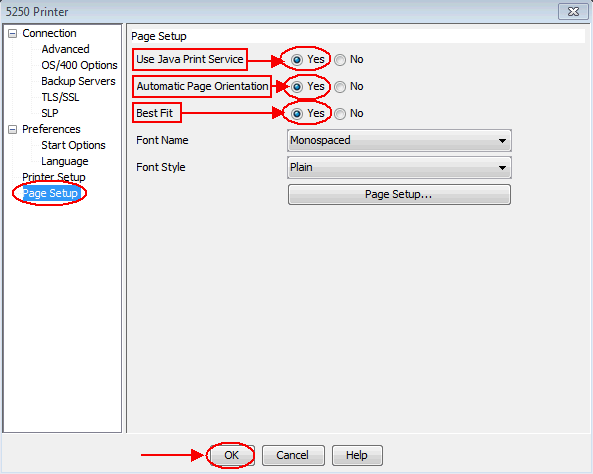
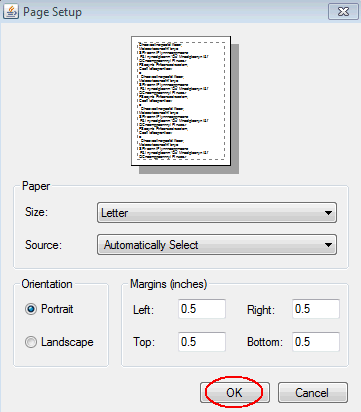
If Automatic Page Orientation is set to No, the Page Setup options allow you to select if the file is to print portrait or landscape and optionally set margins. 
Click on OK after making any changes to Page Setup. 2D. Click on OK to create the printer session.
- 3. Configuring the Printer Session to Use a Printer Definition Table (PDT)
3A. On the OS/400 Options settings
Select Use HPT as No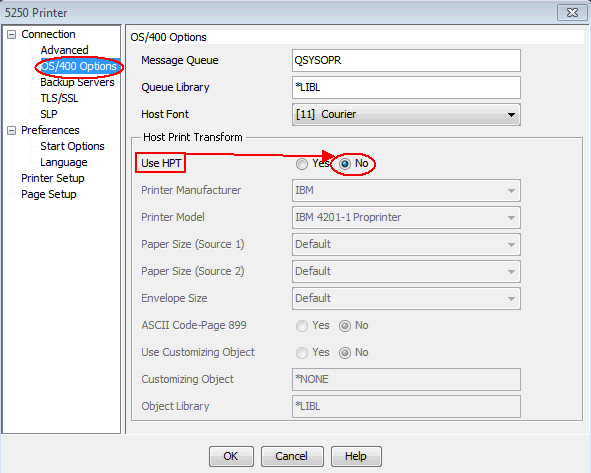
3B. On the Printer Setup settings
Specify Print To as Windows Printer
Specify Choose Windows Printer as Use Default (recommended), or select Other, then click on Select Printer to select from a list of Windows printers installed on the PC
Specify Use Printer Definition Table as Yes
Select the Printer Definition Table to use from the pull down list
NOTE: For more information on migrating existing PDT files or creating PDT files, refer to the Help Contents from the IBM i Access Client Solutions - Session Manager (HELP / HELP CONTENTS). Locate and click the Printer Definition Table Compiler link under the PDT Compiler Tool Menu Option.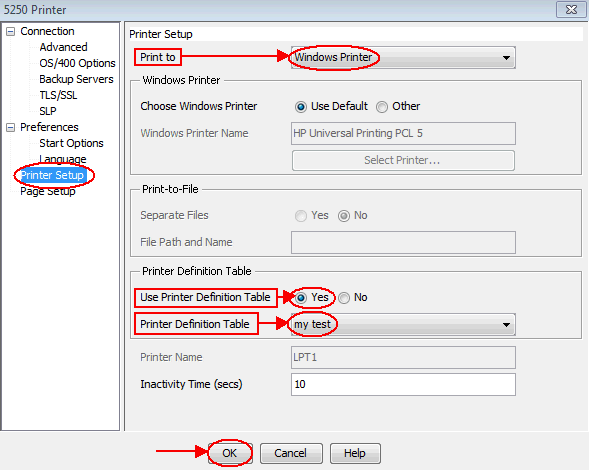
3C. Click on OK to create the printer session
- 4. Configuring the Printer Session to Print To File
In using IBM i Access for Windows to print a spooled file to a PC text file, the Windows print driver was configured to Print To File. When a file was printed though the PC5250 printer session configured to use that Windows print driver, a prompt was displayed for the user to identify the path where the text file would reside and the name of the file.
In using IBM i Access Client Solutions, the Windows print driver is not configured to Print To File. If it is, no prompt will appear for the user to specify the path and name of the file.4A. On the Printer Setup settings:
Specify Print To as File
In the Print-to-File section, specify Separate Files as Yes or No
NOTE: If Separate Files is Yes, each spooled file will be a separate text file on the PC. The name provided in the File Path and Name field will be appended with an alphanumeric value to prevent duplicate text file names. If Separate Files is No, all spooled files will be contained in a single text file.
Specify the File Path and Name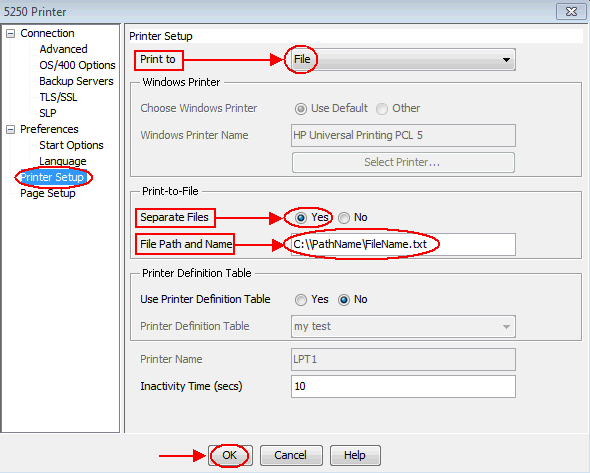
4B. Click on OK to create the printer session.
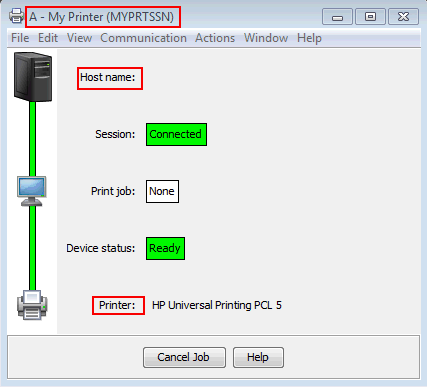
After clicking on OK to create the printer session, you will be prompted with a Signon to IBM i window to provide your IBM i log on credentials.
After entering your IBM i user ID and password, click on OK
This is an example of the started session that shows the Session Name as configured on the Connection settings, the Host Name as configured as the Destination Address on the Connection settings and the Windows print driver as configured on the Printer Setup settings.
The view of this session can be modified by changing the Preferences (EDIT / PREFERENCES / APPEARANCE / WINDOW SETUP ...)

Additionally, other information can be shown in the display by selecting the VIEW menu option. The optional information that can be included are:
Menu, Graphic Display, Graphical OIA, Textual OIA, Status Bar and Quick Connect
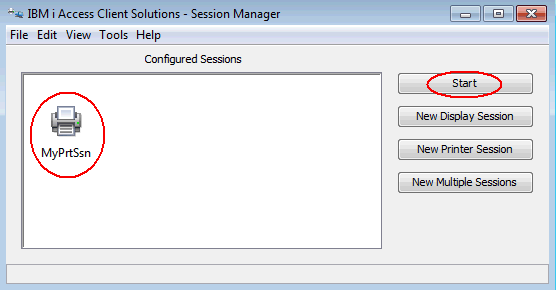
| 5. | Save the printer session by clicking on FILE / SAVE Specify the desired name for the session and click on SAVE The session will then appear in the Configured Sessions box of the Session Manager You can restart the printer session by either double clicking on the printer session ICON or selecting the ICON and clicking on Start |
| 6. | Test printing a spooled file NOTE: It has been found that the printer session may need to be saved by clicking on FILE / SAVE before it will print. If spooled files are still not printing, make the Windows print driver the Windows Default driver and test again. If using a PCL 6 printer, ensure the PCL 6 Windows print driver is backward compatible to PCL 5 or download and use a Universal Print Driver for the printer. This topic is discussed at the beginning of the document too. |
Was this topic helpful?
Document Information
Modified date:
10 January 2025
UID
nas8N1022590