Troubleshooting
Problem
This document describes the procedure for moving PEP to a new HMC. This procedure should be followed whenever Servers in a PEP need to be moved to a new HMC
Resolving The Problem
This procedure should be followed whenever Servers in a Power Enterprise Pool need to be moved to a new HMC. It applies to any situation where Power Enterprise Pools are involved in moving or replacing HMCs.
If this procedure is not followed, some of the errors which may be encountered include the following:
o Open Serviceable Events which cannot be closed
o Platform Event Logs which are not reported or called home through Serviceable Events
o RMC communication problems between the HMC and partitions
o Power Enterprise Pool will not correctly migrate to the new HMCs
o Power Enterprise Pool may be unmanageable
o Power Enterprise Pool can not be deleted from the former HMCs
Pre-checks for Power Enterprise Pool HMC communication
For clarity the following terms will be used to designate between the current versus new HMC masters (Fill in the Hostname/IP address information in your environment to keep them straight)
Current Master Hostname/IP address __________/_____________
Current Managing HMC Hostnames/IP addresses __________/_____________
New Master Hostname/IP address __________/_____________
New Managing HMC Hostnames/IP addresses __________/_____________
Make sure that there are no firewalls between the HMCs
The HMC-to-HMC communication in this case uses RMC. Make sure that port 657 is open on each HMC.
When moving systems with Power Enterprise Pools (PEP) in 850 or later, replace the managing HMC(s) first. Then set a new master and replace the master. Then finally restore the original master if desired.
Step One: Remove the Managing HMCs
1. Close all serviceable events
a. Verify that all serviceable events reported against a managed server have been reported to IBM and repaired.
b. Close the serviceable events.
2. For each managing HMC being replaced, do the following:
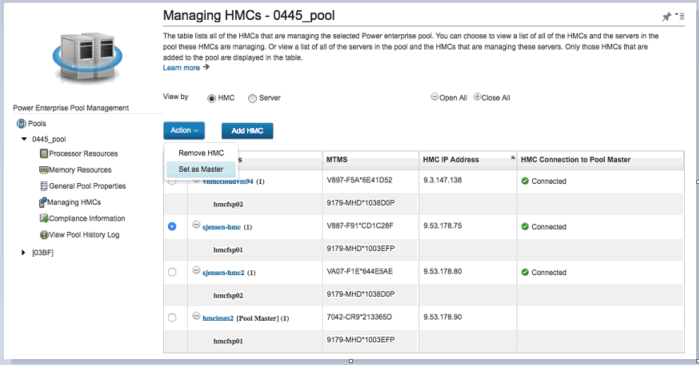
Before removing the PEP server connections, remove the managing HMC from the pool.

Step Two: Remove PEP server connections:
1. Permanently remove all server connections from the Managing HMC.
Classic View:
a. Record all current connections:
1) Access the restricted shell
Local HMC: Click HMC Management, Open Restricted Shell Terminal
Remote: ssh to the HMC
2) Run lssysconn -r all
3) Save the output
b. Expand Systems Management, Servers
c. Select the server, remove the connection:
1) Select the server
2) Expand Connections, select Reset or Remove Connections, select Remove Connection, click OK
d. Repeat steps b - c for each server in the PEP as well as other servers not in the PEP that need to be moved
Classic view:
![[$783FEDC01EC604C8.jpg]](/support/pages/system/files/support/nas/nastech.nsf/0/89f8d75a60ba3e9085258273006f0319/Content/0.8E02.jpg) Enhanced View: a. Record all current connections: 1) Access the restricted shell Local HMC: Click HMC Management > Console Management > Open Restricted Shell Terminal Remote: ssh to the HMC 2) Run lssysconn -r all 3) Save the output b. Click Resources > All Systems c. Select the server, remove the connection: 1) Select the server 2) Click Actions, select Reset or Remove Connection, select Remove Connection, click OK d. Repeat steps b - c for each server in the PEP as well as other servers not in the PEP that need to be moved |
Enhanced view:

3. Ensure that all necessary connections have been removed
a. Access restricted shell
b. Run lssysconn -r all
c. Verify that there are no PEP server connections listed in the lssysconn -r all output
Step Three: Connect the PEP servers to the new Managing
HMC
1. Connect the server(s)
NOTE: Depending on the server firmware level and type of network configuration, the servers may reconnect automatically.
a. In Classic View expand Systems Management, Servers.
In Enhanced View click Resources, All Systems
b. Reconnect the servers.
For servers connected on the private DHCP server network, you should wait approximately 5 minutes for the server to reconnect. To force a rediscovery immediately, do the following:
1) Disconnect the ethernet cable from the Server's FSP HMCx port
2) Wait one minute
3) Reconnect the ethernet cable
4) Server should appear within 3 minutes.
5) For each connection, enter the HMC access password.
For servers connected using an open network, you will need to manually add by IP address.
Classic View:
1) Go to Connections → Add Managed System
2) Enter the IP address and HMC access password
Enhanced View:
1) Click Connect Systems button in the top right corner
2) Enter the IP address and HMC access password
d. Verify all servers are connected:
1) Access the restricted shell
2) Run lssysconn -r all
3) Compare the output to the output from the original HMC.
Step Four: After connecting the PEP servers to the new managing HMC, add the new managing HMC to the pool.


Repeat these steps for all Managing HMCs that need to be move/replaced.
Step Five: Replace the master HMC if necessary:
Before removing the PEP server connections, set a new master HMC. This will make the current master HMC a Managing HMC. Then follow the steps above for removing the Managing HMC from the pool and adding it back to the pool. Finally, restore this HMC as master if desired.

Was this topic helpful?
Document Information
Modified date:
22 September 2021
UID
nas8N1022552