How To
Summary
This document provides steps to create a Red Hat OpenShift Container Platform (OCP) Version 4.6 Google Container Platform (GCP) cluster. The document lists installation prerequisites and it walks you through the installation of Guardium Insights v3.1.0 on a Red Hat OpenShift Version 4.6.x, 4.7.x or 4.8.x GCP Cluster.
Steps
- Install the gcloud CLI
- Install Red Hat OpenShift 4.6.x on Google Cloud Platform (GCP)
- Generate the SSH key
- Download the service account key
- Install the Red Hat OpenShift 4.6.x GCP cluster
- Download and install the command line tool
- Start Red Hat OpenShift Container Storage installation
- Install IBM Cloud Pak Common Services (ICS)
- Install Guardium Insights
- Validation criteria
- Uninstall Guardium Insights
Install the gcloud CLI
- Issue this command to download gcloud CLI:
wget https://dl.google.com/dl/cloudsdk/channels/rapid/downloads/google-cloud-sdk-289.0.0-darwin-x86_64.tar.gz - Extract the file:
tar xvf google-cloud-sdk-289.0.0-darwin-x86_64.tar.gz - Run the installation:
./google-cloud-sdk/install.shWhen prompted to help improve the Google Cloud SDK, enter Y for yes. - The expected output is similar to:
Your current Cloud SDK version is: 289.0.0 The latest available version is: 363.0.0 ┌───────────────────────────────────────────────────────────────────────────────────────────────────────────────┐ │ Components │ ├──────────────────┬──────────────────────────────────────────────────────┬──────────────────────────┬──────────┤ │ Status │ Name │ ID │ Size │ ├──────────────────┼──────────────────────────────────────────────────────┼──────────────────────────┼──────────┤ │ Update Available │ BigQuery Command Line Tool │ bq │ < 1 MiB │ │ Update Available │ Cloud SDK Core Libraries │ core │ 20.9 MiB │ │ Update Available │ Cloud Storage Command Line Tool │ gsutil │ 8.1 MiB │ │ Not Installed │ App Engine Go Extensions │ app-engine-go │ 4.8 MiB │ │ Not Installed │ Appctl │ appctl │ 18.5 MiB │ │ Not Installed │ Cloud Bigtable Command Line Tool │ cbt │ 7.6 MiB │ │ Not Installed │ Cloud Bigtable Emulator │ bigtable │ 6.6 MiB │ │ Not Installed │ Cloud Datalab Command Line Tool │ datalab │ < 1 MiB │ │ Not Installed │ Cloud Datastore Emulator │ cloud-datastore-emulator │ 18.4 MiB │ │ Not Installed │ Cloud Firestore Emulator │ cloud-firestore-emulator │ 40.4 MiB │ │ Not Installed │ Cloud Pub/Sub Emulator │ pubsub-emulator │ 60.7 MiB │ │ Not Installed │ Cloud SQL Proxy │ cloud_sql_proxy │ 7.4 MiB │ │ Not Installed │ Emulator Reverse Proxy │ emulator-reverse-proxy │ 14.5 MiB │ │ Not Installed │ Google Cloud Build Local Builder │ cloud-build-local │ 6.2 MiB │ │ Not Installed │ Google Container Registry's Docker credential helper │ docker-credential-gcr │ 2.2 MiB │ │ Not Installed │ Kustomize │ kustomize │ 7.6 MiB │ │ Not Installed │ Minikube │ minikube │ 26.6 MiB │ │ Not Installed │ Nomos CLI │ nomos │ 24.4 MiB │ │ Not Installed │ On-Demand Scanning API extraction helper │ local-extract │ 12.5 MiB │ │ Not Installed │ Skaffold │ skaffold │ 20.1 MiB │ │ Not Installed │ anthos-auth │ anthos-auth │ 18.0 MiB │ │ Not Installed │ config-connector │ config-connector │ 46.9 MiB │ │ Not Installed │ gcloud Alpha Commands │ alpha │ < 1 MiB │ │ Not Installed │ gcloud Beta Commands │ beta │ < 1 MiB │ │ Not Installed │ gcloud app Java Extensions │ app-engine-java │ 52.7 MiB │ │ Not Installed │ gcloud app PHP Extensions │ app-engine-php │ 21.9 MiB │ │ Not Installed │ gcloud app Python Extensions │ app-engine-python │ 7.8 MiB │ │ Not Installed │ gcloud app Python Extensions (Extra Libraries) │ app-engine-python-extras │ 26.4 MiB │ │ Not Installed │ kpt │ kpt │ 12.8 MiB │ │ Not Installed │ kubectl │ kubectl │ < 1 MiB │ │ Not Installed │ kubectl-oidc │ kubectl-oidc │ 18.0 MiB │ │ Not Installed │ pkg │ pkg │ │ └──────────────────┴──────────────────────────────────────────────────────┴──────────────────────────┴──────────┘ - To install or remove components at the current SDK version (289.0.0), run this command:
gcloud components install COMPONENT_IDOr this command:gcloud components remove COMPONENT_ID - When prompted with this question:
Modify profile to update your $PATH and enable shell command
completion?
Do you want to continue (Y/n)?
Enter Y for yes. - The Google Cloud SDK installer prompts you to update an rc file to bring the Google Cloud CLI to your environment:
Enter a path to an rc file to update, or leave blank to use [/Users/myUsername/.zshrc]: Backing up [/Users/myUsername/.zshrc] to [/Users/myUsername/.zshrc.backup]. - Issue this command:
gcloud --versionThe expected output is similar to:Google Cloud SDK 289.0.0 bq 2.0.56 core 2020.04.10 gsutil 4.49 - To begin the configuration of gcloud, enter this command:
gcloud init - You are presented with this output and then walked through the configuration:
Welcome! This command will take you through the configuration of gcloud. Settings from your current configuration [default] are: core: account: MyUsername@ibm.com disable_usage_reporting: 'False' - When prompted with this choice:
Pick configuration to use:
 [1] Re-initialize this configuration [default] with new settings
 [2] Create a new configuration
Enter 2 to create a new configuration. - When prompted with this input:
Enter configuration name. Names start with a lowercase letter and
contain only lowercase letters a-z, digits 0-9, and hyphens '-':
Enter a configuration name. This example uses gcpviswa2 as the configuration name. The expected output is similar to:Your current configuration has been set to: [gcpviswa2] - By default, the gcloud init command includes diagnostics and generates this output:
Network diagnostic detects and fixes local network connection issues.
Checking network connection...done.
Reachability Check passed.
Network diagnostic passed (1/1 checks passed).
In the future, you can skip diagnostics by issuing gcloud init --skip-diagnostics. - When prompted with this choice:
Choose the account you would like to use to perform operations for
this configuration:
 [1] MyUsername@ibm.com
 [2] Log in with a new account
Please enter your numeric choice:
Enter 1 to use the current account.
The expected output is similar to:You are logged in as: [MyUsername@ibm.com]. - When prompted with this choice:
Pick cloud project to use:
 [1] aesthetic-frame-155821
 [2] Create a new project
Please enter numeric choice or text value (must exactly match list
item):
Enter 1 to use the current cloud project.
The expected output is similar to:Your current project has been set to: [aesthetic-frame-155821]. - When prompted with this question:
Do you want to configure a default Compute Region and Zone? (Y/n)?Enter y to configure a default region and zone. - When prompted with this question:
Which Google Compute Engine zone would you like to use as project
default?
If you do not specify a zone via a command line flag while working
with Compute Engine resources, the default is assumed.
 [1] us-east1-b
 [2] us-east1-c
 [3] us-east1-d
 [4] us-east4-c
 [5] us-east4-b
 [6] us-east4-a
 [7] us-central1-c
 [8] us-central1-a
 [9] us-central1-f
 [10] us-central1-b
 [11] us-west1-b
 [12] us-west1-c
 [13] us-west1-a
 [14] europe-west4-a
 [15] europe-west4-b
 [16] europe-west4-c
 [17] europe-west1-b
 [18] europe-west1-d
 [19] europe-west1-c
 [20] europe-west3-c
 [21] europe-west3-a
 [22] europe-west3-b
 [23] europe-west2-c
 [24] europe-west2-b
 [25] europe-west2-a
 [26] asia-east1-b
 [27] asia-east1-a
 [28] asia-east1-c
 [29] asia-southeast1-b
 [30] asia-southeast1-a
 [31] asia-southeast1-c
 [32] asia-northeast1-b
 [33] asia-northeast1-c
 [34] asia-northeast1-a
 [35] asia-south1-c
 [36] asia-south1-b
 [37] asia-south1-a
 [38] australia-southeast1-b
 [39] australia-southeast1-c
 [40] australia-southeast1-a
 [41] southamerica-east1-b
 [42] southamerica-east1-c
 [43] southamerica-east1-a
 [44] asia-east2-a
 [45] asia-east2-b
 [46] asia-east2-c
 [47] asia-northeast2-a
 [48] asia-northeast2-b
 [49] asia-northeast2-c
 [50] asia-northeast3-a
Did not print [36] options.
Too many options [86]. Enter "list" at prompt to print choices fully.
Please enter numeric choice or text value (must exactly match list
item):
Enter the number that corresponds to the region that you want to set. For this example, enter 13 for us-west1-a.
The expected output is similar to:Your project default Compute Engine zone has been set to [us-west1-a]. You can change it by running [gcloud config set compute/zone NAME]. Your project default Compute Engine region has been set to [us-west1]. You can change it by running [gcloud config set compute/region NAME]. - The final expected output is similar to:
Created a default  boto configuration file at [/Users/myUsername/.boto]. See this file and
[https://cloud.google.com/storage/docs/gsutil/commands/config] for more
information about configuring Google Cloud Storage.
Your Google Cloud SDK is configured and ready to use!

* Commands that require authentication will use MyUsername@ibm.com by default
* Commands will reference project `aesthetic-frame-155821` by default
* Compute Engine commands will use region `us-west1` by default
* Compute Engine commands will use zone `us-west1-a` by default

Run `gcloud help config` to learn how to change individual settings

This gcloud configuration is called [gcpviswa2]. You can create additional configurations if you work with multiple accounts and/or projects.
Run `gcloud topic configurations` to learn more.

Some things to try next:

* Run `gcloud --help` to see the Cloud Platform services you can interact with. And run `gcloud help COMMAND` to get help on any gcloud command.
* Run `gcloud topic --help` to learn about advanced features of the SDK like arg files and output formatting
Install Red Hat OpenShift 4.6.x on Google Cloud Platform (GCP)
Prerequisites:
- Ensure that your GCP project is created.
- Creation of the service account.
- Download the correct version of the UPI installer.
- Ensure that you have downloaded the correct version of the oc client.
- Log in to the GCP console (https://cloud.google.com) and create a project:

-
Create a service account key:
- Open the Service Accounts page in GCP.
- Click Create Service Account.
- Under Service account details, enter a Service account name.
- Optional: Modify the Service account ID and add a description.
- Click Create.
- Under Grant this service account access to a project, from the Select a role drop-down list, select Pub/Sub Subscriber.
- Click Continue and then click Done to create the service account.
- In the list of service accounts, next to the service account you created, click Actions > Manage keys.
- Click Add Key > Create a key.
- Under Key type, select JSON.
- Click Create.
To learn more about creating service accounts, see https://cloud.google.com/kubernetes-engine/docs/tutorials/authenticating-to-cloud-platform.
- Enable API services in GCP.
Your GCP project requires access to several API services to complete Red Hat OpenShift Container Platform (OCP) installation.
In the GCP dashboard, click Search for APIs & Services and then click Library and search for the required APIs as described in https://docs.openshift.com/container-platform/4.6/installing/installing_gcp/installing-gcp-account.html. Then, enable the APIs according to https://cloud.google.com/service-usage/docs/enable-disable#enabling.

- Verify that you have the required roles as described here. To complete this step, navigate inside your GCP project and select IAM > Service Account. Then, select the account to use for your OCP installation and edit it.
Navigate to the permissions tab to add these required permissions:- Compute Admin
- Security Admin
- Service Account Admin
- Service Account User
- Storage Admin DNS Administrator

After you add the required roles, click SAVE.
- Create the domain name to use for the installation. Navigate to Cloud Domains and Register a domain. After you follow the steps in the GCP console, the registration appears:

Note: To allow the new DNS to take effect immediately, change the TTL to 60 seconds (by default, the TTL is greater than 2 hours):

Generate the SSH key
Note: When you generate the SSH key, provide a nonstandard name for the key (a name other than id_rsa) to avoid existing key destruction and separate OCP access.
- Issue this command:
ssh-keygen -N '' -f ~/.ssh/ocp4.6gcp.key -q <<< y > /dev/nullThe expected output is similar to:-rw------- 1 149934974 2635 Nov 26 17:07 ocp4.6gcp.key -rw-r--r-- 1 149934974 592 Nov 26 17:07 ocp4.6gcp.key.pub - Issue this command:
eval "$(ssh-agent -s)"The expected output is similar to:Agent pid 24324 - Issue this command:
ssh-add ~/.ssh/ocp4.6gcp.keyThe expected output is similar to:Identity added: /Users/myUsername/.ssh/ocp4.6gcp.key (myUsername@LP-C02DRE3QMD6M.local)
Download the service account key
The service account key was created in this step. This key is JSON format and must be available on your local machine.
- Navigate to IAM > Service Account > Keys > Add Key > Create in JSON Format. Download this file and place it in the .gcp directory of your home folder (~/.gcp/osServiceAccount.json). If the folder does not exist, create it.
- To export the credentials, issue this command:
Where <path_to_JSON_file> is the path to the JSON file, for example, /Users/myUsername/.gcp/osServiceAccount.json.export GOOGLE_APPLICATION_CREDENTIALS=<path_to_JSON_file> - Activate the service account credentials by issuing this command:
The expected output is similar to:gcloud auth activate-service-account --key-file="/Users/myUsername/.gcp/osServiceAccount.json"Activated service account credentials for: [gi- serviceaccount@aesthetic-frame-155821.iam.gserviceaccount.com] - Issue this command:
The expected output is similar to:gcloud auth listCredentialed Accounts ACTIVE ACCOUNT MyUsername@ibm.com * gi-serviceaccount@aesthetic-frame-155821.iam.gserviceaccount.com guardiuminsights-for-gcp@aesthetic-frame-155821.iam.gserviceaccount.com - Issue this command:
gcloud config listThe expected output is similar to:[compute] region = us-west1 zone = us-west1-a [core] account = gi-serviceaccount@aesthetic-frame-155821.iam.gserviceaccount.com disable_usage_reporting = False project = aesthetic-frame-155821 Your active configuration is: [gcpguardium1]
Install the Red Hat OpenShift 4.6.x GCP cluster
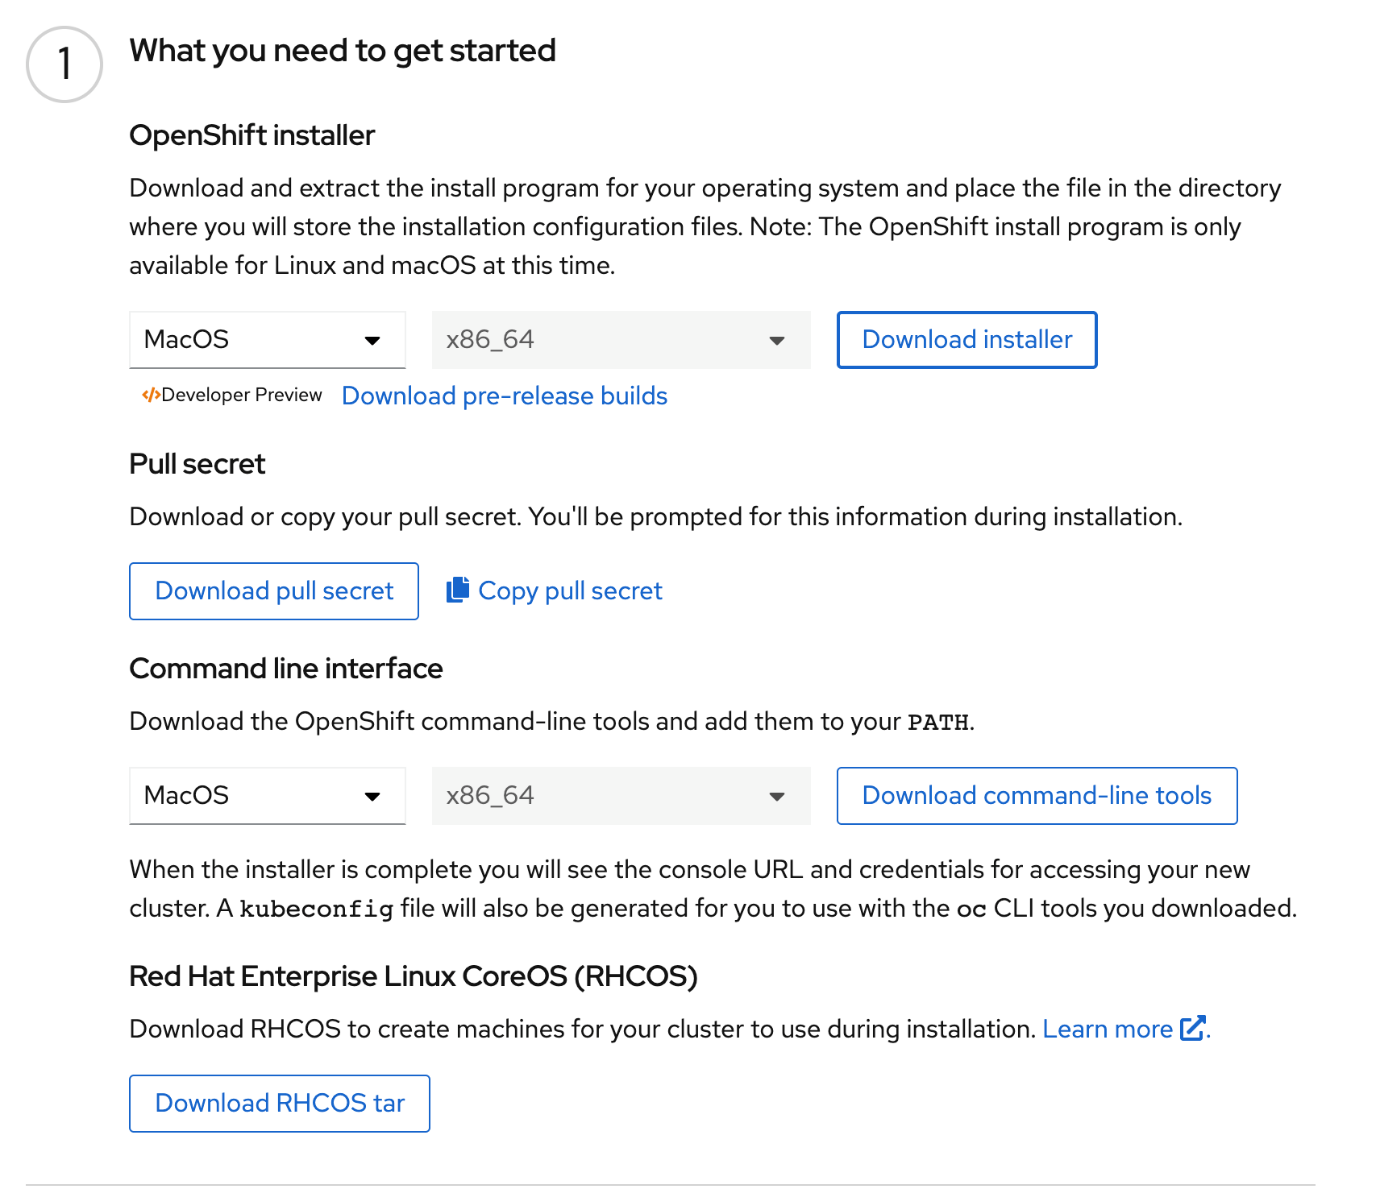
- Access the Infrastructure provider page, Red Hat OpenShift cluster manager site. If you do not have a Red Hat account, create one.
- Click the GCP infrastructure provider to navigate to the installation type page, and then select either installation type (since you will not actually be downloading the installer from this page, you can select either installation type at this time):

- Click Download pull secret:

Note: Do not click Download installer as this downloads the latest version of OCP installer. You will need to ensure that you download Version 4.6 instead (a version that is supported by Guardium Insights) using the Wget command in the next step. - To create a directory for Red Hat OpenShift installation, issue these commands:
mkdir gcp
Cd gcp
Wget https://mirror.openshift.com/pub/openshift-v4/clients/ocp/stable-4.6/openshift-install-mac-4.6.48.tar.gz
The expected output is similar to:tar xvf openshift-install-mac.tar.gzIssue this command:wget https://mirror.openshift.com/pub/openshift-v4/clients/ocp/stable-4.6/openshift-client-mac-4.6.48.tar.gzThe expected output is similar to:tar xvf openshift-client-mac.tar.gzAfter you extract both archive files (install-mac and client-mac), use these commands to move the files:mv oc kubectl /usr/local/bin oc version ./openshift-install versionThe expected output is similar to:./openshift-install 4.6.48 built from commit 1cfb1b32f5aaf0dfe0fb2ea9da41c710da9b2c76 release image quay.io/openshift-release-dev/ocp-release@sha256:6f03d6ced979d6f6fd10b6a54529c186e3f83c0ecf3e2b910d01505d2f59037aFor reference, the OCP client is available at https://mirror.openshift.com/pub/openshift-v4/clients/ocp/stable-4.6/. - To create the Install-config file, issue this command:
./openshift-install create install-config –dir=<installation_directory>Where <installation_directory> is the gcp directory that you created previously.? SSH Public Key /Users/myUsername/.ssh/ocp4.6gcp.key.pub ? Platform gcp INFO Credentials loaded from file "/Users/myUsername/.gcp/osServiceAccount.json" ? Project ID Guardium Images (aesthetic-frame-155821) ? Region us-east1 ? Base Domain ibmguardiuminsights.com ? Cluster Name testgcp ? Pull Secret [? for help] ************************************************************************************************************************************************************************************************************The expected output is similar to:INFO Install-Config created in: . - Copy and paste the pull secret or download and place it in the installation directory.
Note: The GCP cluster is installed in a single zone and all workers and masters that will run should be run in the same zone. Make changes in the config.yaml file to accommodate the configuration.
Sample config.yaml file:apiVersion: v1 baseDomain: ibmguardiuminsights.com compute: - architecture: amd64 hyperthreading: Enabled name: worker platform: gcp: type: n2d-standard-16 osDisk: diskSizeGB: 128 replicas: 6 controlPlane: architecture: amd64 hyperthreading: Enabled name: master platform: gcp: type: n2d-standard-16 osDisk: diskSizeGB: 1024 replicas: 3 metadata: creationTimestamp: null name: gcptest networking: clusterNetwork: - cidr: 10.128.0.0/14 hostPrefix: 23 machineNetwork: - cidr: 10.0.0.0/16 networkType: OpenShiftSDN serviceNetwork: - 172.30.0.0/16 platform: gcp: projectID: aesthetic-frame-155821 region: us-east1 publish: External pullSecret: '{"auths":{"cloud.openshift.com":{"auth":"b3BlbnNoaWZ0LXJlbGVhc2UtZGV2K29jbV9hY2Nlc3NfNzAyZWE4NTJjZmQ0NGZjYjg5MjAzNjI4MjEwZjU0MTI6T0tFR1NZNDBPR0cwU09HR1lVWUc3MTI1NkRQR0JJWlZRUVRPSEtKNlNLRzRPNkpWUzUySU1FUkgwUzNFRzM0WQ==","email":"MyUsername@ibm.com"},"quay.io":{"auth":"b3BlbnNoaWZ0LXJlbGVhc2UtZGV2K29jbV9hY2Nlc3NfNzAyZWE4NTJjZmQ0NGZjYjg5MjAzNjI4MjEwZjU0MTI6T0tFR1NZNDBPR0cwU09HR1lVWUc3MTI1NkRQR0JJWlZRUVRPSEtKNlNLRzRPNkpWUzUySU1FUkgwUzNFRzM0WQ==","email":"MyUsername@ibm.com"},"registry.connect.redhat.com":{"auth":"fHVoYy1wb29sLWM4ODgyZWZlLWNlNTYtNGQ0OC04MjcxLTcxZjUxOGFhYTgyZDpleUpoYkdjaU9pSlNVelV4TWlKOS5leUp6ZFdJaU9pSTBObVF3WldVNE1EWXhZV00wT0RNNFltTmxPVFptWlRVNE5HUTFPR0l6TkNKOS5tZG02ZElKTS02NTJ3c003ZUpQMjRtNnJDV0VEcjJIWC1GbjlBaXFtTUZmbi15eXpzMTZjeUVhVWNVODFYckxSOW9NZlVFVkN1MFBUajZISDJoWTVNd1NDTkRRb3pzZ0k1LV9mZ2ptWXM4ZkwyT09ZSlVfdUlpdUdSRDNZb25ZYVROSHN6X1Z5dUdjS2lBRDdwY2VUNUE3SWFpblpEbmF4UHJ1aVBENFNjM0hUT2Z3OWFYZUkyelEzU25IaXZUak01a3VoVFBtcE05eFoyWnFrLTBGWmFCWF9pY0gxMDc1WHptV1BZcG1SN2ZkejBWZ1FtT2t1ZDZEUlZjTkVfRUNnalNGWXZPWEZKak94cEtrLVY2aHkwY3hudVI4Tk5hMWJ3WkhKejdWYld4aG5XUGtFNWV0OWZjRjFDVWJiOWxiZGVzQUxELTJtOUE5dEp6Tm00ZkN2cTE0clpTXzVhWXJVX3dOa21BdTNMV0MxbjgxSVRXOHNoYVQ3c0dCU2pfUVROZUZZb0tHZlV4cU1Tb0pHWjhIVlpKSVI0OWJ2eWx5eUNpNG1vQTNvcnpQUDhRQ0VPOXR6Y2dXMnd5elZhUmFwTHZaUmg3ZXhHZXdUZ01ocHdFZXB0djJCeldGOWtoLVF4cDdOVjlOQWRLS0prbW0wX0dnR2xYSGlSbEVqYmZJcTNtVzgwZXlPdHEtVmFMMVFuYnFWaFUyTWRwYXUzd1AydGxTWjU1VHRwODUzZVlEU3owTzA4NGk0UWp3NjZHYUhpbGktV1p0WmV5OHQzZXlpRVZhQ1hVX1lNNGtmclUzVmt1MVo1SElnMnR4ZERJNFNoaUlNYVhnNjVOLTBkX0x0QTdfbG5zSFFoT05pTmIxSGRYeGYzWFZnOC0tc05mSFhFbVh6bW1TR3ZQbw==","email":"MyUsername@ibm.com"},"registry.redhat.io":{"auth":"fHVoYy1wb29sLWM4ODgyZWZlLWNlNTYtNGQ0OC04MjcxLTcxZjUxOGFhYTgyZDpleUpoYkdjaU9pSlNVelV4TWlKOS5leUp6ZFdJaU9pSTBObVF3WldVNE1EWXhZV00wT0RNNFltTmxPVFptWlRVNE5HUTFPR0l6TkNKOS5tZG02ZElKTS02NTJ3c003ZUpQMjRtNnJDV0VEcjJIWC1GbjlBaXFtTUZmbi15eXpzMTZjeUVhVWNVODFYckxSOW9NZlVFVkN1MFBUajZISDJoWTVNd1NDTkRRb3pzZ0k1LV9mZ2ptWXM4ZkwyT09ZSlVfdUlpdUdSRDNZb25ZYVROSHN6X1Z5dUdjS2lBRDdwY2VUNUE3SWFpblpEbmF4UHJ1aVBENFNjM0hUT2Z3OWFYZUkyelEzU25IaXZUak01a3VoVFBtcE05eFoyWnFrLTBGWmFCWF9pY0gxMDc1WHptV1BZcG1SN2ZkejBWZ1FtT2t1ZDZEUlZjTkVfRUNnalNGWXZPWEZKak94cEtrLVY2aHkwY3hudVI4Tk5hMWJ3WkhKejdWYld4aG5XUGtFNWV0OWZjRjFDVWJiOWxiZGVzQUxELTJtOUE5dEp6Tm00ZkN2cTE0clpTXzVhWXJVX3dOa21BdTNMV0MxbjgxSVRXOHNoYVQ3c0dCU2pfUVROZUZZb0tHZlV4cU1Tb0pHWjhIVlpKSVI0OWJ2eWx5eUNpNG1vQTNvcnpQUDhRQ0VPOXR6Y2dXMnd5elZhUmFwTHZaUmg3ZXhHZXdUZ01ocHdFZXB0djJCeldGOWtoLVF4cDdOVjlOQWRLS0prbW0wX0dnR2xYSGlSbEVqYmZJcTNtVzgwZXlPdHEtVmFMMVFuYnFWaFUyTWRwYXUzd1AydGxTWjU1VHRwODUzZVlEU3owTzA4NGk0UWp3NjZHYUhpbGktV1p0WmV5OHQzZXlpRVZhQ1hVX1lNNGtmclUzVmt1MVo1SElnMnR4ZERJNFNoaUlNYVhnNjVOLTBkX0x0QTdfbG5zSFFoT05pTmIxSGRYeGYzWFZnOC0tc05mSFhFbVh6bW1TR3ZQbw==","email":"MyUsername@ibm.com"}}}' sshKey: | ssh-rsa AAAAB3NzaC1yc2EAAAADAQABAAABgQC8FluS/ZGyWJtC/jFGwyFHWXxYLQFNlcKguuYxYrokQMg4SJe8Ou95g1R+LRFgLWHKkAREQ+O+ix83DU1FMdN48ZM43jBJ4QYjymh1Qy17XfT9+ZLaL4ySbhixg3e7hSKVaosEBmkiojTXfccXEbtA08lm8OfV6AGhf5PYOvHqw0Y9Xlb/9BponrORDeiTG61ievgyOVvVcRANdnutSyLCa13VyX2JElCYgSegEmIjX+1+PJQGpUxdIrC72Pn2/JCPmQcBo2FUKZ3jnCrOD968ILXUp9qpEqwpzzT75tw3oK1mU7hlbZU0Wmvo3ouXhkO9StMDPO0R6TWl36JukI9pYcduOIT+6CcB+L6YqFhUSDQuf+qnCs9kSJxmw7K5zIeOciK9lqwJZb4zcK5JeoS0keVnuQtKMpavTGBHsPb6XoDnZI3J7ZTxZZ+T7pJ3d4r9ddf+lcDNtg7QNOR22PUGznXMQ6Q9cJnLQzQL6dslA6RaTAUFuzwscg6Vi6lwo20= myUsername@LP-C02DRE3QMD6M.local - Issue this command to install the GCP cluster:
./openshift-install create cluster --dir=/<OpenShift-installation-directory.If you would prefer to debug the installation, issue this command instead:./openshift-install create cluster --dir=/<OpenShift-installation-directory>--log-level=debugNote: If only master nodes are provisioned, but worker nodes cannot be provisioned, then enable the network security API.
The expected output is similar to:INFO Install complete! INFO To access the cluster as the system:admin user when using 'oc', run 'export KUBECONFIG=/Users/myUsername/gcp/auth/kubeconfig' INFO Access the OpenShift web-console here: https://console-openshift-console.apps.testgcp.ibmguardiuminsights.com INFO Login to the console with user: "kubeadmin", and password: "nsMSI-Ym3se-juwXG-BRHsS" INFO Time elapsed: 47m9s - Issue this command:
'export KUBECONFIG=/Users/myUsername/gcp/auth/kubeconfig'Note: For OCP Versions 4.6.x, 4.7.x, and 4.8.x, download from https://mirror.openshift.com/pub/openshift-v4/x86_64/clients/ocp/ and follow the previous steps for installation.
Download and install the command-line tool
Note: This section can be skipped if you have already installed the command-line tool.
To verify installation, use the command-line tool to issue this command:
oc whoami
The expected output is similar to:
system:admin
Issue this command:
oc get nodes
The expected output is similar to:
testgcp-p6kwp-master-0.c.aesthetic-frame-155821.internal         Ready    master   16h   v1.20.10+bbbc079
testgcp-p6kwp-master-1.c.aesthetic-frame-155821.internal         Ready    master   16h   v1.20.10+bbbc079
testgcp-p6kwp-master-2.c.aesthetic-frame-155821.internal         Ready    master   16h   v1.20.10+bbbc079
testgcp-p6kwp-worker-b-jrqx5.c.aesthetic-frame-155821.internal  Ready   worker   16h   v1.20.10+bbbc079
testgcp-p6kwp-worker-b-z2vsf.c.aesthetic-frame-155821.internal   Ready    worker   16h   v1.20.10+bbbc079
testgcp-p6kwp-worker-c-ckb8f.c.aesthetic-frame-155821.internal   Ready    worker   16h   v1.20.10+bbbc079
testgcp-p6kwp-worker-c-snbsw.c.aesthetic-frame-155821.internal   Ready    worker   16h   v1.20.10+bbbc079
testgcp-p6kwp-worker-d-csbk7.c.aesthetic-frame-155821.internal   Ready    worker   16h   v1.20.10+bbbc079
testgcp-p6kwp-worker-d-jckh6.c.aesthetic-frame-155821.internal   Ready    worker   16h   v1.20.10+bbbc07
To access the Red Hat OpenShift web console, open https://consoleopenshiftconsole.apps.testgcp.ibmguardiuminsights.com/ and use the username and password that is provided during installation.
Start Red Hat OpenShift Container Storage installation
Prerequisite: The default Google Cloud storage class uses hard disk drive (HDD). For better performance, use solid-state drive (SSD) by creating a storage class that uses pd-ssd, according to this ssd-storageclass.yaml example:
apiVersion: storage.k8s.io/v1
kind: StorageClass
metadata:
 name: faster
provisioner: kubernetes.io/gce-pd
parameters:
 type: pd-ssd
volumeBindingMode: WaitForFirstConsumer
reclaimPolicy: Delete
- Click Operators > Installed Operators to view all installed operators. Ensure that the selected Project is openshift-storage.
- If the openshift-storage project is not available, create it with this command:
oc create ns openshift-storage - Click Red Hat OpenShift Container Storage.
- In the Red Hat OpenShift Container Storage operator page, click Install.
- In the Install Operator page, ensure that these options are selected by default:
- Update Channel: stable-4.6
- Installation Mode: A specific namespace on the cluster
- Installed Namespace: Operator recommended namespace openshift-storage
If the openshift-storage namespace does not exist, it will be created during the operator installation. - Select the Enable operator recommended cluster monitoring on this namespace check box (required for cluster monitoring).
- Set Approval Strategy to Automatic.
After setting these options, click Install.
- Open the Red Hat OpenShift Container Storage details:

- In the Storage Cluster card, click Create Instance.
- Create the storage cluster according to this image:

- Select at least 3 worker nodes for OCS storage. Select only those worker nodes on which you don't want to run Db2:

Verify that the final Status of the installed storage cluster is Phase: Ready with a green tick mark:

See https://access.redhat.com/documentation/en-us/red_hat_openshift_container_storage/4.6/html-single/deploying_and_managing_openshift_container_storage_using_google_cloud/index for more information.
Note: If you are using OCP Version 4.7.x or 4.8.x, you must install storage for that version (the steps for doing this are the same as for Version 4.6.x).
To verify that the storage classes were installed, issue this command:

Install IBM Cloud Pak Common Services (ICS)
- Log in to the cluster:
INFO Login to the console with user: "kubeadmin", and password: " nsMSI-Ym3se-juwXG-BRHsS " - Obtain the CASE bundle:
export LOCAL_CASE_DIR=$HOME/offline mkdir $LOCAL_CASE_DIR export CASE_ARCHIVE=ibm-guardium-insights-2.1.0.tgz - Save the CASE bundle:
cloudctl case save \
  --case https://github.com/IBM/cloud-pak/raw/master/repo/case/${CASE_ARCHIVE} \
  --outputdir $LOCAL_CASE_DIR --tolerance 1
The expected output is similar to:Downloading and extracting the CASE ... - Success Retrieving CASE version ... - Success Validating the CASE ... [warn] - certifications/ibmdefault.yaml: validation error: Certification file name [ibmdefault] not currently in supported list: [ibmmc, ibmccs, ibmccscp, ibmccp, ecomc, ecoccs] [warn] - certifications/ibmdefault.yaml: validation error: The certification file ibmdefault.yaml is not listed under the certifications parameter in case.yaml [warn] - certifications/ibmdefault.yaml: the specified certifications file does not exist in the certifications/files directory: ExternalSecurityReport.pdf [WARNING]: open /root/offline/ibm-guardium-insights/signature.yaml: no such file or directory - Success Creating inventory ... - Success Finding inventory items - Success Resolving inventory items ... Parsing inventory items [WARNING]: Ignoring the following digest error: Cannot validate digest for a case in the inventory item ibmCommonServiceOperatorSetup. Inventory Item ibmCommonServiceOperatorSetup is not found in the digest map Validating the signature for the ibm-cp-common-services CASE... Validating the signature for the ibm-auditlogging CASE... Validating the signature for the ibm-cert-manager CASE... Validating the signature for the ibm-cs-commonui CASE... Validating the signature for the ibm-events-operator CASE... Validating the signature for the ibm-cs-healthcheck CASE... Validating the signature for the ibm-cs-iam CASE... Validating the signature for the ibm-zen CASE... Validating the signature for the ibm-licensing CASE... Validating the signature for the ibm-management-ingress CASE... Validating the signature for the ibm-cs-mongodb CASE... Validating the signature for the ibm-cs-monitoring CASE... Validating the signature for the ibm-platform-api-operator CASE... [WARNING]: Ignoring the following digest error: Cannot validate digest for a case in the inventory item redisOperator. Inventory Item redisOperator is not found in the digest map Validating the signature for the ibm-cloud-databases-redis CASE... - Success - Create the namespace:
oc create namespace ibm-common-services - Install the IBM Common Services catalog:
cloudctl case launch \
  --case ${LOCAL_CASE_DIR}/${CASE_ARCHIVE} \
  --namespace ibm-common-services \
  --inventory ibmCommonServiceOperatorSetup \
  --action install-catalog \
  --tolerance 1 \
  --args "--registry icr.io"
The expected output is similar to:Welcome to the CASE launcher Attempting to retrieve and extract the CASE from the specified location [✓] CASE has been retrieved and extracted Attempting to validate the CASE Skipping CASE validation... Attempting to locate the launch inventory item, script, and action in the specified CASE [✓] Found the specified launch inventory item, action, and script for the CASE Attempting to check the cluster and machine for required prerequisites for launching the item Checking for required prereqs... No requires section specified. Required prereqs result: OK Checking user permissions... No user rules specified. [✓] Cluster and Client Prerequisites have been met for the CASE Running the CASE ibmCommonServiceOperatorSetup launch script with the following action context: installCatalog Executing inventory item ibmCommonServiceOperatorSetup, action installCatalog : launch.sh Checking arguments for install catalog action -------------Create catalog source------------- catalogsource.operators.coreos.com/opencloud-operators created check for any existing operator group in ibm-common-services ... no existing operator group found -------------Create operator group------------- operatorgroup.operators.coreos.com/common-service created [✓] CASE launch script completed successfully OK - Issue this command:
oc get pods -n openshift-marketplaceThe expected output is similar to:NAME READY STATUS RESTARTS AGE acde7109b852622a0ba3377ccaa17fb33f852e65eb9f41dfbbd58a243af59ks 0/1 Completed 0 118m certified-operators-glvts 1/1 Running 0 5h13m community-operators-2g87n 1/1 Running 0 12h marketplace-operator-74d56ff548-nm7fl 1/1 Running 0 27h opencloud-operators-wn542 1/1 Running 0 22s redhat-marketplace-779fk 1/1 Running 0 27h redhat-operators-q65mz 1/1 Running 0 18h - Issue this command:
oc get catalogsource -n openshift-marketplaceThe expected output is similar to:NAME DISPLAY TYPE PUBLISHER AGE certified-operators Certified Operators grpc Red Hat 27h community-operators Community Operators grpc Red Hat 27h opencloud-operators IBMCS Operators grpc IBM 52s redhat-marketplace Red Hat Marketplace grpc Red Hat 27h redhat-operators Red Hat Operators grpc Red Hat 27h - Install IBM Common Services operators:
export ICS_SIZE=medium

cloudctl case launch \
  --case ${LOCAL_CASE_DIR}/${CASE_ARCHIVE} \
  --namespace ibm-common-services \
  --inventory ibmCommonServiceOperatorSetup \
  --tolerance 1 \
  --action install-operator \
  --args "--size ${ICS_SIZE}"
The expected output is similar to:Welcome to the CASE launcher Attempting to retrieve and extract the CASE from the specified location [✓] CASE has been retrieved and extracted Attempting to validate the CASE Skipping CASE validation... Attempting to locate the launch inventory item, script, and action in the specified CASE [✓] Found the specified launch inventory item, action, and script for the CASE Attempting to check the cluster and machine for required prerequisites for launching the item Checking for required prereqs... No requires section specified. Required prereqs result: OK Checking user permissions... Kubernetes RBAC Prerequisite Verbs Result Reason rbac.authorization.k8s.io.clusterroles/* get,list,watch,create,patch,update true apiextensions.k8s.io.customresourcedefinitions/v1beta1 get,list,watch,create,patch,update true security.openshift.io.securitycontextconstraints/ get,list,watch,create,patch,update true User permissions result: OK [✓] Cluster and Client Prerequisites have been met for the CASE Running the CASE ibmCommonServiceOperatorSetup launch script with the following action context: installOperator Executing inventory item ibmCommonServiceOperatorSetup, action installOperator : launch.sh -------------Installing common services via OLM------------- -------------Create common services operator subscription------------- subscription.operators.coreos.com/ibm-common-service-operator created wait for operand registry cr created ... wait for operand registry cr created ... wait for operand registry cr created ... -------------Create common service custom resource------------- Warning: oc apply should be used on resource created by either oc create --save-config or oc apply commonservice.operator.ibm.com/common-service configured wait for operand config is ready ... -------------Create operand request------------- operandrequest.operator.ibm.com/common-service created -------------Install complete------------- [✓] CASE launch script completed successfully OK - Check the pod and catalog source status - This takes 10 - 20 minutes.
oc get pods -n ibm-common-servicesThe expected output is similar to:NAME READY STATUS RESTARTS AGE audit-logging-cleanup-wkbpx 0/1 Completed 0 20m audit-logging-fluentd-ds-2n7r5 1/1 Running 0 20m audit-logging-fluentd-ds-dmlcz 1/1 Running 0 20m audit-logging-fluentd-ds-kg4d9 1/1 Running 0 20m audit-logging-fluentd-ds-q5d6b 1/1 Running 2 20m audit-logging-fluentd-ds-ql7vd 1/1 Running 0 20m audit-policy-controller-69b78cfb8f-mt9dv 1/1 Running 0 20m auth-idp-6495b58b7f-c4q52 4/4 Running 0 20m auth-idp-6495b58b7f-hkxbp 4/4 Running 0 20m auth-pap-668f77c758-k776g 2/2 Running 0 20m auth-pap-668f77c758-xzkkt 2/2 Running 0 20m auth-pdp-5949d69987-5cfhl 2/2 Running 0 20m auth-pdp-5949d69987-d2hb7 2/2 Running 0 20m cert-manager-cainjector-86569ccbc4-lxnhz 1/1 Running 0 19m cert-manager-controller-78c9974c84-8bmnm 1/1 Running 0 19m cert-manager-webhook-868f77fc5d-rl5zx 1/1 Running 1 19m configmap-watcher-654d8bdcb7-lc64k 1/1 Running 0 19m default-http-backend-556fb7475f-qknfl 1/1 Running 0 20m iam-onboarding-p2rv4 0/1 Completed 0 20m iam-policy-controller-7bf4d7c969-s4ssz 1/1 Running 1 20m ibm-auditlogging-operator-746ffdcb89-8lw4x 1/1 Running 0 20m ibm-cert-manager-operator-6d77948978-s4xj5 1/1 Running 0 21m ibm-common-service-operator-5dcdf68948-t9g6h 1/1 Running 0 24m ibm-common-service-webhook-bd65548d7-9z8zn 1/1 Running 0 23m ibm-commonui-operator-867f84bb7f-qf8cq 1/1 Running 0 20m ibm-events-operator-v3.11.0-6fbf578ff6-2qkq9 1/1 Running 0 20m ibm-healthcheck-operator-856cf7f5d5-6c8r4 1/1 Running 0 20m ibm-iam-operator-566796d88f-bg2gk 1/1 Running 0 20m ibm-ingress-nginx-operator-5fd6fb9d7-vtfzc 1/1 Running 0 20m ibm-licensing-operator-6f94c99f9d-prtpk 1/1 Running 0 20m ibm-licensing-service-instance-7db6f57ff6-m8f7j 1/1 Running 0 19m ibm-management-ingress-operator-5bd75c67f9-j4ssb 1/1 Running 0 20m ibm-mongodb-operator-68794c759f-5jg2s 1/1 Running 0 19m ibm-monitoring-grafana-6d586f6686-6727n 4/4 Running 1 20m ibm-monitoring-grafana-operator-845498b54f-bqfvq 1/1 Running 0 21m ibm-namespace-scope-operator-dd7b6f494-ssqhm 1/1 Running 0 23m ibm-platform-api-operator-6fc68f484c-qwnkn 1/1 Running 0 20m ibm-zen-operator-84457b8b6d-k5t9v 1/1 Running 0 20m icp-memcached-784c9b4b9b-r4645 1/1 Running 0 20m icp-mongodb-0 2/2 Running 0 18m icp-mongodb-1 2/2 Running 0 12m icp-mongodb-2 2/2 Running 0 11m management-ingress-8b8747579-69s8n 1/1 Running 0 8m16s management-ingress-8b8747579-ck2wq 1/1 Running 0 8m16s meta-api-deploy-6444c66c8b-gtdkc 1/1 Running 0 19m must-gather-service-0 1/1 Running 0 20m nginx-ingress-controller-7bc44766bd-67pvv 1/1 Running 0 20m nginx-ingress-controller-7bc44766bd-88j5m 1/1 Running 0 20m oidc-client-registration-lhrbh 0/1 Completed 0 20m oidcclient-watcher-7bddb9d7f4-m567x 1/1 Running 0 20m operand-deployment-lifecycle-manager-8679b478b9-qtjmp 1/1 Running 0 23m platform-api-d6c7dbfbd-9ctn2 2/2 Running 0 20m secret-watcher-c4bcd9cc7-9stkf 1/1 Running 0 20m secretshare-5fd5b4fb76-zfrzn 1/1 Running 0 23m security-onboarding-khqj9 0/1 Completed 0 20m setup-job-mzp4k 0/1 Completed 0 19m system-healthcheck-service-7dd8bffbb4-j6whk 1/1 Running 0 20m - Retrieve the IBM Common Services Console credentials (required for Guardium Insights installation).
oc -n ibm-common-services get secret platform-auth-idp-credentials -o jsonpath='{.data.admin_password}' | base64 -dThe output is the password. You can change the password by issuing this command:cloudctl pm update-secret ibm-common-services platform-auth-idp-credentials -d admin_password=<new_password>
Install Guardium Insights
- Obtain the CASE bundle. This is only required if you did not already obtain the CASE bundle when installing ICS.
export LOCAL_CASE_DIR=$HOME/offline mkdir $LOCAL_CASE_DIR export CASE_ARCHIVE=ibm-guardium-insights-2.1.0.tgz - Save the CASE bundle. This is only required if you did not already save the CASE bundle when installing ICS.
cloudctl case save \
  --case https://github.com/IBM/cloud-pak/raw/master/repo/case/${CASE_ARCHIVE} \
  --outputdir $LOCAL_CASE_DIR --tolerance 1
The expected output is similar to:Downloading and extracting the CASE ... - Success Retrieving CASE version ... - Success Validating the CASE ... [warn] - certifications/ibmdefault.yaml: validation error: Certification file name [ibmdefault] not currently in supported list: [ibmmc, ibmccs, ibmccscp, ibmccp, ecomc, ecoccs] [warn] - certifications/ibmdefault.yaml: validation error: The certification file ibmdefault.yaml is not listed under the certifications parameter in case.yaml [warn] - certifications/ibmdefault.yaml: the specified certifications file does not exist in the certifications/files directory: ExternalSecurityReport.pdf [WARNING]: open /root/offline/ibm-guardium-insights/signature.yaml: no such file or directory - Success Creating inventory ... - Success Finding inventory items - Success Resolving inventory items ... Parsing inventory items [WARNING]: Ignoring the following digest error: Cannot validate digest for a case in the inventory item ibmCommonServiceOperatorSetup. Inventory Item ibmCommonServiceOperatorSetup is not found in the digest map Validating the signature for the ibm-cp-common-services CASE... Validating the signature for the ibm-auditlogging CASE... Validating the signature for the ibm-cert-manager CASE... Validating the signature for the ibm-cs-commonui CASE... Validating the signature for the ibm-events-operator CASE... Validating the signature for the ibm-cs-healthcheck CASE... Validating the signature for the ibm-cs-iam CASE... Validating the signature for the ibm-zen CASE... Validating the signature for the ibm-licensing CASE... Validating the signature for the ibm-management-ingress CASE... Validating the signature for the ibm-cs-mongodb CASE... Validating the signature for the ibm-cs-monitoring CASE... Validating the signature for the ibm-platform-api-operator CASE... [WARNING]: Ignoring the following digest error: Cannot validate digest for a case in the inventory item redisOperator. Inventory Item redisOperator is not found in the digest map Validating the signature for the ibm-cloud-databases-redis CASE... - Success - Set the variables:
export NAMESPACE=staging
export ICS_USER=admin
export ICS_PASS=<new password>
export CP_REPO_USER=cp
export CP_REPO_PASS=<ibm_entitlement_key>
Where you can obtain the <ibm_entitlement_key> at https://myibm.ibm.com/products-services/containerlibrary. - Create the namespace:
oc create namespace $NAMESPACE oc project $NAMESPACE - Run the preinstall script:
cloudctl case launch    \
  --case ${LOCAL_CASE_DIR}/${CASE_ARCHIVE} \
  --namespace ${NAMESPACE} \
  --inventory install     \
  --action pre-install    \
  --tolerance 1 \
  --args "-n ${NAMESPACE} -a ${ICS_USER} -p ${ICS_PASS} -h sysgcp-xsbvp-worker-c-g48np.c.aesthetic-frame-155821.internal,sysgcp-xsbvp-worker-c-jv9f4.c.aesthetic-frame-155821.internal -t false -l true"
Where, for the -h parameter, list the worker node names on which you want to host Db2.
The expected output is similar to:Welcome to the CASE launcher Attempting to retrieve and extract the CASE from the specified location [✓] CASE has been retrieved and extracted Attempting to validate the CASE Skipping CASE validation... Attempting to locate the launch inventory item, script, and action in the specified CASE [✓] Found the specified launch inventory item, action, and script for the CASE Attempting to check the cluster and machine for required prerequisites for launching the item Checking for required prereqs... Prerequisite Result Cluster Kubernetes version must be >=1.16.0 true openshift Kubernetes version must be >=1.14.6 true Kubernetes node resource must match a set of expressions defined in prereqs.yaml true Client openssl CLI must meet the following regex: OpenSSL 1.1.1* true Client cloudctl CLI must meet the following regex: [a-zA-Z]* v3.(1[0-9]|[4-9]).[1-9]* true Required prereqs result: OK Checking user permissions... Kubernetes RBAC Prerequisite Verbs Result Reason *.*/ * true User permissions result: OK [✓] Cluster and Client Prerequisites have been met for the CASE Running the CASE install launch script with the following action context: preInstall Executing inventory item install, action preInstall : launch.sh -------------Installing dependent GI preinstall: /Users/myUsername/gcp-ocp4.6/ibm-guardium-insights-case-bundle/stable/ibm-guardium-insights-bundle/case/ibm-guardium-insights------------- PRE-INSTALL VALUES: -n staging -h testgcp-lnt5j-worker-d-2tcfb.c.aesthetic-frame-155821.internal -l true Warning : One or more optional parameters not passed, default values will be used OpenSSL is working with parameters -pbkdf2 #####IBM Guardium Insights Pre-installation: Starting Preparation##### Already on project "staging" on server "https://api.testgcp.ibmguardiuminsights.com:6443". node/testgcp-lnt5j-worker-d-2tcfb.c.aesthetic-frame-155821.internal labeled Skipping data node(s) tainting. Node testgcp-lnt5j-worker-d-2tcfb.c.aesthetic-frame-155821.internal already labelled. #####IBM Guardium Insights Pre-installation: Ingress Certificate Recreation##### Overwrite existing secrets mode: no -------------------------------------------------------------- Starting: IBM Guardium Insights: Ingress creation script. Generating certificates since some of the 3 arguments are not set Creating TLS secret Ingress Secret insights-ingressca not found. Creating secret. secret/insights-ingressca created Completed: IBM Guardium Insights : Ingress creation script. -------------------------------------------------------------- [✓] CASE launch script completed successfully OK -
Install the catalogs:
cloudctl case launch \
  --case ${LOCAL_CASE_DIR}/${CASE_ARCHIVE} \
  --namespace openshift-marketplace \
  --inventory install \
  --action install-catalog \
  --tolerance 1
The expected output is similar to:Welcome to the CASE launcher Attempting to retrieve and extract the CASE from the specified location [✓] CASE has been retrieved and extracted Attempting to validate the CASE Skipping CASE validation... Attempting to locate the launch inventory item, script, and action in the specified CASE [✓] Found the specified launch inventory item, action, and script for the CASE Attempting to check the cluster and machine for required prerequisites for launching the item Checking for required prereqs... Prerequisite Result Kubernetes node resource must match a set of expressions defined in prereqs.yaml true Client oc CLI must meet the following regex: [a-zA-Z]* 4.[3-9]*.[0-9]* true Client cloudctl CLI must meet the following regex: [a-zA-Z]* v3.(1[0-9]|[4-9]).[1-9]* true Required prereqs result: OK Checking user permissions... Kubernetes RBAC Prerequisite Verbs Result Reason *.*/ * true User permissions result: OK [✓] Cluster and Client Prerequisites have been met for the CASE Running the CASE install launch script with the following action context: installCatalog Executing inventory item install, action installCatalog : launch.sh -------------Installing catalog source------------- -------------Installing dependent catalog source: ibm-db2uoperator------------- Welcome to the CASE launcher Attempting to retrieve and extract the CASE from the specified location [✓] CASE has been retrieved and extracted Attempting to validate the CASE Skipping CASE validation... Attempting to locate the launch inventory item, script, and action in the specified CASE [✓] Found the specified launch inventory item, action, and script for the CASE Attempting to check the cluster and machine for required prerequisites for launching the item Checking for required prereqs... Prerequisite Result Client oc CLI must meet the following regex: [a-zA-Z]* 4.[3-9]*.[0-9]* true Required prereqs result: OK Checking user permissions... No user rules specified. [✓] Cluster and Client Prerequisites have been met for the CASE Running the CASE db2uOperatorSetup launch script with the following action context: installCatalog Executing inventory item db2uOperatorSetup, action installCatalog : launch.sh Checking arguments for install catalog action catalogsource.operators.coreos.com/ibm-db2uoperator-catalog created apiVersion: operators.coreos.com/v1alpha1 kind: CatalogSource metadata: name: ibm-db2uoperator-catalog namespace: openshift-marketplace spec: displayName: IBM Db2U Catalog image: docker.io/ibmcom/ibm-db2uoperator-catalog@sha256:5347c6f194868eb7531bd15cf584dabb0dc82b8674409e8ffbbea2c5bc4bcafe imagePullPolicy: Always publisher: IBM sourceType: grpc updateStrategy: registryPoll: interval: 45m ibm-db2uoperator-catalog {"connectionState":{"address":"ibm-db2uoperator-catalog.openshift-marketplace.svc:50051","lastConnect":"2021-12-01T10:17:01Z","lastObservedState":"CONNECTING"},"registryService":{"createdAt":"2021-12-01T10:16:59Z","port":"50051","protocol":"grpc","serviceName":"ibm-db2uoperator-catalog","serviceNamespace":"openshift-marketplace"}} {"connectionState":{"address":"ibm-db2uoperator-catalog.openshift-marketplace.svc:50051","lastConnect":"2021-12-01T10:17:18Z","lastObservedState":"READY"},"registryService":{"createdAt":"2021-12-01T10:16:59Z","port":"50051","protocol":"grpc","serviceName":"ibm-db2uoperator-catalog","serviceNamespace":"openshift-marketplace"}} [✓] CASE launch script completed successfully OK -------------Installing dependent catalog source: ibm-cloud-databases-redis------------- Welcome to the CASE launcher Attempting to retrieve and extract the CASE from the specified location [✓] CASE has been retrieved and extracted Attempting to validate the CASE Skipping CASE validation... Attempting to locate the launch inventory item, script, and action in the specified CASE [✓] Found the specified launch inventory item, action, and script for the CASE Attempting to check the cluster and machine for required prerequisites for launching the item Checking for required prereqs... Prerequisite Result Kubernetes node resource must match a set of expressions defined in prereqs.yaml true openshift Kubernetes version must be >=1.14.6 true Client oc CLI must meet the following regex: [a-zA-Z]* 4.[3-9]*.[0-9]* true Required prereqs result: OK Checking user permissions... No user rules specified. [✓] Cluster and Client Prerequisites have been met for the CASE Running the CASE redisOperator launch script with the following action context: installCatalog Executing inventory item redisOperator, action installCatalog : launch.sh Checking arguments for install catalog action -------------Installing catalog source------------- apiVersion: operators.coreos.com/v1alpha1 kind: CatalogSource metadata: name: ibm-cloud-databases-redis-operator-catalog namespace: openshift-marketplace spec: displayName: ibm-cloud-databases-redis-operator-catalog publisher: IBM sourceType: grpc image: icr.io/cpopen/ibm-cloud-databases-redis-catalog@sha256:bb65ca87c987b040b0a8cea4cf44af9bf1a0110442f249529032dd580cc29b36 updateStrategy: registryPoll: interval: 45m catalogsource.operators.coreos.com/ibm-cloud-databases-redis-operator-catalog created done [✓] CASE launch script completed successfully OK -------------Installing dependent catalog source: mongodbOperator------------- Welcome to the CASE launcher Attempting to retrieve and extract the CASE from the specified location [✓] CASE has been retrieved and extracted Attempting to validate the CASE Skipping CASE validation... Attempting to locate the launch inventory item, script, and action in the specified CASE [✓] Found the specified launch inventory item, action, and script for the CASE Attempting to check the cluster and machine for required prerequisites for launching the item Checking for required prereqs... Prerequisite Result Kubernetes node resource must match a set of expressions defined in prereqs.yaml true openshift Kubernetes version must be >=1.14.6 true Client oc CLI must meet the following regex: [a-zA-Z]* 4.[3-9]*.[0-9]* true Required prereqs result: OK Checking user permissions... No user rules specified. [✓] Cluster and Client Prerequisites have been met for the CASE Running the CASE mongodbOperator launch script with the following action context: installCatalog Executing inventory item mongodbOperator, action installCatalog : launch.sh No Actions required for this CASE [✓] CASE launch script completed successfully OK -------------Installing dependent catalog source: guardiumInsightsOperator------------- Welcome to the CASE launcher Attempting to retrieve and extract the CASE from the specified location [✓] CASE has been retrieved and extracted Attempting to validate the CASE Skipping CASE validation... Attempting to locate the launch inventory item, script, and action in the specified CASE [✓] Found the specified launch inventory item, action, and script for the CASE Attempting to check the cluster and machine for required prerequisites for launching the item Checking for required prereqs... Prerequisite Result Kubernetes node resource must match a set of expressions defined in prereqs.yaml true openshift Kubernetes version must be >=1.14.6 true Client oc CLI must meet the following regex: [a-zA-Z]* 4.[3-9]*.[0-9]* true Required prereqs result: OK Checking user permissions... No user rules specified. [✓] Cluster and Client Prerequisites have been met for the CASE Running the CASE guardiumInsightsOperator launch script with the following action context: installCatalog Executing inventory item guardiumInsightsOperator, action installCatalog : launch.sh No Actions required for this CASE [✓] CASE launch script completed successfully OK done [✓] CASE launch script completed successfully OK - Issue this command:
oc get pod -n openshift-marketplaceThe expected output is similar to:NAME READY STATUS RESTARTS AGE 3d79bc1fdd5b502dd48a21a7bde619cf1ab0fb24c2ba37b78c9db5e41dg7p74 0/1 Completed 0 58m 432bf90a0a2ae4daeff1a8d8ad57ae936b47a6cd0b71a8dc1127c454casfd8j 0/1 Completed 0 57m 5079f0b764665fdecef84a6f50c13c55710e81531ddacdbac8faa0b248779sf 0/1 Completed 0 57m 602e82c9094e8c088d892ad6cf734efa67fa7a2fbb7404a9c1e996bfe247b47 0/1 Completed 0 55m 67f545ebc1376cc60c655f177193079eb4920e08de78e9bb203fbd909e2v9p9 0/1 Completed 0 57m 9692f8fbb670c2be83f95c021ca853588c2e4782515fa272d22969327amv2pl 0/1 Completed 0 59m acd7307aefe424b9030adbbd46641b0dbee3809e0cbc93604382e8db87m495s 0/1 Completed 0 57m acde7109b852622a0ba3377ccaa17fb33f852e65eb9f41dfbbd58a243af59ks 0/1 Completed 0 3h1m ad4622529533b14b1f7f21c19f3289861c17cad62c7a116f82596321fa4sp7w 0/1 Completed 0 57m b10d3e3c379419f2b9dabf78bc64372a00af14efabc9e87218b7f0e3d9x7vt6 0/1 Completed 0 57m bc7521b428f293bfff65fe56d17fba5d849836d1915f8666271cf153ecrrl45 0/1 Completed 0 57m certified-operators-glvts 1/1 Running 0 6h16m community-operators-2g87n 1/1 Running 0 13h dea584dca6d9d0ae177887936345eb3a316f48a0f3bc04489bfb1a87155z4js 0/1 Completed 0 57m e04d42e5f1898a59ea3103b040095971020047bff23e3aa45ede0c420btpbcc 0/1 Completed 0 57m e5f0e904e92c2e7522f80c968aea047e84ae922b5f443410fc1c550e9fd66hr 0/1 Completed 0 59m e6853075795a3dcc7b72f48fea5eb37cf7e7edeca72df4002aa34fcf60gqwrc 0/1 Completed 0 57m e6ccece3fa4ce0d95ed677dcfafc8973c0c0f1a00b6214e850fe9e7befgf9fp 0/1 Completed 0 57m ec4e1bf3195e6d7402e02aacd7dd07531cb69183d7dad5bd0d9bf3ff53j5lgz 0/1 Completed 0 57m ibm-cloud-databases-redis-operator-catalog-qbv5d 1/1 Running 0 74s ibm-db2uoperator-catalog-4gf4k 1/1 Running 0 2m8s marketplace-operator-74d56ff548-nm7fl 1/1 Running 0 28h opencloud-operators-wn542 1/1 Running 0 64m redhat-marketplace-779fk 1/1 Running 0 28h redhat-operators-q65mz 1/1 Running 0 19h - Install the operators:
cloudctl case launch \
  --case ${LOCAL_CASE_DIR}/${CASE_ARCHIVE} \
  --namespace ${NAMESPACE} \
  --inventory install \
  --action install-operator \
  --tolerance 1 \
  --args "--registry cp.icr.io --user ${CP_REPO_USER} --pass ${CP_REPO_PASS} --secret ibm-entitlement-key"
The expected output is similar to:Welcome to the CASE launcher Attempting to retrieve and extract the CASE from the specified location [✓] CASE has been retrieved and extracted Attempting to validate the CASE Skipping CASE validation... Attempting to locate the launch inventory item, script, and action in the specified CASE …………... deployment.apps/guardiuminsights-controller-manager created [✓] CASE launch script completed successfully OK [✓] CASE launch script completed successfully OK - Issue this command:
oc get podsThe expected output is similar to:NAME READY STATUS RESTARTS AGE guardiuminsights-controller-manager-55774fbfdb-bhd8n 1/1 Running 0 65s ibm-cloud-databases-redis-operator-776b974f5f-hctf6 1/1 Running 0 2m50s mongodb-kubernetes-operator-758c495c44-mtqzf 1/1 Running 0 2m11s
Guardium Insights custom resource (CR) deployment
- Create a <filename>.yaml file, using this as an example:
apiVersion: gi.ds.isc.ibm.com/v1
kind: GuardiumInsights
metadata:
  #name: This must be 10 or less characters
  name: staging
spec:
  version: 3.1.0
  license:
    accept: true
    licenseType: "L-TESX-C86NC4"
  guardiumInsightsGlobal:
    size: values-small
    image:
      insightsPullSecret: ibm-entitlement-key
      repository: cp.icr.io/cp/ibm-guardium-insights
    insights:
      ingress:
        hostName: staging.apps.sysgcp.ibmguardiuminsights.com
        domainName: apps.sysgcp.ibmguardiuminsights.com
      ics:
        namespace: ibm-common-services
        registry: common-service
    #storageClassName: Must be a ReadWriteMany StorageClass
    storageClassName: ocs-storagecluster-cephfs
  dependency-db2:
    image:
      insightsPullSecret: ibm-entitlement-key
    db2:
     size: 2
     resources:
       requests:
         cpu: "6"
         memory: "28Gi"
       limits:
         cpu: "6"
         memory: "28Gi"
     storage:
     - name: meta
       spec:
         storageClassName: "ocs-storagecluster-cephfs"
         accessModes:
         - ReadWriteMany
         resources:
           requests:
             storage: "1000Gi"
       type: create
     - name: data
       spec:
         storageClassName: "ocs-storagecluster-cephfs"
         accessModes:
         - ReadWriteOnce
         resources:
           requests:
             storage: "4000Gi"
       type: template
     mln:
       distribution: 0:0
       total: 2
  dependency-kafka:
    kafka:
      storage:
        type: persistent-claim
        size: 250Gi
        class: "ocs-storagecluster-ceph-rbd"
    zookeeper:
      storage:
        type: persistent-claim
        size: 20Gi
        class: "ocs-storagecluster-ceph-rbd"
  mini-snif:
    persistentVolumesClaims:
      mini-snif-shared:
        storageClassName: "ocs-storagecluster-cephfs"
  universal-connector-manager:
    persistentVolumesClaims:
      universal-connector-manager-shared:
        storageClassName: "ocs-storagecluster-cephfs"
  settings-datasources:
    persistentVolumesClaims:
      settings-datasources:
        storageClassName: "ocs-storagecluster-cephfs"
  ticketing:
    persistentVolumesClaims:
      ticketing-keystore:
        storageClassName: "ocs-storagecluster-cephfs"
In the YAML file, replace the host name, domain name, and class for your current environment. - Apply the YAML file:
oc apply -f <filename>.yaml - To monitor the Guardium Insights CR, issue this command:
oc get guardiuminsights -wThe expected output is similar to:NAME TYPE STATUS REASON MESSAGE DESIRED_VERSION INSTALLED_VERSION gi-sample Running True Reconciling Starting to Reconcile 3.1.0 gi-sample Running True GuardiumInsightsInstallRunning Secret creation completed 3.1.0 gi-sample Running True GuardiumInsightsInstallRunning Instantiated Redis Sentinel CR 3.1.0 gi-sample Running True GuardiumInsightsInstallRunning Instantiated MongoDB CR 3.1.0 gi-sample Running True GuardiumInsightsInstallRunning Instantiated Kafka CR 3.1.0 gi-sample Running True GuardiumInsightsInstallRunning Instantiated DB2 CR 3.1.0 gi-sample Running True GuardiumInsightsInstallRunning Checking for Kafka CR Success 3.1.0 gi-sample Running True GuardiumInsightsInstallRunning Validating Kafka Connection Success 3.1.0 gi-sample Running True GuardiumInsightsInstallRunning Checking for Redis CR Success 3.1.0 gi-sample Running True GuardiumInsightsInstallRunning Validating Redis Connection Success 3.1.0 gi-sample Running True GuardiumInsightsInstallRunning Checking for MongoDB CR Success 3.1.0 gi-sample Running True GuardiumInsightsInstallRunning Validating MongoDB Connection Success 3.1.0 gi-sample Running True GuardiumInsightsInstallRunning Checking for DB2 CR Success 3.1.0 gi-sample Running True GuardiumInsightsInstallRunning Validating DB2 Connection Success 3.1.0 gi-sample Running True GuardiumInsightsInstallRunning Checking for initial Tenant creation 3.1.0 gi-sample Running True GuardiumInsightsInstallRunning Checking for initial Tenant creation 3.1.0 gi-sample Running True Reconciling Checking GI Pods/Deployments/Statefulsets are running 3.1.0 gi-sample Running True Reconciling Checking GI Pods/Deployments/Statefulsets are running 3.1.0 gi-sample Running True Reconciling Checking GI Pods/Deployments/Statefulsets are running 3.1.0 3.1.0 gi-sample Ready True Complete Completed Reconciliation 3.1.0 3.1.0
Validation criteria
Guardium Insights should be successfully installed after 1 hour.
- Issue this command:
oc get guardiuminsightsThe expected output is similar to:NAME TYPE STATUS REASON MESSAGE DESIRED_VERSION INSTALLED_VERSION gi-sample Ready True Complete Completed Reconciliation 3.1.0 3.1.0 - All PVCs in the namespace should be Bound status with the correct storage class. Issue this command:
oc get pvcThe expected output is similar to:NAME STATUS VOLUME CAPACITY ACCESS MODES STORAGECLASS AGE activelogs-c-gi-sample-db2-db2u-0 Bound pvc-875cffb4-7e8d-4bd6-ba3a-d45697551df9 200Gi RWO ocs-storagecluster-cephfs 26m activelogs-c-gi-sample-db2-db2u-1 Bound pvc-125a8bef-ccfc-47f4-8fba-1d98f37b4759 200Gi RWO ocs-storagecluster-cephfs 26m c-gi-sample-db2-meta Bound pvc-8b8df167-c744-4cfd-b92e-f8155a5b7437 1000Gi RWX ocs-storagecluster-cephfs 27m data-c-gi-sample-db2-db2u-0 Bound pvc-f2c517ad-af1b-4274-89c1-505fb2f8c1b8 4000Gi RWO ocs-storagecluster-ceph-rbd 26m data-c-gi-sample-db2-db2u-1 Bound pvc-92a01f2a-ee98-47b3-bade-35239145643a 4000Gi RWO ocs-storagecluster-ceph-rbd 26m data-c-gi-sample-redis-m-0 Bound pvc-4329eaa1-22b0-44a1-b7d3-6c37114f4a68 20Gi RWO ocs-storagecluster-cephfs 27m data-c-gi-sample-redis-m-1 Bound pvc-4d36f5d9-cb5d-4c67-a30c-40ce81c678bb 20Gi RWO ocs-storagecluster-cephfs 27m data-c-gi-sample-redis-m-2 Bound pvc-b9bd78d1-21bd-48c9-a09f-61a6fcf68db0 20Gi RWO ocs-storagecluster-cephfs 27m data-gi-sample-kafka-0 Bound pvc-6539ce17-a722-4e68-a18d-eeb2ffa01262 250Gi RWO ocs-storagecluster-ceph-rbd 27m data-gi-sample-kafka-1 Bound pvc-b1c62248-ce18-4cfe-b12e-291a7e1453c4 250Gi RWO ocs-storagecluster-ceph-rbd 27m data-gi-sample-kafka-2 Bound pvc-c7c33d55-b121-426b-8a41-4f931204fcdd 250Gi RWO ocs-storagecluster-ceph-rbd 27m data-gi-sample-zookeeper-0 Bound pvc-35ee41e5-f655-4ead-8330-35ae54c0587c 20Gi RWO ocs-storagecluster-ceph-rbd 28m data-gi-sample-zookeeper-1 Bound pvc-d97cc734-ea0a-4b24-b6ab-4b992bb37dd4 20Gi RWO ocs-storagecluster-ceph-rbd 28m data-gi-sample-zookeeper-2 Bound pvc-7d231f5a-3fc3-4583-8418-0fedec348418 20Gi RWO ocs-storagecluster-ceph-rbd 28m data-volume-gi-sample-mongodb-0 Bound pvc-2f628ccc-89bb-4e3e-85d8-222b9347fad2 250Gi RWO ocs-storagecluster-cephfs 28m data-volume-gi-sample-mongodb-1 Bound pvc-f5f24c7b-945f-412e-8b22-f322336cede3 250Gi RWO ocs-storagecluster-cephfs 27m data-volume-gi-sample-mongodb-2 Bound pvc-2a984c92-8913-4f42-8860-819649679567 250Gi RWO ocs-storagecluster-cephfs 27m gi-samplevyusfhlqeb3js88nxvvany-mini-snif-shared Bound pvc-62b4742a-8e1a-49a3-9ab9-50c8365c3aaa 50Gi RWX ocs-storagecluster-cephfs 2m55s logs-volume-gi-sample-mongodb-0 Bound pvc-282002c1-3227-4315-a58f-b5f41a722265 250Gi RWO ocs-storagecluster-cephfs 28m logs-volume-gi-sample-mongodb-1 Bound pvc-dc6a051e-cdd1-4897-8545-5943992622d9 250Gi RWO ocs-storagecluster-cephfs 27m logs-volume-gi-sample-mongodb-2 Bound pvc-b3e88414-6b82-4345-ba2e-6c9197c63162 250Gi RWO ocs-storagecluster-cephfs 27m mini-snif-i-gi-samplevyusfhlqeb3js88nxvvany-mini-snif-0 Bound pvc-bf0f98e8-5154-4706-a1c8-ce579cf72cf3 50Gi RWO ocs-storagecluster-cephfs 2m56s snif-picker-config Bound pvc-291e69cd-e88e-43b3-a8fd-6eff5e252bbf 50Mi RWO ocs-storagecluster-cephfs 2m51s ticketing-keystore Bound pvc-a74ce09b-dd50-4389-8b14-604ea5412a1b 2Mi RWX ocs-storagecluster-cephfs 25m universal-connector-manager-shared Bound pvc-94ff0032-5b57-46c5-a856-03942b965fcb 50Gi RWX ocs-storagecluster-cephfs 24m - Log in to the Guardium Insights user interface at http://staging.apps.testgcp.ibmguardiuminsights.com. The expected output is:

- To validate SCP, issue this command:
oc get routeThe expected output is similar to:NAME HOST/PORT PATH SERVICES PORT TERMINATION WILDCARD gi-sample-apigateway-api staging.apps.testgcp.ibmguardiuminsights.com /api gi-sample-apigateway 8443 reencrypt/Redirect None gi-sample-apigateway-docs staging.apps.testgcp.ibmguardiuminsights.com /docs/v3 gi-sample-apigateway 8443 reencrypt/Redirect None gi-sample-insights staging.apps.testgcp.ibmguardiuminsights.com / gi-sample-insights <all> reencrypt/Redirect None gi-sample-ssh-service staging.apps.testgcp.ibmguardiuminsights.com gi-sample-ssh-service service-sshservice None gi-samplevyusfhlqeb3js88nxvvany-snif-picker-feed feed.vyusfhlqeb3js88nxvvany.gi-sample.apps.testgcp.ibmguardiuminsights.com gi-samplevyusfhlqeb3js88nxvvany-snif-picker-headless feed passthrough None gi-samplevyusfhlqeb3js88nxvvany-snif-picker-unix unix.vyusfhlqeb3js88nxvvany.gi-sample.apps.testgcp.ibmguardiuminsights.com gi-samplevyusfhlqeb3js88nxvvany-snif-picker-headless unix passthrough None myUsername@LP-C02DRE3QMD6M ~ % myUsername@LP-C02DRE3QMD6M ~ % oc get svc | grep ssh gi-sample-ssh-service LoadBalancer 172.30.246.98 35.196.163.71 22222:31729/TCP 15h myUsername@LP-C02DRE3QMD6M ~ % mkdir test-ssh myUsername@LP-C02DRE3QMD6M ~ % cd test-ssh myUsername@LP-C02DRE3QMD6M test-ssh % vi testfile myUsername@LP-C02DRE3QMD6M test-ssh % myUsername@LP-C02DRE3QMD6M test-ssh % ls -ltr total 8 -rw-r--r-- 1 myUsername 149934974 37 Dec 2 11:33 testfile myUsername@LP-C02DRE3QMD6M test-ssh % cat testfile echo "welcome to scp testing in GCP" myUsername@LP-C02DRE3QMD6M test-ssh % oc get secret ssh-service-ssh-gen -ojsonpath='{.data.guardium_to_insights_scp}' | base64 -d > guardium_to_insights_scp myUsername@LP-C02DRE3QMD6M test-ssh % ls -ltr total 16 -rw-r--r-- 1 myUsername 149934974 37 Dec 2 11:33 testfile -rw-r--r-- 1 myUsername 149934974 1674 Dec 2 11:34 guardium_to_insights_scp myUsername@LP-C02DRE3QMD6M test-ssh % chmod 400 guardium_to_insights_scp myUsername@LP-C02DRE3QMD6M test-ssh % cat guardium_to_insights_scp -----BEGIN RSA PRIVATE KEY----- MIIEowIBAAKCAQEAl1OqpJuSgxmPbN6wTSZGFoQnEjCKrt8nFQEo2KicenvMQJ3Z qtIfYnFQ/KDkPTX3Qh4BVoIoGFGYvc4Cq8tlbhtYQ8VwqZGKE9zeYfmALgH6w+wb eA7JvdC7Cpb4JOLOrop5aT+/7Qc25P5XOiG38eMx1/msBjcMy81jH42lbA3+rzDI 2lYUpGDgHhGu54VVTQQSMsOTjh8KJTdMHvRsGTXJLiAIE5mTMKJJW8dzEkzwAOIU EOH7b64rnL+pYn0B7r6oqFHGI8yQf2ilublohpInrhUWCF7qqynUtVRcMAKJ8biD tGEkIZy/iXRvR5dbQXMSjXyujlFpxn0dYevcnQIDAQABAoIBACSuZTjNdTBOK9QK DtZEpsyicA4asiM9eG3BADO0e2m9RH+NQ8wCbxUfvq/eGDU2NZ9TQqPDnRB4BvxL SZ53CTkta7HR1ENmQgAak9VP82AznqOLQgVSIFjgldY1TiUyzULF0jRO/ajpDMdp V5+BuOLrXZOqs6Y2BeYI/TQS07xjMJ8ClICNXih71GsGL5EfPqWmOqwQOfKIVEEE hBeDH+6CiPEBfbgk12YKGfly8wRY/a7mpU2ncp52uBlaux2sjA1bNYL7q7MKdkCX CzQjAjhLUzrWtBi0sT6ewd2yS7opCRbM+YG7mLxzu50qGD8/TjY3XQmPW+l1qiV4 1+UbDIECgYEAyJ8BUZ/yGawic6nZsB/8kRkXgURyLeAzFfZexIigP9nH7feQgYbL Cw0rfoKah6KKeZOs/DDzZDjUdQCih59cqRQYhHNYWDyMhQ6/3/um5zvZ/AMUqmte eLEvvNzKHTpsFH2ZKuIAAiJz1uJnb3sQqupv80gpwaGLz9/pdQTa940CgYEAwRlB O2yCfYjLQKwgnoVKDR/ENZ6hvti326qxIIxyacewQhj3hNkFVF0RAs5lWKRTdpbo QSf0ADhHenfXkp+2H2PlCimLxek2rWCGCD7Thch0XfnN3oV+XgFTQ8R9lscZrYDq pYRVbQbKaRK8FIA+7BGxbprzoYbN27o+vibO7VECgYAO8dlVTUbppqsCVrrCpf9Y h7f6hzDCPhtQHYQ9u7fESeLc1T5Mh9AESLzetbfxNqh+GgQe3T6kTp90/9EbrUFn zvlslHMWT5xgJRMiCksKmqjIXypg75KgBwL5XLEpsDpw5FJOoXtCrXJXpZHy+gXp 1YD1bIC/zdruZ02qy+vL2QKBgD58BJ7NCyDCHjtMN7X0HbVHfT94mJBgIoajonOM 3w0ZwBBzccz8SPw2rWWCEktvyU5LoNZMrmlPzNl1ZD2fDtjzg08ZiJA/WiEaZeTP J7VX20f5qMOD4RNcTGxWbelXfhil6cgrnVUNaHw9wrzDjxjm1Mqcu4+eRoj+qITx m+4xAoGBALJRnZh+vR8tRn/xbDzINfkuS+5UJO4PA89Y2YRPcimp7zrtZhB16PyY yLcrJQAQjrmQPuAU+kFOZarFEZ7lkDTLimUMU67karHsbsXcz0uqaluzuAAFQLr9 rawQRfypZMDsuPYXP3jxYP1LCHxU40bWTwVZA4H5d6kHkRhiuTuG -----END RSA PRIVATE KEY-----% myUsername@LP-C02DRE3QMD6M test-ssh % oc rsh gi-sample-ssh-service-5d65c59d58-hxk8v sh-4.4$ cd /service/datamart/TNT_VYUSFHLQEB3JS88NXVVANY/ sh-4.4$ ls sh-4.4$ pwd /service/datamart/TNT_VYUSFHLQEB3JS88NXVVANY sh-4.4$ exit exit myUsername@LP-C02DRE3QMD6M test-ssh % scp -i guardium_to_insights_scp -P 22222 testfile scpuser@35.196.163.71:/service/datamart/TNT_VYUSFHLQEB3JS88NXVVANY/ The authenticity of host '[35.196.163.71]:22222 ([35.196.163.71]:22222)' can't be established. RSA key fingerprint is SHA256:AKpZ55fe6t8YsIbsBifmvIWBKkytuS+TIZAMEKKMt+k. Are you sure you want to continue connecting (yes/no/[fingerprint])? yes Warning: Permanently added '[35.196.163.71]:22222' (RSA) to the list of known hosts. testfile 100% 37 0.1KB/s 00:00 myUsername@LP-C02DRE3QMD6M test-ssh % oc rsh gi-sample-ssh-service-5d65c59d58-hxk8v sh-4.4$ cd /service/datamart/TNT_VYUSFHLQEB3JS88NXVVANY/ sh-4.4$ ls testfile
Uninstall Guardium Insights
To uninstall Guardium Insights, issue this command:
oc delete `oc get guardiuminsights -oname -n ${NAMESPACE}` -n ${NAMESPACE}
To clean up after you uninstall Guardium Insights, issue these commands:
oc delete $(oc get tenantguc -oname)
oc delete $(oc get tenantminisnif -oname)
oc delete `oc get pvc -oname -n ${NAMESPACE}` -n ${NAMESPACE}
Document Location
Worldwide
[{"Type":"MASTER","Line of Business":{"code":"LOB24","label":"Security Software"},"Business Unit":{"code":"BU059","label":"IBM Software w\/o TPS"},"Product":{"code":"SSNH7ER","label":"IBM Security Guardium Insights for IBM Cloud Pak for Security"},"ARM Category":[{"code":"a8m0z000000Gp0NAAS","label":"INSTALL UPGRADE MIGRATION"}],"ARM Case Number":"","Platform":[{"code":"PF025","label":"Platform Independent"}],"Version":"3.1.0"}]
Was this topic helpful?
Document Information
Modified date:
14 March 2022
UID
ibm16550482