How To
Summary
The 7063-CR2 Power HMC, is the latest hardware appliance model released in May of 2021. As was the case for our previous model, it is important that the BMC component of the HMC is taken into consideration when planning for the installation and configuration of the 7063-CR2. This document covers some pre-installation considerations and a recommended path to configure the 7063-CR2 HMC.
Objective
This document does not replace IBM Documentation resources, but rather complements them by offering a simplified collection of topics that can guide most users through the process of installing and configuring the HMC.
This document discusses pre-installation considerations, cabling, and configuration of a new 7063-CR2 Power HMC.
Environment
Any new 7063-CR2 Power HMC
Steps
1) Pre-installation Planning
1.1) Installing the HMC into a Rack (if applicable)
1.2) What is the Baseboard Management Controller (BMC), and why it is important?
1.3) BMC networking plan
1.4) HMC networking plan
2) Cabling the HMC
3) Power On the HMC
4) The Setup Wizard
5) Additional Tasks
5.1) Create a new BMC user to use for Console Inband Communication Credentials.
5.2) Configure Console Inband Communication Credentials
5.3) Enable remote command execution (ssh)
6) Electronic Service Agent Setup Wizard (Call home)
1) Pre-installation Planning
1.1) Installing the HMC into a Rack (if applicable)
The 7062-CR2 HMC provides two types of rails for installation into a rack:
- Fixed Rails (FC ERK0)
- Adjustable Rails (FC ERK1)
Orders that include racking by IBM Manufacturing, will default to the Fixed Rails, otherwise, the Adjustable Rails are added by default. The Fixed Rails can be selected for orders that do not include racking at IBM Manufacturing, however, it is important to read the description of the each of the rails in the sales manual, to ensure they will fit the intended rack. The Adjustable Rails provide the most flexibility when installing on non-IBM racks.
For instructions and considerations when installing the 7063-CR2 HMC into a rack, see these IBM Documentation articles:
- Prerequisites for installing the rack-mounted 7063-CR2 system
- Determining and marking the location in the rack for the 7063-CR2 system
- Attaching the adjustable rails to the system chassis and to the rack
- Attaching the fixed rails to the system chassis and to the rack
1.2) What is the Baseboard Management Controller (BMC), and why it is important?
The Baseboard Management Controller (BMC) on the 7063-CR2 is based on the OpenBMC Open Source project.
In simple terms, think of the BMC as an environment that starts operating on your HMC appliance, as soon as power is applied. It is analogous to what Flexible Service Processors (FSPs) are for the managed systems.
The BMC is part of the appliance and it is required to configure its networking so it can be accessed for service purposes.
In addition, the HMC software stack, communicates with its own BMC to monitor any platform events reported for problem diagnosis.
In addition, the HMC software stack, communicates with its own BMC to monitor any platform events reported for problem diagnosis.
The BMC provides many management functions, for example, controlling the power state of the HMC remotely (power on or off), event logging (to see platform events), remote console access through KVM (remotely see and interact with the local console), serial over LAN (remote access to the serial console), updating firmware (HMC firmware), Virtual Media (mount media remotely to look like it is local on the HMC), and many others.
It is highly recommended that HMC administrators, become familiar with the BMC, its configuration, network settings, and features, to both maximize the productivity of the HMC, and maintain the platform. The most common method of accessing the BMC is through its web user interface. Once the BMC is configured on the network, point your browser to https://<BMC IP or hostname>.
1.3) BMC networking plan
When creating the network plan for the HMC, it is important to include the network connection to the BMC.
Ignoring the BMC during the planning phase, can result in unnecessary reconfiguration of the network interfaces on the HMC or missing the remote management benefits it provides.
Read the following article on "How to configure the BMC on the 7063-CR2" for details on the network interfaces of the BMC and how to configure them.
Before moving forward, consider which interface of the BMC you will configure and how that may impact the way you normally configured the HMC interfaces.
1.4) HMC networking plan
Typically there are two types of networks configured on the HMC, a "service network" where the managed systems connect to, and a "public" network through which the HMC is accessed remotely. The implementation of these networks can vary, from simple to complex, depending on how the administrator sets them up. For the purpose of this document, we will consider an environment where there will be one service network, and one public network as it represents the majority of installations.
When selecting the "service network", most administrators traditionally select interface eth0 (first physical Ethernet port on the HMC). This has historical roots based on early models of HMC that could only support a DHCP network, on port eth0. This restriction has been lifted for many years and several generations of the HMC hardware appliance. The location of the "service network" can be on any available port. Understanding this fact can help simplify the configuration of the BMC network.
The "public" network, the network the administrator uses to access the HMC remotely via web browser or ssh, tends to be configured on the next port, eth1.
With the knowledge that the BMC shares a physical port with the HMC software, in eth0, and that usually the BMC remote access is configured on the same public network as the HMC, this presents an opportunity to combine both interfaces on the same physical port. In this configuration, the "service network" would then be configured on a port other than eth0.
It is up to the administrator to determine what works best for their environment. If configuring the BMC on the network is not an option then understand that there will be times when a firmware update to the HMC's BMC and PNOR code (the two firmware images on the HMC), will be required. In addition, some diagnostic service procedures may require BMC access. In those cases, a direct connection to the BMC will be necessary.
2) Cabling the HMC
After considering both the BMC and HMC networking plans, the next step is to cable the HMC.
We will cover two scenarios based on which BMC port the user will configure on the network:
- HMC and BMC sharing physical port 0 (eth0)
- BMC on dedicated port (port M)
Cabling for configuration 1: HMC and BMC sharing physical port 0 (eth0)
The benefit of this configuration is that both HMC and BMC, share a single cable. This is a suitable configuration for environments where the BMC and the HMC can co-exist on the same subnet.
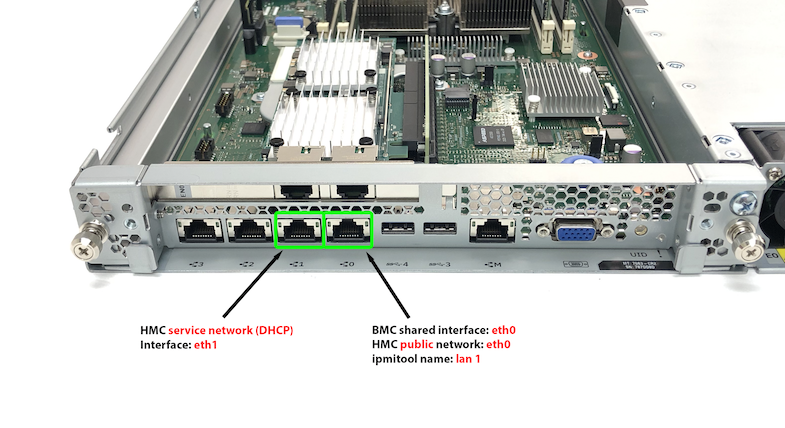
In this configuration, connect an Ethernet cable from the switch to port 0 (eth0). It is important that an active link is present prior to configuring the BMC network interface.
Cabling for configuration 2: BMC on dedicated port (port M)
In this configuration, the BMC network interface is configured on the dedicated port (port M). The HMC public network and the service network are configured on ports eth0 and eth1 respectively.
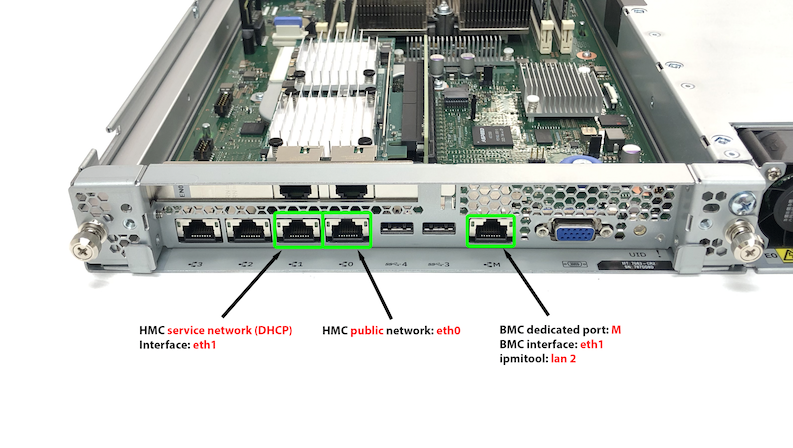
NOTE: Although eth0 has traditionally been used as the service network port through which to connect the managed systems via DHCP, it is recommended to configure that network on any other port than eth0. Having eth0 instead be used for the public network, or left unused, could allow for a redundant path to the BMC to be configured, if it was necessary in the future, given that eth0 is the shared BMC port.
Connect all the cables according to the wanted configuration.
3) Power On the HMC
After applying power to the HMC, wait a few minutes for the power button to start blinking. Once it reaches that state, press the power button to power on the system.
4) The Setup Wizard
After interacting with the "Display configuration selection", "Language configuration selection", "Keyboard layout selection", panels, and accepting licenses, the "HMC Guided Setup Wizard" loads.
The main tasks on the setup wizard are the following:
- Change Management Console Date and Time.
- Read HMC to inband BMC credentials notice
- Change management console passwords
- Create additional management console users
- Configure management console network settings
- Configure notification of problem events
Lets look at the Guided Setup Wizard steps in detail.
Change Management Console Date and Time

In this panel, set the date, time, and time zone. By default it loads in UTC time.
Click Next to continue.
Read HMC to inband BMC credentials notice
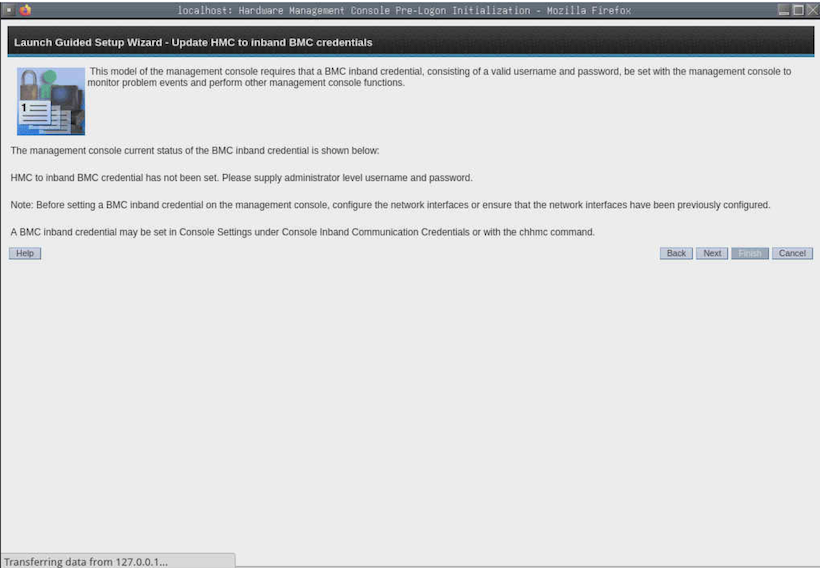
This panel contains a notification for the user to read, about a new required step in the configuration of the 7063-CR2.
We will cover this step, later on in this document. Click Next to continue.
New hscroot password
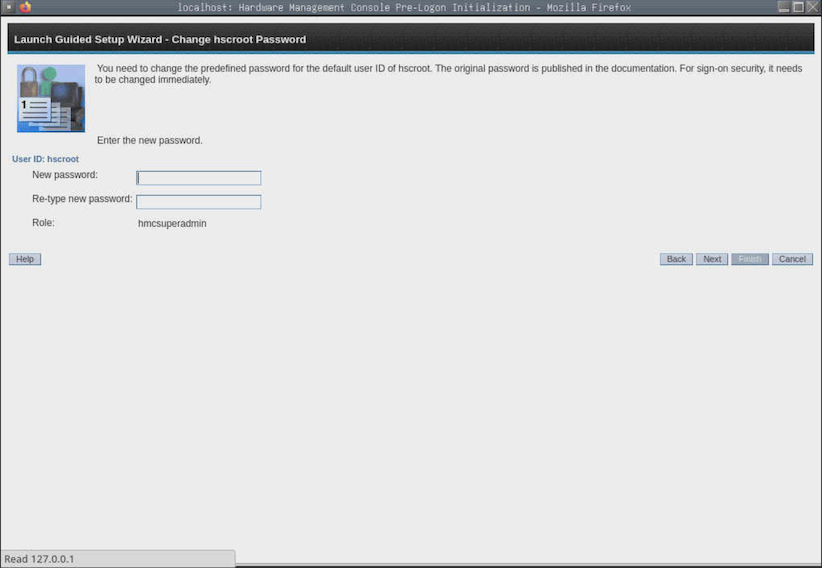
Set a new hscroot password, then click Next to continue.
New root password
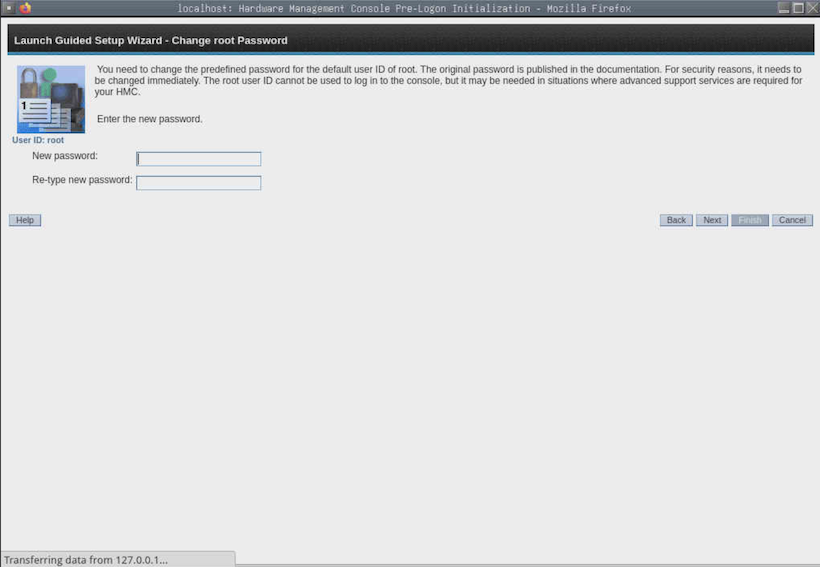
Set a new root password for the HMC, then click Next to continue.
Create other users
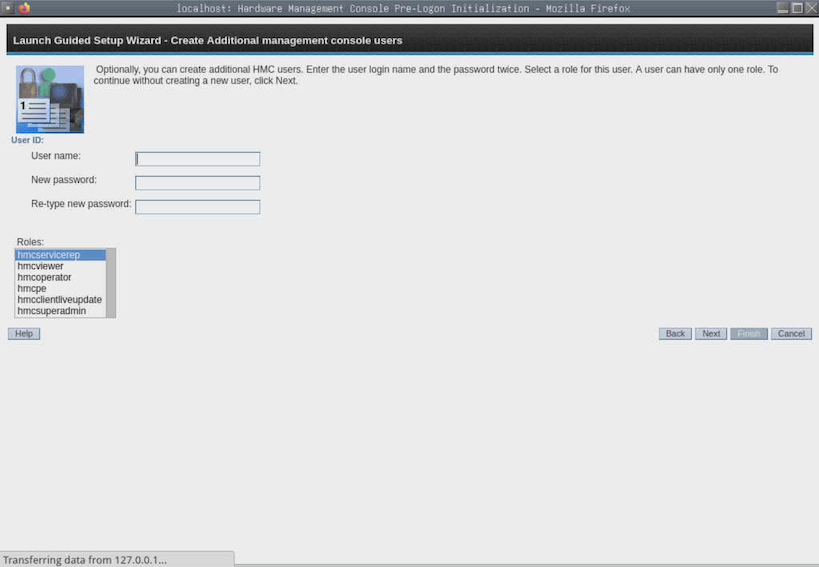
Optionally, create other users.
For example, create user "hscpe", set its password, and set the role to "hmcpe", then click Next to continue.
The next steps
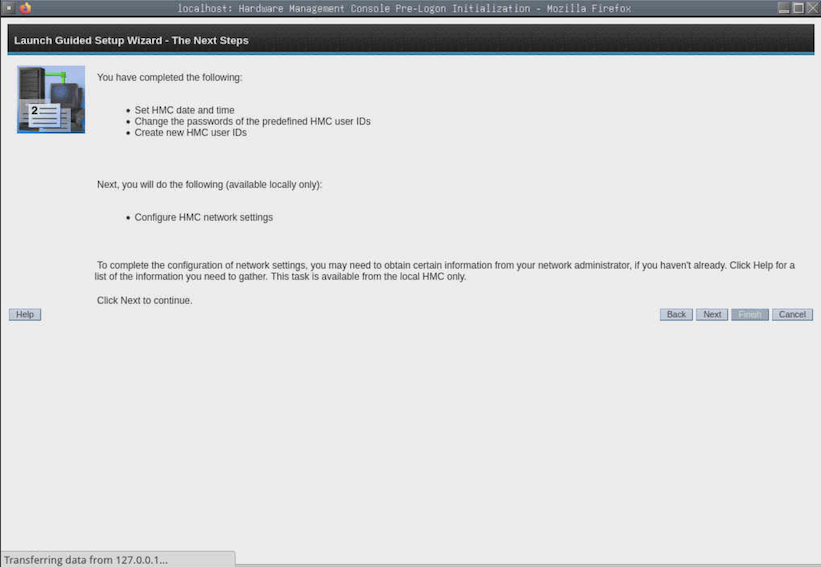
The wizard summarizes the steps completed so far and prompts the user to click Next to continue onto configuring the network settings.
Configure Management Console Network Settings
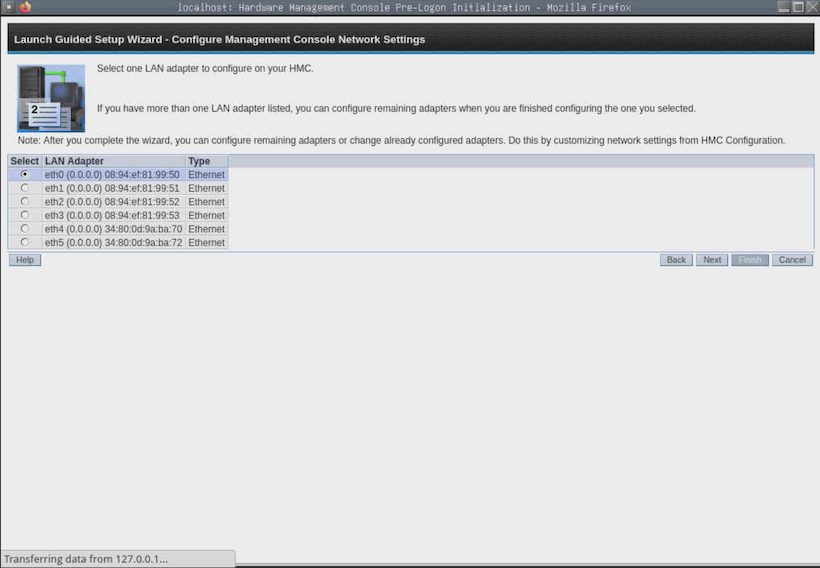
Select eth0 and click Next to continue.
Set speed and duplex

Select speed and duplex. The recommendation is to leave it set to Autonegotiation. Click Next to continue.
Configure the open network
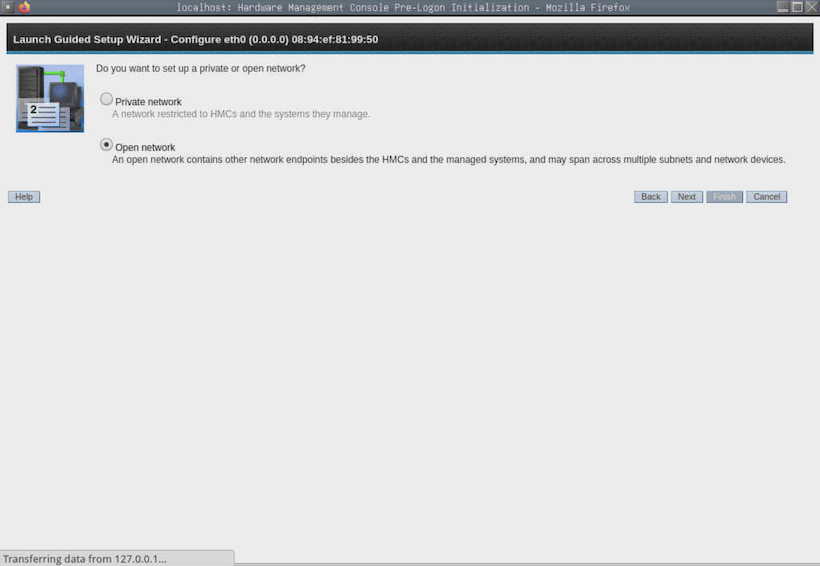
Select Open network and click Next to continue.
We will configure the open network on eth0 because it provides flexibility for environments where the BMC will also be configured in the open network.
A single cable on port eth0 can be shared by both the HMC and the BMC.
Specify an IP address

Specify the IP address and the network mask for the open network. This is the network you will use to access the HMC remotely.
Click, Next to continue.
Configure ipv6
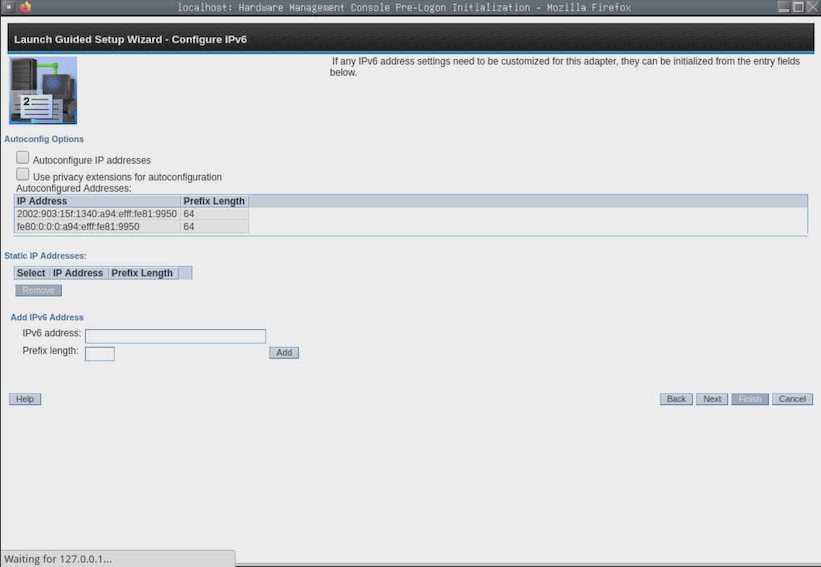
If necessary, configure IPV6 settings, otherwise leave blank, and click Next to continue.
Configure firewall
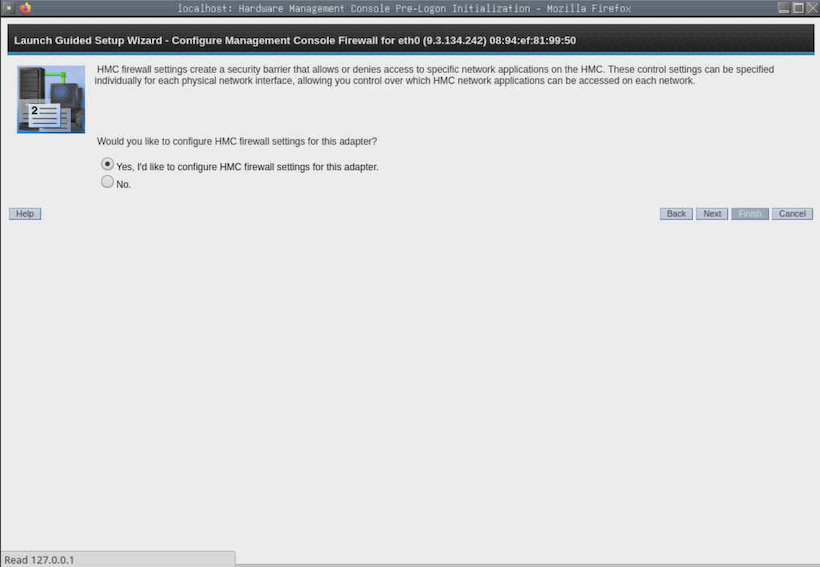
Select "Yes" to configure the firewall settings for that interface. Click Next to continue.
Select applications to allow through the firewall.
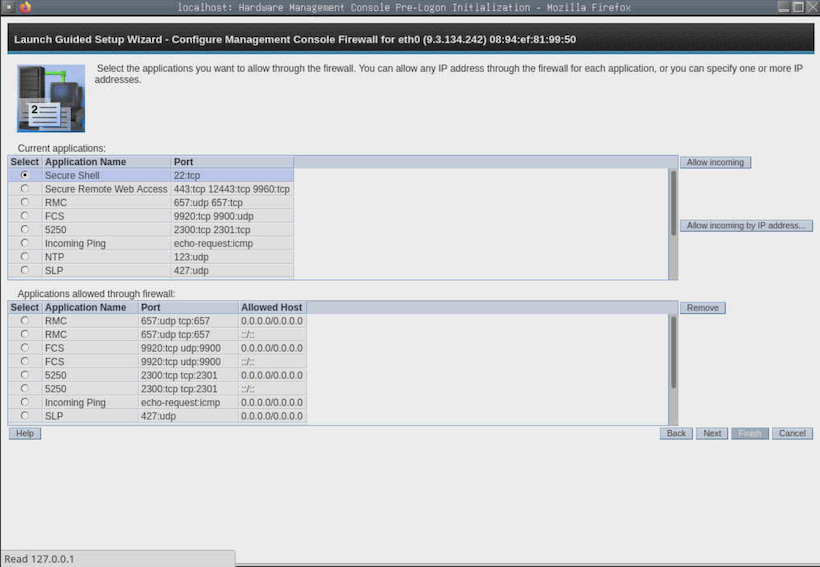
At a minimum, select Secure Shell then click Allow incoming. Repeat for Secure Remote Web Access. Click Next to continue.
Configure the Private network
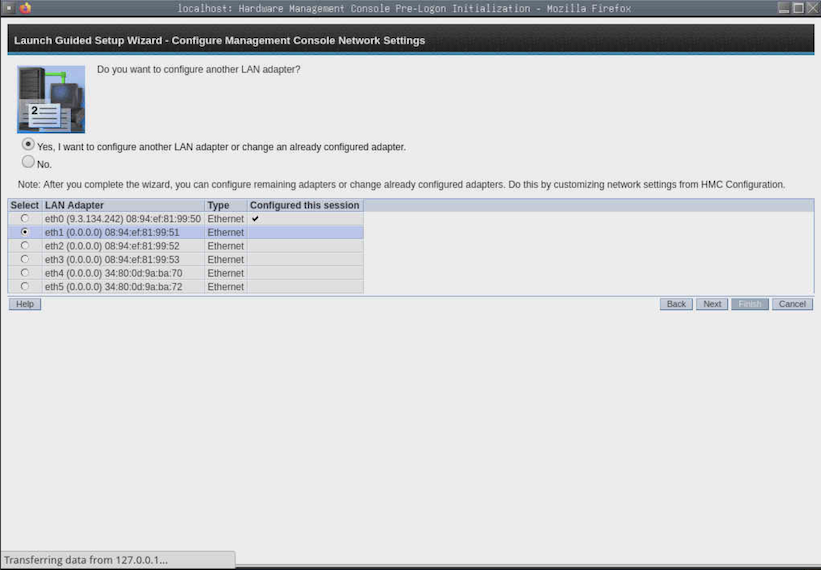
Select eth1, and click Next to continue.
We will configure the private network on eth1. The private network can be hosted on any port and more than one private network may be configured.
We recommend avoiding eth0 for the private network as it would effectively eliminate the possibility of using eth0 as a shared port for the BMC.
Set speed and duplex
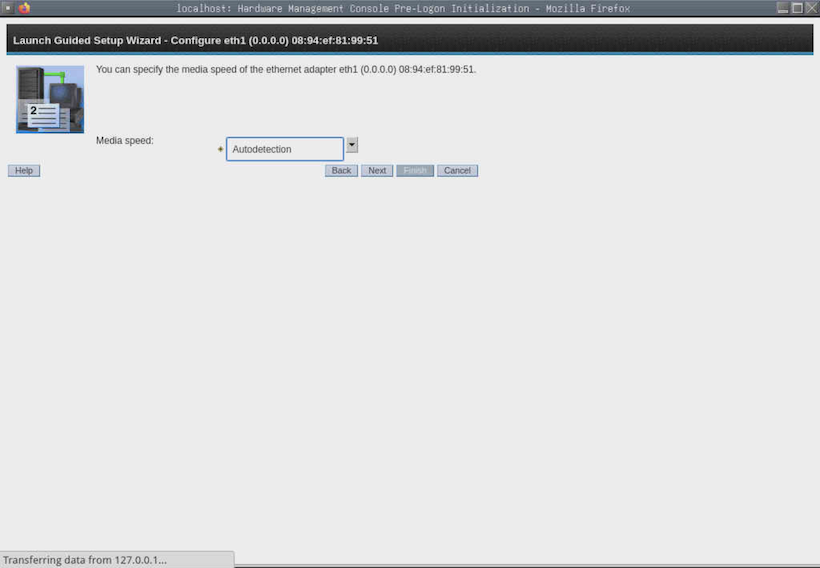
Select speed and duplex. The recommendation is to leave it set to Autonegotiation. Click Next to continue.
Private network
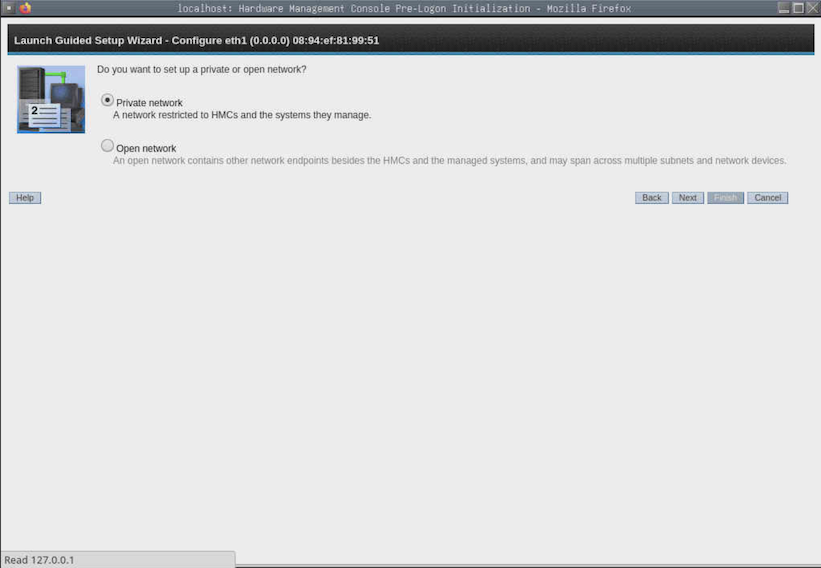
Select Private network and click Next to continue.
Configure Private network
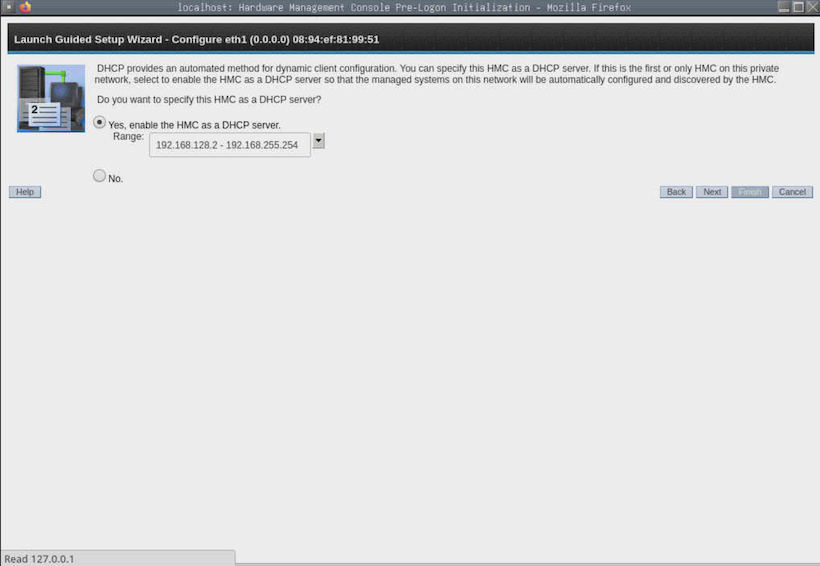
Select the DHCP range and click Next to continue.
NOTE: When setting up a redundant HMC (a second HMC), select a different range than the one selected on the first HMC.
Configure additional networks (optional)
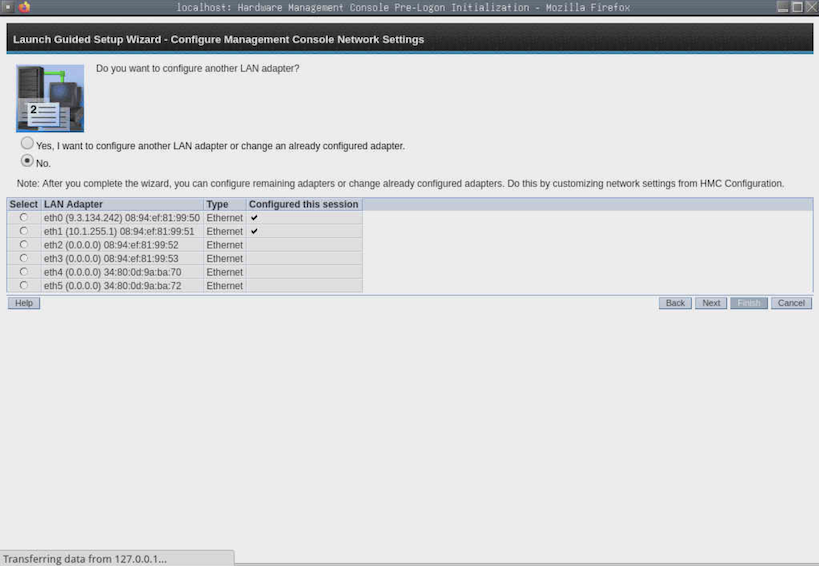
Configure any other network necessary, otherwise, select No, and click Next to continue.
Set the hostname, even if the customer is unsure what it will be in the environment, set anything here to
avoid it defaulting to localhost. Ex. hmc1, hmc2, p10hmc, etc
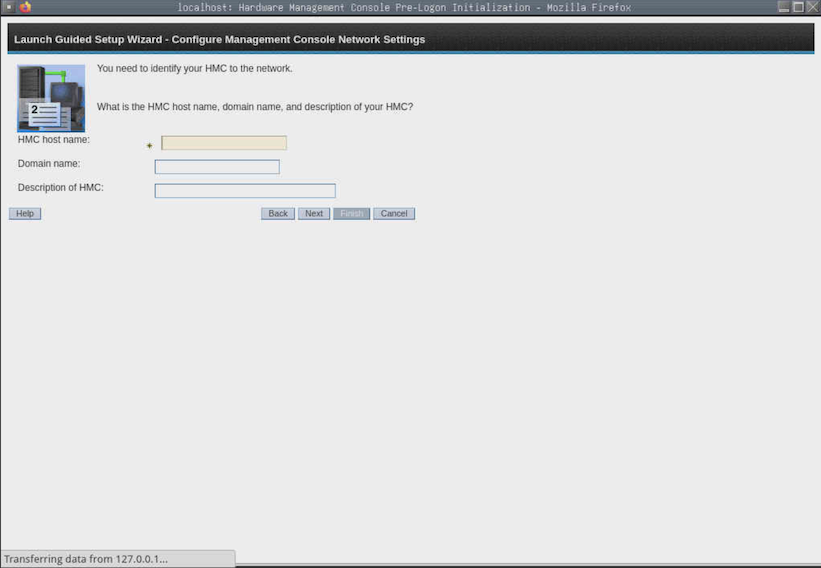
Set the HMC hostname, domain, and description. Click Next to continue.
Configure gateway
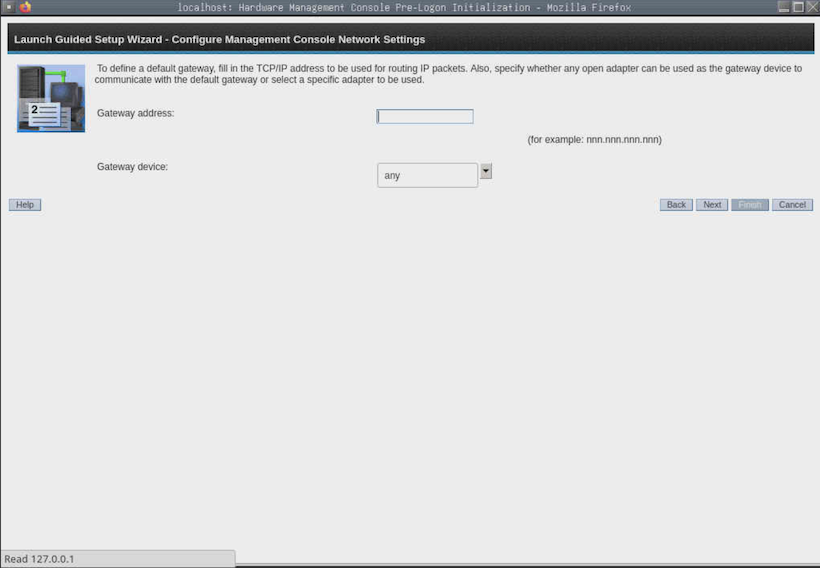
Configure the gateway IP address and under gateway device, select the open network interface. In our example, eth0.
Click Next to continue.
Configure DNS
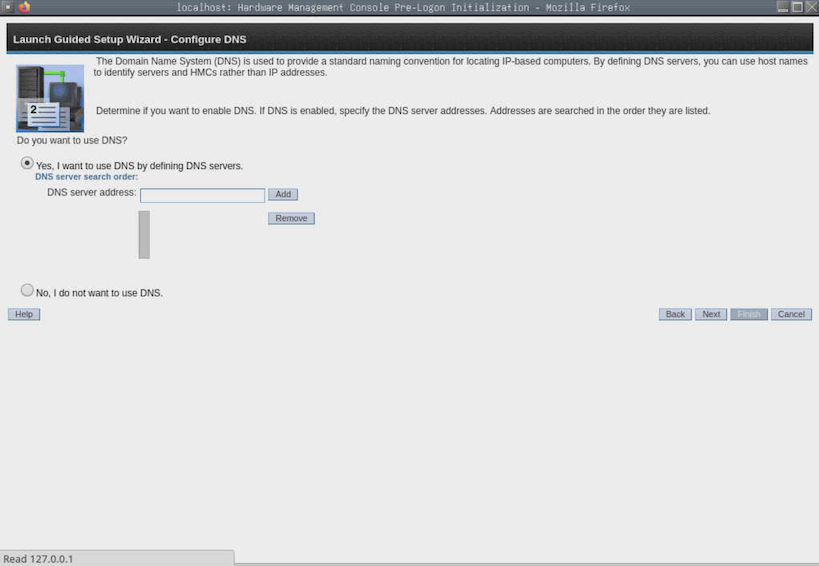
Configure one or more DNS server addresses. Click Add after each address entered. Click Next when done, to continue.
Configure domain

Configure the domain suffix search order. Click Next to continue.
Configure BMC network settings
NOTE: This panel was modified to support configuring both the dedicated and shared BMC interfaces, starting with the first PTF for v10r1.1010, PTF MF68970. This section includes examples of both panels and instructions for each.
Panel as shown in HMC v9r2.950 and v10r1.1010 base:
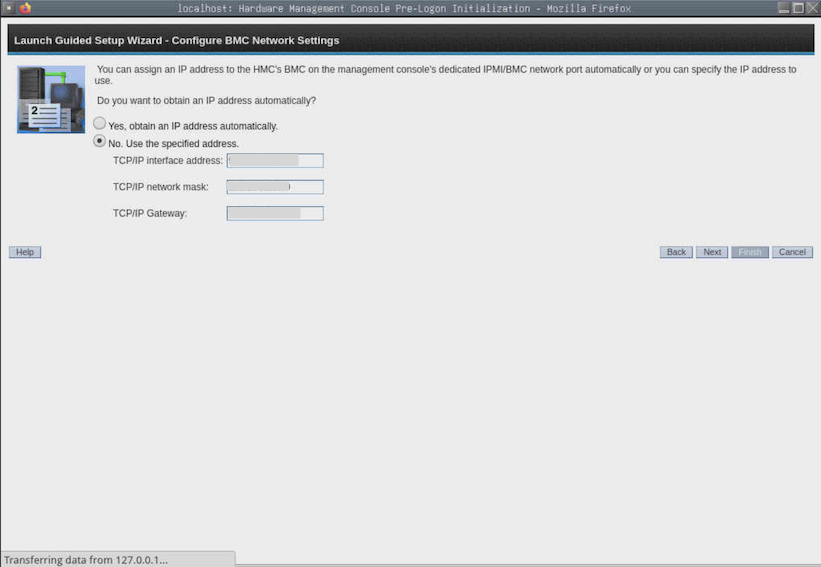
This version of the task only configures the dedicated BMC interface (port M).
If only the shared BMC port will be configured (done via ipmitool from the Petitboot shell, as shown in How to configure the BMC on the 7063-CR2 HMC) then click Next to continue.
Otherwise, if configuring the dedicated BMC interface, verify that a cable with an active link is connected to the port. If no active link is detected the changes will not be saved.
Specify the IP address, network mask, and gateway and click Next to continue.
Specify the IP address, network mask, and gateway and click Next to continue.
Panel as shown in v10r1.1010 plus PTF MF68970 or higher:

This version of the panel can configure either or both of the BMC ports, dedicated or shared.
Verify that a cable with an active link is connected to each of the ports being configured, otherwise the settings will not be saved.
For the port(s) selected, specify the IP address, network mask, and gateway and click Next to continue.
Next steps
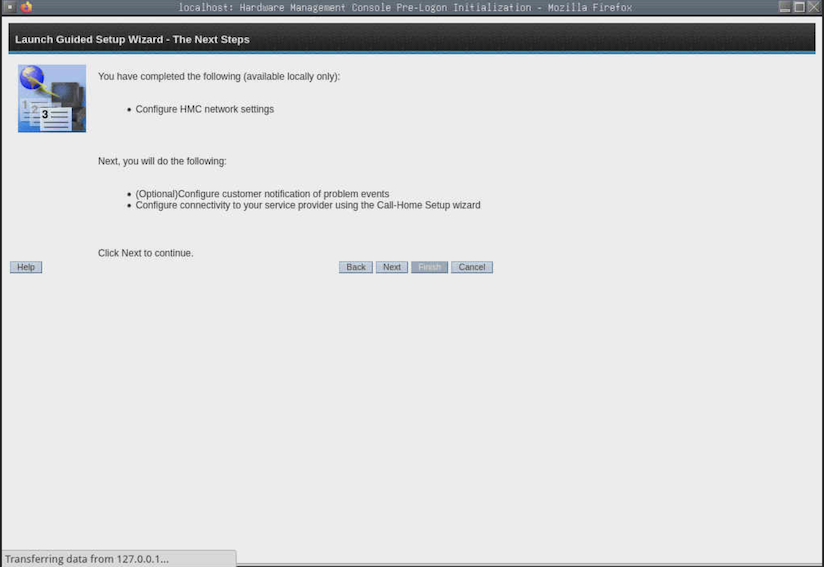
With network configuration completed, the setup wizard reports the next steps to complete. Click Next to continue.
Configure SMTP

If notification of problem events via email is wanted, configure an SMTP server, and add the email addresses to be notified.
Click Next to continue.
Finish

Click Finish to perform all the configuration steps.
Results and close
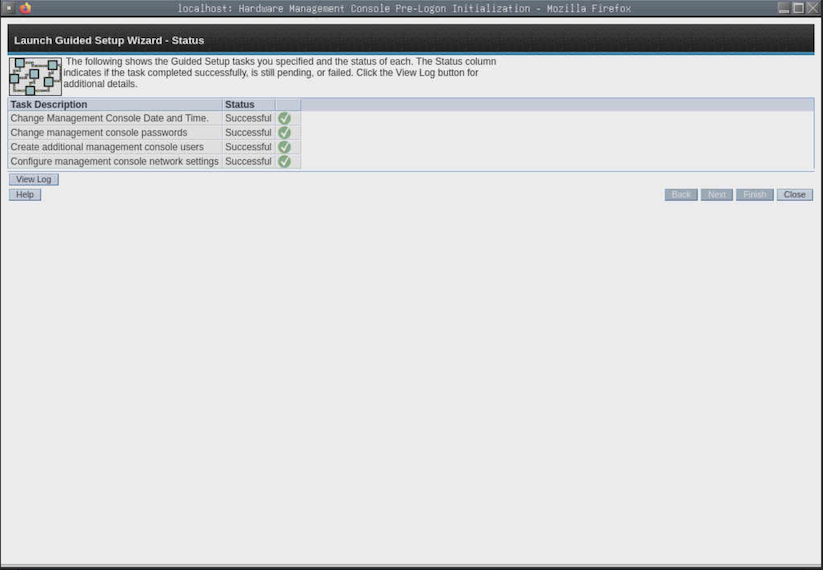
The Setup Wizard reports the status of each configuration step. Click Close to end.
5) Additional Tasks
5.1) Create a new BMC user to use for Console Inband Communication Credentials.
For users only configuring the BMC shared interface (eth0), with HMC versions lower than v10r1.1010 plus PTF MF68970 or newer, it will be necessary to first reboot the HMC and configure the shared interface using ipmitool from the Petitboot shell as shown in How to configure the BMC on the 7063-CR2 HMC. Once done, access the BMC remotely and add a new user.
5.2) Configure Console Inband Communication Credentials
When setting the credentials, use the user created in the previous task, 5.1.
5.3) Enable remote command execution (ssh)
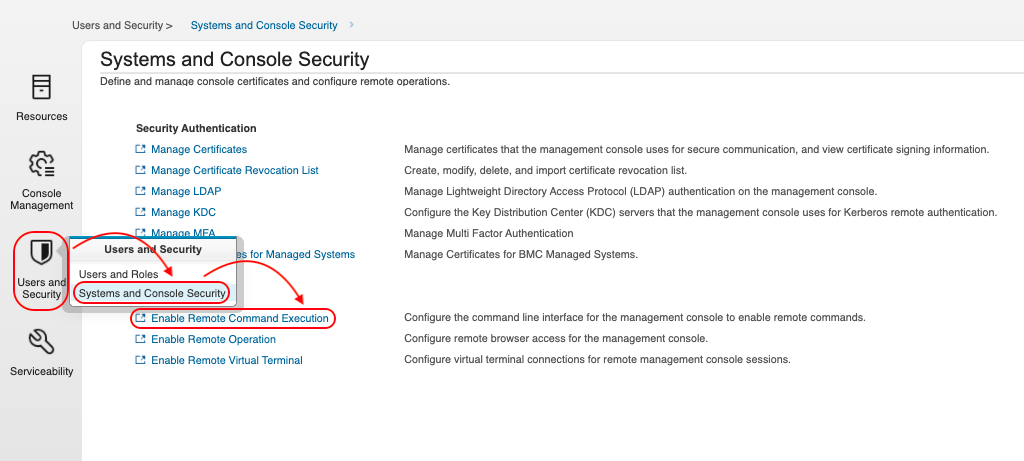
Select Users and Security -> Systems and Console Security -> Enable Remote Command Execution
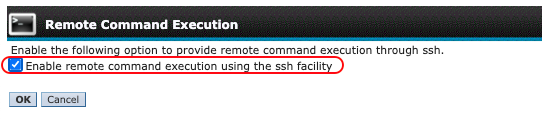
Check the box and click Ok.
6) Electronic Service Agent Setup Wizard (Call home)
We strongly recommend configuring the HMC for Call home. The following steps cover launching the Electronic Service Agent Wizard:
Launching the wizard:
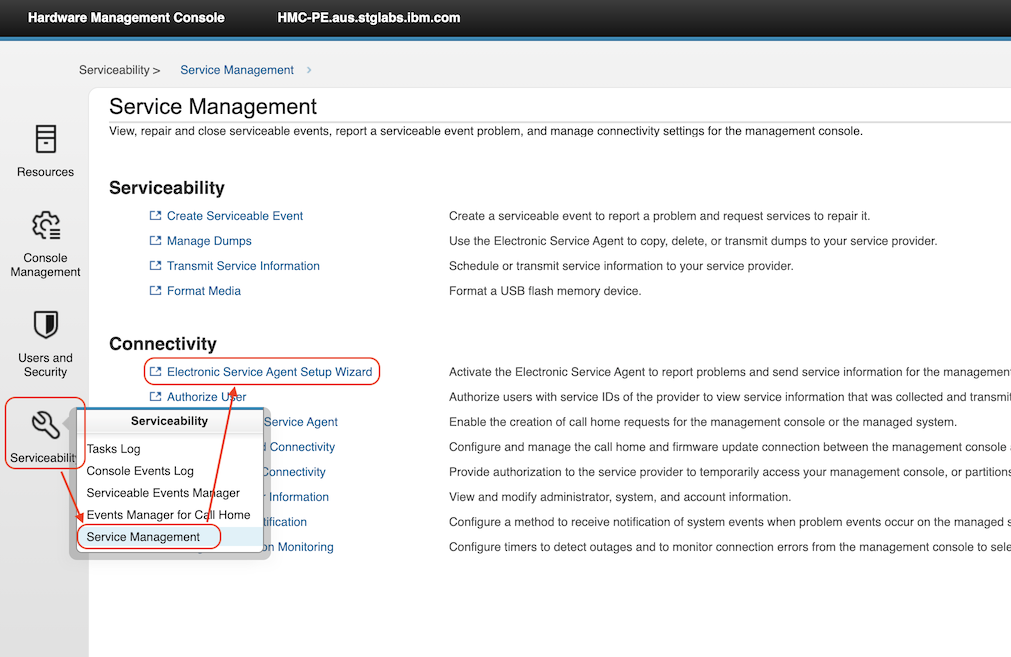
Select Serviceability -> Service Management -> Electronic Service Agent Setup Wizard
Welcome panel:
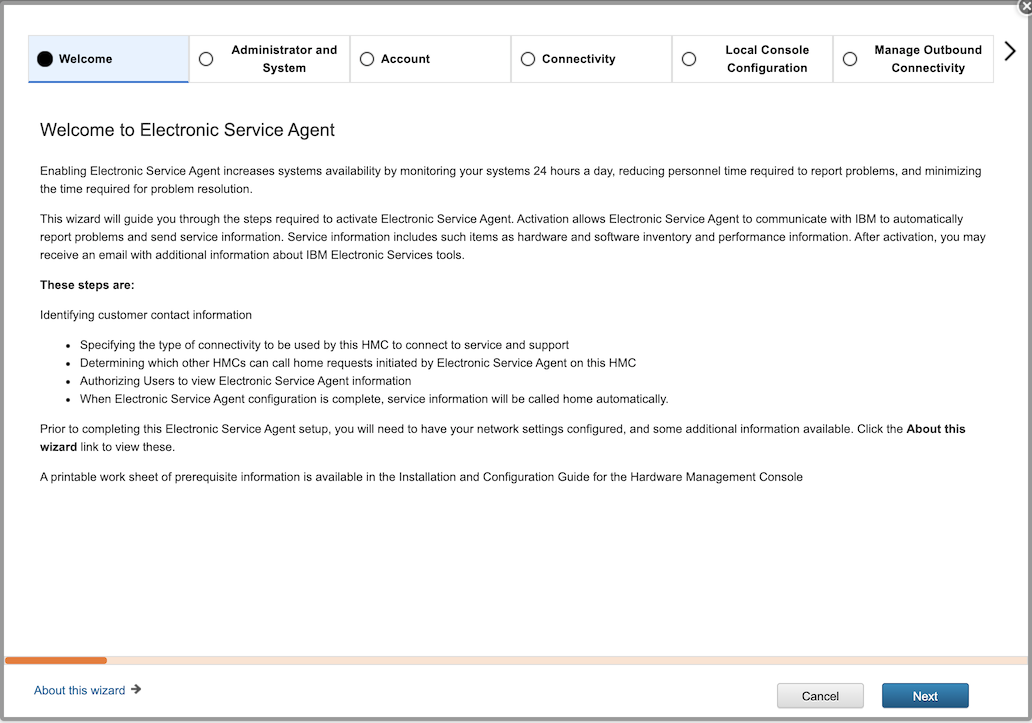
Read about the benefits of enabling Electronic Service Agent. Click Next to continue.
Administrator and System Information:
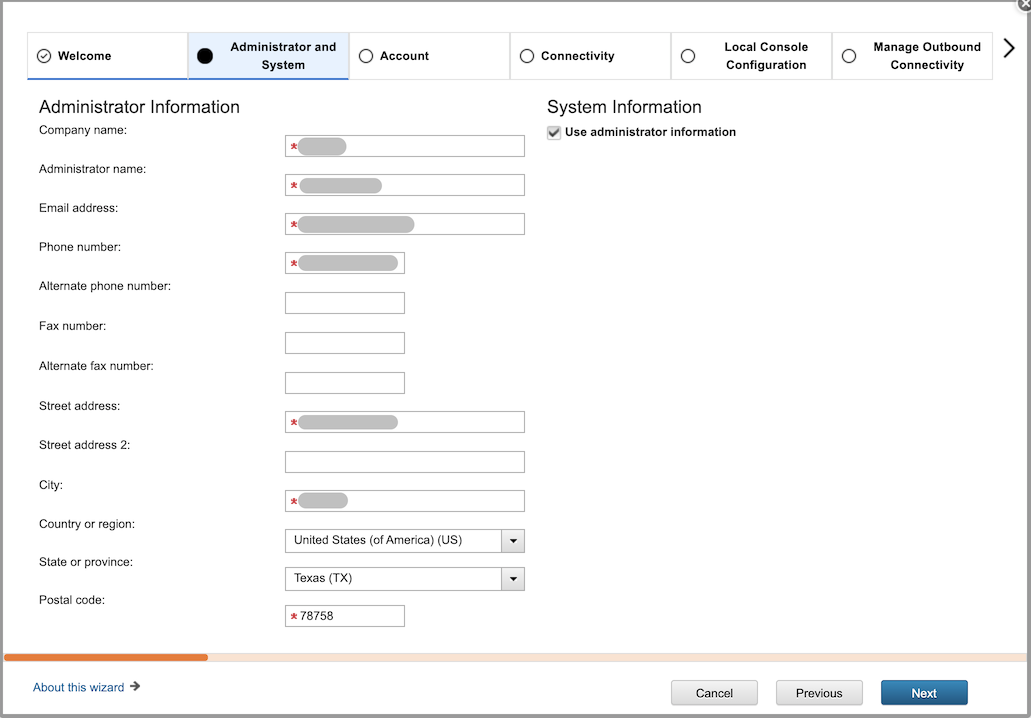
Complete the information for the administrator. If the systems information will be similar, leave the Use administrator information checked, and click Next to continue.
Alternatively, if the systems information is different...

Uncheck Use administrator information and complete the form, then click Next to continue.
Account Information
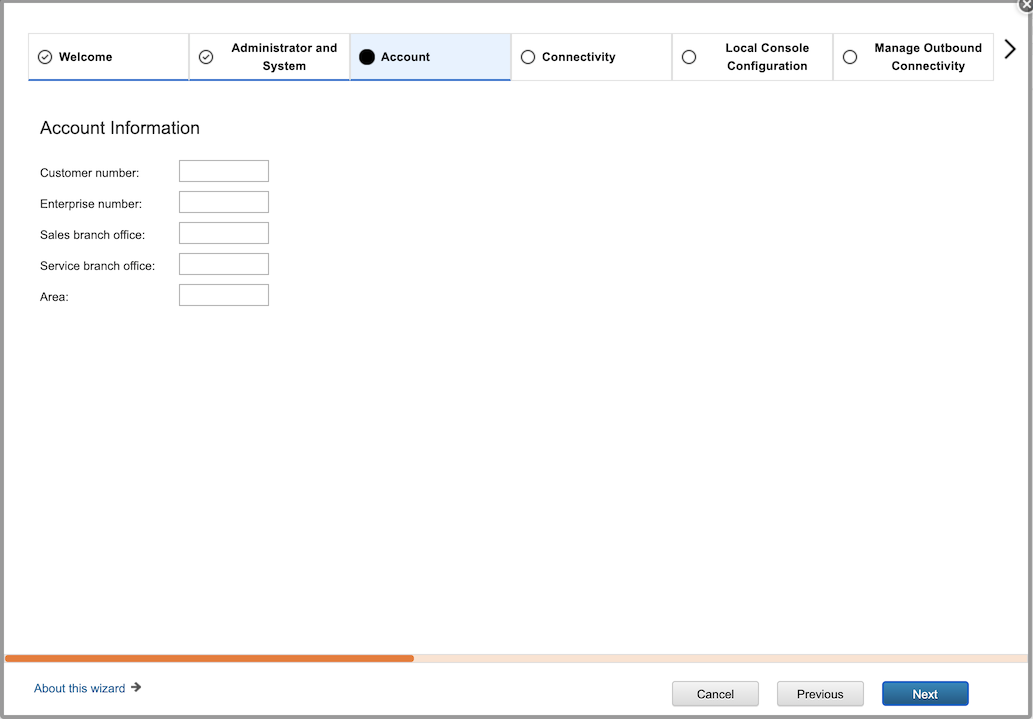
If available, complete the customer account information. If not available, leave it blank. Click Next to continue.
Connectivity
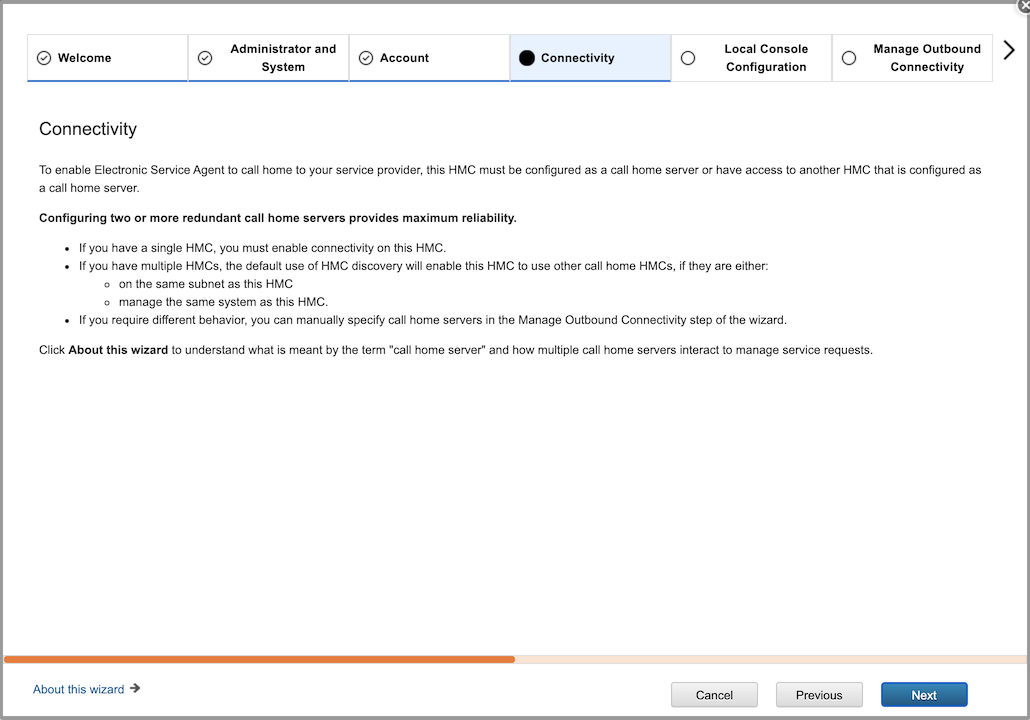
Read about connectivity options. We recommend all the HMCs managing systems be enabled as call home servers. Click Next to continue.
Local Console Configuration
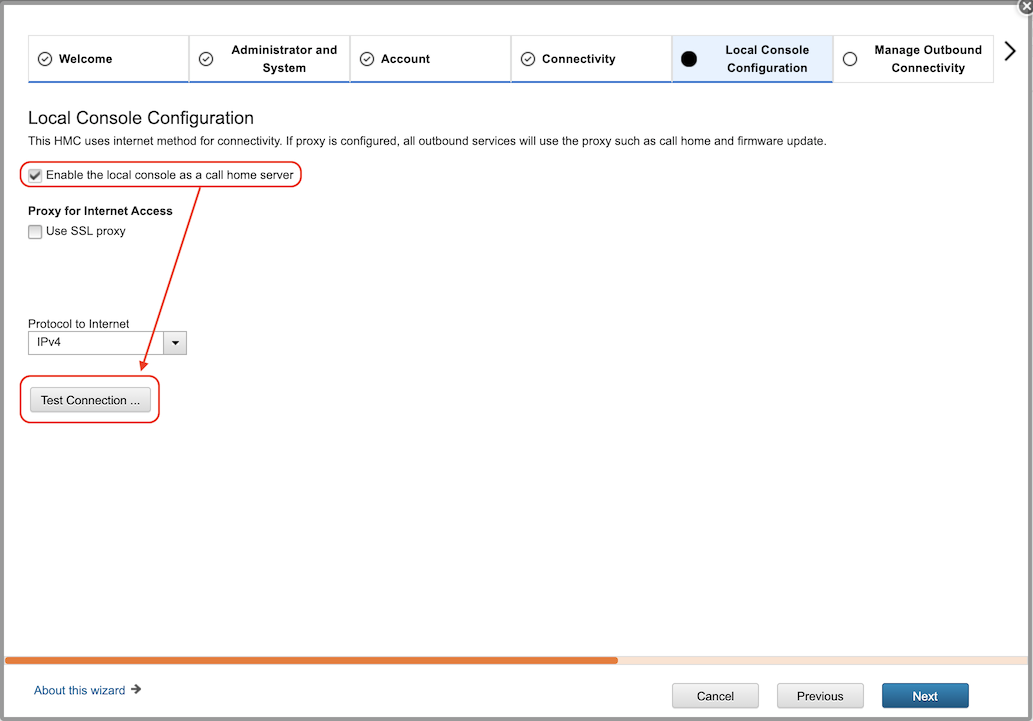
Check the box Enable the local console as a call home server. An acceptance panel will open. After reading, click Accept.
If there is a proxy, check the box Use SSL proxy and fill out the information.
Click Test Connection ... to verify the connectivity to the IBM Electronic Service Agent servers.
Test Connection
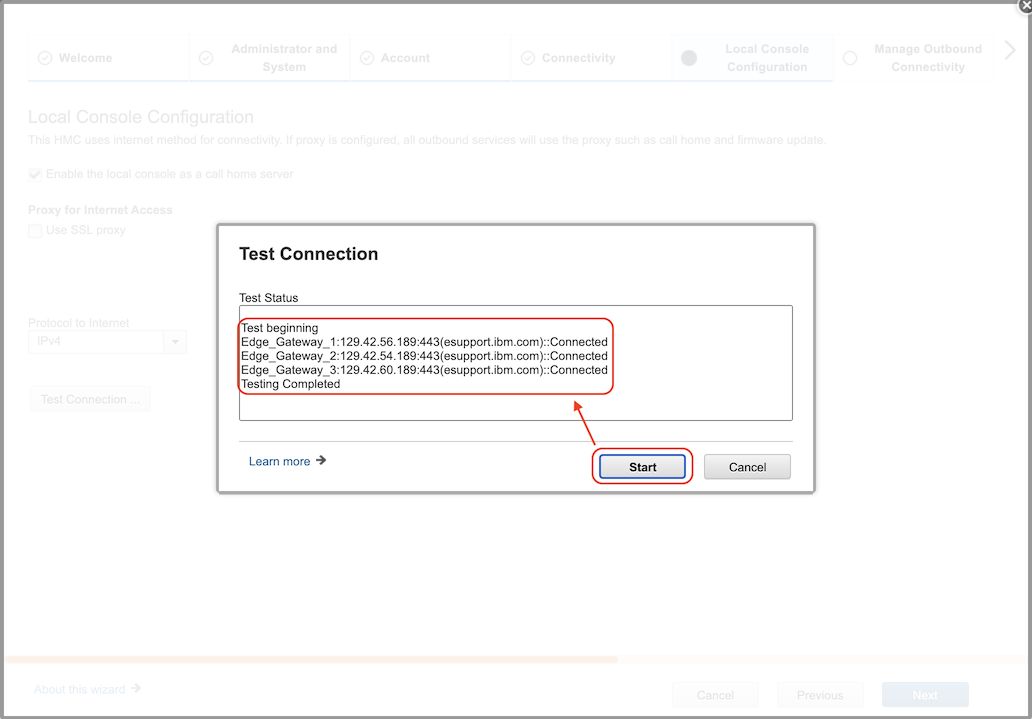
Click the Start button. Good connectivity results in Connected being reported. If the test fails, check the network configuration, firewall, and proxy settings.
Click Cancel to return to the previous panel, then click Next to continue.
Manage Outbound Connectivity
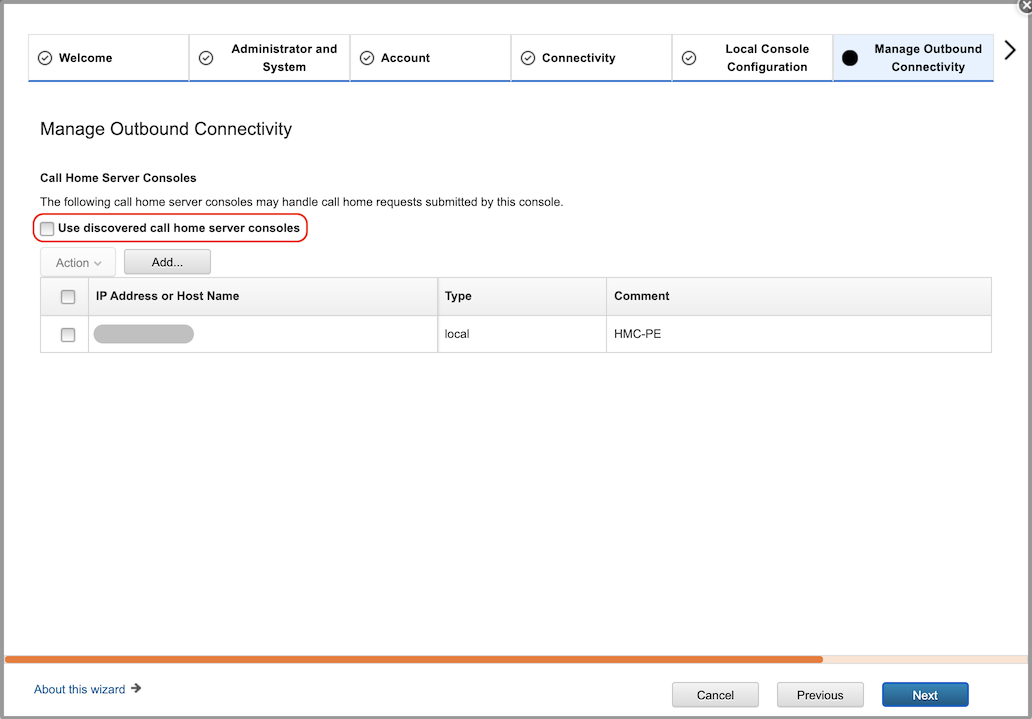
We recommend leaving Use discovered call home servers unchecked. This will force the HMC to use itself as call home server.
The local HMC might be listed as a discovered call home server. This is working as designed.
Some data transmission like Transmit Service Data, and Update Access Keys require the local primary HMC to be the initiator of the transmission. This is the reason to recommend not using discovered call home servers.
Click Next to continue.
Authorized User
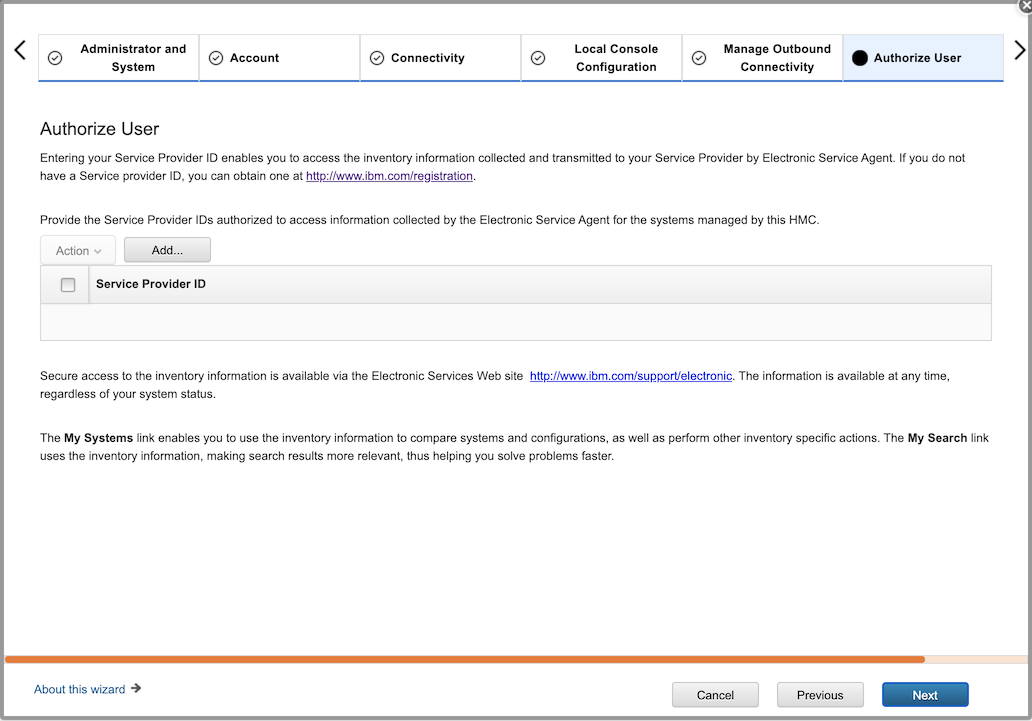
If the service data sent to IBM is to be visible to one or more users, provide their service provider IDs by adding them one at a time.
For information on obtaining a Service Provider ID, visit http://www.ibm.com/registration .
Summary
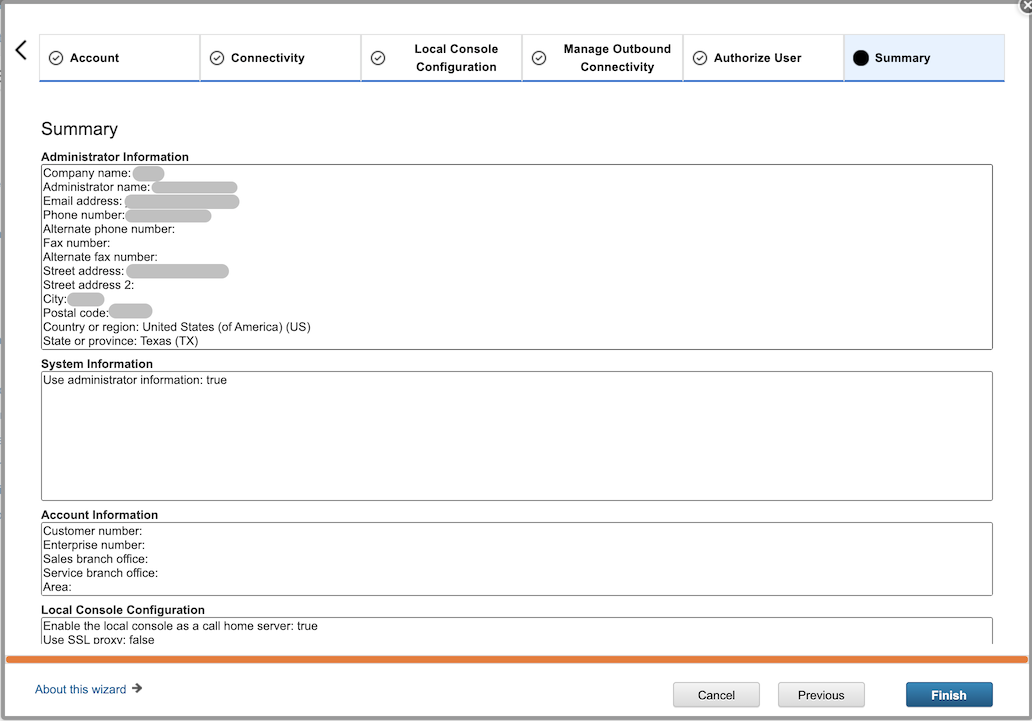
Review all the information provided, then click Finish when ready.
Generate a Test Problem
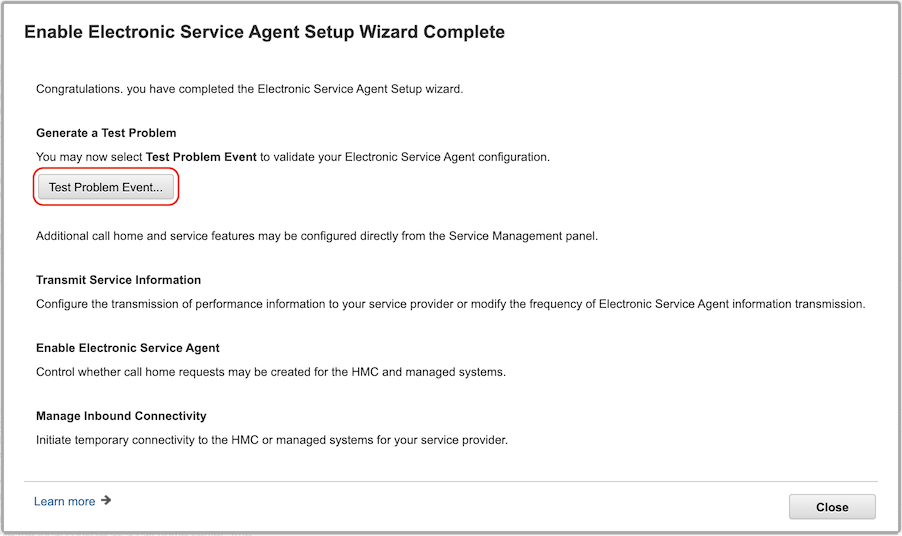
Click Test Problem Event
Start test problem event
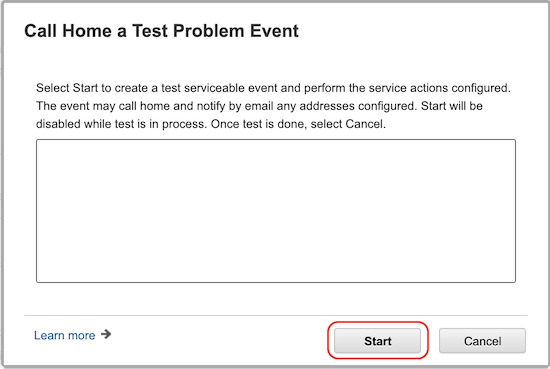
Click Start to report a test problem.
The goal of this test is to obtain a Case number (formerly PMH). That will confirm there is a clear path to and from IBM servers.
Once the test results are displayed, verify there is a case number included (it will still mention the term PMH but the case number will start with TS).
Click Cancel to exit the test panel, then click Close on the previous panel to conclude the wizard.
Document Location
Worldwide
[{"Type":"MASTER","Line of Business":{"code":"LOB57","label":"Power"},"Business Unit":{"code":"BU058","label":"IBM Infrastructure w\/TPS"},"Product":{"code":"7063-CR2","label":"Hardware Management Console (7063-CR2)"},"ARM Category":[],"ARM Case Number":[],"Platform":[{"code":"PF025","label":"Platform Independent"}]}]
Was this topic helpful?
Document Information
Modified date:
29 March 2022
UID
ibm16485099