How To
Summary
This technote provides the steps for configuring the Data Server Manager product on a secured Lightweight Directory Access Protocol (LDAP) server.
Objective
Configuring Data Server Manager with secured LDAP servers
Steps
You may use any application for configuring Data Server Manager with an LDAP server that works as a proxy server between a server that reads plain text and one that works on SSH protocols. For example:
- Ghostunnel
- Stunnel
Prerequisite
Ensure that you configure the LDAP server. For more information, refer to Managing DSM user authentication with LDAP.
Configuring Data Server Manager using Ghostunnel
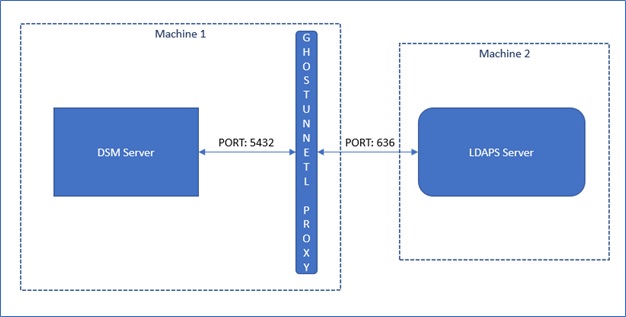
Workflow of Data Server Manager and Ghostunnel as a proxy
- Download and install the type of Ghostunnel appropriate for your platform on the same machine where Data Server Manager is installed. For example, for Linux Ubuntu use ghostunnel-v1.5.3-linux-amd64-with-pkcs11.
You can find all the Ghostunnel releases in the following URL: - Run the following command to start Ghostunnel:
./ghostunnel-v1.5.3-linux-amd64-with-pkcs11 client --listen localhost:<ghostunnel_port> --target <LDAPS_Server>:636 --override-server-name <LDAPS_Server> --status localhost:6060 --disable-authentication
Note: It is mandatory to use localhost instead of IP address in the command when using a Ghostunnel client. - Add the Ghostunnel host (localhost) and port number in the customldap.properties file present in the following path:
<DSM_installation_dir>/Config/customldap.properties
ldap.host=localhost
ldap.port=<ghostunnel_port> - Restart the Data Server Manager server.
Configuring Data Server Manager using Stunnel
- Download and install Stunnel appropriate for your platform on the same machine where Data Server Manager is installed.
- Edit the stunnel.conf file present in the following location:
<stunnel_installation_dir>/stunnel.confclient= yes accept = 127.0.0.1:<stunnel_port> connect = <LDAP_Server_IP>:636
- Run the following command to start Stunnel:
stunnel /etc/stunnel/stunnel.conf - Add the Stunnel host (localhost) and port number in the customldap.properties file present in the following path:
<DSM_installation_dir>/Config/customldap.properties
ldap.host=localhost
ldap.port=<stunnel_port> - Restart the Data Server Manager server.
Related Information
Document Location
Worldwide
[{"Type":"SW","Line of Business":{"code":"LOB10","label":"Data and AI"},"Business Unit":{"code":"BU059","label":"IBM Software w\/o TPS"},"Product":{"code":"SS5Q8A","label":"IBM Data Server Manager"},"ARM Category":[{"code":"a8m3p000000h9fCAAQ","label":"DSM"}],"ARM Case Number":"","Platform":[{"code":"PF025","label":"Platform Independent"}],"Version":"2.1.5;and future releases"}]
Was this topic helpful?
Document Information
Modified date:
04 June 2021
UID
ibm16455189