Release Notes
Abstract
This technical note contains installation instructions, a list of new features, and resolved issues for the IBM Security QRadar Incident Forensics 7.4.3 (743_QRadar_FixPack_2020.11.0.20210517144015) SFS. These instructions are intended for administrators who are upgrading to QRadar Incident Forensics 7.4.3 by using an SFS file. Use this fix pack to upgrade all of your QRadar components.
Content
-
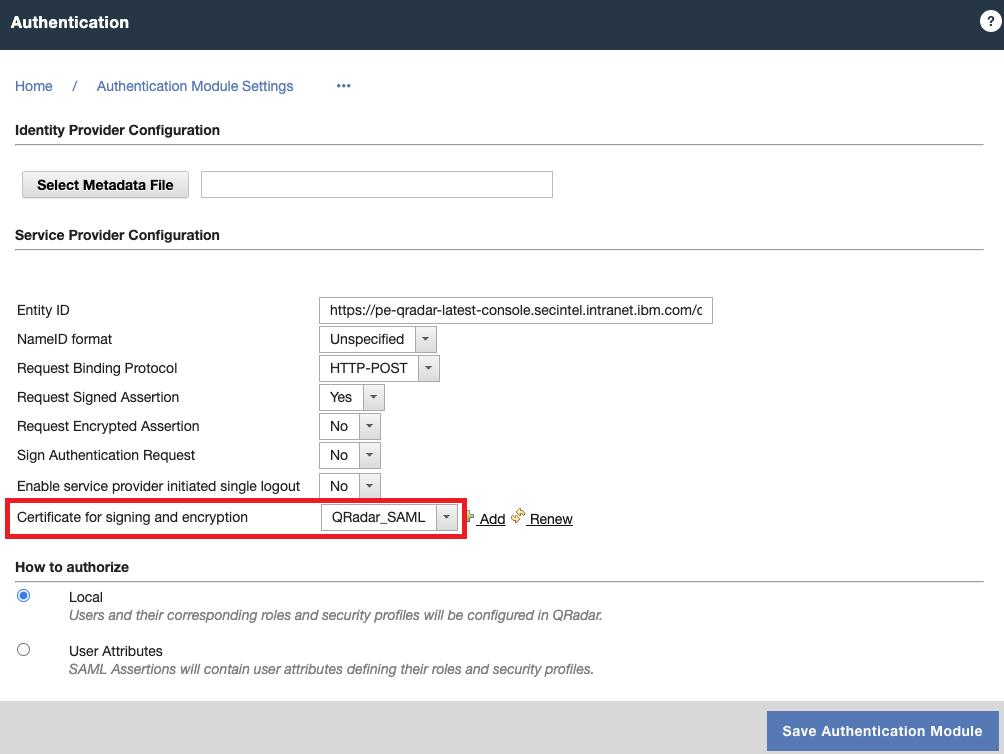
Reconfiguring SAML authentication
- On the Admin tab, click Authentication.
- On the Authentication Module Settings window, select SAML 2.0.
http://<yourqradarserverhostname>:9381/root-qradar-ca_ca
http://<yourqradarserverhostname>:9381/QRadarSAML_ca.crt
http://<yourqradarserverhostname>:9381/root-qradar-ca_ca.crl
http://<yourqradarserverhostname>:9381/QRadarSAML_ca.crl
Known issues in QRadar Incident Forensics 7.4.3
Resolved issues
For a list of APAR links of resolved issues in QRadar Incident Forensics 7.4.3, see Authorized Program Analysis Reports.
Some APAR links might take 24 hours to display properly after a software release is posted to IBM Fix Central.
Upgrade information
QRadar Incident Forensics 7.4.3 resolves reported issues from users and administrators from previous QRadar Incident Forensics versions. This cumulative software update fixes known software issues in your QRadar Incident Forensics deployment. QRadar Incident Forensics software updates are installed by using an SFS file, and updates all appliances attached to the QRadar Console.
The 743_QRadar_FixPack_2020.11.0.20210517144015 SFS file can upgrade the following QRadar Incident Forensics versions to QRadar Incident Forensics 7.4.3:
- QRadar Incident Forensics 7.3.2 (Fix Pack 3 - Fix Pack 7)
- QRadar Incident Forensics 7.3.3 (GA - Fix Pack 8)
- QRadar Incident Forensics 7.4.0 (GA - Fix Pack 4)
- QRadar Incident Forensics 7.4.1 (GA - Fix Pack 2)
- QRadar Incident Forensics 7.4.2 (GA - Fix Pack 3)
However, this document does not cover all of the installation messages and requirements, such as changes to appliance memory requirements or browser requirements for QRadar. To review any additional requirements, see the QRadar Incident Forensics Installation Guide.
See QRadar: Software update check list for administrators for a list of steps to review before you update your QRadar Incident Forensics deployment.
Before you begin
Ensure that you take the following precautions:
- Back up your data before you begin any software upgrade. For more information about backup and recovery, see the QRadar Incident Forensics Administration Guide.
- To avoid access errors in your log file, close all open QRadar Incident Forensics sessions.
- The QRadar Incident Forensics software update cannot be installed on a managed host that is at a different software version from the Console. All appliances in the deployment must be at the same software revision to update the entire deployment.
- Verify that all changes are deployed on your appliances. The update cannot install on appliances that have changes that are not deployed.
- If this is a new installation, review the instructions in the QRadar Incident Forensics Installation Guide.
Installing the QRadar Incident Forensics 7.4.3 Software Update
- Download the software update to install QRadar Incident Forensics 7.4.3 from the IBM Fix Central website: http://www.ibm.com/support/fixcentral/quickorder?product=ibm%2FOther+software%2FIBM+Security+QRadar+Incident+Forensics&fixids=7.4.3-QRADAR-QIFSFS-20210517144015
- Use SSH to log in to your Console as the root user.
- To verify you have enough space (5GB) in /store/tmp for the QRadar Console, type the following command:
df -h /tmp /storetmp /store/transient | tee diskchecks.txt
- Best directory option: /storetmp
It is available on all appliance types at all versions. In QRadar 7.4.1 versions /store/tmp is a symlink to the /storetmp partition.
- Best directory option: /storetmp
If the disk check command fails, retype the quotation marks from your terminal, then re-run the command. This command returns the details to both the command window and to a file on the Console named diskchecks.txt. Review this file to ensure that all appliances have at minimum 5GB of space available in a directory to copy the SFS before attempting to move the file to a managed host. If required, free up disk space on any host that fails to have less that 5GB available.
Note: In QRadar 7.3.0 and later, an update to directory structure for STIG compliant directories reduces the size of several partitions. This can impact moving large files to QRadar.
- To create the /media/updates directory, type the following command:
mkdir -p /media/updates
- Use SCP to copy the files to the QRadar Console to the /storetmp directory or a location with 5GB of disk space.
Important: If the SFS file is in the /storetmp directory and you do not upgrade, when the overnight diskmaintd.pl utility runs, the SFS file is deleted. For more information, see Daily disk maintenance (https://www.ibm.com/support/pages/qradar-732-files-storetmp-are-removed-daily-disk-maintenance).
- Change to the directory where you copied the patch file. For example,
cd /storetmp
- To mount the patch file to the /media/updates directory, type the following command:
mount -o loop -t squashfs /storetmp/2020.7.0.20201113144954.sfs /media/updates - To run the patch installer, type the following command:
/media/updates/installer
Note: The first time that you run the software update, there might be a delay before the software update installation menu is displayed.
- Using the patch installer, select all.
- The all option updates the software on all appliances in the following order:
- Console
- Remaining appliances.
-
If you do not select the all option, you must select your Console appliance.
As of QRadar 7.2.6 Patch 4 and later, you are only provided the option to update all or update the Console appliance. Managed hosts are not displayed in the installation menu to ensure that the Console is patched first. After the Console is patched, a list of managed hosts that can be updated is displayed in the installation menu. This change was made starting with QRadar 7.2.6 Patch 4 to ensure that the Console appliance is always updated before managed hosts to prevent upgrade issues.
If you want to patch systems in series, you can update the Console first, then copy the patch to all other appliances and run the patch installer individually on each managed host. The Console must be patched before you can run the installer on managed hosts. When updating in parallel, there is no order required in how you update appliances after the Console is updated.
If your Secure Shell (SSH) session is disconnected while the upgrade is in progress, the upgrade continues. When you reopen your SSH session and rerun the installer, the patch installation resumes.
- The all option updates the software on all appliances in the following order:
Installation wrap-up
- After the patch completes and you have exited the installer, type the following command:
umount /media/updates
- Clear your browser cache before you log in to the Console.
- Delete the SFS file from all appliances.
- To ensure that all services are running, on the Admin tab, click Advanced > Deploy Full Configuration.
Results
A summary of the software update installation advises you of any managed hosts that were not updated. If the software update fails to update a managed host, you can copy the software update to the host and run the installation locally.
After all hosts are updated, send an email to your team to inform them that they will need to clear their browser cache before they log in to the QRadar Incident Forensics interface.
Was this topic helpful?
Document Information
Modified date:
24 September 2021
UID
ibm16450855