News
Abstract
The QRadar App Framework SDK provides utilities to develop, package, and deploy an application for QRadar.
Content
QRadar App Framework SDK
The QRadar® App Framework SDK provides utilities to develop, package, and deploy an application for QRadar®.
Download QRadar SDK V2.0.0 SDK video overview Migrating your apps
This README contains the following sections:
New in v2
SDK v2 contains a number of significant changes from v1. These changes align with the introduction of version 2 of the QRadar® App Framework.
If you have used SDK v1 previously, please read carefully the information in the following sections.
Python
To install and execute, SDK v2 requires Python 3. Python 2 is not supported by this version of the SDK.
More specifically, the app base image is the RHEL8 ubi-minimal image plus a number of add-ons including Python 3, OpenSSL, systemd, and SQLite.
Installation includes the creation of a Python 3 virtual environment. Any existing Python installation on the user’s machine is left untouched, as is any installation of SDK v1.
To enable local build and run, you must have Docker installed and running on your machine.
On Linux, your user must be in a docker group so that the SDK can interact with Docker without requiring elevated privileges. More information on configuring Docker on Linux can be found here.
SDK v2 has a new example app where the Python code better reflects Flask recommended practices such as using an application factory, and defining routes using blueprints.
The retrieved certificate bundle and the server connection details are stored locally, making this a one-time-only process for a given QRadar server. The location of the stored files is a directory named
where <version> corresponds to the app base image version bundled with the SDK, e.g. 2.0.0. This ensures that the deployed app will execute in the same container environment as was used to develop it locally.
Instructions for installing WSL 2, including pre-requisites for your Windows environment, can be found at https://docs.microsoft.com/en-us/windows/wsl/install-win10.
When choosing your Linux distribution, the latest Ubuntu version is recommended.
Do not use sudo to execute the install script. Elevated privileges are not required.
SDK v2 is installed under your home directory. The default location is a sub-directory named qradarappsdk. The install script will ask if you want to choose a different location. If your chosen directory is not empty, the install script will warn you that the directory will be wiped, and ask for confirmation before proceeding.
In development mode, Flask will detect any changes you make to your app’s Python code and dynamically reload your app, letting you see the effect of your changes without needing a container restart.
Another feature of Flask development mode is the stack trace viewer/debugger which is displayed in your browser when you make a request to an app endpoint and that request encounters an error in your Python code.
Apps that include Python code in their implementation must use Python 3.
App base image
The app base image is now derived from Red Hat Universal Base Image rather than CentOS.More specifically, the app base image is the RHEL8 ubi-minimal image plus a number of add-ons including Python 3, OpenSSL, systemd, and SQLite.
Any rpm dependencies bundled with an app must be compatible with Red Hat 8, and any Python packages bundled with an app must be compatible with the base image’s Python environment.
App container
Processes within the app container now run as a non-privileged user, not as root. The same non-privileged user owns all app-related files and directories inside the container.The new location for app-related files and directories inside the container is /opt/app-root.
SDK installation
Unlike the SDK v1 installer, root privileges are not required to run the SDK v2 install script.The install script places the SDK in a sub-directory of the user’s home directory.
Installation includes the creation of a Python 3 virtual environment. Any existing Python installation on the user’s machine is left untouched, as is any installation of SDK v1.
Running apps locally
Packaged with SDK v2 is the latest app base image, based on Red Hat UBI.To test your app, the SDK now supports building an app image and running an app container locally, effectively providing the same environment as when an app is deployed to a QRadar server. This functionality replaces the SDK v1 mechanism, which executed app code locally within a Python virtual environment.
To enable local build and run, you must have Docker installed and running on your machine.
On Linux, your user must be in a docker group so that the SDK can interact with Docker without requiring elevated privileges. More information on configuring Docker on Linux can be found here.
SDK entry point
SDK v2 actions are invoked using the command qapp rather than the v1 entry point qradar_app_creator.SDK version coexistence
The combination of different install locations and different entry points means that SDK v1 and v2 can coexist. This allows developers to maintain an older CentOS version of an app while working on a newer Red Hat UBI version.Note: if you need to maintain multiple versions of Python on your machine, pyenv is a useful tool for managing your development environment.
Removing SDK v1
If you wish to delete SDK v1 from your machine, you need to manually remove these items:- directory
/usr/local/etc/QRadarAppSDK - file
/usr/local/bin/qradar_app_creator
Root privileges will be required, i.e. use sudo.
App layout
The src_deps directory for defining app dependencies and scripts has been replaced by a directory named container. For more details see the Create and Build actions.SDK v2 has a new example app where the Python code better reflects Flask recommended practices such as using an application factory, and defining routes using blueprints.
qpylib
The source code for qpylib is no longer included in the SDK example app. Instead, qpylib is pre-installed as a Python package in the app base image. You do not need to (and should not) bundle qpylib source code with your app.The source code for qpylib is now maintained in an open source repository on Github. Most top-level functions are the equivalent of their pre-Github counterparts, although there are some minor changes to function parameter names and to error reporting.
SDK version check
The first invocation of qapp each day performs a check to determine if there is a newer version of the SDK on the X-Force App Exchange. If there is a newer version, a message is displayed advising you to update. This is to ensure your environment is up to date with the latest fixes, features, and base image version.Server communication
A number of SDK actions (e.g.deploy, status) communicate with a QRadar server via the QRadar Application Framework REST API. Connection to a QRadar server needs certificate verification, and, depending on your development environment, a proxy may also be required.SDK v2 introduces a new mechanism for certificate retrieval and SOCKS proxy configuration. The first time you execute an action that accesses a specific QRadar server, the SDK issues a sequence of prompts which guide you through retrieval of certificates and, if required, configuration of a SOCKS proxy. The SDK then downloads the certificate bundle
/etc/pki/tls/certs/ca-bundle.crt from the server.The retrieved certificate bundle and the server connection details are stored locally, making this a one-time-only process for a given QRadar server. The location of the stored files is a directory named
.qradar_app_sdk/<server_ip_address> under your home directory.The new certificate retrieval mechanism ensures that verification will function correctly if custom certificates have been installed on the QRadar server.
To facilitate certificate verification, your local network configuration must be able to map the QRadar server’s host name to its IP address. For this to happen, you may need to add an entry for the QRadar server to your /etc/hosts file.
App deployment
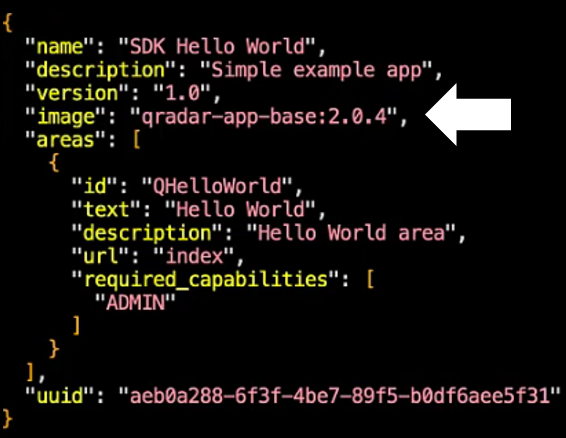
Before deploying a UBI-based app to a QRadar server, the manifest.json file must contain an entry like this:"image": "qradar-app-base:<version>"
For example:where <version> corresponds to the app base image version bundled with the SDK, e.g. 2.0.0. This ensures that the deployed app will execute in the same container environment as was used to develop it locally.
When you use the SDK create action to create an app workspace, the manifest.json file is pre-populated with the image field.
Installing the SDK
SDK requirements
- SDK v2 runs on Linux and MacOS. It does not provide native support for Microsoft Windows (see Using Windows Subsystem for Linux).
- Python 3.6.8 or later is required, so that a Python virtual environment can be created during the installation process.
Using Windows Subsystem for Linux
If you wish to use the SDK on Windows, you must first configure the Windows Subsystem for Linux (WSL).There are two versions of WSL. For the SDK, use WSL 2.
Instructions for installing WSL 2, including pre-requisites for your Windows environment, can be found at https://docs.microsoft.com/en-us/windows/wsl/install-win10.
When choosing your Linux distribution, the latest Ubuntu version is recommended.
SDK installation process
Extract the contents of the SDK zip archive to an empty directory.Within that directory, run the install script:
./install.shDo not use sudo to execute the install script. Elevated privileges are not required.
SDK v2 is installed under your home directory. The default location is a sub-directory named qradarappsdk. The install script will ask if you want to choose a different location. If your chosen directory is not empty, the install script will warn you that the directory will be wiped, and ask for confirmation before proceeding.
App Development
After installation, SDK v2 is accessed using the
For example:
For simplicity throughout this document, examples like the one above involving the app workspace show qapp being called inside the workspace directory. This is not obligatory, as any action related to an app workspace allows you to specify a -w option to identify the workspace location.
The components of the example app include:
Running an app locally consists of two steps:
The build action first checks that your Docker registry contains the a copy of the base image shipped with the SDK. If not, the base image is loaded into your registry.
With the base image in place, your app is combined with it to create a new image in your registry. If the name of your app workspace is, for example, myapp, then your app image will be tagged in your registry as myapp:latest.
The actual processing performed by qapp build depends on:
The run action checks if an image exists in your registry corresponding to the app workspace. If not, it initiates a build.
Finally, the app container is started with these modifications:
If your app uses Flask, qapp run starts Flask in production mode. If you wish to start Flask in development mode, use the -d option:
qapp command, which should be available on your path. qapp -h will display all of the actions you can perform. These actions are described in the following sections.Create
To develop your own app, you can use the SDK’s example app as your starting point. To do this, populate a new app workspace using the create action.For example:
mkdir myappcd myappqapp createFor simplicity throughout this document, examples like the one above involving the app workspace show qapp being called inside the workspace directory. This is not obligatory, as any action related to an app workspace allows you to specify a -w option to identify the workspace location.
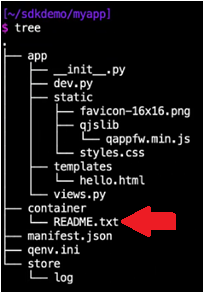
On completion of the create action, your workspace will contain a “Hello World” app based on the Python Flask web framework.
The components of the example app include:
- manifest.json: a JSON manifest file that describes the app and defines what it does.
- app: a directory containing Python source code and files for rendering web content.
- container: a placeholder directory for app dependencies, scripts and configuration files.
- store: a directory for persisting app data, particularly log files.
- qenv.ini: an SDK-specific configuration file where app container environment variables are defined.
Build/Run/Clean
The Docker-related prerequisites for using the build, run, and clean actions are described in the Running apps locally section above.
If you are using WSL 2, Docker Desktop for Windows requires some additional configuration in order to function correctly. For full instructions, see https://docs.docker.com/docker-for-windows/wsl.
Running an app locally consists of two steps:
- Build an app image, if one does not already exist.
- Run a container using the app image.
qapp run will perform both steps, or if you wish you can first call qapp build to create an image, and then qapp run to run the container. These actions are described in more detail in the following sections.
Build
With the base image in place, your app is combined with it to create a new image in your registry. If the name of your app workspace is, for example, myapp, then your app image will be tagged in your registry as myapp:latest.
The actual processing performed by qapp build depends on:
- The content of your app’s container directory. For more details, see container/README.txt in the example app.
- The content of manifest.json. This is used to generate program entries in the supervisord.conf file which will be placed in directory /etc in the built image. Having a program entry for Flask depends on the manifest’s load_flask field: this defaults to true. Other program entries are generated for each service in the manifest.
Other points to note:
- The SDK does not automatically rebuild an app image when you make changes to container dependencies and scripts. You must do this yourself. Running qapp clean -i is the easiest way to remove everything Docker-related before rebuilding.
- Any build-time scripts that you provide cannot access the app and store directories, because those directories are only available after being mounted into the running container - see the Run section.
- The manifest.json field dependencies is no longer supported. You cannot override the locations container/pip and container/rpm.
Run
With the app image in place, the run action checks if the app already has a running container. If so, you are prompted for confirmation that the running container can be removed.
Finally, the app container is started with these modifications:
- The following items from your app workspace are mounted into the container under /opt/app-root:
- app directory
- store directory
- manifest.json
- Any environment variables defined in qenv.ini are set in the container.
- Any scripts in container/run are executed.
On successful container startup, if your app uses Flask, the run action informs you that your app is available at http://localhost:<port>, where <port> is the host port mapped to port 5000 in the app container. By using the -p option, you can choose to bind port 5000 in your container to a specific host port number. However, the default behavior is to let Docker select the port, and is the recommended way to run your app.
If your app manifest defines other services with their own ports in the container, Docker will assign a separate host port number to each container port specified in the manifest.
If the name of your app workspace is, for example, myapp, then your app container is named qradar-myapp.
If you encounter an issue with app container startup, the -l option provides a convenient view of the container startup logs, and may help to diagnose the problem.
Flask run environment
qapp run -d
In development mode, Flask will detect any changes you make to your app’s Python code and dynamically reload your app, letting you see the effect of your changes without needing a container restart.
If you want Flask to monitor other files and perform a reload when those files change, add an entry to qenv.ini like this example:
[flask]

FLASK_RUN_EXTRA_FILES=app/templates/mytemplate.html:app/static/js/myscripts.js
Another feature of Flask development mode is the stack trace viewer/debugger which is displayed in your browser when you make a request to an app endpoint and that request encounters an error in your Python code.
Clean
The clean action provides a convenient way of removing your app container and image.
When your app is ready for deployment to a QRadar server, use the package action to create an app zip file:
The deploy action uploads your app zip file to a QRadar server and installs the app:
Deployment will assign a unique numeric identifier to your app, e.g. 1105. Any other SDK actions relating to your app require you to supply this identifier.
If your app manifest includes an entry for authentication, you must supply to the deployment the name of a QRadar user who has the capabilities requested by your app. If you already know which user you want to use for authorization, you can supply that user’s name via the -o option. Otherwise, the deployment will prompt you to select an entry from a list of users who have the required capabilities.
If you choose to stop the deployment without choosing an authorization user, your app will remain in a state where it is waiting for authorization. You can subsequently authorize or cancel the app deployment.
The cancel action is used to cancel an app deployment that has not completed, i.e. where the app’s status is CREATING or UPGRADING:
qapp clean stops and removes the app container. In addition, if you wish to remove the app image from your registry, supply the -i flag.
Package
qapp package -p com.mycompany.myapp.zip
The package action will exclude from the zip any files which it knows are not required, such as Python compiled files (.pyc).If your manifest.json file does not contain an image field, qapp package will add one and set its value corresponding to the base image version bundled with the SDK.
If you have supplied an image field but its value differs from the bundled base image version, qapp package will output a warning message. You should check that the image you have specified is actually the one you want your app to be deployed with on the QRadar server.
Deploy
qapp deploy -q <QRadar server> -u <QRadar user> -p com.mycompany.myapp.zip
You will be prompted for the password of the user supplied with the -u option.
The default timeout for uploading your zip file is 60 seconds. If your file is large you can use the -t option to specify a longer timeout.
Deployment will assign a unique numeric identifier to your app, e.g. 1105. Any other SDK actions relating to your app require you to supply this identifier.
If your app manifest includes an entry for authentication, you must supply to the deployment the name of a QRadar user who has the capabilities requested by your app. If you already know which user you want to use for authorization, you can supply that user’s name via the -o option. Otherwise, the deployment will prompt you to select an entry from a list of users who have the required capabilities.
If you choose to stop the deployment without choosing an authorization user, your app will remain in a state where it is waiting for authorization. You can subsequently authorize or cancel the app deployment.
Status
Use the status action to check the status of your app:
qapp status -q <QRadar server> -u <QRadar user> -a <app ID>
Authorize
Use the authorize action to complete an app deployment that is waiting for authorization:
qapp authorize -q <QRadar server> -u <QRadar user> -a <app ID>
If you already know which user you want to use for authorization, you can supply that user’s name via the -o option. Otherwise, the deployment will prompt you to select an entry from a list of users who have the required capabilities.
Cancel
qapp cancel -q <QRadar server> -u <QRadar user> -a <app ID>
Delete
The delete action removes your app from the QRadar server:
qapp delete -q <QRadar server> -u <QRadar user> -a <app ID>
Note that if an app’s deployment has not completed then you must use the cancel action before attempting to delete the app.
[{"Line of Business":{"code":"LOB24","label":"Security Software"},"Business Unit":{"code":"BU059","label":"IBM Software w\/o TPS"},"Product":{"code":"SSBQAC","label":"IBM Security QRadar SIEM"},"ARM Category":[{"code":"a8m0z000000cwt3AAA","label":"QRadar Apps"}],"Platform":[{"code":"PF025","label":"Platform Independent"}],"Version":"7.3.3;7.4.1;7.4.2"}]
Was this topic helpful?
Document Information
Modified date:
13 November 2020
UID
ibm16366759