News
Abstract
IBM® is migrating QRadar SIEM auto update servers to a new location in the IBM Cloud®. This flash notice is intended to remind administrators that they must change their auto update configuration to use a new IBM Cloud® web server to avoid interruptions with daily and weekly software updates. Administrators who use IP-based firewall rules in their organization must also update their corporate firewall rules to allow traffic to the IBM Cloud auto update web server.
Content
About
| Server changes | Web server hostname | Static IP address and port | Location | Description |
| New server cluster | https://auto-update.qradar.ibmcloud.com/ | 169.47.251.244:443 | Global | New server active on 27 July 2020 |
| Legacy server | https://qmmunity.q1labs.com/ | 69.20.113.167 | United States | Active until 30 November 2020 |
| Legacy server | https://qmmunity-eu.q1labs.com/ | 212.64.156.13 | Europe | Active until 30 November 2020 |
Affected versions
IMPORTANT: Administrators who fail to update their corporate firewalls might experience an interruption in service after 30 November 2020. QRadar® Support recommends that all administrators update their QRadar Console's auto update settings during a maintenance window and confirm that auto updates complete successfully.
Summary
| Web server | Static IP address and port | Location | Description |
| https://auto-update.qradar.ibmcloud.com/ | 169.47.251.244:443 | Global | New server active on 27 July 2020 |
Action Required: Configuring your auto update server address
All QRadar administrators are expected to update their auto update server configuration by 30 November 2020 to prevent an interruption in auto update downloads.
- Log in to the QRadar Console as an administrator.
Notice: QRadar on Cloud administrators are not required to make this change. The QRadar on Cloud DevOps team has implemented a change on QRadar on Cloud Console appliances to use the new IBM Cloud weekly auto update servers. - Click the Admin tab.
- In the System Configuration section, click Auto Update.
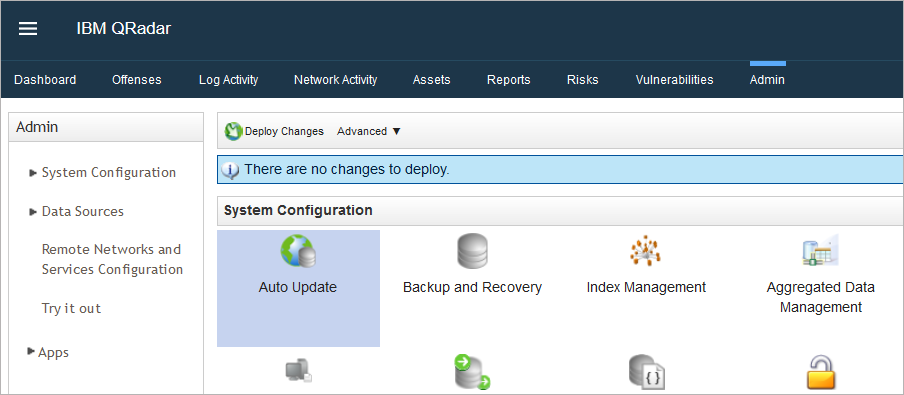
- Click Change Settings.
- Click the Advanced tab to configure the update server and backup settings.
- In the Web Server field, type the following address: https://auto-update.qradar.ibmcloud.com/
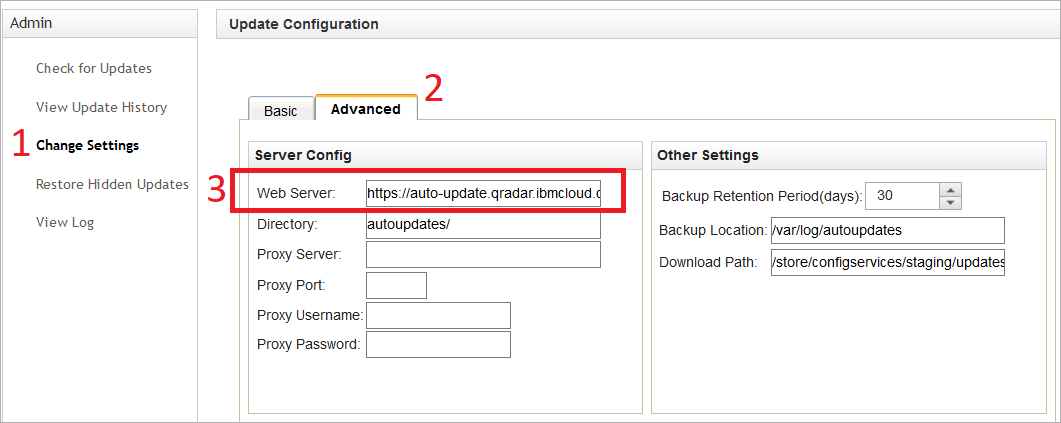
Note: The Web Server field must include a trailing forward slash '/' character to prevent Invalid format for server errors. If you receive an invalid format error message, verify your auto update server URL ends with a / character.

- If prompted, click Yes to load the auto update settings. This service restart does not stop any services, only reloads the configuration and refreshes the existing configuration.
- To test the auto update configuration, click Check for Updates.
- Click Get New Updates.
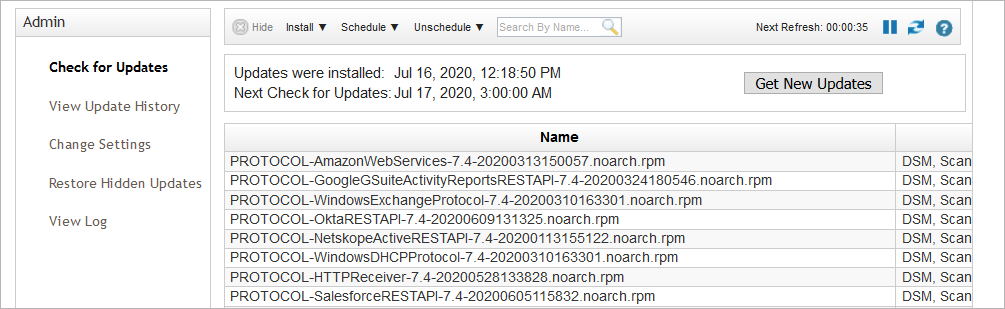
- Wait for the auto update server to update files. This might take several minutes to complete.

Results
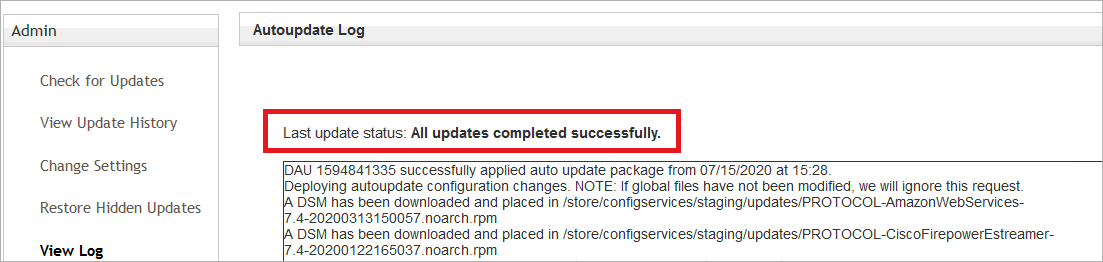
A system notification is generated to administrators that the auto update is complete. Optionally, administrators can confirm that updates were applied from the View Update History page or can use the command line to verify they are using the new auto update server at https://auto-update.qradar.ibmcloud.com/. For any issues, see the Troubleshooting section.
Troubleshooting: How to validate auto update settings from the command line
Administrators who prefer the command line can SSH to the QRadar Console as the root user to verify the connection to the new auto update server.
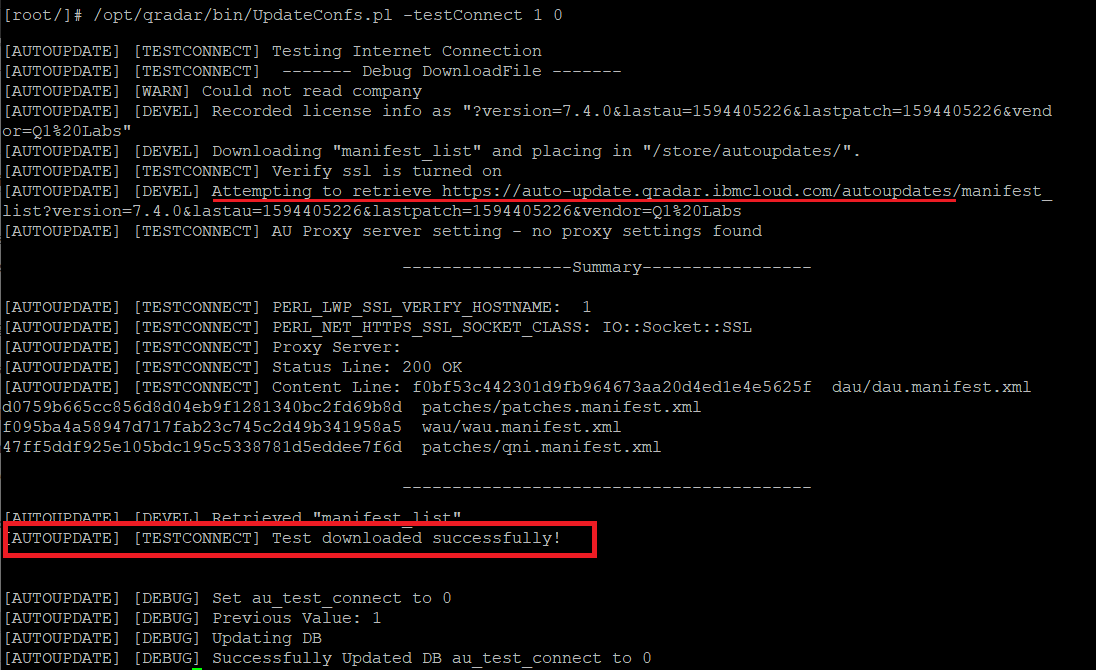
- Type the following command to verify the connection: /opt/qradar/bin/UpdateConfs.pl -testConnect 1 0
- If successful, the following message is displayed:[AUTOUPDATE] [TESTCONNECT] Test downloaded successfully!
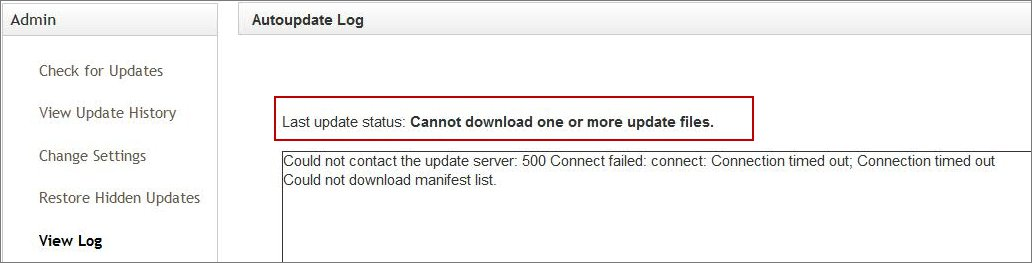
- If unsuccessful, the following message is displayed and the administrator should verify their proxy configuration:[AUTOUPDATE] [TESTCONNECT] Could not download manifest list.

Troubleshooting: Proxy validation and SSL 500 error messages
User interface error message:
Error log example:
Fri Mar 6 03:34:03 2020 [WARN] Could not retrieve "manifest_list_512": 500 Can't connect to auto-update.qradar.ibmcloud.com:443 (Crypt-SSLeay can't verify hostnames) Fri Mar 6 03:34:03 2020 [DEBUG] Set error_code to 4 Fri Mar 6 03:34:03 2020 [DEBUG] Previous Value: 6 Fri Mar 6 03:34:03 2020 [DEBUG] Updating DB Fri Mar 6 03:34:03 2020 [DEBUG] Successfully Updated DB error_code to 4 Fri Mar 6 03:34:03 2020 [WARN] Could not download manifest list. Fri Mar 6 03:34:03 2020 [DEVEL] Cleanup requested with return code 0 Fri Mar 6 03:34:03 2020 [DEBUG] Set autoupdate_status to 0 Fri Mar 6 03:34:03 2020 [DEBUG] Previous Value: 1 Fri Mar 6 03:34:03 2020 [DEBUG] Updating DB Fri Mar 6 03:34:03 2020 [DEBUG] Successfully Updated DB autoupdate_status to 0 Fri Mar 6 03:34:03 2020 [DEVEL] Cleaning up scripts.
How to resolve SSL 500 proxy errors
A utility has been released to IBM Fix Central to resolve manifest and connection issues. The AUProxyFP.tgz file on IBM Fix Central can be used to resolve proxy connection issues on all QRadar 7.3.x and 7.4.x versions.
- Download the Auto Update fix pack from IBM Fix Central to your laptop or workstation: AUProxyFP.tgz.
- SCP the file to a directory of the QRadar Console, such as /root, /tmp, or /storetmp.
- Using SSH, log in to the QRadar Console as the root user.
- Type the following command to extract the file: gunzip -c AUProxyFP.tgz | tar zxvf -
- Navigate to the directory with the extracted file.
- Type the following command to install the proxy fix pack: ./install.sh
- After the installation completes, type the following command to verify the connection:
/opt/qradar/bin/UpdateConfs.pl -testConnect 1 0
- If successful, the following message is displayed and the administrator can continue to Step #8:
[AUTOUPDATE] [TESTCONNECT] Test downloaded successfully!
- If unsuccessful, the following message is displayed and the administrator should verify their proxy configuration:
[AUTOUPDATE] [TESTCONNECT] Could not download manifest list.
- Log in to the QRadar Console as an administrator.
- Click the Admin tab.
- Click Auto Update icon.
- Click Get New Updates button.
- Wait for the auto update to attempt the connection.
- Click View Log to verify the Last Update Status.
Results
If you continue to experience issues or error messages related to "Could not contact the update server: 500 SSL negotiation failed: Could not download manifest list", then contact QRadar Support.
Was this topic helpful?
Document Information
Modified date:
03 June 2026
UID
ibm16333083