Troubleshooting
Problem
After a disk unit, cache, RAID or storage adapter failure, it can be difficult to assess how extensive the damage may be and how to identify the affected objects.
Cause
Storage related hardware failures can mark disk pages as "bad", so even after fixing the failing hardware, there can be residual "bad" pages that need to be cleaned up. These "bad" pages can result in various errors such as damaged object messages, machine checks, failed saves, objects that can't be deleted, abnormal system terminations, etc.
Resolving The Problem
First, make sure all of the hardware problems have been resolved; failed drive(s) replaced, cache and adapter errors addressed, etc.
After the hardware issues are resolved, make sure the latest QMGTOOLS build is installed. See the following document on how to download and install the QMGTOOLS toolkit on your IBM i server.
Verify the appropriate fix from the following list is applied to the system:
- MF66290 (R740)
- MF66289 (R730)
- MF66288 (R720)
Be sure to sign in as QSECOFR (or equivalent) in order to have enough authority to run the Bad Disk Page Analysis tools.
Once the IBM i MustGather tools have been installed and updated, type GO QMGTOOLS/DAMAGE to bring up the Bad Disk Page Analysis tools on the DAMAGE menu. You can also navigate to the menu from the Must Gather Data Collector menu (MG) - GO QMGTOOLS/MG, option 16 - Internals (INTMNU), option 3 - Damage Menu.
Please note that these tools should be used under the direction of the IBM i Global Support Center.

Option 1 - Check PAL and LIC log for bad page entries:
Scanning every disk page header to see if it's marked bad can take a lot of time. Depending on the size and number of the disk units, it could take hours. Option 1 on the DAMAGE menu, or command QMGTOOLS/CHKBPGLOG, will check the Product Activity Log (PAL) and Licensed Internal Code (LIC) log for entries associated with bad disk pages. Running the Check logs for bad disk pages tool allows specifying a starting date for it to use when searching the logs. *BEGIN can be used to search the logs as far back as they go. However, it's advisable to start with the date of the hardware failure.
If no entries are found, especially with *BEGIN for the start date, scanning the disks for bad pages would likely be a waste of time. However, the user can choose to try an earlier date, or go ahead and scan the disks anyway.
If any entries indicating bad disk pages are found in the logs (such as SRCxxxx7000 in the PAL, or LIC log entries with major/minor codes of 1000/5125 or 0100/0207), a screen similar to the following will be displayed -

If the disk units are attached to internal storage adapters, the tool will use the disk configuration to find the associated adapter(s) for the affected unit(s) and present a screen similar to the following -

The tool will then identify all of the disk units under the affected adapter(s) and display the SCNBADPGS confirmation screen showing the number of selected units and a list of the selected units -

Option 2 - Scan disk units for bad disk pages:
Scans can also be started using option 2 on the DAMAGE menu, or by using the QMGTOOLS/STRBPGSCAN command.

The drives to be scanned can be selected by specifying individual unit numbers separated by spaces (e.g. 1 2 3 4), adapter resource names (e.g. DC03 DC04), unit number ranges (e.g. 1-8 50-56 4001-4003), or a combination of the three. There is also a reserved keyword *ALL to scan all disk units in the configuration. However, since this tool has a limit of 400 units per scan, the *ALL option is only valid on systems with 400 or fewer drives. Scanning 400 units could take an incredibly long time and should rarely be needed, but if there is a need to scan more than 400 units, it can be done with sequential scans using ranges (e.g. first scan 1-400 and when that finishes, start a new scan for 401-800, etc.).
After confirming the units to scan, the following prompt for user IDs and passwords will be shown -

Be sure to provide credentials for OS QSECOFR (or equivalent) and SST 22222222 (equivalent or higher) profiles so the scan tools will have enough authority to run.
Note: For DBCS systems, make sure there is an existing type 5555 virtual device, that is not currently in use, and specify that device on the Virtual device parameter
The scan will be started in SST and then a batch job will be submitted to monitor the scan progress. After the monitor job has been submitted, the scan status screen will be shown -

Option 3 - Check scan status:
Option 3 from the DAMAGE menu, or running the QMGTOOLS/CHKBPGSCAN command will bring up the Status of Bad Page Scan screen. Use F5 periodically to refresh the screen. The scan will go through several phases:
- Scanning disk units for bad page headers
- Dumping LIC log data generated by HEADERFINDER
- Analyzing data from the LIC log entries
- Identifying objects
Once the scan is complete, the status screen will show that the scan is not currently active -

Option 4 - Work with scan reports:
Option 4 on the DAMAGE menu, or running the QMGTOOLS/WRKBPGRPT command, will display the Work With Bad Page Scan Reports screen which lists all completed scans found in the QMGBADPGS library.

The Work With Bad Page Scan Reports screen displays a summary of each completed scan. The summary information includes:
- Date and time the scan was started
- Number of units scanned
- Yes or No indication whether or not all unit scans reached normal completion
- Total bad page count
- Number of bad pages fixed in free space
- Number of remaining bad pages
- Yes or No indication if any of the bad pages are also the first page of an address segment
- Yes or No indication of any objects that the tool tried to identify
From the Work With Bad Page Scan Reports screen, the following operations are available:
- F6 will save the QMGBADPGS library (which contains all of the data for any completed scans) into a save file and send it to IBM using QMGTOOLS/FTP2IBMCMD.
- Option 4 allows scan data to be deleted. More than one scan can be selected at a time, and a confirmation screen is displayed to verify that the scan data should really be deleted.
- Option 6 will spool a report showing all of the information that can be view using option 5.
- Option 5 brings up a Work with Bad Page Scan Report menu for the selected scan where details can be viewed about the scanned units, bad pages and objects/addresses associated with bad pages (as shown below).
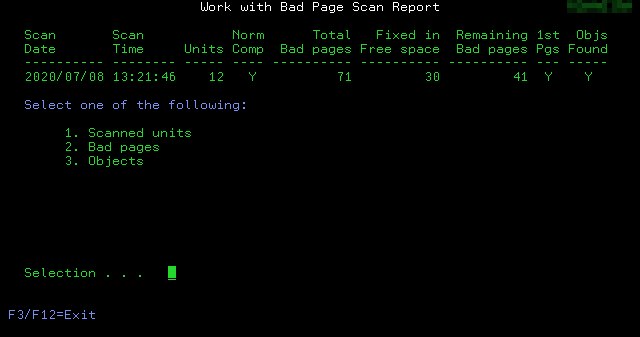
Example Scanned units screen:

Example Bad pages screen:

If any of the bad pages were also the first page of an address segment, you can use F10 to work with those entries.

Option 5 will show details about the page, address and suggested action.

If F8 or option 4 to clean up bad first page entries is used, the following confirmation screen is displayed.

Example Objects screen:

To clean up the damaged objects, they should be deleted and then a new scan run against the disk unit(s) that they were found on. The new scan will clean up the bad pages that were released into free space when the objects were deleted. After the scan completes, the deleted objects can be re-created, restored, or replicated as needed and as supported by the environment.
Option 6 - Clear IOP dump segments:
If there are bad pages in any of the reserved IOP dump segments on unit 1 (see example Objects screen above), option 6 from the BADPAGES menu, or the QMGTOOLS/CLRIOPDMP command can be used to delete and rebuild the IOP dump segments.
Note: This option should only be used under the direction of IBM Support, and after all hardware issues have been identified. Clearing the dump segments could erase data needed by the hardware support team as part of their root cause analysis into the hardware failure that caused the bad pages.
Document Location
Worldwide
[{"Business Unit":{"code":"BU070","label":"IBM Infrastructure"},"Product":{"code":"SWG60","label":"IBM i"},"ARM Category":[],"Platform":[{"code":"PF025","label":"Platform Independent"}],"Version":"All Version(s)","Line of Business":{"code":"LOB68","label":"Power HW"}}]
Was this topic helpful?
Document Information
Modified date:
18 April 2025
UID
ibm16244502