Release Notes
Abstract
This technical note contains a list of the installation instructions, new features, and includes a resolved issues list for the release of IBM Security QRadar 7.3.1 Patch 2 ISO (7.3.1.20180202182152). This software update applies to QRadar, QRadar Vulnerability Manager, and QRadar Risk Manager. These instructions are intended for administrators who are upgrading from QRadar 7.2.8 Patch 1 or later to QRadar 7.3.1 Patch 2.
Content
Note: If you upgrade from QRadar 7.3.0 to 7.3.1 Patch 2, you may experience an extended upgrade window due to APAR IJ04398. You must let the patch complete uninterrupted to prevent further issues.
Known Issue
Refer to APAR IJ04398 before you attempt to update a system with many assets due to the possibility of maintenance windows that might be extended by several hours. Do not force restart updates in progress. A forced restart or exit of the patch in progress can cause further issues or possible corruption of a host, which requires a rebuild.
| Product | Component | Number | Description |
|---|---|---|---|
| QRADAR | KERNEL | IJ04398 | PATCH/UPGRADE TO QRADAR 7.3.1 PATCH 2 CAN HANG FOR AN EXTENDED PERIOD OF TIME (HOURS) WITH "VULN_MAP_ASSET_MV DOES NOT EXIST" |
What's new
For information on what's new in QRadar 7.3.1, see: https://www.ibm.com/support/knowledgecenter/SS42VS_7.3.1/com.ibm.qradar.doc/c_qradar_ov_whats_new_731.html
About this upgrade
These instructions are intended to assist you when you update appliances from QRadar 7.2.8 to QRadar 7.3.1 Patch 2 by using an ISO file. This ISO can update QRadar, QRadar Risk Manager, and QRadar Vulnerability Manager products from 7.2.8 to version 7.3.1. If you have a software installation, need the latest memory requirements, or are making use of off-board storage, review the QRadar Upgrade Guide to prevent issues.
| Products | Version | ISO File Upgrades to QRadar 7.3.1 Patch 2? |
| QRadar QRadar Vulnerability Manager QRadar Risk Manager QRadar Log Manager | 7.2.8 Patch 1 to 7.2.8 Patch 10 (or latest version) | Yes, use these release notes to complete this process. |
| QRadar Incident Forensics | 7.2.8 Patch 1 to 7.2.8 Patch 10 (or latest version) | See the QRadar Incident Forensics ISO and release notes. |
| QRadar Network Insights | 7.2.8 Patch 3 to 7.2.8 Patch 10 (or latest version) | See the QRadar Network Insights ISO and release notes. |
| QRadar QRadar Vulnerability Manager QRadar Risk Manager QRadar Log Manager QRadar Network Insights QRadar Incident Forensics | 7.3.0 (any patch version) | No, use the 7.3.1 SFS file. For more information, see the QRadar 7.3.1 SFS Release Notes. |
| QRadar Network Packet Capture | 7.3.0 Build 1601 | No, see the QRadar Network Packet Capture release notes. |
| QRadar Packet Capture | 7.2.8 Build 278 | No, see one of the following release notes: QRadar Packet Capture 7.3.1 QRadar Packet Capture 7.3.1 Software Installs (your hardware) |
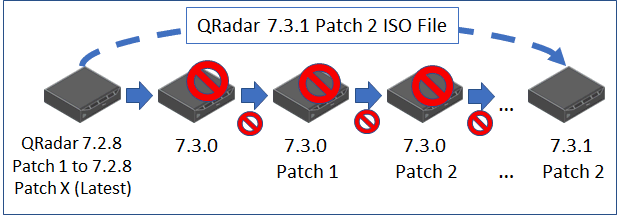
Figure 1: If your deployment is at QRadar 7.2.8 version or later, you are not required to install each ISO release to update to QRadar 7.3.1 Patch 2.
Administrator notes
- This update includes a change to how login authentication works for fallback LDAP, Radius, or Active Directory on administrator accounts. If the external authentication server is unavailable, not all administrators are able to revert to local administrator passwords without a configuration change. This change was implemented in QRadar 7.3.0 Patch 4 or later; this note is included in 7.3.1 Patch 2 to raise awareness for this change. For more information, see: QRadar: External Authentication Fails Due to Password Fallback Change for Administrators.
- TLS v1.0 and TLSv1.1 is disabled in this release; connections to the user interface for legacy browsers might be rejected.
- WinCollect agents at version 7.2.2-2 or older use TLSv1.0 and TLS v1.1 connections to upgrade agents, which is disabled in QRadar 7.3.1 (all patch versions). If you have managed WinCollect agents, you must upgrade to WinCollect 7.2.5 before you install QRadar 7.3.1 Patch 2. WinCollect 7.2.5 is a pre-requisite for QRadar 7.3.1 Patch 2. Standalone WinCollect agents are not impacted by this requirement.
- Customized routes or static routes that are configured manually in QRadar are not preserved after the upgrade to QRadar 7.3.1 Patch 2 completes.
- Any iptables rules that you configured should be reviewed and noted for clean-up post installation. The interface names have changed in QRadar 7.3.1 Patch 2 due to the Red Hat Enterprise 7 operating system updates; if you reference the interfaces you must manually update the iptables rules.
- Each HA appliance must be updated individually by using the ISO file. The SFS file can allow the primary appliance to update the secondary, but the ISO file does not support this functionality. If you run the ISO setup on an HA primary, wait for the update to complete, and then run the setup on the HA secondary.
- There is no patch "All" option because QRadar 7.3.1 Patch 2 uses an ISO file to upgrade. The ISO must be mounted on the appliance and run locally on each host. If you have a software installation, you need your Red Hat Enterprise ISO and the QRadar ISO. If you have software installations on your own hardware you must read the QRadar Upgrade Guide to understand how to partition your systems appropriately.
- The QRadar 7.3.1 Patch 2 upgrade will take longer than expected due to the kernel changes to Red Hat 7 Enterprise. Early upgrade customers are reporting 2 to 2.5 hours to upgrade the Console appliance. You should be aware of this longer time frame and plan maintenance windows accordingly.
- Utilities or custom scripts that power users might have created for their QRadar deployment should be copied off the system. During the QRadar 7.3.1 Patch 2 update a warning is displayed that only data in /store is going to be preserved. After the appliance reboots, any scripts, 3rd party accounts, or utilities in /tmp, or /, or /root are deleted. ISO files that were mounted initially by using /root, are not impacted because this cleanup occurs later in the installation procedure.
Before you upgrade
Ensure that you take the following precautions:
- Back up your data before you begin any software upgrade and verify that you have recent configuration backups that match your existing Console version. If required, take an on demand configuration backup before you begin. For more information about backup and recovery, see the IBM Security QRadar Administration Guide.
- HA appliances should have primaries in the online state and secondary as standby for their HA pair status.
- If you have off-board storage configured, see the QRadar Upgrade Guide. There are special instructions for administrators with /store using off-board storage.
- If you installed QRadar as a software installation on your own hardware, see the QRadar Upgrade Guide for partition information.
- WinCollect 7.2.5 is a pre-requisite for QRadar 7.3.1 Patch 2; all managed agents must be updated. Standalone WinCollect agents are not impacted by this requirement.
- All appliances in the deployment must be at the same software and patch level in the deployment.
- Verify that all changes are deployed on your appliances. The update cannot install on appliances that have undeployed changes.
- A QRadar 7.3.1 Patch 2 ISO is available to upgrade from QRadar 7.2.8 Patch 1 or install a new appliance or virtual machine. Review the QRadar Installation Guide.
- To avoid access errors in your log file, close all open QRadar user interface sessions.
- If you are unsure of the IP addresses or hostnames for the appliances in the deployment, run the /opt/qradar/support/deployment_info.sh utility to get a CSV file that contains a list of IP addresses for each managed host.
- If you are unsure of how to proceed when reading these instructions or the documentation, it is best to ask before you start your upgrade. To ask a question in our forums, see: http://ibm.biz/qradarforums.
Part 1. Staging files and pretesting your deployment (required)
It is important that you pretest your deployment to ensure that you don't experience unexpected issues when you update to QRadar 7.3.1. A pretest is a common precaution before you install an update so that you can locate potential issues. The pretest does not restart services and can be completed without scheduled downtime. The pretest typically takes between 3 to 5 minutes to complete on each appliance. If for some reason your SSH session is disconnected, you can reconnect to the remote host using screen.
Procedure
The pretest should be completed on all hosts before you attempt to upgrade to QRadar 7.3.1 Patch 2.
- Download the QRadar 7.3.1 Patch 2 ISO (5 GB) from the IBM Fix Central website: http://www.ibm.com/support/fixcentral/swg/quickorder?parent=IBM%20Security&product=ibm/Other+software/IBM+Security+QRadar+SIEM&release=7.3.0&platform=Linux&function=fixId&fixids=7.3.1-QRADAR-QRFULL-20180202182152&includeSupersedes=0&source=fc
IMPORTANT: QRadar Incident Forensics and QRadar Network Insights use a unique ISO file to upgrade from 7.2.8 to 7.3.1 Patch 2. See the Fix Central page for those products to download the correct file.
- Use SSH to log in to your Console as the root user.
- Type the following command: screen
- To make the directory for the update, type:
/opt/qradar/support/all_servers.sh -k “mkdir -p /media/cdrom || umount /media/cdrom" - To verify that you have enough space (4GB) in /tmp for the ISO on all appliances, type:
/opt/qradar/support/all_servers.sh -k df -h /root /var/log | tee diskchecks.txt
- Best directory option: /root
It is available on all appliance types, and is the best option to host the ISO file. - 2nd best directory option: /var/log
This directory is available on all appliances, but there might not be the required space available. - DO NOT USE: /tmp, /store/tmp, or /store/transient for your ISO upgrade. These directories are partitioned as part of the upgrade; you cannot use them as storage locations or mount points for the ISO file.
If the disk check command fails, retype the quotation marks from your terminal, then re-run the command. This command returns the details to both the command window and to a file on the Console named diskchecks.txt. Review this file to ensure that all appliances have at minimum 5GB of space available in a directory to copy the ISO before you attempt to move the file to a managed host. If required, free up disk space on any host that fails to have less that 5GB available.
Reminder: Utilities or custom scripts that you have created for QRadar should be copied off the system. During the 7.3.1 update a warning is displayed that only data in /store will be preserved. Therefore, Scripts, 3rd party utilities in /tmp, or /, or /root will be deleted during the upgrade.
- If there is not 4GB of space in /root or /var/log, you must make directory space for the ISO file.
- Using WinSCP or SCP, copy the ISO to the /root or /var/log directory on the QRadar Console with 4GB of disk space for the ISO file.
- To copy the files to all appliances, type: /opt/qradar/support/all_servers.sh -k -p /root/Rhe764QRadar7_3_1_20180202182152.stable-7-3-1.iso -r /root
- To mount the ISO on all appliances, type the following command: /opt/qradar/support/all_servers.sh -C -k “mount -o loop /root/Rhe764QRadar7_3_1_20180202182152.stable-7-3-1.iso /media/cdrom"
- To pretest the Console appliance, type: /media/cdrom/setup -t
The pretest output is written to the command window. Review this output after the pretest completes. - Use SSH to open an SSH session to the other appliances in your deployment. QRadar Support recommends that you run the pretest on each host to identify issues before the update begins.
- To pretest the managed host, type: /media/cdrom/setup -t
Results
If an appliance in your deployment fails the pretest, take the recommended action from the pretest utility. The issue must be resolved before the update to QRadar 7.3.1 Patch 2 begins to prevent downtime for specific appliances. If there are messages you do not understand or want to discuss further, you can use our forums http://ibm.biz/qradarforums to get advice. You can also open a ticket directly with QRadar Support (http://ibm.biz/qradarsupport).
Part 2. Installing the QRadar 7.3.1 Patch 2 ISO on the Console Appliance
These instructions guide you through the process of upgrading an existing QRadar installation at 7.2.8 Patch 1 or later to QRadar 7.3.1 Patch 2. The update on the Console must be completed before you attempt to update any managed hosts to QRadar 7.3.1 Patch 2.
Procedure
You must complete the Staging files and pretesting your deployment procedure before you begin the installation steps.
- Use SSH to log in to the Console as the root user.
- To run the ISO installer on the Console, type the following command: /media/cdrom/setup
Important: Upgrading from QRadar 7.2.8 Patch 1 or later to QRadar 7.3.1 Patch 2 should take approximately 2 hours on a Console appliance.
- Wait for the Console primary update to complete.
- If you have an HA Secondary, you can now update the secondary appliance.
- Open an SSH session to the HA Console secondary.
- Type the following command to update the secondary Console: /media/cdrom/setup
- Wait for the HA Console secondary to complete the update.
Results
A summary of the ISO installation advises you of any issues. If there are no issues, use SSH to log in to the managed hosts and start the installer on each host to run the setup in parallel.
Part 3. Installing the QRadar 7.3.1 ISO on all other managed hosts
After the Console and Console HA secondary are updated to QRadar 7.3.1, the rest of the deployment can be updated. After the Console is updated, you can update Event Processors, Event Collectors, QFlow appliances in any order. You must open an SSH session to each host to run the setup command. The all_servers.sh utility cannot be used to start ISO installations.
If any of your appliances are HA pairs, you must upgrade the primary appliance first.
Procedure
- Use SSH to log in to the Console as the root user.
- Open an SSH session to each managed host and type the following command: /media/cdrom/setup
Important: Upgrades for managed hosts should take approximately 1.5 hours.
- Wait for the managed host update to complete.
- If you have an HA Secondary, you can now update the secondary appliance.
- Open an SSH session to the manage host HA secondary.
- Type the following command to update the secondary: /media/cdrom/setup
- Wait for the HA Console secondary to complete the update.
Results
A summary of the ISO installation advises you of any issues. If there are no issues, run the ISO setup on the Console HA secondary appliance, if you have an HA pair. If you do not have a Console in HA, you can then start SSH sessions to each host and run the setup in parallel.
Part 4. Installation wrap-up
- After all hosts are updated, advise your team that they must clear their browser cache before logging in to QRadar SIEM.
- To unmount the /media/cdrom directory on all hosts, type:
/opt/qradar/support/all_servers.sh -C -k “umount /media/cdrom" - Delete the ISO from all appliances.
- If you use WinCollect agents version 7.2.6 or later, you must reinstall the SFS file on the QRadar Console. This is due to issues where the ISO replaces the SFS on the Console with WinCollect 7.2.5 as described here: APAR IV96364. To install the latest WinCollect SFS on the Console, see the WinCollect release notes: WinCollect 7.2.7 Release Notes.
- Review any static routes or customized routing. As mentioned in the administrator notes, all routes were removed and will need to be reconfigured after the upgrade completes.
- Review any iptable rules that are configured to see if the interface names that have changed in QRadar 7.3.1 due to the Red Hat Enterprise 7 operating system updates affect them. Update any iptables rules that use Red Hat 6 interface naming conventions.
Resolved issues for QRadar 7.3.1 Patch 2
Some APAR links in the following table might take 24 hours to display properly after a software release is posted to IBM Fix Central. Several of these issues were fixed in 7.2.8 and 7.3.0 versions and exist in the 7.3.1 Patch 2 software update. For this reason, some APARs state that they were fixed in earlier releases, but are displayed as part of the QRadar 7.3.1 Patch 2 resolved issues list.
| Product | Component | Number | Description |
|---|---|---|---|
| QRADAR | KERNEL | IJ03379 | EVENT DATA PROCESSED INTO SPILLOVER CAN SOMETIMES FAIL TO PARSE WHEN PROCESSED BY THE REGULAR QRADAR PIPELINE |
| QRADAR | INSTALL/UPGRADE | IJ03213 | QRADAR SYSTEMS BUILT AT 7.2.2.-7.4 CAN FAIL TO UPGRADE TO 7.3.1.X WITH A 'TA_DSM_INFO' VIOLATES FOREIGN KEY ERROR |
| QRADAR | HIGH AVAILABILITY | IJ02820 | /OPT/QRADAR/BIN/TIME_SYNC.SH CAN CAUSE EVENTUAL HA (HIGH AVAILABILITY) INSTABILITY (DEPLOY FAIL, HA FAILOVER FAIL) |
| QRADAR RISK MANAGER | USER INTERFACE | IJ03791 | RISK MANAGER CAN DISPLAY '...HTTP STATUS CODE 404' OR 'APPLICATION ERROR - AN ERROR HAS...' AFTER UPGRADE |
| QRADAR VULNERABILITY MANAGER | REPORTS | IJ03841 | IP ADDRESSES AND ASSET NAMES ARE MISSING FROM SCAN RESULTS EXCEL REPORT AFTER UPGRADE TO QRADAR 7.3.1.X |
Where do I find more information?
Was this topic helpful?
Document Information
Modified date:
17 June 2018
UID
swg27050769