Release Notes
Abstract
This is a special release note intended to walk administrators through a two part installation process. The purpose of this release note is to upgrade a deployment at QRadar v7.2.5 GA (QRadar 7.2.5 Build 20150428213537) to Interim Fix 01 for QRadar v7.2.5 Patch 1.
Content
To update from QRadar 7.2.5 GA (QRadar 7.2.5 Build 20150428213537) to Interim Fix 01, administrators must complete the installation process for Part 1 for their deployment, then follow the instructions in Part 2.
Part 1: Installing QRadar 7.2.5 Patch 1
About this task
Part 1 of these instructions will guide the administrator through the process of updating the QRadar deployment from QRadar v7.2.5 GA to QRadar 7.2.5 Patch 1. After the installation is completed, the administrator must then complete the installation process for part 2.
Before you begin
Ensure that you take the following precautions:
- Back up your data before you begin any software upgrade. For more information about backup and recovery, see the IBM Security QRadar Administration Guide.
- To avoid access errors in your log file, close all open QRadar sessions.
- The fix pack for QRadar cannot be installed on a managed host that is at a different software version from the Console. All appliances in the deployment must be at the same software revision to patch the entire deployment.
- Verify that all changes are deployed on your appliances. The patch cannot install on appliances that have changes that are not deployed.
Procedure
- Download the fix pack 7.2.5-QRADAR-QRSIEM-20150519202709 from the IBM Fix Central website: http://www.ibm.com/support/fixcentral/swg/quickorder?parent=Security%2BSystems&product=ibm/Other+software/IBM+Security+QRadar+SIEM&release=7.2.0&platform=Linux&function=fixId&fixids=7.2.5-QRADAR-QRSIEM-20150519202709:hidden&includeSupersedes=0&source=fc
- Using SSH, log in to your system as the root user.
- Copy the fix pack to the/tmp directory on the QRadar Console.
Note: If space in the /tmp directory is limited, copy the fix pack to another location that has sufficient space. - Review the files in the /tmp directory for replication files that might be using up space unnecessarily, such as tx000XX.sql.
- If tx000xx.sql files are listed, type the following command to remove these files: rm tx*.sql
This prevents a disk space issue from occurring in /tmp that can occur. - To create the /media/updates directory, type the following command: mkdir -p /media/updates
- Change to the directory where you copied the patch file. For example, cd /tmp
- To mount the patch file to the /media/updates directory, type the following command:
mount -o loop -t squashfs 725_QRadar_patchupdate-7.2.5.20150519202709.sfs /media/updates - To run the patch installer, type the following command: /media/updates/installer
Note: The first time that you run the fix pack, there might be a delay before the fix pack installation menu is displayed. - Using the patch installer, select all.
The all option updates the software on all systems in your deployment. In HA deployments, primary HA appliances are patched and replicate the patch update to the secondary HA appliance.
If you do not select the all option, you must copy the update to each appliance in your deployment and install the fix pack. If you manually install fix packs in your deployment, you must update your appliances in the following order:
1. Console
2. Event Processors
3. Event Collectors
4. Flow Processors
5. Flow Collectors
If your Secure Shell (SSH) session is disconnected while the upgrade is in progress, the upgrade continues. When you reopen your SSH session and rerun the installer, the patch installation resumes. - After the patch completes and you have exited the installer, type the following command: umount /media/updates
- Administrators and users should clear their browser cache before logging in to the Console.
Results
A summary of the fix pack installation advises you of any managed host that were not updated. If the fix pack fails to update a managed host, you can copy the fix pack to the host and run the installation locally.
After all hosts are updated, administrators can send an email to their team to inform them that they will need to clear their browser cache before logging in to the QRadar SIEM interface.
What to do next
After the deployment is updated to QRadar v7.2.5 Patch 1, then administrators are ready to follow the instructions to install Interim Fix 01 in part 2 of this technical note.
Part 2: Installing Interim Fix 01 for QRadar 7.2.5 Patch 1
Interim fixes are intended to resolve specific APAR issues in the latest version of QRadar. If your deployment is installed with IBM Security QRadar 7.2.5 Patch 1 (7.2.5.20150519202709), then this interim fix can be applied to your system.
| Number | Description |
|---|---|
| IV73889 | OFFENSE GENERATION UNEXPECTEDLY STOPS OCCURRING IN QRADAR |
Before you begin
Ensure that you take the following precautions:
- Back up your data before you begin any software upgrade. For more information about backup and recovery, see the IBM Security QRadar Administration Guide.
- To avoid access errors in your log file, close all open QRadar sessions.
- The interim fix for QRadar cannot install on a managed host that is at a different software version from the Console. All appliances in the deployment must be at the same software revision to patch the entire deployment.
- Verify that all changes are deployed on your appliances.
- The patch cannot install on appliances that have changes that are not deployed.
About this task
Interim fixes are software updates intended to fix a small number of known software issues in your QRadar deployment. The interim fix restarts services, which halts event and flow collection in your deployment until the installation completes.
Procedure
- Download interim fix 7.2.5.QRADAR-QRSIEM-20150605002623INT from the IBM Fix Central website: http://www.ibm.com/support/fixcentral/swg/quickorder?parent=Security%2BSystems&product=ibm/Other+software/IBM+Security+QRadar+SIEM&release=7.2.0&platform=Linux&function=fixId&fixids=7.2.5-QRADAR-QRSIEM-20150605002623INT%3Ahidden&includeSupersedes=0&source=fc
- Using SSH, log in to your system as the root user.
- Copy the interim fix to the /tmp directory on the QRadar Console.
Note: If space in the /tmp directory is limited, copy the interim fix to another location that has sufficient space. - To create the /media/updates directory, type the following command: mkdir -p /media/updates
- Change to the directory where you copied the patch file. For example, cd /tmp
- To mount the patch file to the /media/updates directory, type the following command: mount -o loop -t squashfs 725_QRadar_interimfix-7.2.5.20150519202709-IF01-20150605002623.sfs /media/updates/
- To run the patch installer, type the following command:/media/updates/installer
Note: The first time that you run the interim fix, there might be a delay before the installation menu is displayed. - Using the patch installer, select all.
The all option updates the software on all systems in your deployment. In HA deployments, primary HA appliances are patched and replicate the patch update to the secondary HA appliance.
- After the patch completes and you have exited the installer, type the following command: umount /media/updates
- Administrators and users should clear their browser cache before logging in to the Console.
If your Secure Shell (SSH) session is disconnected while the upgrade is in progress, the upgrade continues. When you reopen your SSH session and rerun the installer, the patch installation resumes.
Results
A summary of the interim fix installation advises you of any managed host that were not updated. If the interim fix fails to update a managed host, you can copy the interim fix to the host, then mount and run the installation locally.
What to do next
After updating to QRadar 7.2.5 Patch 1 Interim Fix 01, the administrator should review their offenses to ensure that new offenses are being generated properly in the QRadar user interface.
Procedure
- Log in to the QRadar Console as an administrative user.
- Click the Offenses tab.
- Review the list of offenses and refresh the view.
- If offenses are being created, the update is complete.
- If offenses are not being created properly, go to step 4 to run a search.
- Click the Log Activity tab.
- Click Add Filter.
- Filter by Log Source [Indexed] Equals System Notification-2. This log source is likely part of the 'Other' log source group.

- Filter by Payload Contains is database executing purge command failed.
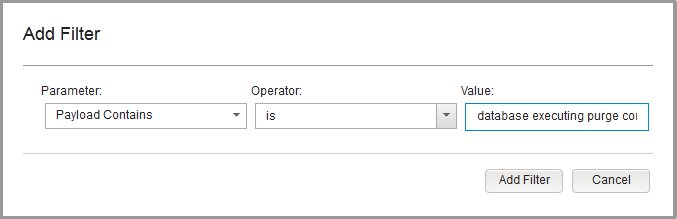
- Click Add Filter.
- Click the View drop-down and select a time range after you applied Interim Fix 01 for QRadar 7.2.5 Patch 1.

(Click to enlarge image)
- Review the results:
- If no results are returned for the time frame after Interim Fix 01 was applied, continue to monitor the search result or contact QRadar customer support.
- If results are returned after the interim fix was applied, continue to Step 11.
- Click the Admin tab.
- On the toolbar, select Advanced > Clean SIM Model.
- Select Soft Clean.
A soft clean SIM sets all existing offenses to inactive and restarts services on the QRadar Console. Any offenses in the queue to be processed will be deleted. - Select the Are you sure you want to reset the data model? check box.
- Click Proceed.
- After the SIM reset process is complete, refresh your browser.
- Click the Offenses tab.
- Review the list of offenses and verify that offenses are being created.
- If offenses are being created after the soft clean SIM, the update is complete.
- If you are not seeing offenses being generated, contact QRadar Customer Support for assistance.
Was this topic helpful?
Document Information
Modified date:
28 July 2020
UID
swg27045945