How To
Summary
Use these procedures to configure and connect the legacy DataStage Designer client to IBM Cloud Pak for Data. You can then use the Designer client to edit jobs in Cloud Pak for Data 3.0.1 or below.
For higher versions, please visit
https://www.ibm.com/support/pages/connect-information-server-datastage-designer-windows-clients-ibm-cloud-pak-data
Objective
Steps
- Ensure that the Red Hat OpenShift (RHOS) client, oc, is installed on your computer (Windows or Mac). You use the oc client to access the Red Hat OpenShift cluster where Cloud Pak for Data is deployed. You can also log in directly to the Linux Infrastructure node and use the oc client already installed there for this procedure.
- If you need the oc client, download the oc command line tool by following the instructions at Get Started with the CLI.
- Install the RHOS client tool and put the directory in which you installed the tool into your path in the OS environment.
- Ensure that you have an account created for you in RHOS so that you can log in and get access to the cluster. Contact the administrator of the RHOS system that is running your instance, if necessary.
- If required, add the IP address and host name for your RHOS system to your hosts file. On Windows, the hosts file is located in:
C:\Windows\System32\drivers\etc\
For example:
192.168.1.100 ibm-master ibm-master.cloud master - From a terminal or command window, log in to the RHOS cluster: oc login https://<openshift cluster>:port. For example:
oc login https://ibm-master.cloud:8443Log in to Cloud Pak for Data with your RHOS credentials. If you get a message about certificates, enter Y. - Follow the instructions to configure the services in Red Hat OpenShift 3.x for use with the legacy DataStage Designer client.
Red Hat OpenShift 3.x:
- Get the list of services by running the command:
Look for is-en-conductor and is-servicesdocker in the list. The designation 'ClusterIP' should appear in the rows for those two services. 'ClusterIP' means that the service is visible only inside of the cluster.oc get service | grep is - Edit the file by running the command:
This command will launch a vi editor to edit the service object.oc edit service is-en-conductor-0
Type /ClusterIP to search for the string "ClusterIP". Change "ClusterIP" to "NodePort". Save the file (:w) and quit editing (:q). - Repeat Step 2 for the is-servicesdocker service.
- Retrieve the list of services again to ensure that the instances of "ClusterIP" are now changed to "NodePort". The ports are now mapped externally.
- Enable IPv4 forwarding in infra node by adding
net.ipv4.ip_forward = 1line to /etc/sysctl.conf and running "sysctl -p" command. OR by running
sysctl -w net.ipv4.ip_forward=1 - Expose an external IP address to allow access to the Services tier and Engine tier using kubectl command, not oc
  kubectl expose deployment iis-services --type=LoadBalancer --name=iis-services-external -n ds
kubectl expose service is-en-conductor-0 --type=LoadBalancer --name=iis-engine-external -n ds
where ds means the OpenShift project name with Cloud Pak fo Data. You can find your actual project name using "oc describe pod is-en-conductor-0 | grep -i ^namespace:" command.
-
Note the node port for Engine tier port 31538 and Services tier port 9446, you need to configure Linux packet filter rules for those ports. For instance, in the following example you need to take care of port 32160 for Engine tier connection and 30653 for Services tier connection from the DataStage thick clients.
[root@dsopenshift-inf ~]# oc get svc | grep external iis-engine-external LoadBalancer 172.30.115.244 <pending> 31538:32160/TCP,31531:31063/TCP 22h iis-services-external LoadBalancer 172.30.72.161 <none> 9446:30653/TCP 24h - Determine the worker node private IP for the Information Server Engine and Services tier pods.
- Worker nodes: Get the INTERNAL-IP of your worker nodes by running the following command.
oc get nodes -o wide | grep -E 'NAME|worker'- Determine the worker node on which is-en-conductor-0 pod and iis-services-* pod are running by running the following command.oc get pods -o wide | grep -E 'NAME|is-(en-conduct|service)' - Configure infra node's Linux firewall to forward the ports identified in step 3 to INTERNAL-IP of the worker nodes. In the following example, port 32160 for Engine tier connection is redirected to port 32160 on the worker node running is-en-conductor-0 pod, port 30653 for Services tier connection to 30653 on the worker node running iis-services-xxx-xxx pod.
Use the masquerade command to mask the IP address of the connecting system and use the gateway IP address instead. This configuration is necessary for it to communicate back to the gateway, then to your client.iptables -t nat -A PREROUTING -p tcp --dport 32160 -j DNAT --to-destination <worker private IP>:32160 iptables -t nat -A PREROUTING -p tcp --dport 30653 -j DNAT --to-destination <worker private IP>:30653
Next, verify your iptables settings by running the following command:iptables -t nat -A POSTROUTING -j MASQUERADEiptables -t nat -L -v -n
- Edit the C:\Windows\System32\drivers\etc\hosts file on your DataStage Designer client computer to add following line:
- <infra node public IP address> is-servicesdocker is-en-conductor-0.en-cond
- Start the Designer client and enter the following information into the fields of the login screen:
- Host name of the services tier: is-servicesdocker:<nodeport-for-Services-tier-port-9446>
- User name: The user name that you use for Cloud Pak for Data
- Password : The password that you use for Cloud Pak for Data
- Project: Select the project that you want to work in and then change the project name path from
IS-EN-CONDUCTOR-0.EN-COND
to
IS-EN- CONDUCTOR-0.EN-COND:<nodeport-for-Engine-tier-port-31538>.
For example, if your project is dstage1, change the project name to:
IS-EN-CONDUCTOR-0.EN-COND:<nodeport-for-Engine-tier-port-31538>/dstage1. 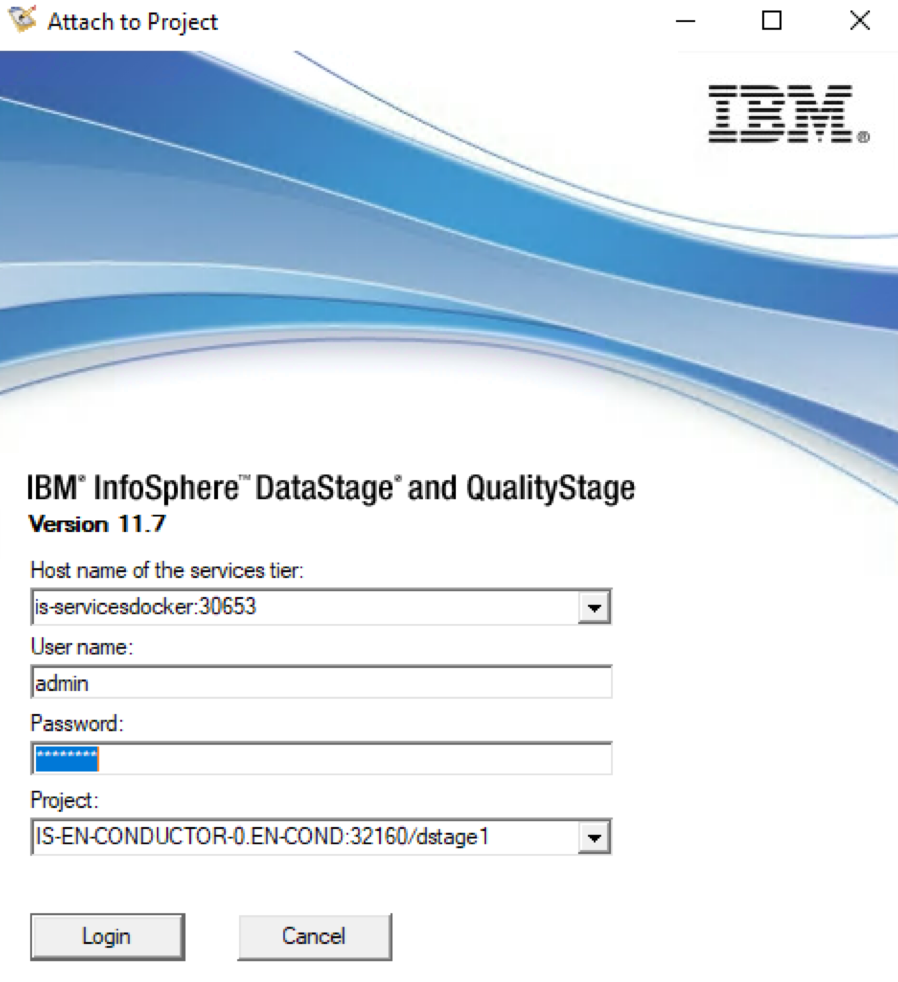
- Click Login to log in to DataStage on the Cloud Pak for Data Cluster.
Related Information
Document Location
Worldwide
Was this topic helpful?
Document Information
Modified date:
15 February 2023
UID
ibm15690733