Question & Answer
Question
How do you install IBM Rational Developer for i at the latest fixpack level on multiple developer machines?
Answer
There are 6 methods available. They are listed from the simplest to the most powerful. You can choose which is most appropriate for your scenario. The first two options are the standard installation methods of the product. The others involve some setup to simplify the effort of installing on multiple developer machines as well as being able to ensure consistency of the installs.
Install from product images on internal file server
Silent install from product images on internal file server
Install from IBM Packaging Utility repository on internal HTTP or file server
Silent install from IBM Packaging Utility repository on internal HTTP or file server
Some of the methods involve downloading of product parts:
- If not using the Web Install method, the product images can be downloaded from the product evaluation site, IBM Passport Advantage, or IBM's Entitled Software Support site. Note: the product evaluation site only includes the core parts.
- If not using the Web Install method or the standard Update method in IBM Installation Manager, product fixpacks are available for download at Fix Central. See the Fix list for Rational Developer for i for more details.
- Activation kits which are used to apply the permanent licenses are available for download at the IBM Passport Advantage site, Rational License Key Center (for Passport Advantage users) and IBM's Entitled Software Support site.
Note: This document is based on using the RPG and COBOL Tools edition of Rational Developer for i but can be applied to the other editions (Modernization Tools, Java Edition).
For more information on Rational Developer for i, review the Rational Developer for i knowledge center or the Rational Developer for i product site.
The simplest method to install the product at the latest fixpack level is to use the Web install method. Review the Web Install of Rational Developer for i for more details. This would have to be done on each developer machine.
- This requires internet access and an IBM id to be specified.
- The Web Install installs the product at the latest fixpack level automatically and only downloads the files required by the selected installable features.
- The activation kit would need to be applied to use the product after the 120-day evaluation period.
The product image can be downloaded (e.g. zips files) and then used to install on each developer machine. When installing from the download image, the launchpad is typically used as the starting point. From the launchpad, the IBM Installation Manager is launched to start the install process of the product.
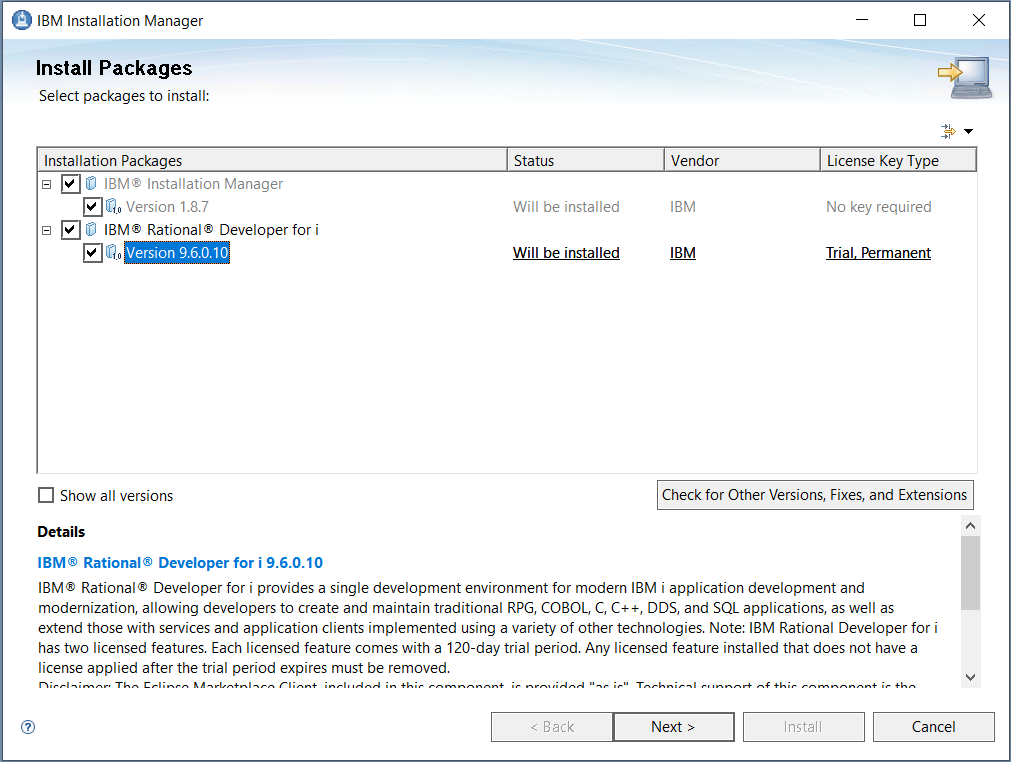
By default, it will install the product image that was downloaded along with IBM Installation Manager if it is not already installed or not at the correct level. On the first panel of IBM Installation Manager, there is Check for Other Versions, Fixes, and Extensions button.

When it is selected, IBM Installation Manager will search for the latest fixpack of the product. This requires internet access and an IBM id to be specified. You can then continue with the install process and the latest level of the product will be installed.
This would have to be done on each developer machine. The activation kit would need to be applied to use the product after the 120-day evaluation period (60 days if installing with older fixpack level).
Install from product images on internal file server:
Another option is to use an image of the product and fixpack on an internal server.
- This avoids each developer needing an IBM id and downloading the product over the internet.
- Each developer would be installing at the same fixpack level.
Procedure:
- Download the product image zips plus the latest fixpack zips. Review Fix list for Rational Developer for i for more details on how to download the product and fixpack zips. See Passport Advantage Parts list for Rational Developer for i for details on part numbers in Passport Advantage. The Rational Developer for i parts on the evaluation site are the same as the Core parts in Passport Advantage and can be activated with the activation kit.
- Unzip the product image and the fixpack on an internal server which all developer machines can access. Optionally, unzip the activation kit zip. If using Modernization Tools, Java Edition, you will have two activation kit zips.
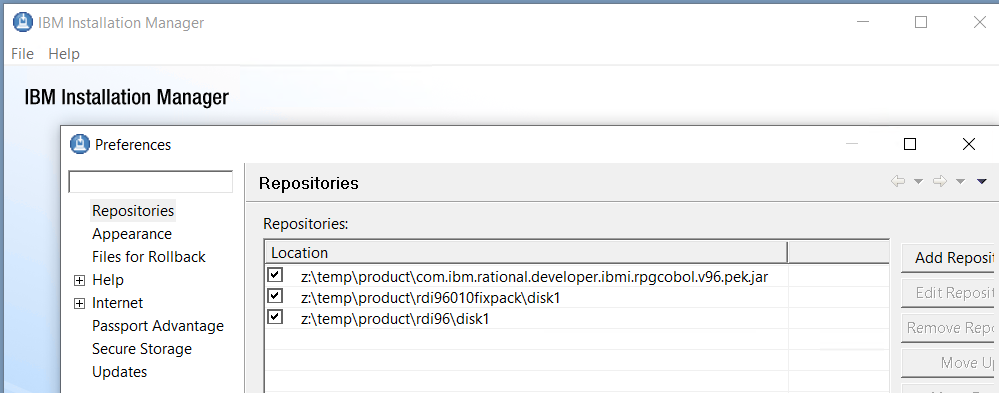
- z:\temp\product\rdi96\disk1
- z:\temp\product\rdi96\disk2
- z:\temp\product\rdi96010fixpack\disk1
- z:\temp\product\com.ibm.rational.developer.ibmi.rpgcobol.v96.pek.jar
- If IBM Installation Manager is not installed on each developer machine, start the launchpad from disk1 and select the link to install the product. This will install the product and also IBM Installation Manager.
- With IBM Installation Manager installed on each developer machine, start IBM Installation Manager and specify product image (if not installed by step 3) and fixpack image locations as repositories in the Repositories preference page.
Optionally, you could specify the .jar file from the activation kit as well as a repository in the preferences so that the permanent license is applied during the install.

- In Installation Manager, click Install and follow the steps to install the product.
Note on IBM ids: When Update is selected in IBM Installation Manager, the IBM servers are searched for product fixpacks. This prompts the user for an IBM id. To disable the search of IBM servers and avoid the prompt for IBM id, disable the Search service repositories during installation and updates option on the Repositories preference page in IBM Installation Manager.
Silent install from product images on internal file server:
A more powerful mechanism which ensures each developers has the same setup is to use IBM Installation Manager's silent install mechanism. This is typically used with product and fixpack images on an internal server.
- One person does an install and uses IBM Installation Manager to generate a response file recording the details of the install by specifying the -record option.
- The response files specifies the installation locations and feature selections plus the location of the product image. The product image location specified must be accessible by all developer machines.
- If the fixpack image and even activation kit are specified as repositories, the install will be at the fixpack level with the activation kit applied and the response file will include the information. Alternatively, separate response files can be used (one to 'update' an install to the fixpack level and another to apply the activation kit). Also, it is possible for the response file to include the information to install IBM Installation Manager on the developer machines.
- See IBM Installation Manager Response files for details on how to create response files.
- See IBM Installation Manager Silent installation roadmaps for overall silent installation topics.
- See IBM Installation Manager Installing Installation Manager silently for commands to install IBM Installation Manager itself silently. Note: the installation kit the document refers to is available on the product disk1 image but is customized to install Installation Manager and the product.
- In the case where the product image is stored on a server which requires authentication, you can store credentials in a storage file and use that during the silent install. See Storing credentials for details.
- On each developer machine, IBM Installation Manager is run silently with the response file by specifying the -input option. The same product install is then done on each developer machine.
Sample response files which do typical installs of the product and IBM Installation Manager are included in the SilentInstall folder on disk1 of the product image. Response files are XML files which can be edited or created manually.
Step-by-step example: To create a silent install response file that does a default install of IBM Installation Manager and the product on Windows at 9.6.0.10 level.
- Put RDi 96 images at c:\temp\product\rdi96, RDi 96010 fixpack image at c:\temp\product\rdi96010fixpack, and the activation kit at c:\temp\product\com.ibm.rational.developer.ibmi.rpgcobol.v96.pek.jar.
- Run as administrator:
- C:\temp\product\rdi96\disk1>InstallerImage_win32_win32_x86_64\install.exe -record c:\temp\rdi96install.xml
- Go through the install. It installs IBM Installation Manager 1.8.7 and Rational Developer for i RPG and COBOL Tools 9.6.0.6 (product images are at 9.6.0.6 level) in default locations.
- It generates the c:\temp\rdi96install.xml which looks like:
- <?xml version='1.0' encoding='UTF-8'?>
<agent-input>
<variables>
<variable name='sharedLocation' value='C:\Program Files\IBM\SDPShared'/>
</variables>
<server>
<repository location='C:\temp\product\rdi96\disk1\InstallerImage_win32_win32_x86_64'/>
<repository location='C:\temp\product\rdi96\disk1'/>
</server>
<profile id='IBM Installation Manager' installLocation='C:\Program Files\IBM\Installation Manager\eclipse' kind='self'>
<data key='cic.selector.arch' value='x86_64'/>
</profile>
<install>
<!-- IBM® Installation Manager 1.8.7 -->
<offering profile='IBM Installation Manager' id='com.ibm.cic.agent' version='1.8.7000.20170706_2137' features='agent_core,agent_jre,agent_web'/>
</install>
<profile id='IBM Software Delivery Platform' installLocation='C:\Program Files\IBM\SDP'>
<data key='cic.selector.arch' value='x86_64'/>
</profile>
<install>
<!-- IBM® Rational® Developer for i 9.6.0.6 -->
<offering profile='IBM Software Delivery Platform' id='com.ibm.rational.developer.ibmi.v96' version='9.6.6.20190513_1608' features='com.ibm.rdi.sdpcore,com.ibm.rdi.jre,com.ibm.rdi.rpgtools'/>
</install>
<preference name='com.ibm.cic.common.core.preferences.eclipseCache' value='${sharedLocation}'/>
</agent-input>
- <?xml version='1.0' encoding='UTF-8'?>
- Modify the file to find RDi 9.6.0.10 and the activation kit locally by updating the repository locations:
- <?xml version='1.0' encoding='UTF-8'?>
<agent-input>
<variables>
<variable name='sharedLocation' value='C:\Program Files\IBM\SDPShared'/>
</variables>
<server>
<repository location='C:\temp\product\rdi96\disk1\InstallerImage_win32_win32_x86_64'/>
<repository location='C:\temp\product\rdi96\disk1'/>
<repository location='C:\temp\product\rdi96010fixpack\disk1'/>
<repository location='C:\temp\product\com.ibm.rational.developer.ibmi.rpgcobol.v96.pek.jar'/>
</server>
<profile id='IBM Installation Manager' installLocation='C:\Program Files\IBM\Installation Manager\eclipse' kind='self'>
<data key='cic.selector.arch' value='x86_64'/>
</profile>
<install>
<!-- IBM® Installation Manager 1.8.7 -->
<offering profile='IBM Installation Manager' id='com.ibm.cic.agent' version='1.8.7000.20170706_2137' features='agent_core,agent_jre,agent_web'/>
</install>
<profile id='IBM Software Delivery Platform' installLocation='C:\Program Files\IBM\SDP'>
<data key='cic.selector.arch' value='x86_64'/>
</profile>
<install>
<!-- IBM® Rational® Developer for i 9.6.0.10 -->
<offering profile='IBM Software Delivery Platform' id='com.ibm.rational.developer.ibmi.v96' features='com.ibm.rdi.sdpcore,com.ibm.rdi.jre,com.ibm.rdi.rpgtools'/>
<offering profile='IBM Software Delivery Platform' id='com.ibm.rational.developer.ibmi.rpgcobol.v96.pek.offering' />
</install>
<preference name='com.ibm.cic.common.core.preferences.eclipseCache' value='${sharedLocation}'/>
</agent-input>
- <?xml version='1.0' encoding='UTF-8'?>
This response file can now be used on other machines to perform the exact same install. On a clean machine (with the same folders under c:\temp - normally, these would probably be on a network drive), run the following to perform the install:
- C:\temp\product\rdi96\disk1>InstallerImage_win32_win32_x86_64\installc.exe -input c:\temp\rdi96010install.xml -acceptLicense -log c:\temp\silent.log
Install from IBM Packaging Utility repository on internal HTTP or file server:
An additional tool available for enterprise deployment is IBM Packaging Utility.
You can use IBM Packaging Utility to copy software packages from installation images, or software update packages from IBM repositories, into local repositories or onto internal web servers from which they can perform installations.
For additional information for enterprise installations including IBM Packaging Utility, review the Enterprise installation articles for more details.
Obtain a copy of the IBM Packaging Utility here: IBM Packaging Utility downloads.
Procedure:
- Install IBM Packaging Utility
- Start IBM Packaging Utility
- Select Copy Packages
- Specify the product image, product fixpack image, and optionally the activation kit as source repositories

- Specify the target repository location to create from the source repositories
- Start the copy process to create the target repository
When the target repository is created and placed on an internal server, each developer machine can specify the repository on the internal server in the Repositories preference page of IBM Installation Manager and then perform the install of the product with the fixpack and optionally the activation kit applied. The repository created by IBM Packaging Utility can be placed on a HTTP server or file server.
Silent install from IBM Packaging Utility repository on internal HTTP or file server:
The Silent Install mechanism can be used with the repository produced by IBM Packaging Utility. In the response file, only the repository produced by IBM Packaging Utility would be specified.
Was this topic helpful?
Document Information
Modified date:
17 February 2026
UID
swg21668005