How To
Summary
Are you an administrator on a Blueworks Live account? Wondering where to find help in performing administration tasks? This admin manual should help you with your Blueworks Live account administration.
Objective
Help Blueworks Live account administrators perform administration tasks.
Steps
If you are an account admin, you will see a link to the admin section at the top right of page after logging onto your Blueworks Live account.

Navigate thru the below tabs to know about every topic in the admin section.
Users can be managed from the 'User Management' tab.

The 'Type' column shows an icon for each user type. Each user type is denoted by a different color for easy navigation.
| User Type | Icon | Description |
|---|---|---|
| Editor | Editors can create, modify, and share process Blueprints and Apps. They can launch and participate in work and have access to process communities. | |
| Contributor | Contributors can create and participate in work and view and comment on shared processes. Contributors cannot modify or create process Blueprints. | |
| Community | Community members have limited access to spaces, blogs, and activity streams. They cannot participate in work or view shared process Blueprints or Apps. Community Member accounts are free. | |
| Viewer | Viewer can only view shared Process Blueprints. They can not participate in work and do not have access to spaces, blogs, or activity streams. |
The 'Full Name' column shows the full name of the user. Clicking on the users name brings up the 'Update User Settings' dialog. In this dialog, on the 'Profile' Tab you can change the users full name and change the user type.

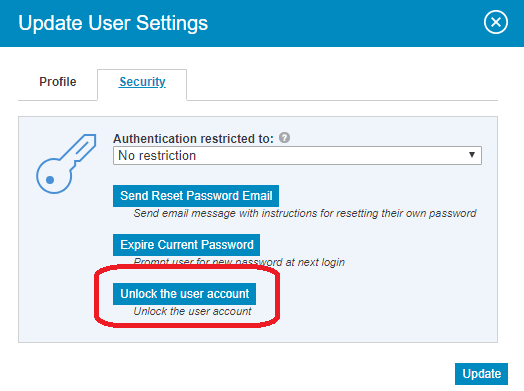
In the 'Security' tab you can force a password reset, send a password reset email and enforce the user to use a specific type of authentication to access Blueworks Live.

The 'Account Admin' column shows the designated administrators for your account. The next columns are pretty self-explanatory. Users can change their own email but admins cannot change users emails. The 'Last Logged In' column shows the date the user last logged into this account. The 'Archive' column is to archive users. Clicking the minus sign will archive the user. To see a list of archived users click 'Archived' next to 'Active'. From that screen you will be able to restore archived users.
At the bottom of the 'User Management' page you can see how many licenses your account is using.

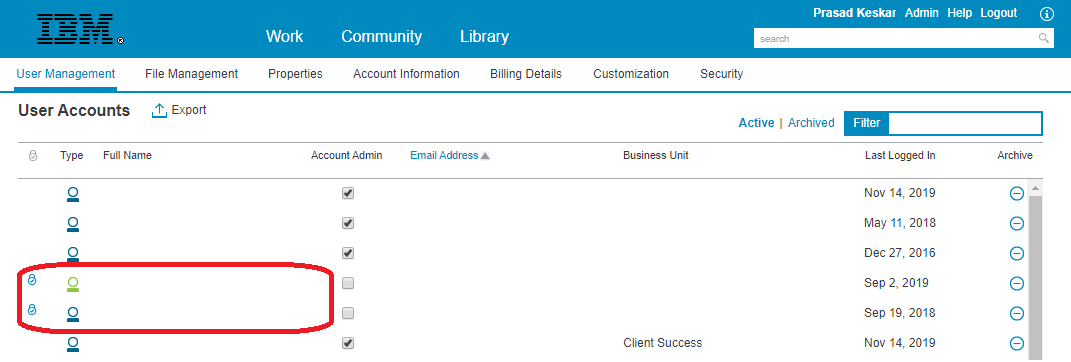
Detecting and unlocking locked out users
You can find locked out users by looking at the first column. Users with a lock icon in front of them are locked out users. To unlock such users, click on the name of the user and in the dialog box, go to the 'Security' tab and click on 'Unlock the user account'.
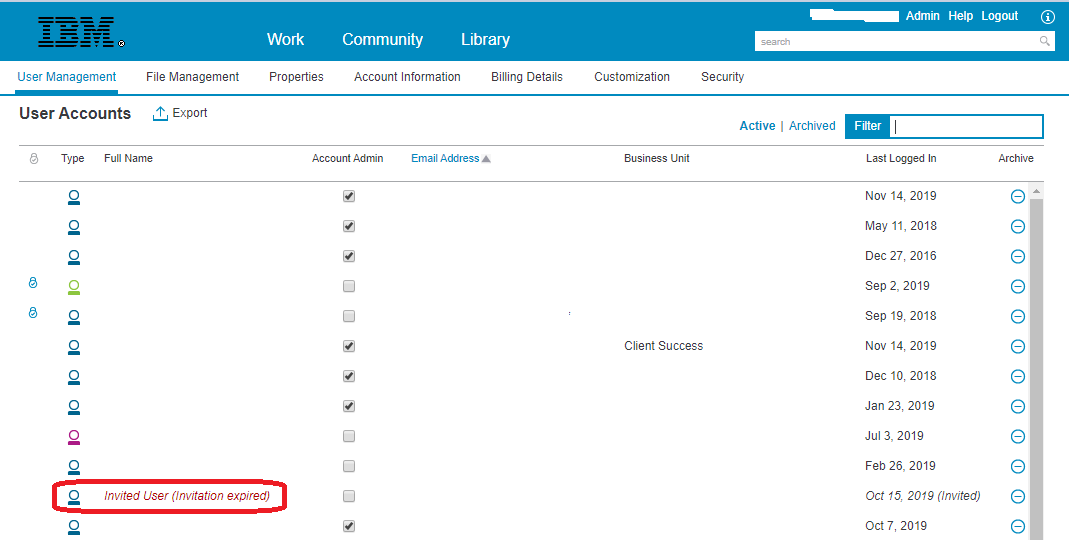
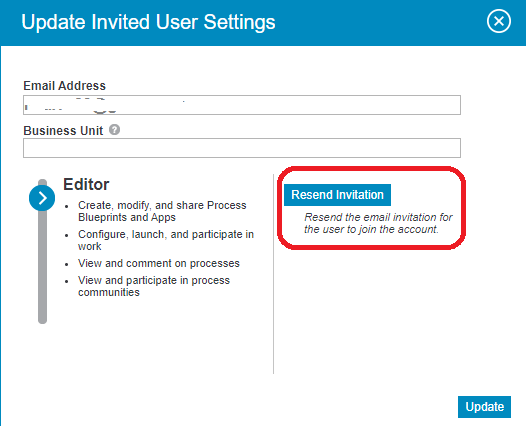
Re-inviting users with expired invitations
Click on the name of the user whose invitation has expired & in the dialog box click on 'Resend Invitation' to send a new invitation email to the user.
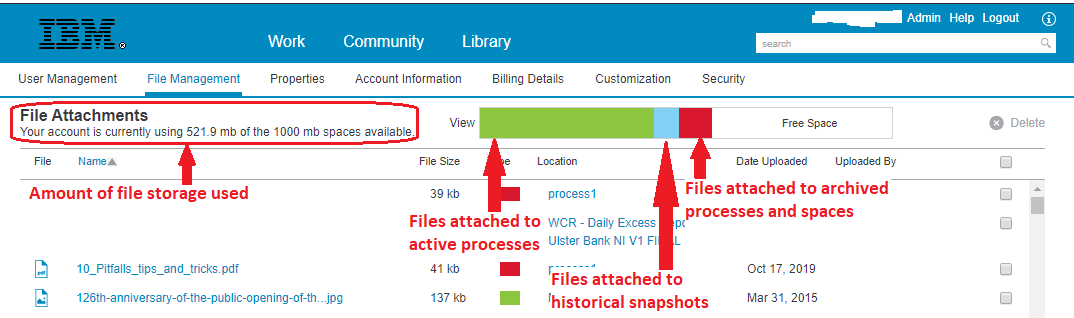
IBM Blueworks Live provides accounts with 50 mb of storage per Editor. Admins can monitor the files stored in Blueworks Live and the amount of storage remaining in the File Management tab.
Blueworks Live assigns a file type based on the files association to processes.
Green - File is attached to an active process.
Blue - File is attached to a historical snapshot of a process.
Red - File is attached to an archived process.
Clicking the file name will bring up the file in a separate window.
The Location column shows what process or app the file is attached to and can be opened from this screen. If a document is attached to multiple processes they will each get their own instance of the document.
Finally, you will be able to see the person that uploaded the document and when it was uploaded.
The final column is the delete column. When you select a document to delete the delete button will become active. Note that deleting the document from the admin console will remove the document from the process that it is attached to.
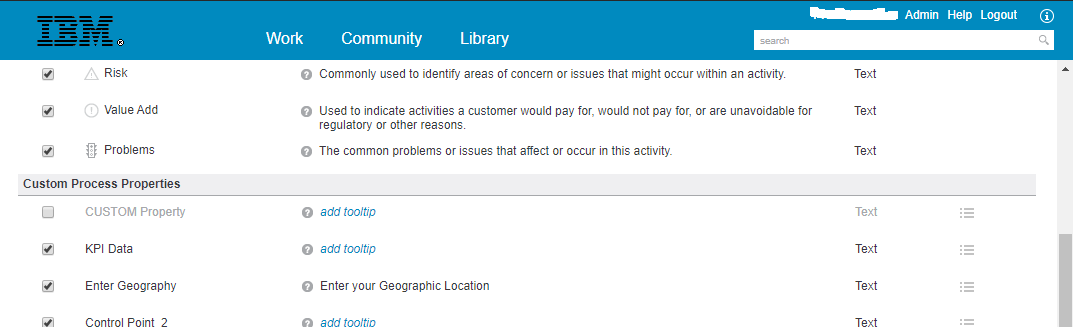
IBM Blueworks Live allows admins to customize the details panel by changing the properties in the 'Properties' tab. Each default property can be turned off or on and new properties can be created. Simply uncheck a property to remove it from the details panel for the account. If a property has an existing value that value will persist but be hidden.
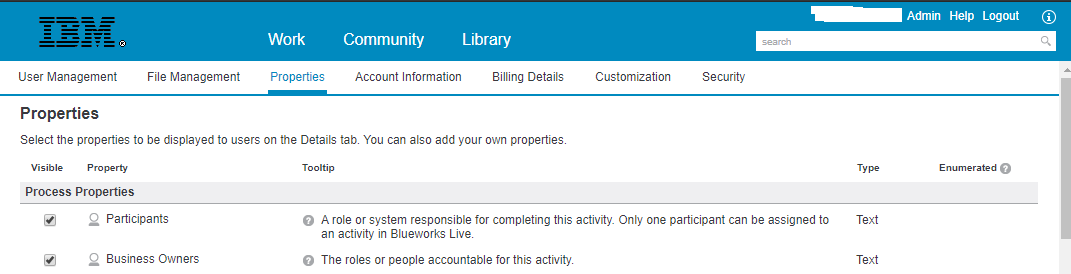
In the Custom Properties admins can add properties that are not covered in the default properties and add tool tip descriptions of these properties.
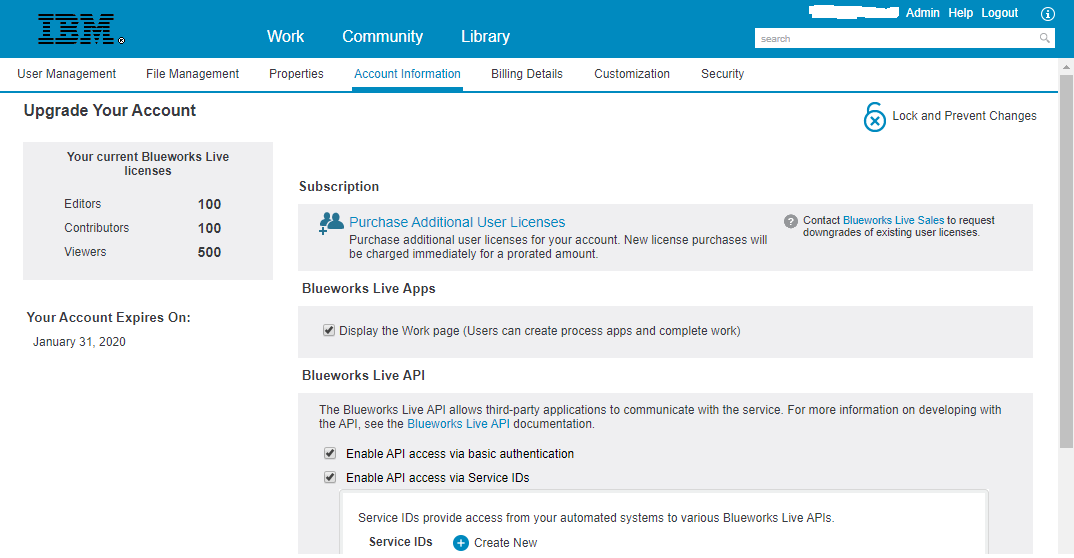
The 'Account Information' tab shows how many licenses you have overall, your account expiration date, what is enabled in your account, allowed API usage, and (if you are a credit card customer) the ability to purchase additional user licenses. You can also lock this page to prevent any changes by other account administrators.
Account information settings in IBM internal accounts are locked. Contact Blueworks Live support to enable API access via Service IDs in your account.
Service IDs provide system access to APIs in Blueworks Live. They are designed for use by automated systems, for example, systems that generate weekly reports or do monthly backups. When the system calls an API, it can use a Service ID instead of authenticating with a user ID and password. For more information please see https://ibm.blueworkslive.com/scr/docs/bwl/topics/service_ids.html
The 'Customization' tab is broken into five separate parts, Preferences, Library, Help, Training and Branding. It is important to note that this tab can be locked to prevent changes.
Most customization settings in IBM internal accounts are locked. Contact Blueworks Live support to enable a custom help page for your account.
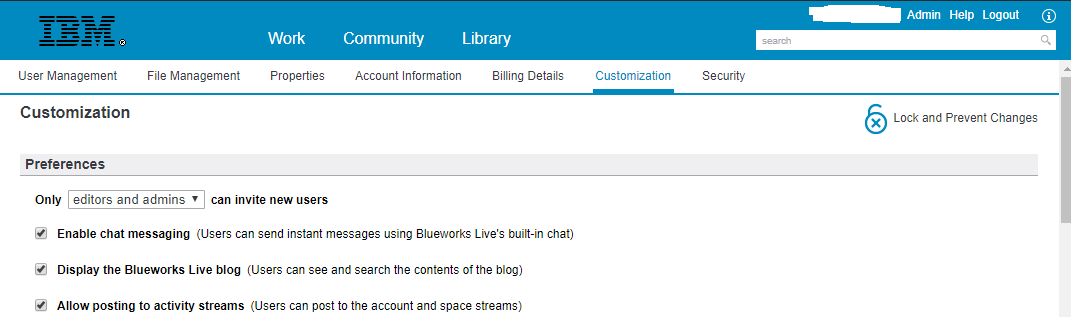
Preferences
The preferences section is basically about what users can see and use in IBM Blueworks Live. First, admins can change who has the ability to invite users. Restricting this group removes (or adds) the invite user button to the bottom of Blueworks Live. Next, admins can choose if the Blueworks Live internal chat should be enabled. Blueworks Live internal chat allows users to send internal links to other users or chat about the process they are both viewing. To begin a chat click on the user that is logged in at the bottom of the page and click chat. If chat is disabled users can still see what process other users are currently viewing.
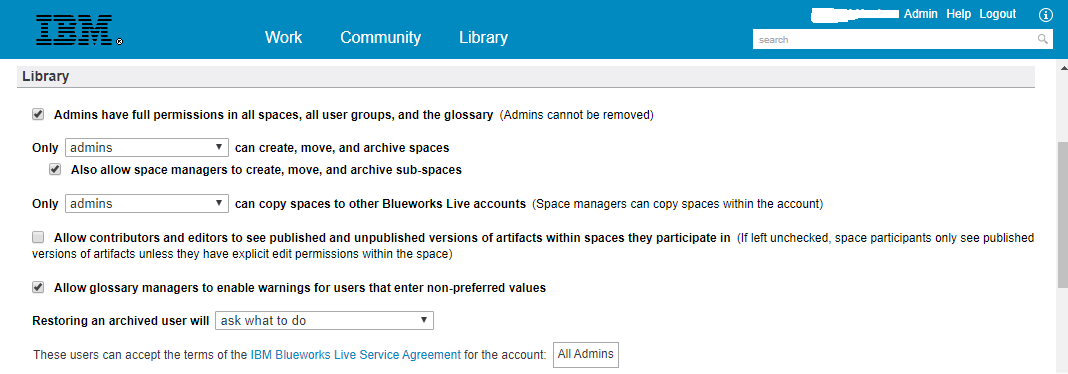
Library
This next section dictates what user type has permission within spaces. This area also allows admins to dictate which admin can accept the terms of use. By default Terms of Use acceptance will be set to all admins but clicking on the All Admins box will allow you to set a specific admin for acceptance.
Help
This section allows you to set a custom help page that appears as a pop-up when an user clicks on the 'Help' link in the header at the top right of the screen.

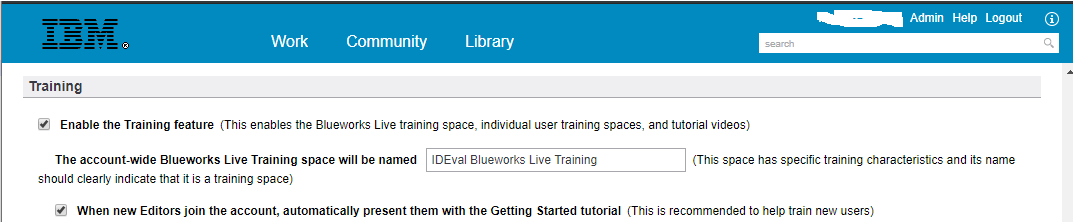
Training
In this section you choose if you want the training space to be visible to users, the name of the training space and if users should be prompted about the 'Getting Started' tutorial when they log in.
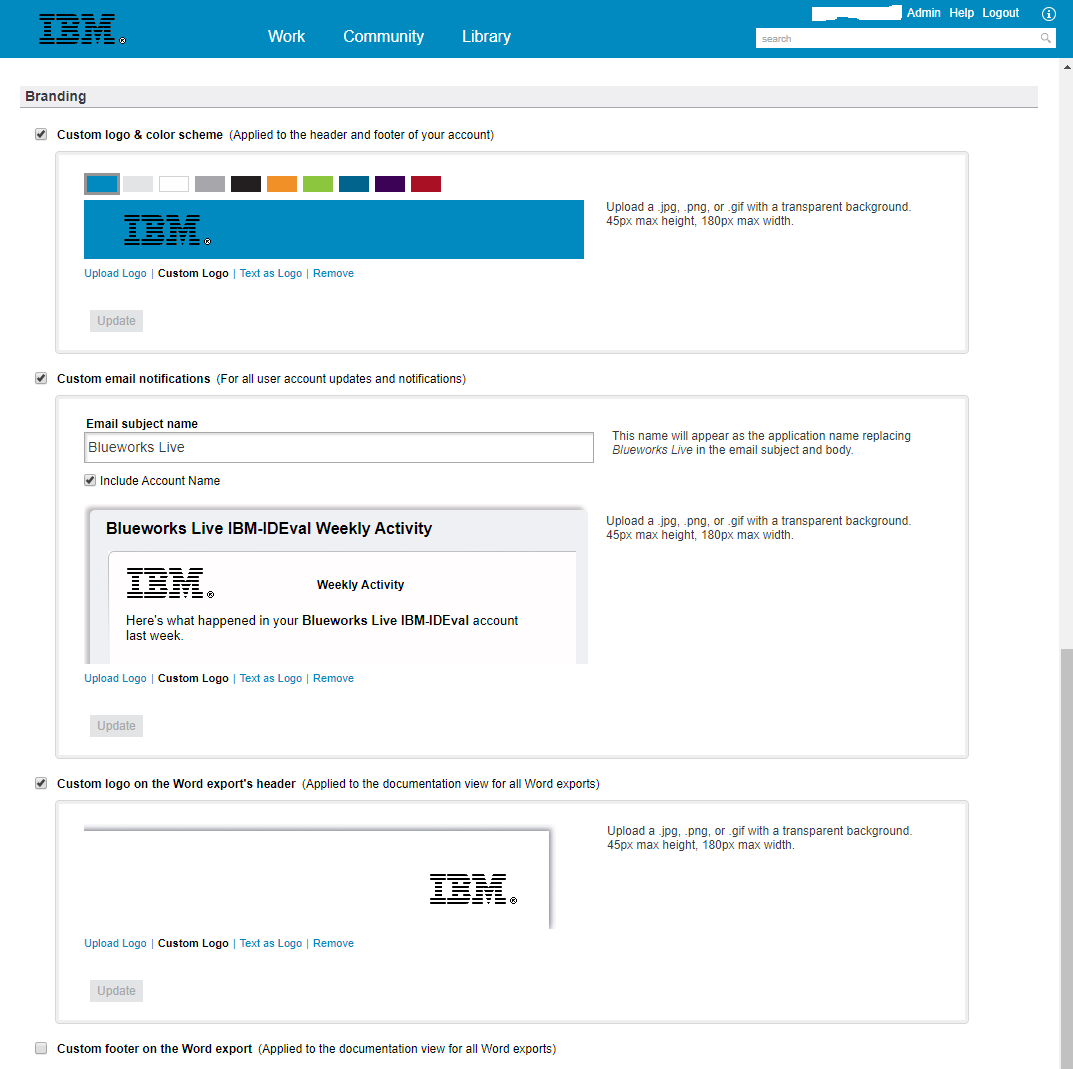
Branding
This section allows admins to customize the look and feel of Blueworks Live to look like an internal portal. Admins can upload their own company logo for both Blueworks Live and for print-ables coming from Blueworks Live. They can also set custom header, custom footer, custom color schema & custom email notifications.
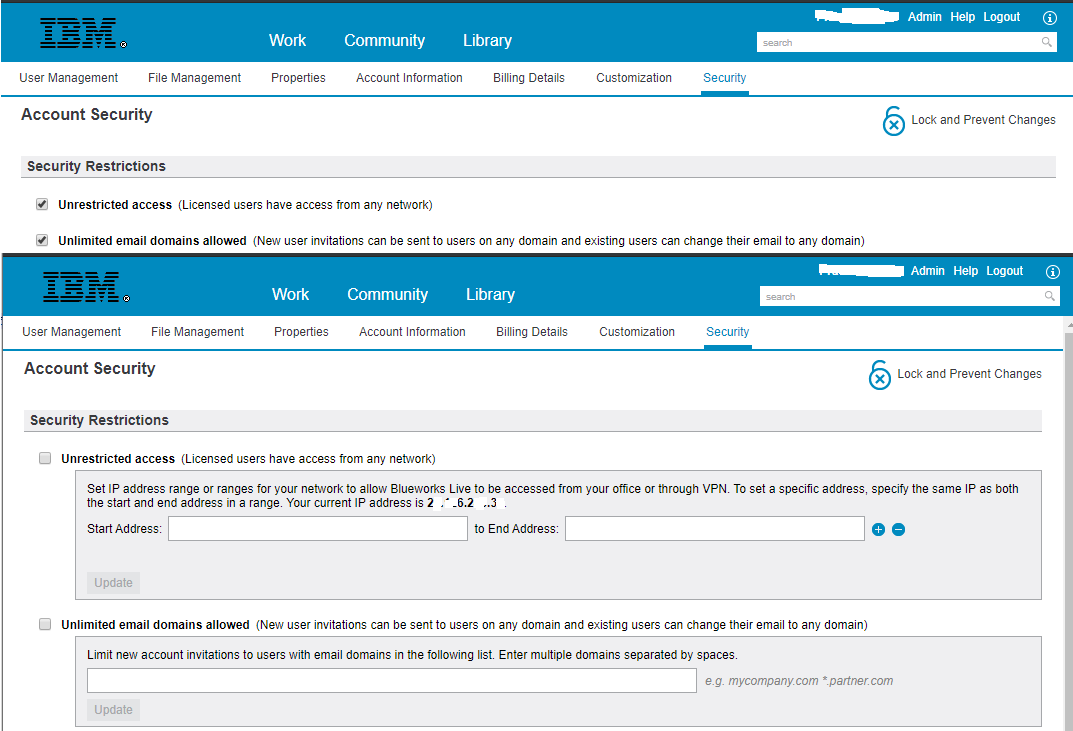
In this tab you set the security restrictions as well as select the authentication type. This tab can be locked to prevent changes by other admins. Security settings in IBM internal accounts are locked. Contact Blueworks Live support to enable IBMid in your account.
Security Restrictions
Blueworks Live allows admins to select the IP Address range or allow all IP addresses into Blueworks Live. Also in Security Restrictions admins can set the email domain name from which users will be allowed to be invited to Blueworks Live.
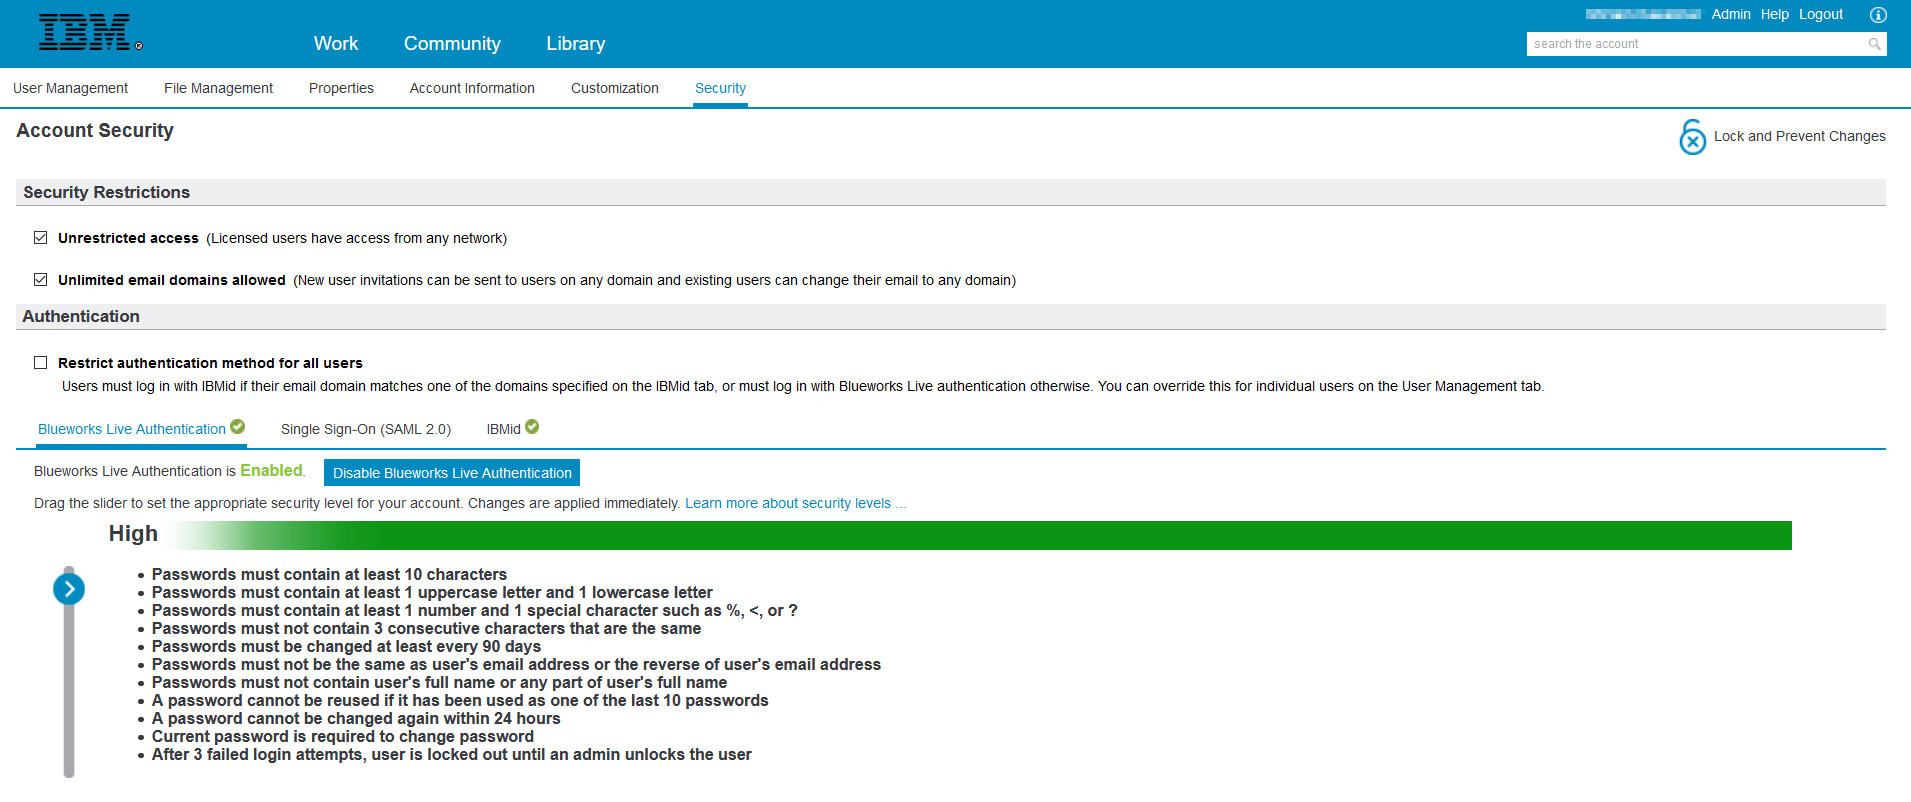
Authentication
Blueworks Live provides three types of authentication - Blueworks Live, Single Sign-On and IBMiD. You can choose one or more of these authentication types.
Blueworks Live authentication only has two security levels for authentication: Medium and High. You can read more about these security levels here: https://www.blueworkslive.com/scr/docs/bwl/topics/secur_authentication.html
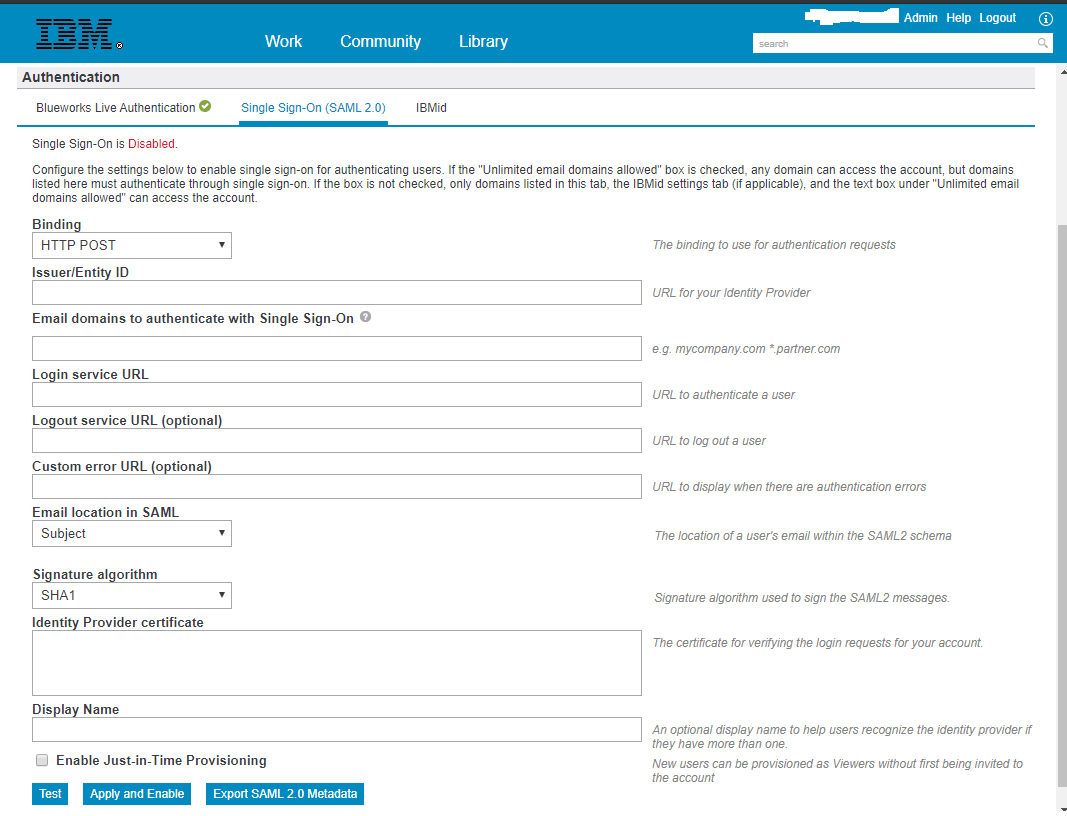
The Single Sign-On (SAML 2.0) tab is visible only if you have explicitly requested Blueworks Live support team to enable it for you. It contains various settings to enable SAML2.0 based SSO authentication for your account. You can read more about these settings & the prerequisites to enable SSO authentication here: https://www.ibm.com/support/pages/how-set-single-sign-sso-blueworks-live
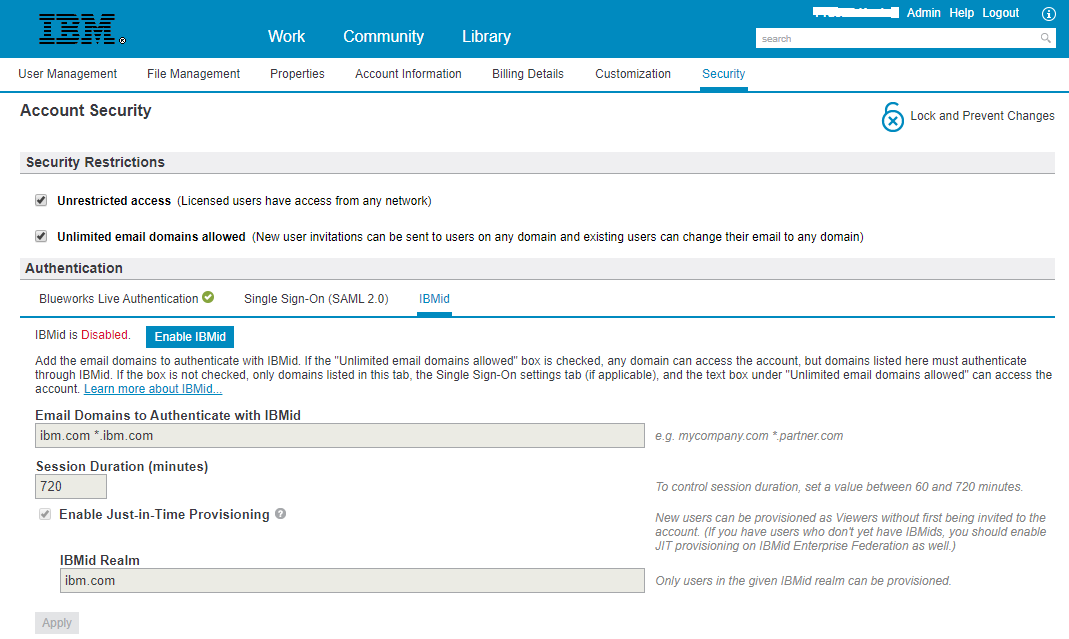
In the IBMiD tab you can select the email domains of the users you want to authenticate with IBMiD. You can also optionally, change the session duration. The default user session lasts for 720 minutes (12 hours). When the session expires, the user is logged out of Blueworks Live, even if their screen is still open in the browser, and must log back in to Blueworks Live to continue working. You can keep the default or enter a value between 60 minutes (1 hour) and 720 minutes (12 hours). After you enable IBMiD, you can go to the User Management tab and look at the Authentication column to see which users are now required to authenticate using IBMid. More information on enabling IBMiD can be found here https://www.ibm.com/support/pages/node/1074522
Document Location
Worldwide
[{"Business Unit":{"code":"BU053","label":"Cloud & Data Platform"},"Product":{"code":"SS2MKC","label":"IBM Blueworks Live"},"Component":"","Platform":[{"code":"PF025","label":"Platform Independent"}],"Version":"All Versions","Edition":"","Line of Business":{"code":"LOB45","label":"Automation"}}]
Product Synonym
Blueworks Live;BWL
Was this topic helpful?
Document Information
Modified date:
31 August 2020
UID
ibm11106121