Technical Blog Post
Abstract
IPython-Jupyter notebook integration with Platform Conductor
Body
 Platform Conductor for Spark (Platform Conductor) provides data analytics by integrating third-party notebooks. While Platform Conductor supports Apache Zeppelin as the built-in notebook, you can integrate other open-source notebooks, such as IPython, for use with Platform Conductor.
The IPython notebook is an interactive computational environment, in which you can combine code execution, rich text, mathematics, plots, and rich media. Its uses include data cleaning and transformation, numerical simulation, statistical modeling, machine learning, and more. Since IPython 4.0, the IPython Notebook has been migrated to Jupyter. For information on the IPython notebook, refer to the official documentation.
To readily integrate the IPython-Jupyter notebook for IPython 3.2.1 with Platform Conductor, use the GP1.1 branch of the IPython-Jupyter notebook sample on ibmcws on IBM BlueMix DevOps Services. While instructions on how to integrate the sample are included in the sample readme, this blog post provides detailed information on each of the steps.
NOTE: If you want to enable authentication within the IPython notebook GUI, install interim fix pcs-1.1-build398394. Read our updated blog post on securely integrating IPython-Jupyter notebook with Platform Conductor.
Create the IPython notebook package
- Download the following files:
- ipython-3.2.1.tar.gz from https://pypi.python.org/pypi/ipython/3.2.1.
- Anaconda2-2.4.1-Linux-x86_64.sh from https://3230d63b5fc54e62148e-c95ac804525aac4b6dba79b00b39d1d3.ssl.cf1.rackcdn.com/Anaconda2-2.4.1-Linux-x86_64.sh.

- Download the scripts and the deployment.xml file from the notebook sample.
git clone -b GP1.1 https://hub.jazz.net/git/ibmcws/Conductor-IPython-Jupyter
cd Conductor-IPython-Jupyter/
You should see deployment.xml as follows:

cd Conductor-IPython-Jupyter/scripts/
You should see the following scripts:

- Create the notebook package using the files from step 1 and 2. Place the files in folders using this structure:
packagename scripts <script_files> package ipython-3.2.1.tar.gzAnaconda2-2.4.1-Linux-x86_64.shdeployment.xml
Make sure all the script files and the Anaconda2-2.4.1-Linux-x86_64.sh file have execution permission for all users and user groups.
Using the following command as an example, create the notebook package:
tar czvf ipython.tar.gz deployment.xml scripts package
The "ipython.tar.gz" notebook package is now ready.
Add the IPython notebook package
- Log in to the Platform Management Console in Platform Conductor.
- Click Workload > Spark > Notebook Management.

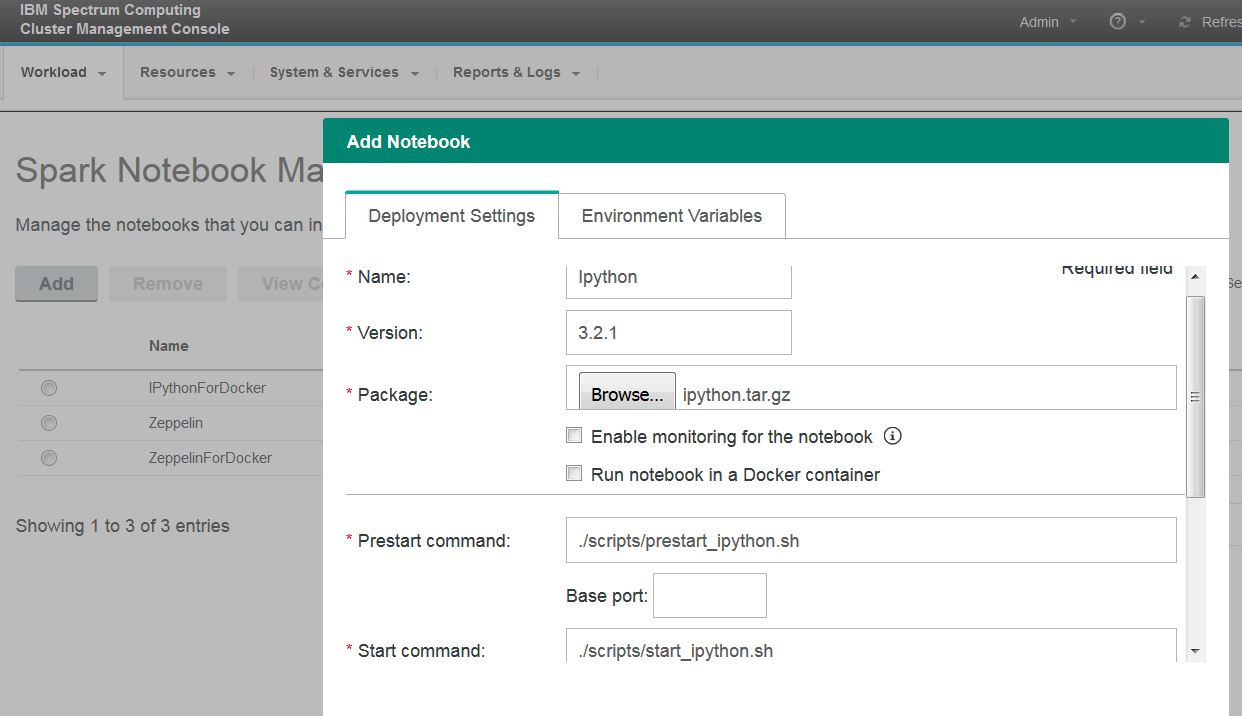
- In the Spark Notebook Management page, click Add.

- Enter the required fields in the Deployment Settings tab as follows:
- Name: Ipython
- Version: 3.2.1
- Package: Click Browse and select the “ipython.tar.gz” package that you downloaded previously.
- Prestart command: ./scripts/prestart_ipython.sh
- Start command: ./scripts/start_ipython.sh
- Stop command: ./scripts/stop_ipython.sh
- Job Monitor command: ./scripts/jobMonitor.sh
NOTE: The IPython notebook sample does not support web monitoring; ensure that you do not select the Enable monitoring for the notebook option.
- This IPython notebook supports Spark 1.4.1 and 1.5.2. In the Environment Variables tab, set the supported_spark_version variable to be one of the following three options:
- 1.4.1
- 1.5.2
- 1.4.1, 1.5.2

Register and Deploy a Spark Instance Group with the IPython notebook
- From the PMC, click Workload > Spark > Spark Instance Groups.

- In the Spark Instance Groups page, click New and select the Spark version and the IPython notebook that you added. If required, define other settings for Spark and the IPython notebook by editing the default configuration. For more information, see Creating Spark instance groups in the IBM Knowledge Center.

- Once you define the settings, click Automatically start deployment once the instance group is created and Create. After a while, the Spark instance group with the IPython-3.2.1 notebook is created and deployed.

Start the registered Spark Instance Group and assign users to the IPython notebook
- Once the Spark instance group is created, click Continue to Instance Group. Then, select the registered Spark instance groups (sparkipython01 used in the example here); then click Start instance group.

- In the Notebooks tab, click Assign users, then choose the IPython notebook and the user you want to assign to the notebook:

The IPython notebook with the Cluster Admin as its user is started. The Admin user can assign other users to this IPython notebook. Notebooks with different users work separately for each. Remember, however, that within one Spark instance group, each user can only have one notebook of the same version.
Launch the IPython notebook
- From the PMC, click Workload > Spark > Applications & Notebooks.
- Under Launch a notebook, click the IPython notebook associated with the Spark instance group. For more information, see Launching notebooks in the IBM Knowledge Center.

The IPython notebook opens in a new tab.
Explore the IPython notebook
The IPython notebook supports over 40 programming languages, including those popular in Data Science such as Python, R, Julia, and Scala. Here we provide some usage examples:
# Python
body Code:
%matplotlib inline
import pandas as pd
import numpy as np
import matplotlib
from matplotlib import pyplot as plt
ts = pd.Series(np.random.randn(1000), index=pd.date_range('1/1/2000', periods=1000))
ts = ts.cumsum()
df = pd.DataFrame(np.random.randn(1000, 4), index=ts.index,
columns=['A', 'B', 'C', 'D'])
df = df.cumsum()
plt.figure(); df.plot(); plt.legend(loc='best')
Screenshot of input and output results when running the preceding code. (Note: to run this code, your environment requires matplotlib lib.)

# scala
body Code:
from pyspark import SparkContext
sc = SparkContext()
raw_events=sc.textFile('/opt/ipython').map(lambda x: x.split('\t‘))
print (raw_events.first())
print (raw_events.take(5))
Screenshot of input and output results when running the preceding code:

View the status of the IPython notebook service
You can monitor the status of a notebook service in two ways: from the PMC and from the command line.
From the PMC
From the Notebooks tab of a Spark instance groups, use the list of notebooks associated with the Spark instance group. The State column will tell you the status of the each notebook. For example:

From the command line
Each started notebook run as a separate service in the Platform Conductor cluster. A series of egosh service commands can be used to access the status of each notebook. For example:
egosh service list -ll|grep spark

We hope this blog helped get you get started with the IPython notebook sample in Platform Conductor. If you'd like to try out Platform Conductor, download an evaluation version from our Service Management Connect page. If you have any questions or require other notebook samples, post them in our forum!
UID
ibm16163749