Troubleshooting
Problem
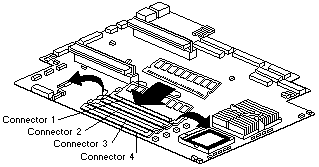
Instructions for installing memory
Resolving The Problem
Adding memory to the server is an easy way to improve system performance. You can increase the amount of memory in the server by installing options called memory-module kits. Each kit contains one industry-standard, dual-inline memory module (DIMM). The server uses a noninterleaved memory configuration, which allows you to add, remove, or replace one DIMM at a time. In an interleaved system you would have to add, remove, or replace memory in sets. The server comes with a dual inline memory module (DIMM) installed on the system board in DIMM slot 1.
Note: Install additional DIMMs in the following order: DIMM connector 2, then 3, then 4.
| Installing memory modules |
|---|
WARNING: When you handle electrostatic discharge-sensitive devices (ESD), take precautions to avoid damage from static electricity.
- Turn off the server and peripheral devices and disconnect the power cord and all external cables; then,
- remove the cover.
- If necessary, remove the PCI card in slot 2 for easier access to the DIMM connectors.
- Touch the static-protective package containing the DIMM to any unpainted metal surface on the server. Then, remove the DIMM from the package.
WARNING: To avoid breaking the retaining clips or damaging the DIMM connectors, handle the clips gently.
- Install the DIMM in the connector.
WARNING: To prevent damage to the DIMM connectors do not force the memory module into the connector.
- Turn the DIMM so that the index slots align correctly with the connector.
Note: The DIMM has two index slots, one in the center and the other on the left half of the DIMMS connector edge.
- Insert the DIMM into the connector by pressing on both corners of the DIMM at the same time. Be sure to press straight into the connector.

- When installing a memory module be sure that no gap exists between the DIMM and the retaining clips. If a gap does exist between the memory module and the retaining clips: open the retaining clips, remove the DIMM; then, reinsert the DIMM properly.
Note: It is a good idea to install or remove any other options at this time.
- Turn the DIMM so that the index slots align correctly with the connector.
- Turn on the server.
Note: When you restart the server, the system displays a message indicating that the memory configuration has changed.
- If you installed additional memory, start the Configuration/Setup Utility program and select Save Settings.
- If you just replaced a failed DIMM, you must start the Configuration/Setup Utility program, select Advanced Setup, select Memory Settings, highlight the connector or bank of connectors that you want to enabled, and then select Enable.
- In some memory configurations, the 3-3-3 beep code might sound during POST followed by a blank display screen. If this occurs and the Boot Fail Count feature in the Start Options of the Configuration/Setup Utility is set to Enabled (its default setting), you must restart the server three times (a "three-boot reset") to force the system BIOS to reset the memory connector or bank of connectors from Disabled to Enabled.
Document Location
Worldwide
Was this topic helpful?
Document Information
Modified date:
23 January 2019
UID
ibm1MIGR-45136