IBM Support

Importing Certificates for use with the IBM i Access Client Solutions Windows Application Package (ACS WinAP)

How To


Summary

This document covers how to import self-signed and signed certificates into the IBM i Access Client Solutions Windows Application Package (ACS WinAP) proprietary key database.

Objective

Understanding certificates at a basic level and how to import the certificates into the key data base for the ACS WinAP.

Environment

Supported Windows based operating systems, supported versions of IBM i Access Client Solutions (ACS) and IBM i Access Client Solutions Windows Application Package (ACS WinAP).

Steps

Please Note:
IBM i Access for Windows and previous versions had an IBM Key Management application that allowed you to display and import certificates. This tool is not available in ACS WinAP.
The Key Database used with IBM i Access for Windows and ACS WinAP both use a proprietary key database format called CMS (Certificate Management System).  You cannot use the ACS client Key Management to manage the CMS database.

Certificate Basics

There are four basic types of certificates used by ACS WinAP:
  • Self-Signed Certificate
  • Signed Certificate
  • Wild Card Certificate
  • User Certificate.
Self-Signed:
As the name implies this is a self-signed certificate that you created yourself in Digital Certificate Manager (DCM).
Signed Certificate:
This is a certificate you created and sent off to be signed by a well-know authority (paid money).
Wildcard Certificate:
This is a special signed certificate where the "issued to" has a name like *.your-domain.com.  It is meant to be used on multiple servers.
User Certificate:
This adds an extra layer of security but is a lot of work for administrators.  Every user is assigned their own certificate.
In most cases, you will be working with a self-signed or signed certificate.
Certificate extensions and formats:
In going though the various procedures and methods mentioned in this document, these are the common certificate extensions you'll come across.
PEM is the format we generally recommend to use to import into the key database on the PC used by the IBM i ACS WinAP.
PEM originally was "Privacy Enhanced Mail" but now is the most common format for x.509 certificates.
PEM formatted certificates have extensions of .crt, .pem, .cer and .key.  They are base64 ASCII encoded.
DER (Distinguished Encoding Rules) is a format that is binary encoded, also follows the x.509 standard.
DER will have extensions of .der or .cer.
PKCS#12 format is required to import the certificate into DCM.
PKCS#12 is a archived file that can contain a private key and generally has the complete bundle of members of the certificate chain. 
It typically is password protected.
PKCS#12 will have an extension of .p12 or .pfx.
PEM or DER formatted certificate files can contain the entire chain (multiple certificates in one file.
Typically the PKCS#12 will have the Root, Intermediates and signer included in the one .pfx or .p12 object.
A PEM or DER format can have a chain of certificates as well.
ACS and the ACS WinAP requires the import of the Certificate Authority (CA) for self-signed certificates or the root, intermediates and signer for third-party signed certificates to use SSL (Secure Socket Layer) /TLS (Transport Layer Security).  You cannot import a chained certificate; a PEM or DER certificate has all the certificates stored in one file.
If you have a chained certificate you must break it apart into a separate certificate(s)/files.  Breaking apart or extracting each individual certificate stored in a chained certificate is a task that is not simple if you have no experience.  It's best to go back to the party that provided the certificate and ask for the root, intermediate and signer to be sent separately in a PEM (preferred format) or DER format.  If that is not an option, this document will include a section explaining how to do this.

Methods to import the certificate(s)

There are two tools to use when importing certificates to the ACS WinAP.
  • Push to Windows from the ACS Key Management tool
  • CWBCOSSL

Push to Windows

This method assumes your ACS 5250 client already connects securely and the certificates are already stored in the ACS key database, just not yet stored in the ACS WinAP.
Step 1
Open the ACS main GUI using the Access Client Solutions desktop icon.  Then, from the Tools menu select Key Management.
ACS Tools Key Management
Step 2
Select the certificate you need to push over to the ACS WinAP and then click on the Push to Windows... button.
You will be prompted for a password to the ACS WinAP key database; it is ca400.  Make sure it is all lowercase.
Press the OK button after you have entered the password.
Note:
If you have not yet authenticated to the IBM i server you may be prompted for your credentials.
Pic of key database management tool
Key Database password prompt image
Once it's stored, you will get a message: MSGGEN002 - The function completed successfully.
Completion message
Press the OK button.
Note:
You may have to select more than one certificate from the ACS Key Management if you have a chained certificate.
In the ACS Key Management tool there is a view button.  You can select a certificate and then click the view button to see detailed information regarding the selected certificate. This can be used to determine if you have selected the correct certificate to push to the ACS WinAP key database.
Note:
With third-party certificates, there are what is called "well-known certificates."
ACS uses Java API's for SSL/TLS connection and Java has it's own key database that ACS "piggy-backs" on.
The Java key database name is cacerts and the password is changeit.
The location depends on your Java deployment.
This is an example path of where the cacerts file for this Java instance is located:
C:\Program Files\AdoptOpenJDK\jdk-11.0.9.11-openj9\lib\security
The consistency here is <PathToJAVA>\lib\security\cacerts
After this key database is opened, it is the same steps as above to push to the ACS WinAP.
Note:
Regarding User Certificates, there is a drop down to select between Trusted Certificates and Personal Certificates, the User Certificates will be under the Personal Certificates drop down menu.

CWBCOSSL

The CWBCOSSL tool has been around since the old Client Access introduced SSL.
This tool is not listed in the IBM i Access Client Solutions program group since the removal of IBM Key Management.
The IBM i Access Client Solutions program group will only show up when you have installed the ACS WinAP.
The way to run the CWBCOSSL tool is via the Windows Command Prompt.
C:\>CWBCOSSL  <enter>
Then the GUI for the tool will open as pictured in Figure 1 below.
Figure 1.
cwbcossl tool image
None of the icons at the bottom of Figure 1 will be used; most will not function.
There are two methods to add certificates that will be discussed in this document with respect to the CWBCOSSL tool.
Method 1:
Start CA Download from button.
This is for self-signed certificates only.
All that needs to be done is use the drop-down next to the Start CA download from... button and select your system name or IP Address where the certificate resides.
Then click on the Start CA download from... button.
You may be prompted for a user ID and password to the IBM i system.
You will then see a prompt to trust the certificate.
Finally, you will be prompted for the CMS key Database password,  which is ca400, all lower case.
Once entered, you will get a completion message.
The steps are pictured below:
User Id Prompt
Password prompt
Key database password prompt
Completion message
After this you are done.
Note:
If the certificates were created out of order within DCM, you may not get the CA that you expect.
If that happens, you wont know until you attempt to connect and it fails with a trust error.
More about identifying certificates will be included in a later section of this document.
Method 2:
Store CA from file.
This method is typically used for third-party certificates (signed certificates) or if the download method fails for self-signed certificates.
The Certificate Authority text label field must not be blank.  This is only a label and you can enter anything you like. 
There is a restriction that does not allow duplicate label names to be stored in the CMS key database.
Once you have entered a label, you press the Store CA from file... button. 
You will then have a dialog to browse to you CRT or CER file.
Browse to the file, select it, and press the OK button.
You will then have the same type of prompts as method2, followed by a completion message.
Note:
The root certificate must be brought in first, followed by the intermediate(s) and finally, the signer.
Store CA from file
Browse and select certificate
Completion message
Again, the steps for method 2 will have to be repeated for a chained certificate that has been split apart into the root, intermediate(s), and signer.
After this, your certificates should be in place and you should be able to enable SSL for the ACS WinAP and use a secured connection.

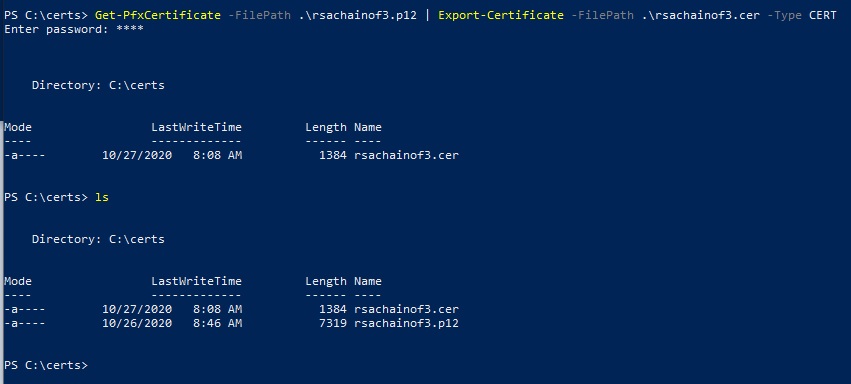
I have a PFX or P12 file, how do I covert to a CRT or CER file?

This document will show two examples of how to break apart, or split, the PFX or P12 (PKCS#12) certificate into it's individual parts as CER or CRT files.
Example 1:  If you already have the PFX or P12 (PKCS#12) file on your Windows machine:
Step 1
Open an Elevated Windows PowerShell.  In Windows search, enter PowerShell (one word).
Right click on the Windows PowerShell application and select Run as administrator.
Opening elevated windows power shell
Step 2
Change directory to the location of your PFX or P12 (PKCS#12) certificate, and list the contents to be sure you're in the right location, as in the example below.
Example change directory and list contents
Step 3
The certificate in the above example has a name of rsachainof3.p12.
The Windows PowerShell command syntax to convert the certificate for our purposes is as follows:
Get-PfxCertificate -FilePath .\rsachainof3.p12 | Export-Certificate -FilePath .\rsachainof3.cer -Type CERT
The first -FilePath parameter points to the location and name of the PFX or P12 (PKCS#12) file to be converted, and the second -FilePath parameter points to the location and name of the output from the command.  In this case the .\ preceding the names just means current location.  When the command is ran, you will be prompted for the password for the PFX or P12 (PKCS#12) file.  This password is set when you export to PKCS#12 from a server, or when it's created.
The following shows an example of the above command and then listing the result:
example ceert conversion
Example 2, if the PFX or P12 file is on the IFS of your IBM i.
Of course, you can copy the PKCS#12 file down to your Windows PC and use example 1.
Below is a demonstration using OpenSSL to do this conversion.
I just briefly want to mention that Windows 10 does have the ability to run Linux subsystems.
These Linux distributions all have openSSL installed on them, and will do the conversion as well.
Although I will not cover that in this document, it's just good to know for advanced users.
Microsoft implementation of this is called Windows Subsystem for Linux (WLS).
Here's a link for more information regarding WSL and WSL2 (updated version):
Step 1
Sign into your ACS 5250 emulator.
Enter the command CALL QP2TERM, and press enter.
This takes you into a PASE (Portable Application Solutions Environment), this is integrated runtime environment similar to Unix.
Step 2
Change to your directory that contains the PKCS12 certificate and list contents to make sure you're in the correct location.
cd /somePath/SomeOtherPath
In this example, the PKCS#12 file is located in my home directory in a folder called certs.
PASE change and list dirctory contents
Step 3
Run the following OpenSSL command to convert the PKCS#12 to a CRT file.
openssl pkcs12 -in rsachainof3.p12 -out rsachainof3.crt -clcerts -nokeys
The -in parameter is the PKCS#12 file name and the -out is the name of the CRT file.
Like the Windows PowerShell method you will be prompted for the PKCS#12 password.
This next screenshot depicts the above completed command, and a directory listing.
Certificate conversion example
At this point, you can FTP down the CRT file to you PC to separate out the individual certificates from the CRT file.
Obviously, FTP isn't the only method to use. One could use Secure Shell Copy, mapped network drive, etc...

I have a chained CER or CRT file, how do I create separate certificates in the chain for import to ACS WinAP?

This document assumes you have the chained CRT or CER file already on the PC.
Step 1
Open Windows File Explorer and browse to the location of your chained certificate.
location of chained certificate File Explorer
Step 2
Double Click the chained certificate to view the certificate using Windows Certificate Management utility (Crypto Shell Extensions).
You should now be viewing the singing certificate.  The certificate used in this example has some odd naming conventions, as it's a test certificate provided by our development team.
Signer certificate
Notice along the top of this certificate there are thee tabs:
General - As the name suggests, just shows general information, although it is helpful.
Details - As the name suggests, this is all of the details regarding the certificate.
Certification Path - Shows the chain in a tree view.
Step 3
Click on the Certification Path tab.
Notice the tree view of the chain.
The very top is the root certificate.
The middle is the intermediate or intermediates, if there are more than one.
The last, or bottom, is the signer certificate.
Tree view of chain
Step 4
With the bottom part of the tree selected (the signer), click on the Details tab.
Towards the bottom of the details window there will be a Copy to File button. Click that button.
Copy to file button on details tab
Once the Copy to file button is clicked, it starts a Welcome to the Certificate Export Wizard.
Export wizard, click next
Click Next button.
Next screen of the wizard asks for the format of the output.  Select either DER encoded binary X.509 (CER), or BASE-64 encoded X.509 (CER).  I personally just leave the first option marked.
Export wizzard format selection
Click Next.
Next part of the Welcome to the Certificate Export Wizard wants a path and file name of the certificate.
In this example, I chose a path C:\certs where my original chain CER is located and a name; signer.cer.
path and name of export
Click Next.
You'll then be presented with a summary dialog. Click the Finish button.
finish export
This next screenshot depicts the signer.cer file stored in the C:\certs folder.
resolt from export wizzard
Now it's just a matter of repeating these steps for the intermediate(s) and root certificate.
Use the original cer file that was opened to start this process, click on the Certification Path tab and select the intermediate certificate.
Then click on View Certificate button.
slect intermediate from tree list
This will bring up the intermediate chain.
Click on the Certification Path tab in this new certificate window.  You will notice the signer is not present.
display tree view of the intermediate
Make sure the bottom item is selected in the tree.  In this case, there is only one intermediate certificate in the chain.
Click on the Details tab.
details tab for intermediate
Use the Copy to File button to start the Welcome to the Certificate Export Wizard.
This is the same process as exporting the signer in the above steps.  Use the previous steps for reference.
In the end,  you will have exported the intermediate certificate to it's own CER file.
In my example, I now have two files up to this point.
I have a signer.cer and an intermediate.cer in the path C:\certs.
results of exporting the intermediate
If you have more than one intermediate, repeat the steps for that one as well.
The final step is to export the root certificate.
Use the original CER file with the complete chain of the certification path.  Select the top most item (the root).
The click on View Certificate.
viewing the root certificate
You'll notice only one item in the Certification Path when displaying the root certificate.
view root certificate tree
Click on the Details tab and use the Copy to File option.
Again, follow the same instructions as previous steps.
In the end, you will have the root saved to a cer file.
In this example I have all three certs now exported and saved to a path of C:\certs.
all three cer files including root
At this point, you are done.
Now, you can import the separate individual certificates into the ACS WinAP key database.
The certificates must be imported in a specific order, starting with the root, then intermediate(s), and finally the signer.

How do I view what is stored in the IBM i ACS WinAP CMS key Database?

In the past, you could simply use the IBM Key Management Utility for all your needs. This included viewing what is stored in the CMS Key Database.
You can still view what's in the CMS key database, but it's a little work and involves using an API set provided by GSKIT8 (current version as of writing this document).
GSKIT is an acronym for Global Security Kit.
This tool is used to manage SSL on the C++ side of the code (ACS WinAP).
Whereas, the ACS Java based client uses the version of Java used by ACS that is installed on the PC to handle SSL.
To use GSKIT8, you must first do some prep work.   All of the commands are ran from a Windows Command prompt.
Step 1
Open a Windows Command Prompt.
Step 2
Run the following command to set PATH variables.
set PATH=C:\Program Files (x86)\IBM\gsk8\bin;C:\Program Files (x86)\IBM\gsk8\lib;%PATH%
Note:
This step is required, and the PATH variables set in this step are not persistent.  This means if you close the Windows Command prompt and open a new one later, this command will need to be ran again.
Step 3
Test to make sure this command runs.  If it's successful, you will see the help text for this command be displayed.
At the Windows Command prompt, enter this command:
gsk8capicmd.exe
Now that the environment is setup, we can run commands.
View all certificate labels in the ACS WinAP key database:
gsk8capicmd.exe -cert -list all -db "C:\Users\Public\Documents\IBM\Client Access\cwbssldf.kdb" -pw ca400
My key database contains a moderate list.
I'm going to use one of the certs as an example.
In the output of the above command, I see a label:  Thawte Personal Basic CA
View details of a certificate:
Provide the Label of the certificate to view.  In the following command the label Thawte Personal Basic CA is used.
gsk8capicmd.exe -cert -details -label "Thawte Personal Basic CA" -db "C:\Users\Public\Documents\IBM\Client Access\cwbssldf.kdb" -pw ca400
Extract the certificate from the CMS database:
Provide the Label of the certificate to extract.  In the following command the label Thawte Personal Basic CA is used.
gsk8capicmd.exe -cert -extract -db "C:\Users\Public\Documents\IBM\Client Access\cwbssldf.kdb" -pw ca400 -label "Thawte Personal Basic CA" -target "c:\certs\thawte.cer"
Note:
Sometimes in this document, commands get pushed to a new line.  Make sure to include the entire command and that there is a space between parameters.
You can do much more with GSKIT8 than the above examples.
Keep in mind the IBM i Support Center doesn't support GSKIT or related commands.

Tips and Tricks

Note: All the following information is AS-IS.  IBM i support does not support any of this.
            This is being provided for assisting Administrators in automation.

Obtaining the Certificate with OpenSSL

OpenSSL is a framework that is recognized industry wide.  In fact the IBM i has it available.
OpenSSL is a Swiss army knife for SSL, one of the many options is the s_client option.
This option allows you to connect to a system port and analyze TLS/SSL.

Some Windows 10 (and above) PCs have OpenSSL already installed, however it's likely not to be available on Windows based PCs by default.
WSL (Windows Subsystem for Linux) can be installed on a Windows based system..
WSL allows you to run a Linux terminal directly on your Wintel based PC or Server.  This allows the installation of Linux tools like OpenSSL and ability to run Linux commands.

Since WSL is on your PC, it allows direct access between Windows and Linux environments files.

The two utilities/commands used to process the OpenSSL output are sed and awk.  These are great tools for parsing and manipulating data.  Those two tools are available on the IBM i in both the PASE and QSHELL environments on the IBM i system.

Example 1
Use OpenSSL to display the certificate(s) for port 9471:

openssl s_client -connect mySystem.com:9471

This will display all the details about the public key.

This in itself is nice, but what if you want this for use with the IBM i Access Client Solutions (ACS) Windows Application Package (WinAP)

We can take the output from the above command and use a stream editor called sed.  sed is available on most if not all POSIX based systems.   With sed we can extract the ASCII PEM based certificate and store that in a file for use with ACS WinAP.

Example 2
Generates a ASCII PEM based certificate, cert.cer:

echo|openssl s_client -connect mySystem.com:9471| sed -ne '/-BEGIN CERTIFICATE-/,/-END CERTIFICATE-/p'>cert.cer

The ACS WinAP will require you to have the intermediate and signer certificate in separate files.

Example 3
Break apart the single certificate created in Example 2:

The awk command is used to generate the multiple .cer files for a chained certificate.
awk is not just a command, it's powerful language for processing data.

cat cert.cer | awk '/BEGIN CERTIFICATE/,/END CERTIFICATE/{ if(/BEGIN CERTIFICATE/){a++}; out="cert"a".cer"; print >out}'

If the certificate is a chained certificate, the above command will create cert1.cer, cert2.cer, etc.
Once you have these certificates, you can then use one of the commands previously mentioned in this document to import into the CMS Key Store.

Note:  Using OpenSSL and connecting to a specific port of a system FQDN (Fully Qualified Domain Name) provided the certificate assigned to that specific server (port).  If your system as multiple certificates assigned, the command would need to be ran against multiple ports.  The other risk, while low, is a DNS hijack, where you believe your connecting to your system, but it's an attackers system.  Make sure that you know what your connecting to.

Automation of Certificate Deployment

No supported methods to automate the importing of certificates to the CMS key store for the Windows Application Package exist.

Both the CMS database (AKA: key store/key database) and the password stash file can be copied from a working PC to another PC that needs to use the same certificate(s).

The location of the those two files are will be at this path:  C:\Users\Public\Documents\IBM\Client Access

The two files names will be:  cwbssldf.kdb and cwbssldf.sth

The problems that can come into play are:
1 - A mismatch in the CMS versions.
This can be avoided by simply making sure you are using the same version of the Windows Application Package.

2 - Overwriting a key store that has existing certificates used to connect to different IBM i systems.
There is no fix for this.  See the next section, Using GSK CLI to find out how to import using command line.

Using GSK CLI

GSK is the IBM Global Security Kit.
This is a framework for all things SSL related.
GSK is used both on the IBM i and on the client side.
This covers a specific topic of GSK CLI (Command Line Interface).

GSK is a large topic and this section just touches the surface, but it should be enough for a savvy administrator to use.

The ACS WinAP uses GSK8 currently.
It only uses GSK for the client side of things.

Keep in mind that IBM i Support doesn't support GSK nor does it support using it.  This section was written for administrators to use for coming up with ideas on automating certificate imports as a post install procedure.

This is a link to the full documentation for GSK8:
IBM Global Security Kit GSKit version 8

See section above the tips and tricks "How do I view what is stored in the IBM i ACS WinAP CMS key Database?" for setup to use gsk8capicmd.exe.

This is command allows you to add a certificate to the ACS WinAP key store:

gsk8capicmd.exe -cert -add -db "C:\Users\Public\Documents\IBM\Client Access\cwbssldf.kdb" -pw ca400 -label "My Cert Label" -file "C:\certs\mycert.cer"

The label "My Cert Label" can be what ever you want.  It just needs to be unique for each certificate added.
If you have a chained certificate this command would be ran for each part in the chain.  IE: root, intermediate, signer.

With this command method, you can put together an automated process to add individual certificates to the key store without impacting existing certificates or adding unwanted additional certificates.

Document Location

Worldwide

[{"Type":"MASTER","Line of Business":{"code":"LOB68","label":"Power HW"},"Business Unit":{"code":"BU070","label":"IBM Infrastructure"},"Product":{"code":"SWG60","label":"IBM i"},"ARM Category":[{"code":"a8m3p000000PCRFAA4","label":"IBM i Access-\u003EAccess Client Solutions-\u003EConnectivity"}],"ARM Case Number":"","Platform":[{"code":"PF012","label":"IBM i"}],"Version":"All Versions"}]

Document Information

Modified date:
23 April 2025

UID

ibm16350999