Technical Blog Post
Abstract
IBM Spectrum Symphony and Jupyter: an application framework integration example
Body
![]() To illustrate IBM Spectrum Symphony's flexibility to integrate with and support other application frameworks, this blog uses IBM Spectrum Symphony 7.2.0.2 with the open-source Jupyter Notebook to run a Monte Carlo simulation sample that computes the value of Pi. Such an integration is an example of how you can write IBM Spectrum Symphony applications and submit IBM Spectrum Symphony workload, and then use the Jupyter Notebook Web application to create and share documents that contain the live code, equations, visualizations, and explanatory text for browser-based data analysis.
To illustrate IBM Spectrum Symphony's flexibility to integrate with and support other application frameworks, this blog uses IBM Spectrum Symphony 7.2.0.2 with the open-source Jupyter Notebook to run a Monte Carlo simulation sample that computes the value of Pi. Such an integration is an example of how you can write IBM Spectrum Symphony applications and submit IBM Spectrum Symphony workload, and then use the Jupyter Notebook Web application to create and share documents that contain the live code, equations, visualizations, and explanatory text for browser-based data analysis.
For details about Jupyter, refer to the project Jupyter web site: http://jupyter.org.
For details about IBM Spectrum Symphony 7.2.0.2, see IBM Knowledge Center: https://www.ibm.com/support/knowledgecenter/SSZUMP_7.2.0/sym_kc_welcome.html
1. Install IBM Spectrum Symphony
In our scenario, we first installed the IBM Spectrum Symphony 7.2.0.2 on Red Hat Enterprise Linux (RHEL) 7.3 on our management host called myhost.example.com. Running the soamview command shows this installation on the host:
[root@myhost sym]# soamview app
APPLICATION STATUS SSM HOST SSM PID CONSUMER
symexec7.2 disabled - - /SymExec/SymExec72
symping7.2 enabled - - /SymTesting/Symping72
2. Deploy the IBM Spectrum Symphony Python application
We next deployed an IBM Symphony Python application called LoggingPython:
[root@myhost sym]# soamview app LoggingPython
APPLICATION STATUS SSM HOST SSM PID CONSUMER
LoggingPython enabled myhost.example.com 25183 /SampleApplications/SOASamples

LogginService.py
We implemented Monte Carlo service side logic, in the on_invoke function, within the LoggingService.py application:
import soamapiversion
import soamapi
import MyMessage
import MyLogger
import pickle
import time
import random
import math
class MyServiceContainer(soamapi.ServiceContainer):
def __init___(self):
self._logger = None
###############################
### Handler to process task ###
###############################
def on_invoke(self, task_context):
self._logger.info("Enter on_invoke")
# Get the task input
inMsg = MyMessage.MyMessage()
task_context.populate_task_input(inMsg)
# We simply echo the data back to the client
out_msg = MyMessage.MyMessage()
x, y = random.random(), random.random()
out_msg.set_intX(round(x, 2))
out_msg.set_intY(round(y, 2))
out_msg.set_bool(x*x + y*y < 1)
#Set our output message
task_context.set_task_output(out_msg)
self._logger.info("Exit on_invoke")
############################################
### Create and run the service container ###
############################################
myContainer = MyServiceContainer()
myContainer.run()
3. Deploy Jupyter on a Docker host
To be able to submit IBM Spectrum Symphony workload from Jupyter, we deployed Jupyter on a Docker host, which included running Jupyter in a Docker container, installing the IBM Spectrum Symphony client package, changing the Jupyter startup script to integrate with the IBM Spectrum Symphony client environment, and finally, accessing the Jupyter web portal. In this example, we used the Jupyter Docker image, which contains the latest Jupyter version (4.4.0, as of publishing this blog).
- Run Jupyter in a Docker container
Here, we used the TensorFlow image (tensorflow/tensorflow) so that Jupyter can access the IBM Spectrum Symphony, as well as the TensorFlow, environment:
$docker run -d --net=host -v /opt:/opt --name tensorflow tensorflow/tensorflow
Docker downloads the image and runs the container automatically. Use the -d option to run the container with daemon mode. After startup, Jupyter will listen on port 8888.
[root@jupyter01 ~]# docker ps
CONTAINER ID IMAGE COMMAND CREATED STATUS PORTS NAMES
f426001e5535 tensorflow/tensorflow "/run_jupyter.sh --a 5 seconds ago Up 5 seconds tensorflow
- Install the IBM Spectrum Symphony client package
We installed the IBM Spectrum Symphony client package on Red Hat Enterprise Linux (RHEL) 7.3:
root@jupyter01:/opt# tar zxvf symclnt-7.2.0.2.x86_64.tar.gz
root@jupyter01:/opt# cd ./ibm/spectrumcomputing/symphonyclient/client72/
Configure Symphony Master host:
[root@jupyter01 client72]# vim conf/ego.conf
# EGO master candidate host
EGO_MASTER_LIST="myhost.example.com"
# EGO VEMKD daemon port number
EGO_KD_PORT=34534
- Modify the Jupyter startup script in the container to integrate with the IBM Spectrum Symphony client environment
To ensure that Jupyter could integrate with IBM Spectrum Symphony, we added the following two lines to the Jupyter startup script (run_jupyter.sh):
root@jupyter01:/opt# tail /run_jupyter.sh
export SOAM_HOME=/opt/ibm/spectrumcomputing/symphonyclient/client72
source /opt/ibm/spectrumcomputing/symphonyclient/client72/profile.platform
jupyter notebook "$@"
and then restarted the Jupyter container so that the changes to the startup script could take effect:
[root@jupyter01 ~]# docker stop tensorflow
tensorflow
[root@jupyter01 ~]# docker start tensorflow
tensorflow
- Access the Jupyter web portal
To be able to create a Jupyter Notebook (required in the next step), we verified our access to the Jupyter web portal by opening the Jupyter URL at http://jupyter01.example.com:8888.
The first time you access this page, you must input a logon token:

To retrieve the Jupyter logon token, we ran:
[root@jupyter01 ~]# docker exec tensorflow jupyter notebook list
which gave us the following output:
Currently running servers:
http://localhost:8888/?token=608f976aa547c9769abc7668c7a6535b54b13ce004… :: /notebooks
On the Jupyter web portal logon page, we then input the token provided in the above output. This allowed us to access the Jupyter home page (and be able to create the Jupyter Notebook in the next step):

4. Create a Jupyter Notebook
The last step was to create a Jupyter Notebook using Python2 for the IBM Spectrum Symphony client application.
Note: Do not call soamapi.uninitialize() in the notebook you create. Since you may run your code multiple times, you will encounter an unknown error when you access the IBM Spectrum Symphony API after calling soamapi.uninitialize().
Here is the Jupyter Notebook created using Python2:
%matplotlib inline
import soamapiversion
import soamapi
import pickle
import math
from numpy import *
import numpy as np
import matplotlib.pyplot as plt
#########################################################
### Message Object transfer between client and server ###
#########################################################
class MyMessage(soamapi.Message):
def __init__(self, x = None, y = None, b = False):
self.__intX = x
self.__intY = y
self.__bool = b
def get_intX(self):
return self.__intX
def set_intX(self, x):
self.__intX = x
def get_intY(self):
return self.__intY
def set_intY(self, y):
self.__intY = y
def get_bool(self):
return self.__bool
def set_bool(self, b):
self.__bool = b
def on_serialize(self, stream):
stream.write_float(self.__intX)
stream.write_float(self.__intY)
stream.write_bool(self.__bool)
def on_deserialize(self, stream):
self.__intX = stream.read_float()
self.__intY = stream.read_float()
self.__bool = stream.read_bool()
##########################
### Initialize the API ###
##########################
soamapi.initialize()
#########################################
### Connect to a Symphony application ###
#########################################
application_name = "LoggingPython"
sec_cb = soamapi.DefaultSecurityCallback("Guest", "Guest")
connection = soamapi.connect(application_name, sec_cb)
prt_msg = "Connected to application:" + application_name + " Connection ID:" + connection.get_id()
print (prt_msg)
########################
### Create a session ###
########################
session_attr = soamapi.SessionCreationAttributes()
session = connection.create_session(session_attr)
prt_msg = "Created session:" + session.get_id()
print (prt_msg)
###################################
### Submit tasks to the session ###
###################################
tasks_to_Submit = 1000
prt_msg = "Submiting " + str(tasks_to_Submit) + " tasks"
print (prt_msg)
for count in range(0, tasks_to_Submit):
task_data = MyMessage(float(count), float(count), True)
task_attr = soamapi.TaskSubmissionAttributes()
task_attr.set_task_input(task_data)
task_input_handle = session.send_task_input(task_attr)
prt_msg = "Sent task:" + task_input_handle.get_id()
# print(prt_msg)
task_input_handle.release()
###################################
### Wait for all of the results ###
###################################
task_output_handle_list = session.fetch_task_output(tasks_to_Submit)
countInCircle = 0
countX = zeros(tasks_to_Submit)
countY = zeros(tasks_to_Submit)
for task_output_handle in task_output_handle_list:
if task_output_handle.is_successful():
out_msg = MyMessage()
task_output_handle.populate_task_output(out_msg)
# Display content of reply
prt_msg = "Task Succeeded [" + task_output_handle.get_id() + "] \n"
prt_msg += "Point Value : " + str(round(out_msg.get_intX(),2)) + "," + str(round(out_msg.get_intY(),2)) + " " + str(out_msg.get_bool())
if out_msg.get_bool():
countInCircle = countInCircle + 1
countX[int(task_output_handle.get_id())-1] = out_msg.get_intX()
countY[int(task_output_handle.get_id())-1] = out_msg.get_intY()
# print (prt_msg)
else:
ex = task_output_handle.get_exception()
prt_msg = "Task Not Succeeded : " + str(ex)
print (prt_msg)
task_output_handle.release()
#print countX, countY
plt.plot(countX, countY, '.')
#print circle
angles_circle = [i*pi/180 for i in range(0,360)]
x = cos(angles_circle)*0.5
y = sin(angles_circle)*0.5
plt.plot(x+0.5, y+0.5, 'r')
plt.axis('equal')
plt.axis('scaled')
print "Pi is roughly %f" % (4.0 * countInCircle / tasks_to_Submit)
#########################
### Close the session ###
#########################
print ("Closing session")
session.close()
session = None
############################
### Close the connection ###
############################
print ("Closing connection")
connection.close()
connection = None
#################################################
### Uninitialize the API ###
### Do not call uninitialize for multiple runs ###
#################################################
#soamapi.uninitialize()
print ("All done!!!")
Output from our example
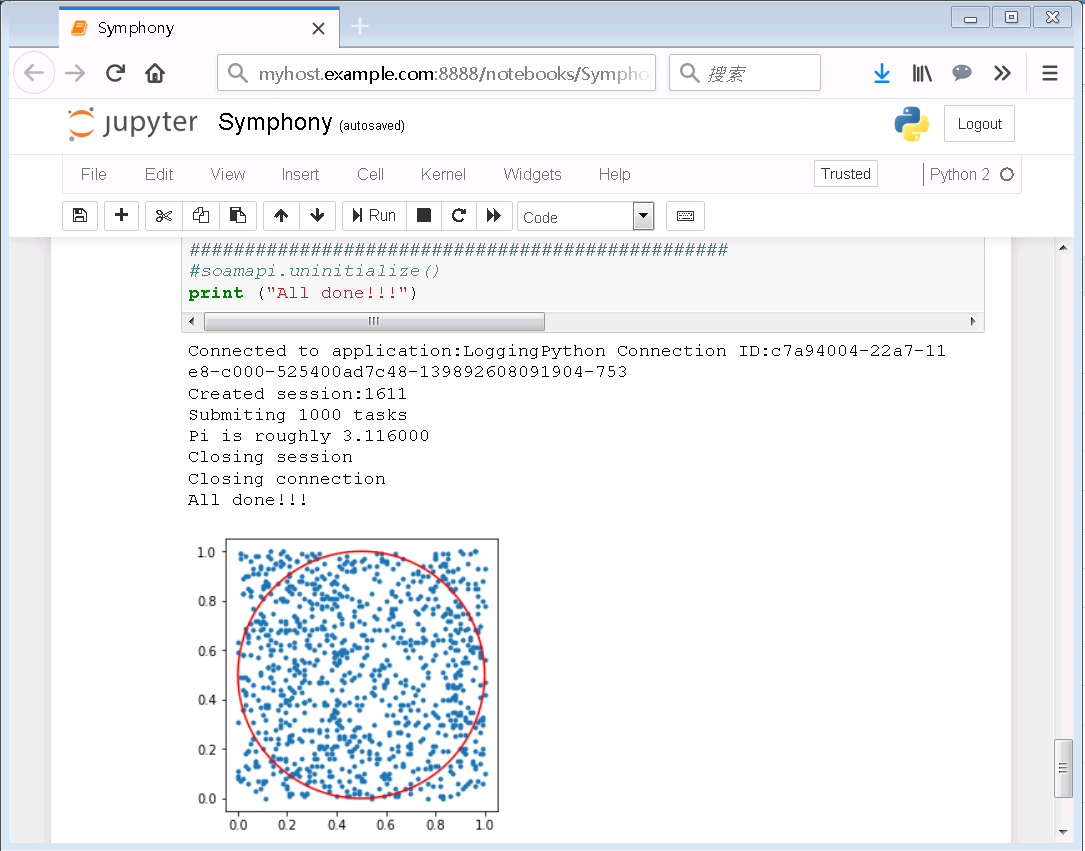
The following results show our IBM Spectrum Symphony workload submitted to the Jupyter Notebook: 1000 tasks submitted to simulate 1000 random points to return the results of Pi (roughly 3.116000). This Jupyter Notebook uses the Python 2D Matplotlib plotting library (matplotlib), with a circle containing 1000 random points in the notebook:
Next steps: Talk to us!
This blog shared our experience with integrating Jupyter with IBM Spectrum Symphony. It's an example of how IBM Spectrum Symphony can support other application frameworks to meet business needs.
We hope it was helpful and informative. If you’ve got comments or questions, add a comment below. You can also start a topic in our IBM Spectrum Symphony forum.
UID
ibm16163977