IBM Support

IBM i2 iBase bulk import - How to grant the SQL server account with read permission for the Bulk Import Data Files folder on the network drive

How To


Summary

i2 iBase runs the "BULK INSERT" statement in SQL server to bulk import the data from the data source. This operation creates a temporary text file in a folder. The SQL server account, that is, the account that starts and runs the SQL server, must have read access for this folder.

This requirement is described in the iBase document on "activating bulk import" - https://www.ibm.com/docs/en/i2-ibase/9.0.4?topic=SSXW43_9.0.4/com.ibm.i2.ibase.admin.doc/overview_of_bulk_import.html

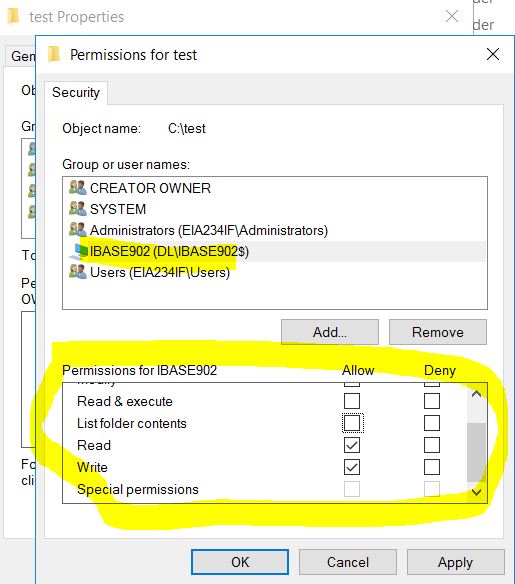
In a default SQL server installation, the account which starts and runs the SQL server is a virtual account (i.e. NT Service\MSSQLSERVER). A virtual account is a local account only. If the Bulk Import Data Files folder is on a network source, then the read access cannot be granted directly to this virtual account. The workaround is to grant the read permission to the computer account for the SQL server ( (in the format <domain_name>\<computer_name>$). This way, the virtual account, which is on the computer that hosts the SQL server, can read the shared folder on a network source.

This technote provides an instruction for this configuration.

Steps

The objective is to grant the read permission to the computer account for the SQL server, so the virtual account, which is on the computer that hosts the SQL server, can also read the shared folder on the network drive.
Step 1 - Go to the shared folder (on the network drive). Right click on the folder, and select "properties" -> "security".

Step 2 - On the security tab, click on "edit". Then select "add" on the Permission dialog.
1
Step 3 - On the "Select Users, Computers, Service Accounts, or Groups" dialog, click on "Object Types". Check the box on "computers". It it crucial you perform this step. This is because by default, the search does not include computers. For the "Location" field, select your domain (for example, DL.LAN)
2
2
Step 4 - Then in the "Enter Object name to select" menu, enter the computer name for the SQL server. Click on "check names" and find the name of the computer name for the SQL server. Finally, press "ok".
4
Step 5 - Now you can grant the computer that hosts the SQL server with read permission for the folder.
5

Document Location

Worldwide

[{"Type":"MASTER","Line of Business":{"code":"LOB24","label":"Security Software"},"Business Unit":{"code":"BU059","label":"IBM Software w\/o TPS"},"Product":{"code":"SSXW43","label":"i2 iBase"},"ARM Category":[{"code":"a8m50000000Ci92AAC","label":"i2 iBase and i2 Analyst\u0027s WorkStation-\u003EImport\/Export"}],"ARM Case Number":"TS007293594","Platform":[{"code":"PF033","label":"Windows"}],"Version":"All Versions"}]

Document Information

Modified date:
05 December 2021

UID

ibm16508475