Troubleshooting
Problem
Resolving The Problem
For an Administrator to create a custom deployment, the administrator can run the install_acs_xx.js /AdminConfig. This will record the responses and update the AdminConfig.properties file in the deployment files. It is recommended that you stage this deployment on a central location such as a network drive/share or IBM i IFS directory that all users have access to. When you use the /AdminConfig parameter, the wizard will appear. The screens and options you will be presented with are as follows:
 Deployment Wizard/AdminConfig
Deploy using the <path>\Windows_Application\install_acs_32.js /AdminConfig command will start the deployment wizard. This will create a customized deployment for your users.
Figure 1. IBM i Access Client Solutions deployment wizard – Change configuration

Click Yes to proceed with the change to the current configuration. Clicking No will end the deployment wizard.
Figure 2 through Figure 13 shows the sequence of dialog boxes that an administrator will see when using the /AdminConfig parameter.
Figure 2. IBM i Access Client Solutions deployment wizard – Begin with default configuration

Click Yes to start with a default version of AcsConfig.properties. If you have previously edited AcsConfig.properties to add your own customizations, those changes will be lost and you need to add them back when /AdminConfig has finished. This step could take a minute, depending on the speed of your file system. A command prompt might appear for a minute or two. Be patient, it will eventually continue.
Figure 3. IBM i Access Client Solutions deployment wizard – Remote or local

Because you are stepping through the Local and Admin Customized option, click No. The remote deployment is described in the next section.
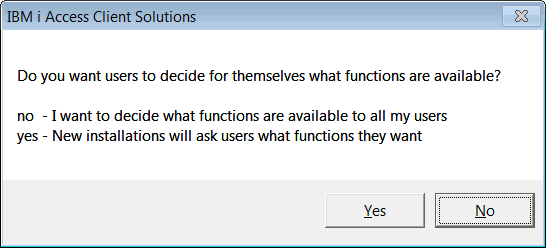
Figure 4. IBM i Access Client Solutions deployment wizard – Who sets available functions?

Click No because you want to decide what functions are available to your users.
Figure 5. IBM i Access Client Solutions deployment wizard – Setting available functions

Click OK.
Figure 6. IBM i Access Client Solutions deployment wizard – 5250 emulation

If you click Yes, you will see the dialog box (as shown in Figure 7) asking if you want to make IBM i Access Client Solutions the default program for existing 5250 session profiles.
Figure 7. IBM i Access Client Solutions deployment wizard – Existing 5250 session profiles

If you are migrating your users from IBM i Access for Windows and/or Personal Communications and they have .ws profiles on their Desktop that they click to start a 5250 emulation session, you should answer Yes to the question in Figure 7. By answering Yes, a file association will be created. Later, when the user clicks a .ws file, the file association causes the IBM i Access Client Solutions emulator to be used. This assumes the .ws file itself is on the Desktop and not just a link to the Personal Communications pcsws.exe file with the .ws file as a parameter.
If you change your mind later, you can disable the IBM i Access Client Solutions file association by going into the IBM i Access Client Solutions GUI, clicking Tools -> File Associations, and clearing the .ws check box.
Figure 8. IBM i Access Client Solutions deployment wizard – Printer Output

Figure 9. IBM i Access Client Solutions deployment wizard –Data Transfer

Figure 10. IBM i Access Client Solutions deployment wizard – Navigator for i

Figure11. IBM i Access Client Solutions deployment wizard – SSL Manage

Figure 12. IBM i Access Client Solutions deployment wizard –Console

Figure 13. IBM i Access Client Solutions deployment wizard – Remote Command

Figure 14. IBM i Access Client Solutions deployment wizard – Product Shortcuts

Keep in mind that you are only customizing the installation for your users. IBM i Access Client Solutions is not currently being installed on any user PC.
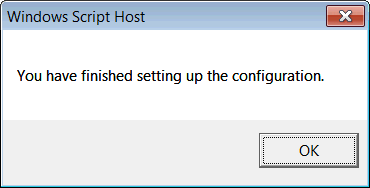
Figure 15. IBM i Access Client Solutions deployment wizard – Finished

You have now successfully customized a preconfigured deployment for your users.
 Deployment - First time user controlled
When your users run the install_acs_xx.js script from their PC, the following actions take place:1. The product files will be copied from the remote location to the local PC at <user_home>\IBM\ClientSolutions 2. File associations will be created. 3. If IBM i Access Client Solutions has never run on this PC before, the user will be presented with a license agreement that must be accepted. Note: The Wizard will not run if the C:\Users\<user>\IBM\Client Solutions path exists on the user's PC; nor will it run if the AcsConf.properties file has been modified.
The wizard will go through the possible options users can select.
Figure 1. IBM i Access Client Solutions deployment wizard – 5250 emulation

Figure 2. IBM i Access Client Solutions deployment wizard – Existing 5250 session profiles

Figure 3. IBM i Access Client Solutions deployment wizard - Printer Output

Figure 4. IBM i Access Client Solutions deployment wizard - Data Transfer

Figure 5. IBM i Access Client Solutions deployment wizard - IBM Navigator for i

Figure 6. IBM i Access Client Solutions deployment wizard - Manage SSL

Figure 7. IBM i Access Client Solutions deployment wizard - Console

Figure 8. IBM i Access Client Solutions deployment wizard - Remote Command

Figure 9. IBM i Access Client Solutions deployment wizard - Shortcuts

 Local and Shared Deployments
Once the custom deployment is created, you have two options for users to deploy the product:
1. Local on the PC
2. Remote from a network drive/share or IBM i IFS directory
Local Deployments:
1. The product files will be copied from the central location to the local PC.
2. To apply product updates to the PC, the install_acs_xx.js script needs to be run again.
3. The remote location does not need to be available to start the product because all product files are available locally on the PC.
Shared Local Deployments:
1. Admin creates the deployment file and rebundles them and puts them to the same location on each users PC.
2. The files reside on the local users pc.
3. The deployment is run from the local users pc. (either by the user or by script etc)
4. Updates are updated locally on each users pc. (ie copy ascbundle.jar and replace the one on each users pc.
***Since all files are copied to the same location on the users pc, pushing updates is not a problem and the users won't have any network latency issues.
Shared Remote Deployments:
1. Users need to connect to the remote location to start the product.
2. The files only reside at the central location and are never copied to the local pc.
3. Updates and configuration changes are picked up automatically by stopping and restarting the IBM i Access Client Solutions.
4. The remote location must be available to all users to start the product.
 Applying product updates
On Local System Deployment:
Updates are applied by calling the install_acs_xx.js script again just like the previous option. However, for this type of deployment, there is one extra step to be performed by the administrator.
When customizing the product using the /AdminConfig parameter, these customizations were written to the AcsConfig.properties file in the product's root directory. When the administrator updates the product files with a new version by extracting the contents of the new version on top of the existing files, by default, the AcsConfig.properties file will get overwritten with a shipped default version. This means that your existing customizations will be lost. The best way to address this is to first save the AcsConfig.properties file, extract the updated files on top of the existing, and replace the AcsConfig.properties file with the one you saved off.
On Remote System Deployment:
The key advantage to this type of deployment is that when the administrator updates the product at the central location or decides to change the function availability, the install_acs_xx.js script does not need to be run again to pick up the updates. This is because the Desktop shortcuts and file associations are already pointing to the updated files at the central location. However, similar to the previous option, the administrator has one more step after updating the product files because the AcsConfig.properties file would have been overwritten with a shipped default version. Adminstrators need to make sure they save the AcsConfig.properties file, extract the updated files on top of the existing, and replace the AcsConfig.properties file with the one that was saved off.
Related Information
Was this topic helpful?
Document Information
Modified date:
31 October 2024
UID
nas8N1020967