Troubleshooting
Problem
This document describes how to configure the HMC to automatically synchronize its clock with a Network Time Protocol (NTP) time server.
Resolving The Problem
This document describes how to configure the HMC to automatically synchronize its clock with a Network Time Protocol (NTP) time server. NTP is supported in HMC Version 6 and later.
Graphical Interface
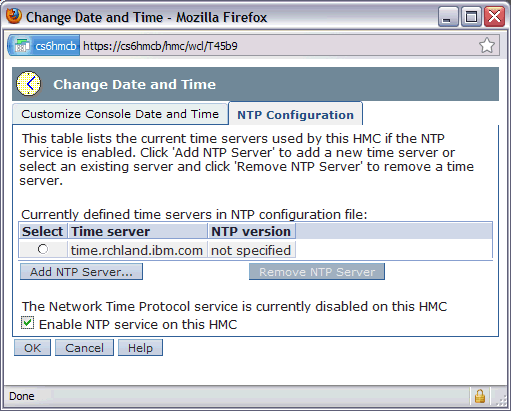
The graphical option is only available on Version 7 HMCs. To enable clock synchronization with a NTP server, you should perform the following:
Note: You must perform all configuration steps and restart the HMC to fully enable NTP.
1. Select HMC Management, click Change Date and Time, and then click the NTP Configuration tab.
2. Enable the NTP Service. Check the box Enable NTP service on this HMC.
3. Add at least one NTP server, and click the Add NTP Server... button. Fill in the IP address or DNS address of the NTP Service. If you do not know the protocol version, select Not specified. Click OK.

4. Click OK to save the changes.
5. Restart the HMC when prompted. Under HMC Management, click Shutdown or Restart, restart, and click OK.
Command Line Interface (CLI)
This option is available for HMC Version 6 and later. To enable Network Time Protocol service (start the daemon on each boot):
chhmc -c xntp -s enable
To add a Network Time Protocol server to the configuration file by IP address and, at the same time, enable firewall access through network interface eth1:
chhmc -c xntp -s add -a 10.10.10.32 -i eth1
To add a Network Time Protocol server to the configuration file by name and, at the same time, enable firewall access through network interface eth1:
chhmc -c xntp -s add -a mytimeserver.company.com -i eth1
Note: If -i is not specified, the firewall will need to be opened. In Version 6, use Customize network settings, LAN adapters, Details, firewall tab to enable NTP. In Version 7, use HMC Management, Change Network settings, LAN Adapters, Details, firewall tab to enable NTP.
Restart the HMC after running the commands to make sure daemon starts with the updated configuration file.
Graphical Interface
The graphical option is only available on Version 7 HMCs. To enable clock synchronization with a NTP server, you should perform the following:
Note: You must perform all configuration steps and restart the HMC to fully enable NTP.
1. Select HMC Management, click Change Date and Time, and then click the NTP Configuration tab.
2. Enable the NTP Service. Check the box Enable NTP service on this HMC.
3. Add at least one NTP server, and click the Add NTP Server... button. Fill in the IP address or DNS address of the NTP Service. If you do not know the protocol version, select Not specified. Click OK.

4. Click OK to save the changes.
5. Restart the HMC when prompted. Under HMC Management, click Shutdown or Restart, restart, and click OK.
Command Line Interface (CLI)
This option is available for HMC Version 6 and later. To enable Network Time Protocol service (start the daemon on each boot):
chhmc -c xntp -s enable
To add a Network Time Protocol server to the configuration file by IP address and, at the same time, enable firewall access through network interface eth1:
chhmc -c xntp -s add -a 10.10.10.32 -i eth1
To add a Network Time Protocol server to the configuration file by name and, at the same time, enable firewall access through network interface eth1:
chhmc -c xntp -s add -a mytimeserver.company.com -i eth1
Note: If -i is not specified, the firewall will need to be opened. In Version 6, use Customize network settings, LAN adapters, Details, firewall tab to enable NTP. In Version 7, use HMC Management, Change Network settings, LAN Adapters, Details, firewall tab to enable NTP.
Restart the HMC after running the commands to make sure daemon starts with the updated configuration file.
Verification
To view the current configuration (if ntp is enabled and list of servers) V8 and below:
lshmc -r
ssh=enable,sshprotocol=,remotewebui=enable,xntp=disable,xntpserver=127.127.1.0,...
Note: support to query NTP status was added in V9 R1
lshmc -r
ssh=enable,sshprotocol=2,sshusedns=enable,remotewebui=enable,xntp=enable,xntpstatus=synchronized,xntpserver=time.amer.,127.127.1.0, ....
To check daemon is running use the netstat command to verify the daemon is listening on udp port 123:netstat -lnu | grep 123
[{"Product":{"code":"SSB6AA","label":"Power System Hardware Management Console Physical Appliance"},"Business Unit":{"code":"BU054","label":"Systems w\/TPS"},"Component":"HMC","Platform":[{"code":"PF025","label":"Platform Independent"}],"Version":"Version Independent","Edition":"","Line of Business":{"code":"LOB08","label":"Cognitive Systems"}}]
Historical Number
382149477
Was this topic helpful?
Document Information
Modified date:
08 October 2025
UID
nas8N1015481