Question & Answer
Question
How to set up Linux in VMWare Workstation with static IP (IPv4)
Answer
Author: Werner Tod
Reviewer: Andriy Melnyk
NOTE: VMWare Workstation 12 and Ubuntu Linux was used for this setup.
This procedure to configure VMWare images with static IP addresses is useful when setting up IBM API Connect (APIC) on VMWare. Some of the APIC images (e.g. the Developer Portal component) are implemented on Linux, and a similar approach can be followed for the others (e.g. the IBM DataPower component and the APIC Management Server component). For the latter, the network configuration commands of the respective component need to be used. Please see the APIC product documentation for details.
Procedure
- Download Ubuntu (ubuntu-16.04.3-server-amd64.iso).
The version used here is: Ubuntu Server 16.04.3 LTS
https://www.ubuntu.com/download - Create a new virtual machine(VM) using the .iso file of the just downloaded Ubuntu image.
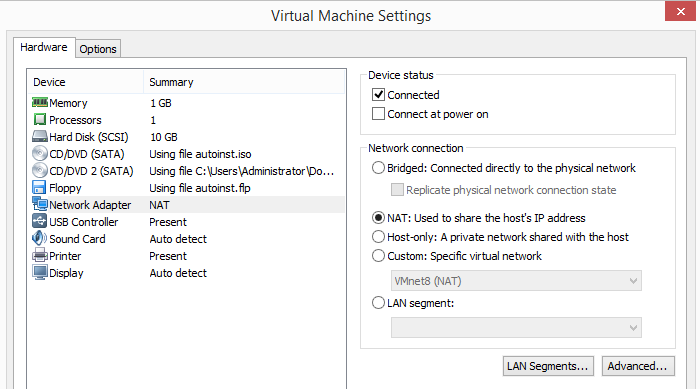
- Once your VM is created open the VM properties. The current configuration is displayed like this one:
- Power up the VM (if it is not running) and note the DHCP IP settings.
In the console / terminal window issue the ifconfig command to retrieve the network interface configuration.
In my case the ethernet interface was shown as 'ens33' with the DHCP setup being configured for the 192.168.247.xxx subnet.
IMPORTANT: note down this subnet information! - Power off the VM.
- Adjust the network settings using VMWare Virtual Network Editor for hosting VM with static IP:
- Open the Virtual Network Editor (top menu Edit->Virtual Network Editor). Remove or disable the existing network interfaces (VMnet0 and VMnet1 in my case you may see different names):

- Add a new network interface (VMnet2 in my case) with the following settings:
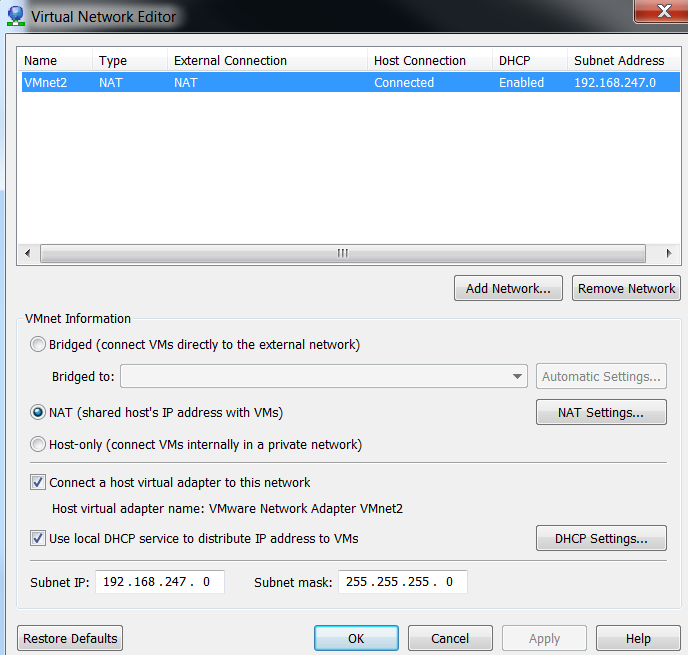

NOTE: the 192.168.247.xxx subnet is determined by the previous DHCP setup!
Only the new NAT network entry will be used for the VM.
- Open the Virtual Network Editor (top menu Edit->Virtual Network Editor). Remove or disable the existing network interfaces (VMnet0 and VMnet1 in my case you may see different names):
- The VM settings after adding a new interface should look like on the image below:

NOTE: Network Adapter is set to VMnet2 now. - Power up the VM and within the VM change the IP settings from dynamic to static IP:
- Create a backup of the file /etc/network/interfaces.
- Edit the network interface definitions in /etc/network/interfaces and adjust them so that your entry for the primary network interface looks similar to this:
auto <your primary network interface>
iface <your primary network interface> inet static
address <static IP address in your subnet choose an address between 3 and 126>
netmask <default is 255.255.255.0>
gateway <your primary network interface>.<1 or 2 use value from VMWare network settings>
dns-nameservers <the gateway is used as default nameserver add any additional nameservers you might want>
e.g.
auto ens33
iface ens33 inet static
address 192.168.247.40
netmask 255.255.255.0
gateway 192.168.247.2
dns-nameservers 194.25.0.68 194.25.0.60 - Adjust your host definitions in /etc/hosts as needed.
- Adjust the hostname in /etc/hostname as needed.
- Restart the VM.
- Your VM should now properly run with the static IP address you have specified (192.168.247.40 in my case).
Test your incoming and outgoing network access and name resolution.
References
VMWare community at:
[{"Business Unit":{"code":"BU053","label":"Cloud & Data Platform"},"Product":{"code":"SSQTW3","label":"IBM On Demand Consulting for Hybrid Cloud"},"Component":"","Platform":[{"code":"PF025","label":"Platform Independent"}],"Version":"All Versions","Edition":"","Line of Business":{"code":"","label":""}}]
Was this topic helpful?
Document Information
Modified date:
28 June 2021
UID
ibm10776193