How To
Summary
This guide shows two supported ways to configure file‑based attachments (Doclinks) for Maximo Manage on OpenShift using a PersistentVolumeClaim (PVC). You can configure the PVC either in OpenShift (by editing the ManageWorkspace custom resource instance) or in Manage Admin. Then align Maximo’s doclinks properties and folder defaults to the same mount path.
Steps
Step 1 — Plan
- Pick an absolute Linux mount path (for example, /DOCLINKS)
- Identify an RWX‑capable StorageClass (for example, CephFS)
- Decide a lowercase RFC‑1123‑compliant pvcName (for example, doclinks)
1) Navigate to Administration > CustomResourceDefinitions > search for ManageWorkspace

2) Select ManageWorkspace and click YAML tab
3) Search for persistentvolume
4) Edit the YAML file.
For example:
deployment:
      persistentVolumes:
        - accessModes:
            - ReadWriteMany
          mountPath: /DOCLINKS
          pvcName: doclinks
          size: 2Gi
          storageClassName: ocs-external-storagecluster-cephfs

1) In Manage, navigate to Administration > Workspace > Manage
2) Actions > Update Configuration > click the pencil icon to edit Persistent Volume Claims (PVC)
3) Enter Mount path, PVC name and size
- Mount path is the in‑container folder where Manage reads/writes files (for example, /DOCLINKS).
- When using a PVC, Attachment Library folders (Attachments, Images, Diagrams, etc.) save under that mount path.
- PVC name must follow Kubernetes RFC‑1123 rules: all lowercase letters or digits, hyphen or dot allowed; must start and end with a letter or digit; up to 253 characters; unique within the namespace.

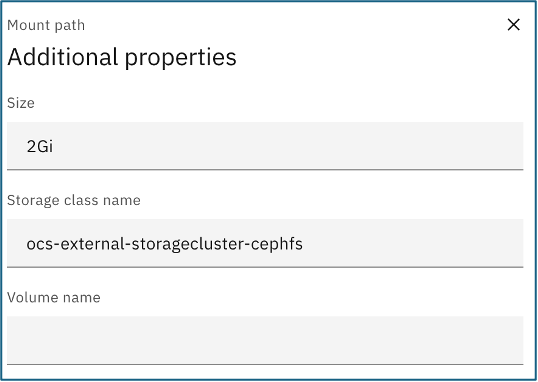
4) Click View under Additional properties
5) Enter a Storage class name
Copy the Storage class name from OpenShift > Storage > StorageClasses). If you have multiple storage classes, choose the one that supports ReadWriteMany (RWX) so multiple pods can mount and read/write the same volume concurrently.
6) Click Save
7) Scroll up the page and click Apply Changes
8) Go to OpenShift > Storage > PersistentVolumeClaims
9) Check to see if it has created an entry for PVC and is Bound.

mxe.doclink.doctypes.defpath = /DOCLINKS
mxe.doclink.doctypes.topLevelPaths = /DOCLINKS
mxe.doclink.path01 = /DOCLINKS=https://hostname/maximo
mxe.doclink.securedAttachment = true
1) Open any Manage application with attachments
2) More Action > Attachment Library/Folders > Manage folders
For each folder, set Default File Path to the Mount Path plus the folder name

Related Information
OpenShift MAS Maximo Doclinks Setup with PVC | Attached Documents Configuration
Configuring storage for attached documents
Administering attached document libraries
Configuring S3 Storage for Attachments
Setting up MAS9 Attached Documents using NFS Volume
How to configure attachment using PVC in Maximo IT
Document Location
Worldwide
Product Synonym
Maximo Manage;MAS; Attached documents
Was this topic helpful?
Document Information
Modified date:
11 July 2026
UID
ibm17266616