Question & Answer
Question
Cause
Answer
This document is broken up into two sections. The first will detail how to record an active application into a playable movie file. The second part will outline how to use the "Microsoft Problem Step Recorder" that is included with Windows 7 and later operating systems. If you find your problem requires switching between applications or interactions with the desktop you might consider using CamStudio.
Note - this should not be done with Blue Diamond PMR, PMH, or cases.
Section 1
How to record an active application as a playable movie file that uses the Windows Xbox Game Bar. An "active application" is open and maximized at the time the recording starts.
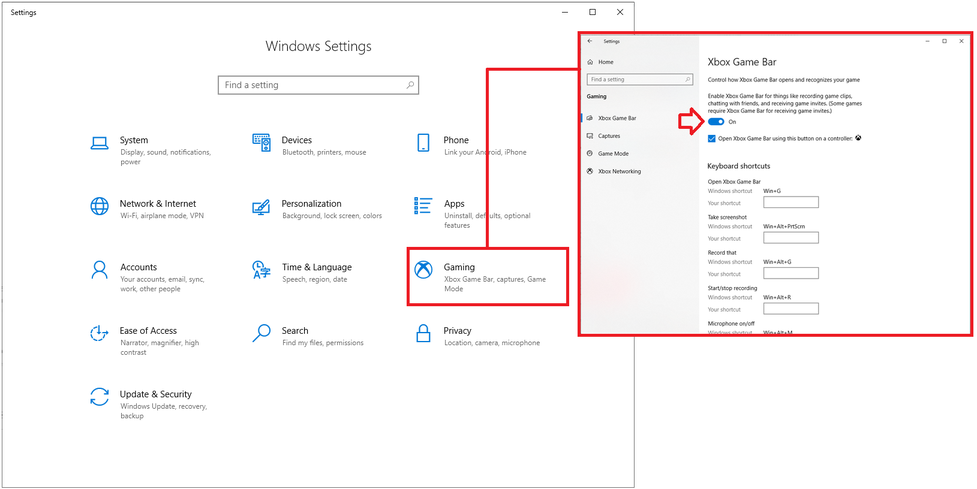
The first thing we must do is verify the Xbox Game Bar is enabled.
- Click the Windows "Start Menu"
- Select "Settings"
- Click "Gaming"
- From the "Xbox Game Bar" window - verify this option is "On" as shown in the graphic.
- Win + Alt + R

- Re-create the problem you want to record
- Click the stop button in blue to end the recording
- Win + Alt + R also works to end the recording

The PSR tool (Problem Steps Recorder) is a Microsoft tool available on Windows 7 PCs and later. When this tool is running it will gather screen shots and mouse clicks until you stop the recording. The resulting click steps and screen shots will be displayed in a "Steps Recorder" window. You simply save the recorded steps as a .zip file on your desktop and submit that file for review.
Starting the "Problem Steps Recorder"
- Start Menu
- Run
- PSR.exe
Note:
If you do not have a "Run" option you may press the Windows Logo Key + R. The Windows logo key is typically located between the Ctrl and Alt keys on your keyboard.

It is possible to see the following warning pop-up. If you know the program window you are attempting to record was started as an administrator you must use the "Run as administrator" option.


Re-create the issue
Work through your re-create steps for the problem. PSR can be minimized if needed.
Annotating or commenting on your screens.
The "Add Comment" button allows you to draw focus to a specific area and provide additional details.
Notes:
Your screen will immediately have a white overlay.
Use your mouse to click and drag a selection area over the portion of your screen that you would like to comment on.
Example - I want to draw attention to the "Not installed" status I am seeing from the WRKPTFGRP screen. Notice how the majority of the screen has the white overlay and the selection area is outlined in red.

You will see a "Highlight Problem and Comment" dialog box in the lower right portion of your screen. You may add the appropriate comments here to further describe the issue you are seeing. Once done press "Ok"

Once you click "Ok" your screen will go back to normal and you can continue re-creating the problem. Feel free to add comments on any screen.
Stop recording and save the resulting file
- Press the "Stop Record" button

- Press the "Save" button
- The "Save As" window will pop
Save the file as RecordedProblemSteps.zip on your desktop
Submit the RecordedProblemSteps.zip for further review
Related Information
Historical Number
N1020974
Was this topic helpful?
Document Information
Modified date:
30 April 2021
UID
nas8N1020974