Question & Answer
Question
This document will answer the question, "How to install an IBM WebSphere Application Server (WAS) Interim Fix Using the IBM Web Administration for i console?"
Answer
Overview
The IBM Web Administration for i (Web Admin) console is a Web-based tool, which provides a full-function GUI for configuring and managing many different web technologies including IBM WebSphere Application Server on the IBM i.
Starting with IBM WebSphere Application Server V8.0, the product's installation factory has changed to use the IBM Installation Manager. The IBM Installation Manager does not provide a GUI interface for the IBM i. Because of this, it can be a bit complex to install and manage the IBM WebSphere Application Server product on the IBM i. To help reduce this complexity, the IBM Web Admin console provides an easy-to-use GUI to manage your IBM i WebSphere Application Server installations and fixes.
Part of this document is taken from the following IBM developerWorks article written by the IBM Web Administration for i GUI development staff. This document expands on the information provided in the URL below to provide the necessary detailed information to successfully update your IBM i WebSphere Application Server installation(s).
http://www.ibm.com/developerworks/ibmi/library/i-webSphere_spplication_server_installation/index.html
Prerequisites
The IBM WebSphere Application Server product installation and fix pack support on the IBM Web Admin console was initially provided by individual PTF SI48431 (IBM i 7.1) and is included in the initial HTTP Group PTF for IBM i 7.2, 7.3 and 7.4. These PTFs have since been superseded with newer versions. The best way to obtain these PTFs and all of the latest IBM Web Admin GUI fixes is to install the latest IBM HTTP Server Group PTF: SF99368 (IBM i 7.1), SF99713 (IBM i 7.2), SF99722 (IBM i 7.3) or SF99662 (IBM i 7.4).
Steps to install the IBM WebSphere Application Server interim fix using the IBM Web Administration for i console
| 1) ***IMPORTANT*** Prior to updating your IBM WebSphere Application Server installation, it is HIGHLY recommended to export/backup your IBM Installation Manager and WebSphere Application Server installation data so that it can be restored if it gets corrupted during the fix pack installation process. Please refer to the IBM Software Technical Document:"How and When To Export/Backup Your IBM Installation Manager and WebSphere Application Server Installation Data on the IBM i?" for more information on this. |
| 2) Update the IBM Installation Manager product to the latest available version using the instructions listed in either of the following IBM Technical documents. How to Download and Install/Upgrade the IBM Installation Manager (IM) for the IBM i |
| 3) Open a 5250 Green Screen session to your IBM i Server and sign on using a user profile that has *ALLOBJ and *SECADM explicit special authorities. |
| 4) After downloading and moving the interim fix file to an IFS directory, extract the contents of the file into the directory. This can be accomplished by performing the following: a) STRQSH b) cd /<directory containing interim_fix file> c) jar xvf <interim_fix file> d) F3 In this example, the interim_fix file is 8.5.5.17-ws-wasprod-ifph25074.zip and the directory is /home/wasifix: a) STRQSH b) cd /home/wasifix c) jar xvf 8.5.5.17-ws-wasprod-ifph25074.zip d) F3 Once the extraction is complete, you will find the repository.config among other files in the /home/wasifix. The repository.config file is what lets the installation process know that there is a fix. |
5) Once the pre-requisites listed above have been met and the IBM WAS interim fix file has been extracted, end all IBM WAS processes for the installation version and edition being updated.
|
6) Display the current value of QALWOBJRST and then change it to *ALL if needed.
|
| 7) Execute the STRHOSTSVR *ALL CL command to ensure all of the IBM i Host Servers are started. |
8) Open a web browser and go to the URL, http://<server>:2001/HTTPAdmin, to display the IBM Web Administration for i console web application.
|
| 9) When prompted, sign in with a user profile containing *SECADM and *ALLOBJ explicit special authorities. |
10) Click on Manage -> Installations on the main IBM Web Administration for i console page. |
| 11) Select the radio button next to the IBM WAS installation you would like to update and click on the "Update" button to start the IBM WAS Fix Pack installation process. 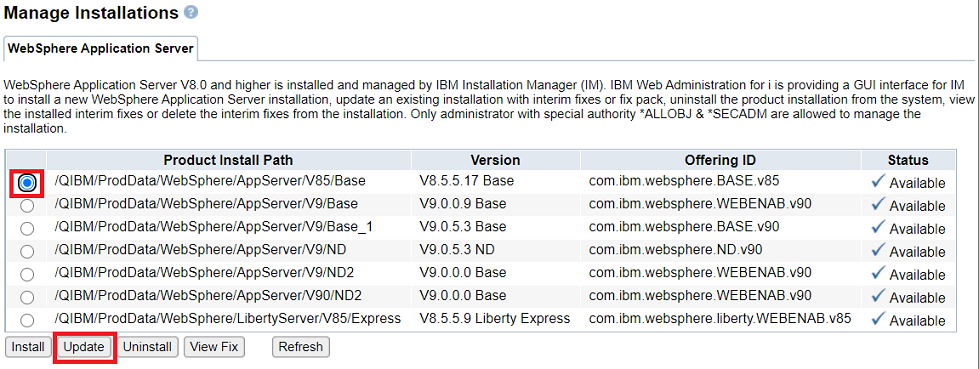 |
| 12) Check the "Interim Fix" box, click on the "Add" button, type in the path to the IFS directory where the iFix file was extracted, click the "Continue" button and click on the "Next" button.  |
| 13) After clicking on the "Next" button, you will be presented with a pop-up box similar to the one below once the interim fix installation repository has been validated for installation. Click OK to proceed. 
|
14) Verify the Product Installation Path and Fix Pack version, then click the "Finish" button at the bottom of the screen to begin the fix pack installation process. |
15) The interim fix installation process will now be begin. The "Manage Installations" screen will appear and designate the product install path being updated with a status of "Updating".
|
16) The status column for the product install path will change to "Available". If an error is received at the bottom of the screen and you are unable to resolve your issue, please open a Service Request (PMR) with IBM here or call 1-800-IBM-SERV. |
17) Verify the IBM WAS interim fix was installed successfully.
|
18) Once the IBM WAS interim fix installation has been verified as successful, you are free to start your IBM WebSphere Application Server profiles back up using the following Qshell command.
|

Was this topic helpful?
Document Information
Modified date:
15 June 2020
UID
ibm16226814