IBM Support

How to enable secure boot on the HMC

How To


Summary

This document contains the steps required to enable secure boot on the HMC.

Objective

Guide the user through the process of enabling or re-enabling secure boot on the HMC.

Environment

Secure boot was introduced in the 7063-CR2 HMC with v10r1.1010.

Pre-requisites:

  • 7063-CR2 HMC at v10r1.1010 or newer
  • PNOR: IBM-mowgli-ibm-OP9_v2.5_4.140-prod or newer
  • BMC: op940.hmc-36 or newer

Steps

Enabling (or re-enabling) Secure Boot on 7063-CR2 HMCs

ATTENTION

If secure boot (OS verification portion) is being re-enabled as part of system backplane replacement, first follow the Physical Presence Reset steps in Preparing the 7063-CR2 system for operation after removing and replacing the system backplane (steps 13-17). Failure to perform the reset may result in the secure boot keys failing to be copied to the firmware.

1 . Update the firmware on the HMC to the following minimum levels, or later:

  • PNOR: IBM-mowgli-ibm-OP9_v2.5_4.140-prod
  • BMC: op940.hmc-36

2. Upgrade or install the HMC with v10r1.1010 or later

3. Check firmware verification is enabled by accessing Petitboot.

Petitboot -> System Information

Scroll down to section "Secure & trusted boot"  and verify the "FW verification" field shows enabled.

System Information FW verification enabled

If FW verification shows disabled:

Secure Boot jumper location

Secure Boot jumper enabled

4. If OS verification is disabled, choose one of the following methods to update the secure boot keys:

  • To use the sb-enable Petitboot Plugin, continue with the next step.
  • To manually extract keys from the operating system, go to step 14.

5. To download the Petitboot plugin for OS Secure Boot enablement:
  1. Go to Scale-out LC System Event Log Collection Tool.
  2. Locate the sb-enable-1.0.pb-plugin.zip link.
  3. Click the link to download the ZIP file.
  4. Extract the ZIP file to access sb-enable-1.0.pb-plugin.

6. Copy the plugin to the root directory of a USB key. Do not place it inside a directory or a folder. Ensure that the USB drive is formatted as FAT32 or VFAT. Do not modify the file extension of the plugin “.pb-plugin”.

7. Insert the USB drive that contains the Petitboot plugin into any of the HMC USB ports.
 
8. If Petitboot detects the .pb-plugin files in the USB drive, it displays the plugins in the Plugins menu option. The number in parentheses indicates the number of plugins that are found on the connected devices. For example, "Plugins(1)" indicates that only one plugin was found on the connected devices.

9. Select Plugins > OS and press Enter.
The OS Secure Boot Enable plugin is installed.
When the installation is complete, the message "OS Secure Boot Enable [installed]" appears.

10. Select Return to Main Menu and press Enter, or press x to return to the main menu.

11. Select Exit to shell.

12. Determine the HMC disk name by running the following command:
arcconf getconfig 1 ld | grep “Disk Name”

Example output:
# arcconf getconfig 1 ld | grep “Disk Name”
    Disk Name                             : /dev/sdb

The disk name is /dev/sdb.

NOTE: Your disk name might be different.

13.  Run the sb-enable command with the disk name:
/usr/lib/pb-plugins/sb-enable <Disk Name>

Example command:
# /usr/lib/pb-plugins/sb-enable /dev/sdb

Note: If sb-enable runs successfully, it reports the success and then restarts the HMC.

Continue to step 21.

14. As hscroot, use the sendfile command to copy the PK, and db files  from the HMC file system to a remote system. These files are available in HMC v10r1.1010 and newer:

sendfile -f /opt/hsc/data/secureboot/PK.auth -h <ip> -d <dir> -u <username> -n PK.auth -s

sendfile -f /opt/hsc/data/secureboot/db.auth -h <ip> -d <dir> -u <username> -n db.auth–s

Where:

  • <ip> is the IP address of the remote system
  • <dir> is the directory in the remote system where the files will be store

NOTE: The sendfile command is used because the files are stored in a location that does not allow copying to removable media directly from the HMC.

15. On the remote system, copy the PK.auth, and db.auth files to a USB drive

Alternatively, an iso file may be created, containing the two files. This iso file can then be mounted remotely via the Virtual Media feature of the BMC. One method to create an iso file from a directory is to use the mkisofs command in Linux:

mkisofs -o secureboot.iso  <dir with auth files>

16. Boot the HMC to Petitboot and select Exit to Shell

If the files were copied to a USB drive, insert it now.

If the files were combined into an iso file to be remotely mounted via virtual, start the virtual media session from the BMC web UI.

17. Run the mount command to verify the automatic mount point

Example of automatic mount location for USB drive.

The mount point is /var/petitboot/mnt/dev/sda1

Adjust as necessary for your drive.

locate USB mount point

Example of automatic mount location for ISO file over Virtual Media.

The mount point is /var/petitboot/mnt/dev/sdb
locate virtual media mount

18. Change directory to the location of the keys in the media

Example for mount point /var/petitboot/mnt/dev/sda1

cd /var/petitboot/mnt/dev/sda1

ls

PK.auth    db.auth

19. Write the content of the PK key, and db files to system firmware with these two commands:

cat PK.auth > /sys/firmware/secvar/vars/PK/update

cat db.auth > /sys/firmware/secvar/vars/db/update

20. Reboot the system by running the command "reboot"

reboot

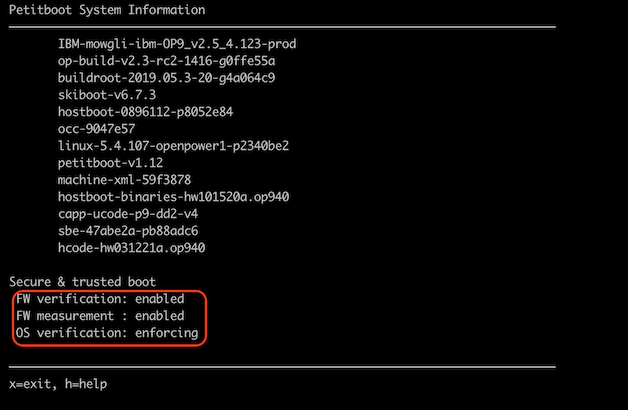
21. Stop the system at Petitboot again and select System Information to confirm the section Secure & trusted boot reflects:

  • FW verification: enabled
  • FW measurement: enabled
  • OS verification: enforcing

Secure Boot all enforcing

22. Exit the shell and back on the main Petitboot menu, select Hardware Management Console

23. Verify the HMC reports secure boot as enabled:

lshmc --boot

secure_boot=1

This concludes the procedure.


Additional Information


What is Secure Boot?

Secure boot is a feature that when enabled, prevents the HMC from booting from an image that has not been signed by the manufacturer.

  • For secure boot to be fully enabled on the HMC, both firmware verification must be enabled, and the OS must be "enforcing" verification.
  • The Secure Boot jumper is set to the "enabled" position on all 7063-CR2 HMCs by default. This controls whether the firmware verification is enabled. If firmware verification is disabled, OS verification will also be disabled.
  • HMC v10r1.1010 is required for the  OS verification of Secure boot to be enforcing.
  • Once OS verification is enforced, the HMC can only be booted by a signed image (ie. v10r1.1010 and newer)
Replacement of the following parts, disables Secure boot. It can be re-enabled using the procedure outlined in this document:
  • System Backplane
  • Trusted Platform Module (TPM)

Document Location

Worldwide


[{"Type":"MASTER","Line of Business":{"code":"LOB57","label":"Power"},"Business Unit":{"code":"BU058","label":"IBM Infrastructure w\/TPS"},"Product":{"code":"7063-CR2","label":"Hardware Management Console (7063-CR2)"},"ARM Category":[],"ARM Case Number":[],"Platform":[{"code":"PF025","label":"Platform Independent"}]}]

Document Information

More support for:
Hardware Management Console (7063-CR2)

Document number:
6489435

Modified date:
28 March 2025

UID

ibm16489435