Question & Answer
Question
This document will answer the question, "How to create an IBM WebSphere Application Server (WAS) profile using the IBM Web Administration for i console?"
Answer
Pre-requisites
A currently supported version of the IBM WebSphere Application Server software product must already be installed and updated to a recent Fix Pack version. Refer to the following hyperlink for the list of currently supported IBM WebSphere Application Server products at specific IBM i OS VRMs.
Official Support Statement for the IBM WebSphere Application Server Product on the IBM i OS
| 1) | Open a web browser and go to the URL, http://<server>:2001/HTTPAdmin, to display the IBM Web Administration for i console web application. If you are not prompted for a userID and password or receive an error in the browser, ensure the ADMIN jobs are started in the QHTTPSVR subsystem using the WRKACTJOB SBS(QHTTPSVR) CL command. If the ADMIN jobs are not started, execute the following CL command to start the ADMIN server: STRTCPSVR *HTTP HTTPSVR(*ADMIN) If you continue to experience issues accessing the IBM Web Administration for i console, please open a Service Request (PMR) with IBM here or call 1-800-IBM-SERV. |
| 2) | Click on the "Setup" tab in the top,left-hand corner of the IBM Web Administration for i GUI. |
| 3) | Click on the link "Create a New Application Sever" in the main window. |
| 4) | The "Create Application Server" welcome screen will be displayed. Click on the "Next" button to begin the application server creation process. |
| 5) | You will then be presented with a screen to select the IBM WebSphere Application Server installation version you would like to create an application server under. Select the radio button next to the WAS version and edition you wish to create an application server profile under and then click the "Next" button. In the screen shot below, the WAS v8.5.5.9 Express installation was chosen.  |
| 6) | Configure the WAS Profile name and description. Then, click on the "Next" button to continue the WAS Profile creation process. |
| 7) | You are not presented with the option of either creating a new IBM HTTP Server to associate with your WAS Profile, selecting an existing IBM HTTP Server instance to associate with your WAS Profile, or not to associate an IBM HTTP Server with your WAS Profile. IBM recommends you select either the "Create a new HTTP server" or "Select an existing HTTP server" option. In the example below, we have selected the "Create a new HTTP server" option.  |
| 8) | You will be presented with the following screen based on the option you selected in the previous step. Create a new HTTP server (powered by Apache) When this option is selected, you will be prompted to enter the name and description for your new HTTP Server as well as the IP address and port you would like the HTTP Server to listen on. After you have configured this information, click the "Next" button.  Select an existing HTTP server (powered by Apache) When this option is selected, you will be prompted to select an existing HTTP Server to associate and use with your new WAS Profile. Select the exist HTTP Server you would like to associate with your WAS Profile and then click on the "Next" button.  Do not associate an external HTTP server with this application server Proceed to the next step to continue the WAS Profile creation process. |
| 9) | Enter the starting port for your WAS profile application server and then click the "Next" button. NOTE: A port block of 21 ports from the starting port specified will be allocated to the WAS Profile. This port block (starting port + 20) cannot be in use by another application or IBM i job. You can use the NETSTAT *CNN command to verify whether any of the ports in the port block are in use. If you find any of the ports in the port block (starting port + 20) are in use, you should specify a different starting port for a port block that is not currently in use to prevent application server start up issues due to port conflicts. In the example below, we have specified port 10000 as the application server starting port, which means the port block will be 10000-10020 for this application server. We have verified that all  NOTE: If you get an error stating, "Error: A port in the range xxx to xxx is already configured by another application. Specify a new port range. "; change the "First port in range" field to a port number and port block that is not currently is use by another application. |
| 10) | The next screen shown will ask if you want to install the Default and Sample applications. By default, only the Default Applications are selected. Check the boxes next to the applications you wish to install into your new application server. IBM recommends checking only the Default Applications. Then, click the "Next" button to proceed. |
| 11) | Click the "Next" button to continue if you don't want to configure Kerberos/Single Sign-on for your WebSphere Application Server at this time. If you do wish to configure your WebSphere Application Server for Kerberos/Single Sign-on, click on the "Configure Identity Tokens" radio button and then click on the "Next" button to continue. IBM recommends you select "Do no configure Identity Tokens". |
| 12) | Finally, you will be presented with a WAS profile creation summary screen. This screen identifies the creation properties you configured (including the port range required to be available for the application server to start successfully) and the URLs to the sample applications you installed (if you installed any). Click on the "Finish" button to complete the WAS Profile and/or HTTP Server creation/association process. IBM recommends you write down the sample application URLs listed on this Summary screen to use for testing your new application server environment in later steps.  |
| 13) | After clicking on the "Finish" button, you will be presented with a similar screen while the WAS Profile is being created. You can click on the 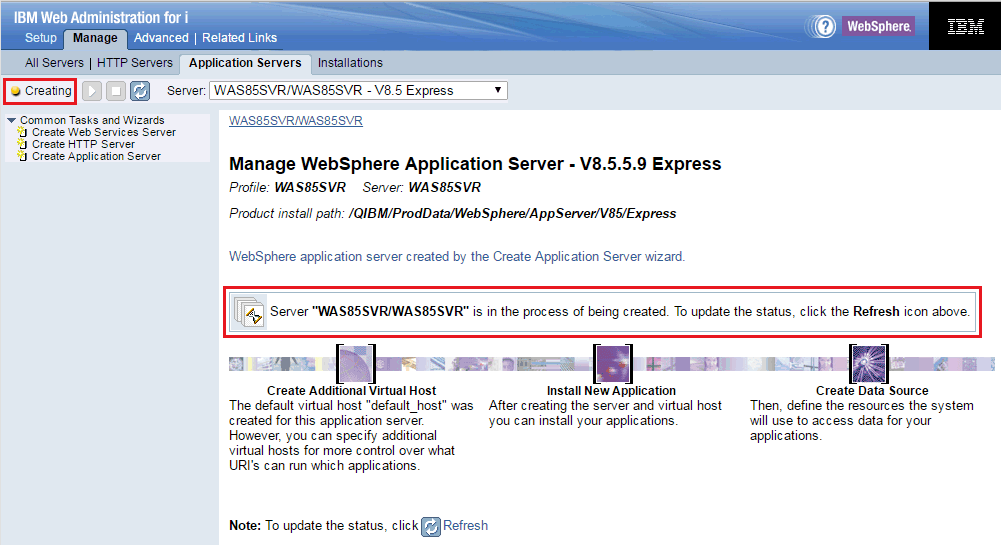 |
| 14) | Once the WAS Profile creation process has completed, the status on the left will change from "Creating", If you experience issues creating your WAS profile, please open a Service Request (PMR) with IBM here or call 1-800-IBM-SERV.  |
| 14) | Click on the green start button, NOTE: In the example below, an IBM HTTP Server is NOT currently associated with the WAS Profile.  |
| 15) | You will noticed the status next to the WebSphere Application Server is now "Starting", You can click on the Once the WebSphere Application Server has started, the status will change to "Started". |
| 16) | Finally, open a web browser and execute one of the URLs listed on the previous summary screen. If the web page is displayed successfully, this tells you your IBM WebSphere Application Server environment was created and is functioning normally. Example:  |
| 17) | Congratulations! You have successfully created a new IBM WebSphere Application Server Profile using the IBM Web Administration for i Console. |
[{"Type":"MASTER","Line of Business":{"code":"LOB68","label":"Power HW"},"Business Unit":{"code":"BU070","label":"IBM Infrastructure"},"Product":{"code":"SWG60","label":"IBM i"},"ARM Category":[{"code":"a8m0z0000000CHUAA2","label":"WebSphere Application Server"}],"ARM Case Number":"","Platform":[{"code":"PF012","label":"IBM i"}],"Version":"All Versions"}]
Was this topic helpful?
Document Information
Modified date:
29 July 2024
UID
nas8N1021317