How To
Summary
This document will discuss how to enable the IBM Heritage Navigator for i web application for Single Sign On (SSO) authentication on the IBM i OS. SSO authentication allows users to authenticate to the IBM Heritage Navigator for i web application using Kerberos tickets without prompting instead of requiring the user to enter a username and password.
Environment
Steps
NOTE: The following steps are specific to IBM Heritage Navigator for i. For updated instructions on how to enable SSO for IBM Navigator for i, see the following:
Ensure the following minimum IBM i HTTP Group PTF level is applied to your IBM i OS.
You can use the CL command WRKPTFGRP to verify your currently installed IBM i Group PTF levels.
NOTE: SSO with IBM Navigator for i is NOT supported at IBM i 7.1 and earlier.
| IBM i OS VRM | HTTP Group PTF | Minimum Level |
| IBM i 7.4 | SF99662 | 1 |
| IBM i 7.3 | SF99722 | 17 |
| IBM i 7.2 | SF99713 | 30 |
Configure Single Sign On (SSO) / Kerberos for your IBM i OS
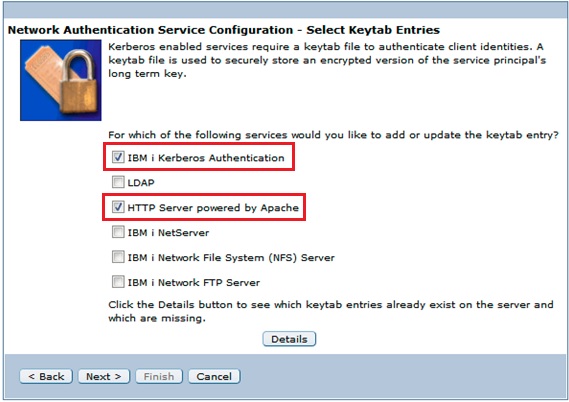
Refer to the IBM Technical Document, How to configure EIM and NAS using IBM Navigator for i , for detailed instructions on how to configure SSO/Kerberos on the IBM i OS. NOTE: You will want to ensure the "HTTP Server powered by Apache" service is checked when configuring Network Authentication Service (NAS) to ensure the HTTP service principal is created.
Once SSO/Kerberos has been successfully configured and is verified as functioning on your IBM i OS, click the Next button to continue.
Ensure the required HTTP service principal(s) exists and was created with the proper case.
Execute the following commands from a 5250 session to verify the HTTP service principal exists and is in the proper case.STRQSH
keytab list
The output should contain 6 entries for the HTTP service principal with (at a minimum) the IBM i Fully Qualified Domain Name (host.domain) in all lowercase. If you see your HTTP service principal host is in all UPPERCASE, IBM strongly recommends you remove it and re-add it in all lowercase by following the "How do I remove and/or add my HTTP service principal?" instructions below.
Example keytab list output (The bolded host name should be in all lowercase):Principal: HTTP/as400.ibm.com@IBM.COM
Key version: 1
Key type: 128-bit AES
Entry timestamp: 2019/02/14-09:43:24
Principal: HTTP/as400.ibm.com@IBM.COM
Key version: 1
Key type: 256-bit AES
Entry timestamp: 2019/02/14-09:43:24
Principal: HTTP/as400.ibm.com@IBM.COM
Key version: 1
Key type: ARCFOUR
Entry timestamp: 2019/02/14-09:43:24
Once you have verified the required HTTP service principal(s) exist and its host name value is in all lowercase characters, click the Next button to continue.
How do I remove and/or add my HTTP service principal?
STRQSH

keytab listIdentify the incorrect HTTP service principal.
keytab delete <httpServicePrincipal>i.e.
keytab delete HTTP/AS400.IBM.COM@IBM.COMDelete the Active Directory IBM i HTTP user account, i.e. <ibmi>_x_HTTP, associated with the old IBM i HTTP service principal.
- Adding a new HTTP service principal with an all lowercase host.
Step 1: Add the new HTTP service principal from a 5250 session.
STRQSHkeytab add HTTP/host.domain@WINDOWSDOMAIN -p <password>keytab add HTTP/as400.ibm.com@IBM.COM -p myHTTPpasswordNOTE: The DSADD and ktpass commands should be ran as an Administrative user on the Active Directory server.
DSADD user "cn=Z1432BP3_2_HTTP,cn=users,dc=IBM,dc=COM" -pwd myHTTPpassword -display Z1432BP3_2_HTTP -pwdneverexpires yes -desc "IBM i HTTP services on system Z1432BP3"ktpass -princ HTTP/host.domain@WINDOWDOMAIN -mapuser <ActiveDirectoryUsername> -pass <ActiveDirectoryUserPassword> -mapop set -crypto All -ptype KRB5_NT_PRINCIPAL
SETSPN -A HTTP/host.domain@WINDOWDOMAIN <ActiveDirectoryUsername>i.e.
ktpass -princ HTTP/as400.ibm.com@IBM.COM -mapuser Z1432BP3_2_HTTP -pass <myHTTPpassword> -mapop set -crypto All -ptype KRB5_NT_PRINCIPAL

SETSPN -A HTTP/as400.ibm.com@IBM.COM Z1432BP3_2_HTTP
Right-click on the <ibmi>_x_HTTP user account and click on Properties.
On the properties panel, click on the Delegation tab.
Click the radio button next to "Trust this user for delegation to any service (Kerberos only)".
Click the Apply and then OK buttons to confirm the change.

Step 5: Change the encryption and password account options for the Active Directory HTTP user account.
Right-click on the <ibmi>_x_HTTP user account and click on Properties.
On the properties panel, click on the Account tab.
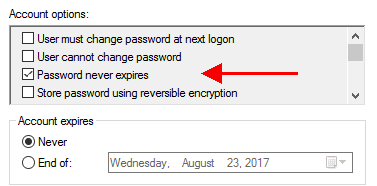
Under the Account options section, check the box next to "Password never expires" if it is not already checked.
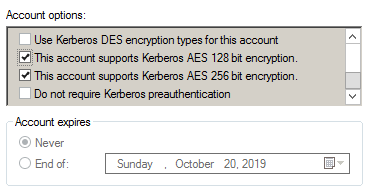
Under the Account options section, check the box(es) for the AES 256 and/or 128 bit encryption types. Uncheck the box for DES encryption.
Click the Apply and then OK buttons to confirm the change.
From Qshell (STRQSH) on the IBM i, test the HTTP service principal to determine if everything is working correctly between the IBM i and Active Directory.
kinit -k HTTP/host.domain@WINDOWSDOMAINkinit -k HTTP/as400.ibm.com@IBM.COM$Verify the Active Directory HTTP user account's properties are set correctly.
Open your Active Directory User Management console.
On the properties panel, click on the Delegation tab.
Click the radio button next to "Trust this user for delegation to any service (Kerberos only)".
Click the Apply and then OK buttons to confirm the change.
Change the encryption and password account options for the Active Directory HTTP user account.
On the properties panel, click on the Account tab.
Under the Account options section, check the box next to "Password never expires" if it is not already checked.
Under the Account options section, check the box(es) for the AES 256 and/or 128 bit encryption types. Uncheck the box for DES encryption.
Click the Apply and then OK buttons to confirm the change.
Once you have configured your IBM i HTTP service principal Active Directory account properties, click the
Execute the Configure.sh script on the IBM i OS
/qibm/proddata/os400/navigator/configure.sh script to update the IBM Navigator for i application's configuration with the Active Directory information serving as your Key Distribution Cernter for your IBM i. If you have configured IBM i Network Authentication Services already and the /QIBM/ProdData/OS400/Navigator/configData file exists, we will read your existing configuration data and prompt you for your HTTP/ service principal password, which in our example is the "Active Directory Z1432BP3 user account password". If a previous configuration of Network Authentication Services (NAS) cannot be found, the configure.sh script prompts you for all components of the configuration.a.
ENDSBS SBS(QHTTPSVR)b.
CALL PGM(QSYSDIR/QINAVMNSRV) PARM(*STOP)c.
Run QSH commandd.
cd /qibm/proddata/os400/navigatore.
configure.shf. Input the information required based on your current NAS and Active Directory configuration.
Example output where NAS has already been configured:
dc=IBM,dc=COM

CN=Z1432BP3_2_HTTP,CN=users,DC=IBM,DC=COM

winkdc.ibm.com
IBM.COM as400.ibm.comHTTP/as400.ibm.comPlease input the password you set for HTTP/ service principal: -->myhttppassword (Active Directory Z1432BP3 user account password)Do you want to go on write these information into server.xml? y or n
y
The server.xml is configured successfully.
$Please input the kerberos configuration!
baseDN: -->
dc=IBM,dc=COM (Base Active Directory Domain)bindDN: -->
CN=Z1432BP3_2_HTTP,CN=users,DC=IBM,DC=COM (HTTP Service Principal Active Directory account)KDC name (hostname.domain): -->
winkdc.ibm.com (This is the full computer name of the KDC server)realm: -->
IBM.COM (Must be uppercase. It can be gotten from the KDC server domain name)IBM i service principal hostname: (lowercase)-->
as400.ibm.com (It's the hostname of the IBM i system and needs to be lowercase.)servicePrincipalNames: -->
HTTP/as400.ibm.com (case must match the actual IBM i HTTP service principal host value) entry minus the @DOMAIN file piece)Please input the password you set for HTTP/ service principal: -->
myhttppassword (Active Directory Z1432BP3 user account password)Do you want to go on write these information into server.xml? y or n
y
The server.xml is configured successfully.
$Note: baseDN, bindDN, servicePrincipalNames, and password for the HTTP service principal can be obtained in the /QIBM/UserData/OS400/iSeriesNavigator/config/NASConfig_<ibmi>.bat file.
WRKLNK '/QIBM/UserData/OS400/iSeriesNavigator/config/*'

Option 5 to display the NASConfig_<ibmi>.bat fileRST DEV('/qsys.lib/qsysdir.lib/QINAVINST.file') OBJ(('/qibm/proddata/os400/navigator/appdata/server.xml'))
ENDTCPSVR *HTTP HTTPSVR(*ADMIN)

WRKACTJOB SBS(QHTTPSVR) - Wait until all ADMIN jobs have ended.

STRTCPSVR *HTTP HTTPSVR(*ADMIN)

WRKACTJOB SBS(QHTTPSVR) - Wait until the CPU utilization of all ADMIN jobs goes down to 0-1% before accessing the web applications.
Set the canonicalHostName Spnego property to false in the IBM Navigator for i server.xml.
WRKLNK '/QIBM/ProdData/OS400/Navigator/appdata/server.xml'
Option 2 to edit
Locate the "spnego
Change the "canonicalHostName="true"" attribute to "canonicalHostName="false"".
After the change, the <spnego authfilterref="spnegoAuthFilter"
canonicalHostName="false"
disableFailOverToAppAuthType="true"
includeClientGSSCredentialInSubject="true"
krb5Config="/QIBM/UserData/OS400/NetworkAuthentication/krb5.conf"
krb5Keytab="/QIBM/UserData/OS400/NetworkAuthentication/keytab/krb5.keytab"
spnegoNotSupportedErrorPageURL="http://as400.ibm.com:2004/ibm/console/logon.jsp"
servicePrincipalNames="HTTP/as400.ibm.com"
trimKerberosRealmNameFromPrincipal="true"/>
Press F3 to save and exit.
Ensure your IBM i server FQDN is configured in your IBM i local host table and DNS.
Enter the following commands to verify the host in your IBM i local host table and DNS. The host name should match in value between the IBM i HTTP service principal, IBM Navigator for i application configuration, and TCP/IP resolution.CFGTCP Option 12
Record the value of Host and Domain. host.domain = IBM i FQDN, i.e. as400.ibm.comF12
CFGTCP Option 10
Verify the the IBM i FQDN = host.name is listed in the IBM i local host table.
IP address Host Name
10.0.0.1 as400.ibm.comF12
NSLOOKUP (Requires 5770SS1 Option 31 to be installed)
host.name, i.e. as400.ibm.com
This should return 1 IP address, <ipAddress>, i.e. 10.0.0.1.set type=ptr
<ipAddress>, i.e. 10.0.0.1
This should return 1 host, which should match the IBM i host.domain, i.e. as400.ibm.com.
Grant *RX data authority for QLWISVR to the IBM i NAS config and keytab files.
Execute the following CL commands from a 5250 session.CHGAUT OBJ('/QIBM/UserData/OS400/NetworkAuthentication/krb5.conf') USER(*PUBLIC) DTAAUT(*RX)
CHGAUT OBJ('/QIBM/UserData/OS400/NetworkAuthentication/keytab/krb5.keytab') USER(*PUBLIC) DTAAUT(*RX)
Configure your web browser to use SSO/Kerberos.
- Configuring Mozilla Firefox to enable SPNEGO
The following steps are available for the latest version of Firefox:
https://developer.mozilla.org/en-US/docs/Mozilla/Integrated_authentication
a. Open Mozilla Firefox.
b. Specify about:config in the Go to a Website field.
c. Select I'll be careful, I promise! in the This might void your warranty! window.
d. Specify network.n in the Filter field.
e. Select the network.negotiate-auth.delegation-uris preference in the list of preferences.
f. Double click to modify the value.
g. Specify the name of your IBM i system in the input field. For example, specify:
hostnameA,hostnameB,hostnameC
i.e. as400.ibm.com,as4002.ibm.com,as4003.ibm.com
h. Use a comma to separate each URL.
i. Select OK.
j. Select the network.negotiate-auth.trusted-uris preference in the list of preferences.
k. Double click to modify the value.
l. Specify the same URL(s) appear in step 7, in the input field.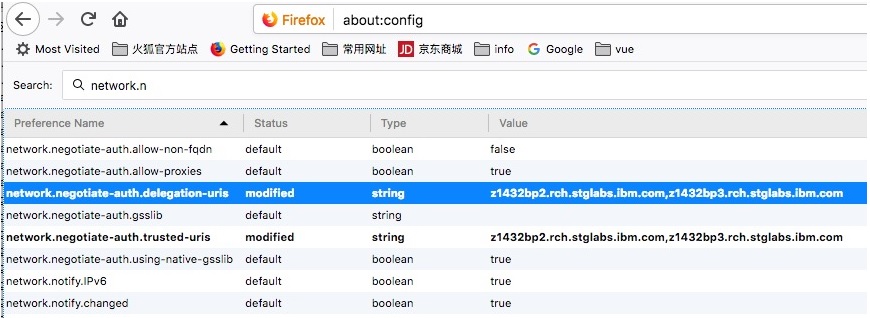
- Configuring Chrome to enable SPNEGO
The following steps are available for the latest version of Chrome:
https://cloud.google.com/docs/chrome-enterprise/policies/#httpAuthentication
The procedure to enable SPNEGO on Chrome is like Windows 10. After you complete steps a,b, and c in “Configuring Edge on Windows 10 to enable SPNEGO”, perform the following special steps for Chrome:
a. Open Microsoft Registry Editor by typing regedit.exe in Run window.
b. Google Chrome uses a few different policies to enable SPNEGO support. IBM recommends all 4 policies are added to your browser even though some are deprecated. Adding all 4 policies ensures all required policies are set to enable SPENGO support.- The AuthNegotiateDelegateAllowlist policy assigns servers that Google Chrome my delegate to.
- The AuthNegotiateDelegateWhitelist policy assigns servers that Google Chrome may delegate to. (deprecated)
- The AuthServerAllowlist policy specifies which servers should be allowed for integrated authentication.
- The AuthServerWhitelist policy specifies which servers should be allowed for integrated authentication. (deprecated)
c. The policies are stored in the Windows registry under HKEY_LOCAL_MACHINE\Software\Policies\Google\Chrome. If the key at the end of the path (Google or Chrome) does not exist, you can manually create it (Right-click -> New -> String Value). The Type of the policy is a String Value (REG_SZ).
d. Multiple servers are separated with commas.
e. Wildcards (*) are allowed in the names.
f. The value of the policy would be the web domain being accessed. i.e. *.rch.stglabs.ibm.com
g. Ensure all 4 policies, AuthNegotiateDelegateAllowlist, AuthNegotiateDelegateWhitelist, AuthServerAllowlist, and AuthServerWhitelist, are added.
You can confirm your browser policies by entering "chrome://policy" in the browser address bar and press ENTER. The browser policies in blue are currently active and being used in the current browser session.
- Configuring Edge on Windows 10 to enable SPNEGO
The following steps are available for the latest version of Edge.
a. Open Security zones in IE (Tools → Internet Options → Security → Local intranet), then add the name of your IBM i system to Local intranet:

b. Change Local intranet security settings as follows: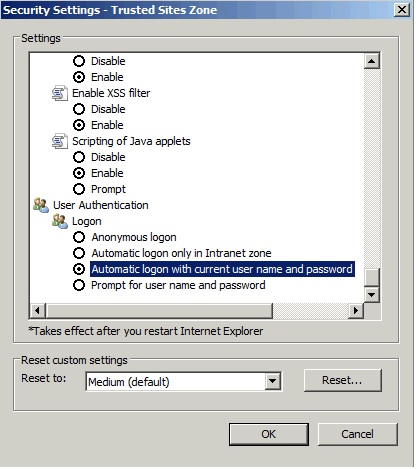
The following steps are available for the version 77 and later of the Edge browser:
https://docs.microsoft.com/en-us/deployedge/microsoft-edge-policies
The procedure to enable SPNEGO in Edge is like Windows 10. After you complete steps a,b, and c in “Configuring Edge on Windows 10 to enable SPNEGO”, perform the following special steps for Edge:
a. Open Microsoft Registry Editor by typing regedit.exe in Run window.
b. Microsoft Edge uses a few different policies to enable SPNEGO support. IBM recommends both policies are added to your browser. Adding both policies ensures all required policies are set to enable SPENGO support.- The AuthNegotiateDelegateAllowlist policy specifies a list of servers that Microsoft Edge can delegate user credentials to.
- The AuthServerAllowlist policy configures a list of allowed authentication servers
c. The policies are stored in the Windows registry under HKEY_LOCAL_MACHINE\Software\Policies\Microsoft\Edge. If the key at the end of the path (Edge) does not exist, you can manually create it (Right-click -> New -> String Value). The Type of the policy is a String Value (REG_SZ).
d. Multiple servers are separated with commas.
e. Wildcards (*) are allowed in the names.
f. The value of the policy would be the web domain being accessed. i.e. *.rch.stglabs.ibm.com
g. Confirm both policies, AuthNegotiateDelegateAllowlist and AuthServerAllowlist, are added.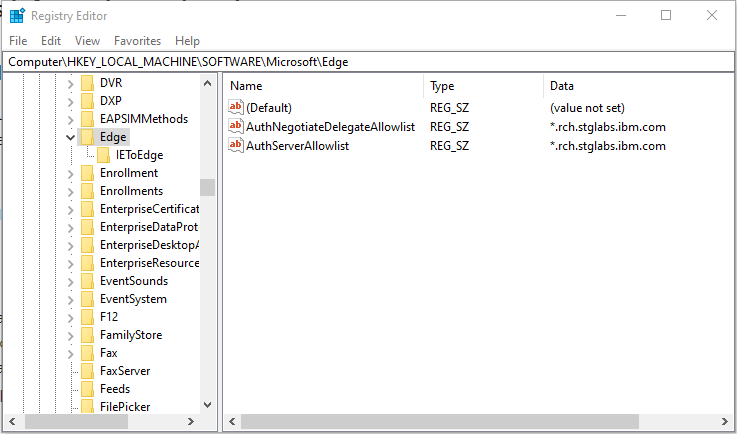
Restart the ADMIN server and test SSO access to the IBM Navigator for i web application.
ENDTCPSVR *HTTP HTTPSVR(*ADMIN)
WRKACTJOB SBS(QHTTPSVR) - Wait until all ADMIN jobs have ended.
STRTCPSVR *HTTP HTTPSVR(*ADMIN)
WRKACTJOB SBS(QHTTPSVR) - Wait until the CPU utilization of all ADMIN jobs goes down to 0-1% before accessing the web applications.
Open a web browser and try accessing the IBM Navigator for i web application URL to verify Single Sign On (SSO) / Kerberos authentication is working properly.
non-TLS URL: http://host.domain:2004/ibm/console
TLS URL: https://host.domain:2005/ibm/console
i.e. http://as400.ibm.com:2004/ibm/console
https://as400.ibm.com:2005/ibm/console
If the IBM Navigator for i web application opens up WITHOUT prompting for an IBM i user profile and password, this verifies SSO/Kerberos is working properly for the IBM Navigator for i web application. Congratulations! You have successfully configured SSO/Kerberos for the IBM Navigator for i web application.
If you are still prompted for an IBM i user profile and password, please review the previous configuration steps to ensure they are correct. If you require further assistance, please contact IBM Support via the telephone number, 1-800-IBM-SERV, or you can open an IBM Service Request here .
Document Location
Worldwide
Was this topic helpful?
Document Information
Modified date:
09 August 2022
UID
ibm10871818