Troubleshooting
Problem
Resolving The Problem
In order to configure the 4765, 4767 & 4769 Cryptographic Coprocessor Cards we first need to make sure we have the required licensed programs installed and have the required PTFs installed.
- V7R3 - https://www.ibm.com/support/pages/ibm-i-73-recommended-fixes-cryptographic-servicesdcmcryptographic-co-processor
- V7R4 - https://www.ibm.com/support/pages/ibm-i-74-recommended-fixes-cryptographic-servicesdcmcryptographic-co-processor
- V7R5 - https://www.ibm.com/support/pages/ibm-i-75-recommended-fixes-cryptographic-servicesdcmcryptographic-co-processor
- V7R6 - https://www.ibm.com/support/pages/ibm-i-76-recommended-fixes-cryptographic-servicesdcmcryptographic-co-processor
Warning: Do not configure the card until the above items are installed on the system.
Configuration Steps:
1) In order to configure the card we first need to enable SSL/TLS for our HTTP ADMIN server. The following document describes how to configure this:
How to Enable Transport Layer Security (TLS) for the IBM Web Administration Server (HTTPAdmin)
2) Once the HTTP Admin server is configured for SSL/TLS we can access the Cryptographic Coprocessor Configuration GUI by typing the following URL (NOTE: Replace 'fully.qualified.system.name' with the Host Name + Domain Name from CFGTCP opt. 10)
https://fully.qualified.system.name:2010/QIBM/CCA/Admin/qc6fmenu.ndm/main0
3) On the main screen click on the 'Basic configuration wizard' on the left menu:

4) Click Continue on the initial welcome page:

5) Select the radio button next to *CREATE (it should show you the type of card it has detected on the system), then click Continue:

6) Put in the name of the device description you'd like to create (in this example CRYPTO) then click Continue:

7) Specify the PKA key store file name and library name (NOTE: The Library has to exist. In the example we create a keystore named 'keystore' in a library named 'crypto'), then click Continue:

8) You should receive a popup that looks like the following, click Ok:

9) You will then receive the following popup, click Ok:

10) Now we will create profiles used to manage the card. It is recommended that we create three profiles. Click Create 3 profiles:
11) We will now set passwords for the default profiles of CRYPSEC1, CRYPSEC2 and CRYPADMN (NOTE: Do not lose these passwords). Click Continue after each:


12) We now will set the Environment ID (EID) for the card (In the example we use an EID of 'CRYPTO'), once that is set click Continue:
13) Next we will set the master keys for the server. It is recommended that we split the master keys into three parts, click Three key part owners:
14) We now will create the master keys using Hexadecimal values. You can create your own or click 'Generate' to create random keys. In this example we will use the 'Generate' button for all three key parts then click Continue (NOTE: At older PTF levels the generated keys were larger than the text field shown. When copying these keys make sure to select all the text from each text field):


15) On the verification screen click Configure:
16) You should receive a popup window that looks like the following, click OK:
17) We now should see a completion screen that looks like the following with no errors, click OK:
18) Back on the main screen if we click on 'Display configuration' on the left we now should see that the card is fully configured and has a status of 'Active':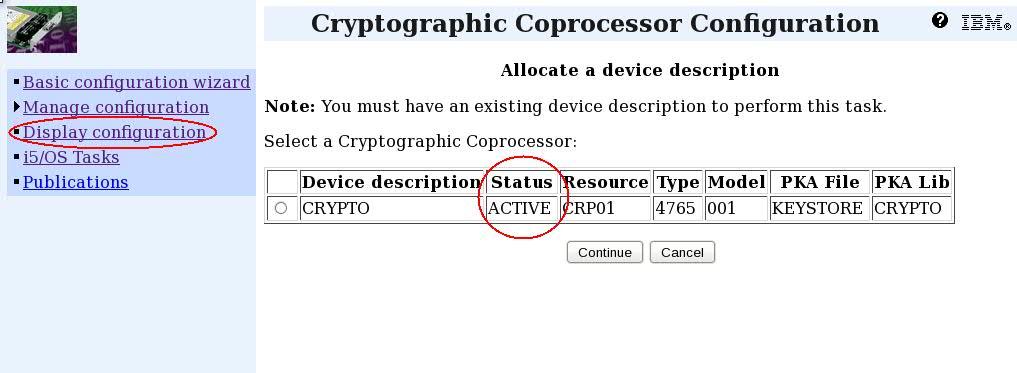
Was this topic helpful?
Document Information
Modified date:
11 November 2025
UID
nas8N1020678