Education
Abstract
This article offers an introduction to form-based login, it then goes on to explain which parts of the form login flow come from the JEE specification and which are specific to WAS/Liberty and finally explains what steps are needed to implement form login with Liberty.
Content
One of the login challenges defined in the J2EE Specification is form-based login. It enables the application developer to customize the login process and present an application-specific form by making use of the Form Login Authentication Method.
Form login works in the following manner:
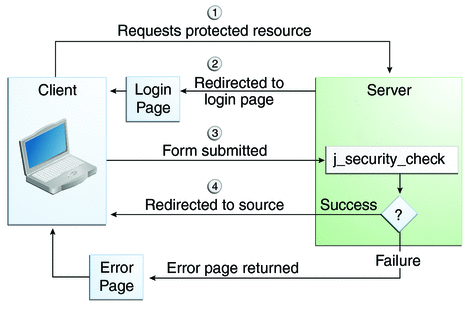
WAS creates a cookie called WASReqURL which contains the path to the requested protected resource in the format http[s]://[:port]/snoop
The action triggered by the form submission runs a special Java EE standard servlet j_security_check.
If the credentials are invalid, WAS redirects the user to an error page, for example https://localhost:port/error.html
NB: It is possible to edit the WASReqURL cookie to change the redirect path after a successful login. Whilst you can change the contents of the WASReqURL you should not be able to set any redirect location i.e. to another domain.
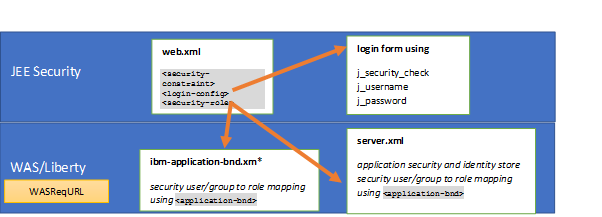
Form-based login and Liberty:
While everything in the deployment descriptor (web.xml file under the Web project, e.g. snoop.ear\DefaultWebApplication.war\WEB-INF\), the name of the j_security_check servlet, and the general flow of how j_security_check is used are the parts of the form login flow that come from the JEE specification, the WASReqURL and security role to user/group mapping using the ibm-application-bnd.xm* and server.xml files are specific to WAS/Liberty:
Please note that single sign-on (SSO) must be enabled for form-based login to succeed as this will generate the LTPA token that is required for form based login, see Why do I need to enable SSO when using form-based login in my WebSphere Application Server application?
Below is a complete copy of the web.xml file that is discussed in this article. The individual sections will be discussed below:
<?xml version="1.0" encoding="UTF-8"?>
<web-app xmlns="http://xmlns.jcp.org/xml/ns/javaee" xmlns:xsi="http://www.w3.org/2001/XMLSchema-instance" xsi:schemaLocation="http://xmlns.jcp.org/xml/ns/javaee http://xmlns.jcp.org/xml/ns/javaee/web-app_4_0.xsd" version="4.0"> <display-name>FormLoginTest</display-name> <security-constraint> <web-resource-collection> <web-resource-name>DefaultDeny</web-resource-name> <url-pattern>/*</url-pattern> </web-resource-collection> <auth-constraint> <role-name>DefaultDeny</role-name> </auth-constraint> </security-constraint> <security-constraint> <web-resource-collection> <web-resource-name>GeneralResources</web-resource-name> <url-pattern>/login.html</url-pattern> <url-pattern>/images/*</url-pattern> <url-pattern>/css/*</url-pattern> <http-method>GET</http-method> </web-resource-collection> <auth-constraint> <role-name>AllUsers</role-name> </auth-constraint> </security-constraint> <security-constraint> <web-resource-collection> <web-resource-name>TestLogin</web-resource-name> <url-pattern>/TestLogin</url-pattern> <http-method>GET</http-method> <http-method>POST</http-method> </web-resource-collection> <auth-constraint> <role-name>TestAuth</role-name> </auth-constraint> <user-data-constraint> <transport-guarantee>CONFIDENTIAL</transport-guarantee> </user-data-constraint> </security-constraint> <security-role> <role-name>AllUsers</role-name> </security-role> <security-role> <role-name>TestAuth</role-name> </security-role> <login-config> <auth-method>FORM</auth-method> <form-login-config> <form-login-page>/login.html</form-login-page> <form-error-page>/error.html</form-error-page> </form-login-config> </login-config> </web-app>
For 1) Security constraint, login configuration and security role in the web.xml file,
<security-constraint> This tag is used to define the access privileges to a collection of resources using their URL mapping.
If the <transport-guarantee> is set to CONFIDENTIAL or INTEGRAL, it generally means that the use of SSL is required, and that type of security constraint applies to all requests that match the URL patterns in the web resource collection and not just to the login dialog box. The strength of the required protection is defined by the value of the transport guarantee:
You can configure an application to redirect from HTTP to HTTPS using CONFIDENTIAL. For further details, see Specifying a Secure Connection.
<login-config> This tag is used to specify an authentication mechanism (authentication method, realm name and form login configuration). The <realm-name> subelement indicates the realm name to use when the basic authentication scheme is chosen for the web application. The <form-login-config> subelement specifies the login and error pages that should be used when form-based login is specified.
<security-role> This tag defines the security role. This role matches to the roles defined in the ibm-application-bnd.xm* and server.xml files.
In the JEE security constraint the * and ** security roles are special when configured in the auth-constraint e.g.
<web-resource-collection>
<web-resource-name>GeneralResources</web-resource-name>
<url-pattern>/images/*</url-pattern>
<url-pattern>/css/*</url-pattern>
<http-method>GET</http-method>
</web-resource-collection>
<auth-constraint>
<role-name>*</role-name>
</auth-constraint>
</security-constraint>
The special role name * is a shorthand for all role names defined in the deployment descriptor. The special role name ** is a shorthand for any authenticated user independent of role.
Security best practices suggest that you Carefully verify that every servlet alias is secure:
The following approach can be taken within every web.xml to ensure that permissions are restrictive:
<web-resource-collection>
<web-resource-name>DefaultDeny</web-resource-name>
<url-pattern>/*</url-pattern>
</web-resource-collection>
<auth-constraint>
<role-name>DefaultDeny</role-name>
</auth-constraint>
</security-constraint>
<web-resource-collection>
<web-resource-name>GeneralResources</web-resource-name>
<url-pattern>/login.html</url-pattern>
<url-pattern>/images/*</url-pattern>
<url-pattern>/css/*</url-pattern>
<http-method>GET</http-method>
</web-resource-collection>
<auth-constraint>
<role-name>AllUsers</role-name>
</auth-constraint>
</security-constraint>
<web-resource-collection>
<web-resource-name>TestLogin</web-resource-name>
<url-pattern>/TestLogin</url-pattern>
<http-method>GET</http-method>
<http-method>POST</http-method>
</web-resource-collection>
<auth-constraint>
<role-name>TestAuth</role-name>
</auth-constraint>
<transport-guarantee>CONFIDENTIAL</transport-guarantee>
</user-data-constraint>
<role-name>TestAuth</role-name>
</security-role>
<auth-method>FORM</auth-method>
<form-login-config>
<form-login-page>/login.html</form-login-page>
<form-error-page>/error.html</form-error-page>
</form-login-config>
</login-config>
For 2) Login page with form that points to j_security_check,
Simple form-based login does not require any extra code development on the server side. The j_security_check servlet used by WebSphere Application Server enforces only the name of the input fields that the developer should put in the custom login form. These fields are as follows:
- j_username should be the input field in which a user will type the user ID.
- j_password should be the input field into which the user will type the password.
The action required for the HTTP POST method is j_security_check. A simple HTML code for the custom login form is given in the following example (login.html also located in the WEB-INF folder):
<head><title> Security FVT Login Page </title></head>
<h2>Form Login</h2>
<FORM METHOD=POST ACTION="j_security_check">
<p>
<font size="2"> <strong> Enter user ID and password: </strong></font>
<BR>
<strong> User ID</strong> <input type="text" size="20" name="j_username">
<strong> Password </strong> <input type="password" size="20" name="j_password" autocomplete="off">
<BR>
<BR>
<font size="2"> <strong> And then click this button: </strong></font>
<input type="submit" name="login" value="Login">
</p>
</body>
</html>
NB: If you are using JSP files as login and error pages, make sure that you set session=”false” to prevent denial of service attacks:
<%@ page language="java" contentType="text/html; charset=ISO-8859-1"
pageEncoding="ISO-8859-1" session="false"%>
For 3) Application security enabled on the Liberty server and a user registry configured,
a) Enable the <appSecurity-3.0> Liberty feature in the server.xml file
b) Add a user registry, for example
<basicRegistry>
<user password="Bob" name="Bob"></user>
</basicRegistry>
For 4) Security role mapping to an application user in the ibm-application-bnd.xm*, web.xml or server.xml files,
J2EE security relies on roles and mappings to users and groups in a registry. Annotations and the web.xml are used to define the roles and the ibm-application-bnd.xm* and the server.xml files are used to bind the roles to the users or groups. While it is possible to add the authorization configuration definition to the ibm-application-bnd.xml or ibm-application-bnd.xmi file, it is recommended that you add the authorization table definitions to the server.xml file under the respective application element because this does not require any updates to the application artefact.
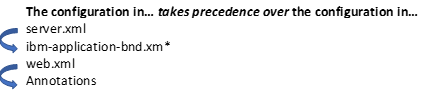
If there is a conflict in the role mapping for a servlet between an application’s web.xml file and annotations, the Servlet specification dictates that the configuration in the web.xml takes precedence. If there is a conflict between the ibm-application-bnd.xm* and server.xml files, then the configuration in the server.xml file takes precedence.
When the role mapping binding information for a protected application is not provided, the default authorization engine takes the role name that is protecting the resource as the group name associated with that role. For example, if the role name is “LibertyUsers”, then a user who belongs to a “LibertyUsers” group has access to that resource. This applies only when no application bind information is specified for the application in the server.xml or the application binding files. For further information, see Configuring authorization for applications in Liberty.
Example of a user security role mapping in the server.xml file:
<webApplication id="FormLoginTest"location="FormLoginTest.war" name="FormLoginTest">
<application-bnd>
<security-role name="TestAuth">
<user name="Bob"/>
</security-role>
<security-role name="AllUsers">
<special-subject type="EVERYONE"/>
</security-role>
</application-bnd>
</webApplication>
Was this topic helpful?
Document Information
Modified date:
18 October 2019
UID
ibm11074664