Troubleshooting
Problem
Environment
Resolving The Problem
To add HTTP Kerberos authentication to an IBM i server, complete the following steps divided into the following main categories of focus:
| o | A new principal name must be added to NAS for Kerberos. |
| o | The HTTP server configuration must be modified to add Kerberos authentication. |
| o | The Web browser options must be changed to allow it to use Kerberos as a means of authentication. |
Adding a New Principal to NAS
To add a principal to your NAS configuration, do the following:
Step 1: On the iSeries, start a session to Qshell (QSH). Use the following command to add the HTTP keytab entry for NAS:
keytab add HTTP/host.domain@WINDOWSDOMAIN
Note: The format for this principal name should be similar to the EIM principal (krbsvr400/host.domain@WINDOWSDOMAIN).
Step 2: A user must be added with the Windows Active Directory Users to be used in conjunction with this principal name. The user can have any password.
Step 3: From an Administrator Microsoft Windows DOS prompt on the Windows Server running Active Directory (and serves as the domain controller), type the following:
KTPASS -MAPUSER activedirectoryusername -PRINC HTTP/host.domain@WINDOWDOMAIN -PASS activedirectoryuserpassword -mapop set -crypto All -ptype KRB5_NT_PRINCIPAL
SETSPN -A HTTP/host.domain.com@WINDOWSDOMAIN activedirectoryusername
SETSPN -A HTTP/as400.ibm.com@IBM.COM IBMi_HTTP_1
Step 4: From Qshell on the iSeries, test to determine if everything is correct for the new principal name. Type the following to test:
kinit -k HTTP/host.domain@WINDOWSDOMAIN
If everything is satisfactory, you will get a $ prompt without errors.
Adding Kerberos Authentication to an HTTP Server Instance
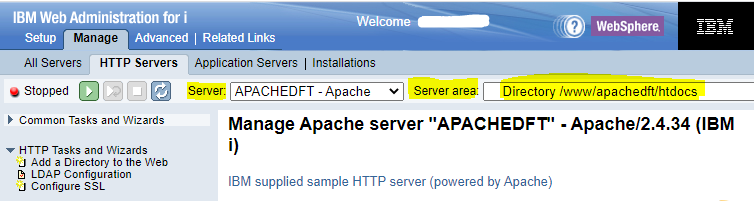
Step 1: In the HTTP Server GUI, select the server that you would like to work with and the particular server area that you want to secure:
Step 2: On the left menu bar, click the Security Link, and click on the Authentication Tab. One of the options is for Kerberos:

Step 3: After selecting Kerberos, click OK. This updates the directory container to look similar to the following:
  <Directory /www/apachedft/htdocs>
   Require all granted
   Require valid-user
   PasswdFile %%KERBEROS%%
   AuthType Kerberos
</Directory>
Step 4: End and restart the HTTP Server instance.
Now your HTTP Server should be set up to use Kerberos and the iSeries is set up to allow the HTTP Server to use Kerberos in NAS. The last step is to get the Web browser to also use it.
Step 5: The web browser needs to be configured to send the Kerberos ticket for authentication:
- Configuring Mozilla Firefox
The following steps are available for the latest version of Firefox:
https://developer.mozilla.org/en-US/docs/Mozilla/Integrated_authentication
a. Open Mozilla Firefox.
b. Specify about:config in the Go to a website field.
c. Select "I'll be careful, I promise!" in the "This might void your warranty!" window.
d. Specify "network.n" in the Filter field.
e. Select the "network.negotiate-auth.delegation-uris" preference in the list of preferences.
f. Double click to modify the value.
g. Specify the name of your IBM i system in the input field. For example, specify:
hostnameA,hostnameB,hostnameC
i.e. as400.ibm.com,as4002.ibm.com,as4003.ibm.com
h. Use a comma to separate each URL.
i. Select OK.
j. Select the "network.negotiate-auth.trusted-uris" preference in the list of preferences.
k. Double click to modify the value.
l. Specify the same URL(s) appear in step 7, in the input field.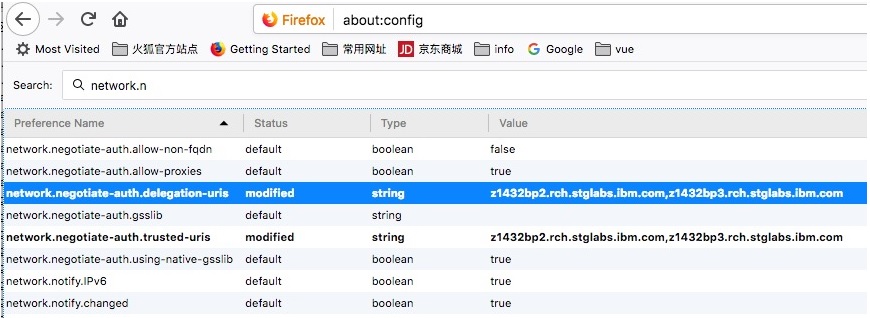
- Configuring Chrome
The following steps are available for the latest version of Chrome:
https://cloud.google.com/docs/chrome-enterprise/policies/#httpAuthentication
The procedure to enable SPNEGO on Chrome is like Windows 10. After you complete steps a,b, and c in “Configuring Edge on Windows 10 to enable SPNEGO”, perform the following special steps for Chrome:
a. Open Microsoft Registry Editor by typing regedit.exe in Run window.
b. Google Chrome uses a few different policies to enable SPNEGO support. IBM recommends all 4 policies are added to your browser even though some are deprecated. Adding all 4 policies ensures all required policies are set to enable SPENGO support.- The AuthNegotiateDelegateAllowlist policy assigns servers that Google Chrome my delegate to.
- The AuthNegotiateDelegateWhitelist policy assigns servers that Google Chrome may delegate to. (deprecated)
- The AuthServerAllowlist policy specifies which servers should be allowed for integrated authentication.
- The AuthServerWhitelist policy specifies which servers should be allowed for integrated authentication. (deprecated)
c. The policies are stored in the Windows registry under HKEY_LOCAL_MACHINE\Software\Policies\Google\Chrome. If the key at the end of the path (Google or Chrome) does not exist, you can manually create it (Right-click -> New -> String Value). The Type of the policy is a String Value (REG_SZ).
d. Multiple servers are separated with commas.
e. Wildcards (*) are allowed in the names.
f. The value of the policy would be the web domain being accessed. i.e. *.rch.stglabs.ibm.com
g. Ensure all 4 policies, AuthNegotiateDelegateAllowlist, AuthNegotiateDelegateallowlist, AuthServerAllowlist, and AuthServerallowlist, are added.
You can confirm your browser policies by entering "chrome://policy" in the browser address bar and press ENTER. The browser policies in blue are currently active and being used in the current browser session.
- Configuring Edge on Windows 10
The following steps are available for the latest version of Edge.
a. Open Security zones in IE (Tools → Internet Options → Security → Local intranet), then add the name of your IBM i system to Local intranet:

b. Change Local intranet security settings as follows: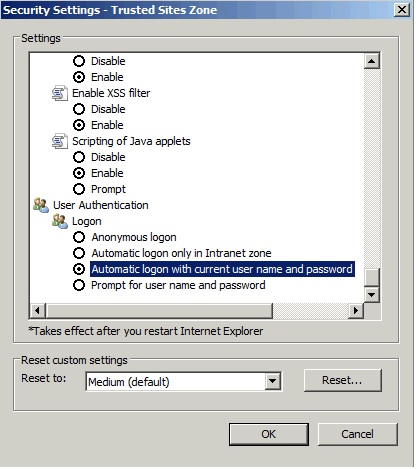
The following steps are available for the version 77 and later of the Edge browser:
https://docs.microsoft.com/en-us/deployedge/microsoft-edge-policies
The procedure to enable SPNEGO in Edge is like Windows 10. After you complete steps a,b, and c in “Configuring Edge on Windows 10 to enable SPNEGO”, perform the following special steps for Edge:
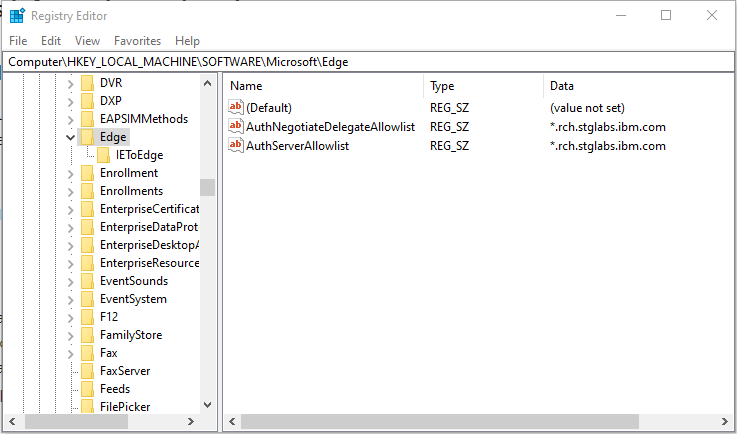
a. Open Microsoft Registry Editor by typing regedit.exe in Run window.
b. Microsoft Edge uses a few different policies to enable SPNEGO support. IBM recommends both policies are added to your browser. Adding both policies ensures all required policies are set to enable SPENGO support.- The AuthNegotiateDelegateAllowlist policy specifies a list of servers that Microsoft Edge can delegate user credentials to.
- The AuthServerAllowlist policy configures a list of allowed authentication servers
c. The policies are stored in the Windows registry under HKEY_LOCAL_MACHINE\Software\Policies\Microsoft\Edge. If the key at the end of the path (Edge) does not exist, you can manually create it (Right-click -> New -> String Value). The Type of the policy is a String Value (REG_SZ).
d. Multiple servers are separated with commas.
e. Wildcards (*) are allowed in the names.
f. The value of the policy would be the web domain being accessed. i.e. *.rch.stglabs.ibm.com
g. Confirm both policies, AuthNegotiateDelegateAllowlist and AuthServerAllowlist, are added.
Historical Number
325250721
Was this topic helpful?
Document Information
Modified date:
20 June 2022
UID
nas8N1016293