Question & Answer
Question
How to enable AIX® system to generate full application core file?
Answer
Following are the steps to ensure the generation of a full core
1. Locating the core
By default, the core file is created in the working directory of the process being core dumped. If required, user can change the default repository for core files by using 'syscorepath' which is explained later. To display the location for the current repository for core files, run the following command
2. Identifying whether core is truncated
To ensure it’s a full core, run the “file” command

As an exception, even though it’s reported as “fulldump” there could be chances of still core being truncated. Verify the same using ”dbx”. If truncated/incomplete due to lack of disk space dbx will display a warning message as illustrated below

3. Enabling fullcore on the system
Run the following command as root user.
This change does not require a system reboot. This setting can also be changed by running “smitty chgsys” command and set the value of Enable full CORE dumps to true.
Verify system attributes as below
Note: This above setting will remain until you reboot the system.
To enable the above full core settings permanently to retain even after reboot
Refer the below link for more information:
http://publib.boulder.ibm.com/infocenter/pseries/v5r3/index.jsp?topic=/com.ibm.aix.cmds/doc/aixcmds1/chdev.htm
4. Disk space required to store core file
Run the following command to check free space on the file system to store the core file.

The core file can be as large as the size of process in memory. The RSS (process size) field of the "ps" command output will give the approximate size of the core file.

5. “syscorepath” utility (AIX® 5.2 or higher)
User can change the default repository for core files by using 'syscorepath'. This can be used to specify a single system-wide directory where all core files of any processes will be saved. The directory should have read and write privileges for all users on the system. If a user does not have permission to write in the directory, a core file will not be created.
The core files generated in this system-wide directory will be given unique names based on the process ID and time, such as core.pid.MMddhhmmss, where pid is the process ID, MM is month, dd is the day of the month, hh is the hour in 24-hour format, mm is minutes, and ss is seconds.
The syntax for this command is

6. Verifying the directory, file ownership, and permissions for the core file
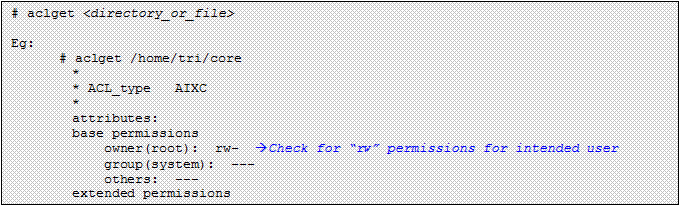
Use the “chmod” or “chown” command to modify the permissions or ownership respectively. Otherwise run “smitty user” to modify characteristics of the user account. Modifications to the user account require re-login as that user.
7. Ensure that ulimit –c (core) and ulimit –f(file) is set to unlimited
To check the current settings run the following commands:

To set core and filesize to unlimited only for the current session, then run the below commands

Set the “ulimit –c” and “ulimit –f” to unlimited for the entire system as below as root user.

You can also set the default hard values in /etc/security/limits file by modifying the stanzas for respective users.,
For “root” user”:

For “abc” user”:

Note: Changing the limit in /etc/security/limits does not affect those processes that are currently running. Relogin/start a new session to reflect the changes and run “ulimit –a” to confirm the modified settings. If necessary, revert back the settings to original values.
Was this topic helpful?
Document Information
Modified date:
17 June 2018
UID
isg3T1011816