Troubleshooting
Problem
This document describes now to create a DDS-defined iSeries physical file which can by used with Client Access or iSeries Access data transfer.
Resolving The Problem
Creating a DDS and Physical File
Client Access or iSeries Access data transfer is designed to access data stored in the operating system relational database (DB2/400). It can access physical files (tables) or logical files (views). The most common methods of creating these files are using SQL (Create Table or Create View), by compiling a source file containing Data Description Specifications (DDS), or by using the iSeries Access data transfer wizard which will create a database table on the iSeries based on the structure of a PC file (refer to Rochester Support Center knowledgebase document New, Data Transfer File Creation Wizard Walk-Through: ![]() for additional information on this feature).
for additional information on this feature).
In the following example, the IBM Programming Development Manager (PDM) and the Source Entry Utility (SEU) are used to enter DDS statements and then compile this source into a physical file.
Sources of documentation
The following references provide further information on the topics discussed in this document:
| o | SC41-3563 Client Access/400 for DOS and OS/2 Technical Reference |
| o | SC09-1771 ADTS/400: Programming Development Manager (PDM) |
| o | SC09-1773 ADTS/400: Data File Utility (DFU) |
| o | SC09-1774 ADTS/400: Source Entry Utility (SEU) |
| o | SC41-3701 Database Programming |
| o | SC41-3712 DDS Reference |
| o | SC41-3722 CL Reference |
Creating the DDS
First, define the Data Description Specifications (DDS) for the database to be created.
From an operating system command line, start Programming Development Manager (PDM) by running the STRPDM command.
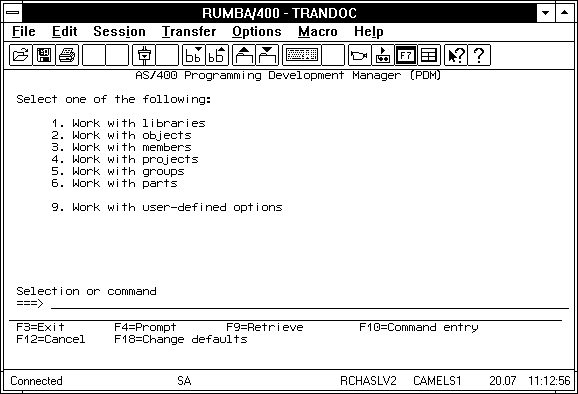
From this screen, select Option 3 to work with members.
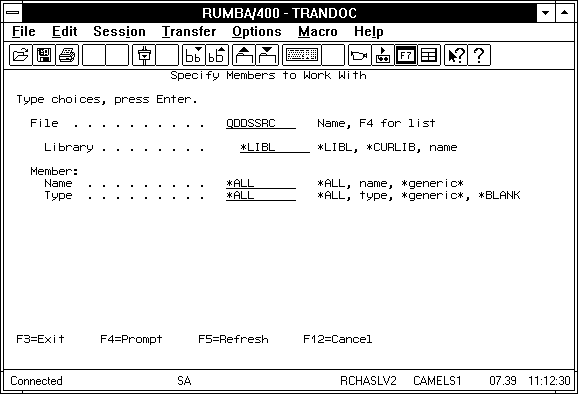
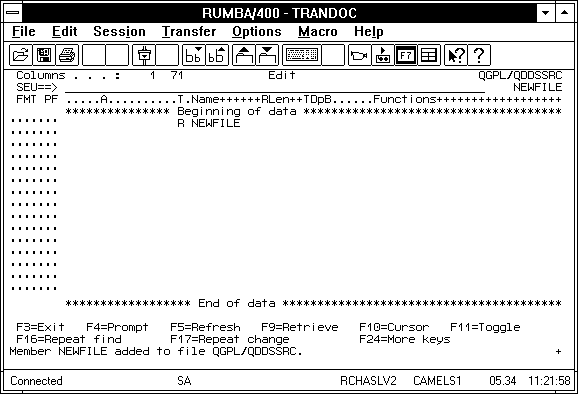
From the Specify Members to Work With screen, select the DDS file to work with. By default this is QDDSSRC in QGPL (or *LIBL).
The Work with Members Using PDM screen is shown.
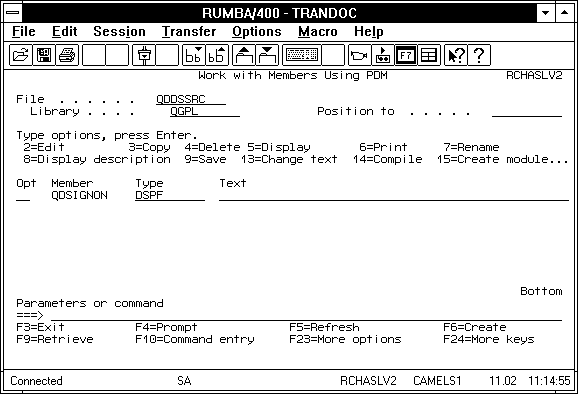
Press F6 to create a new member.
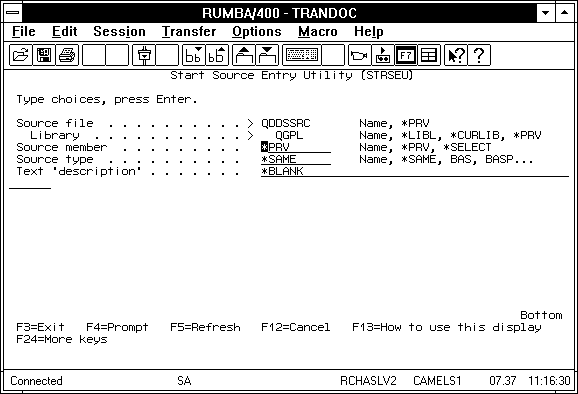
Type the name for the DDS member in the Source Member field. Source Type is PF when creating a DDS. A description can also be added.
The Edit screen is shown below. You are now using Source Editor Utility (SEU) to edit your member.
The first line of the DDS must include R and a file name as shown below.
Note: SEU is positional. Therefore, R must be in the T column, and the filename (in this case NEWFILE) must be in the Name column.
Press the Enter key and the screen changes slightly. Put the cursor on the first 0 of the line number 0001.00, type I, and hit Enter. You are given a new line to enter data on. Place the cursor on the new line, and press F4.
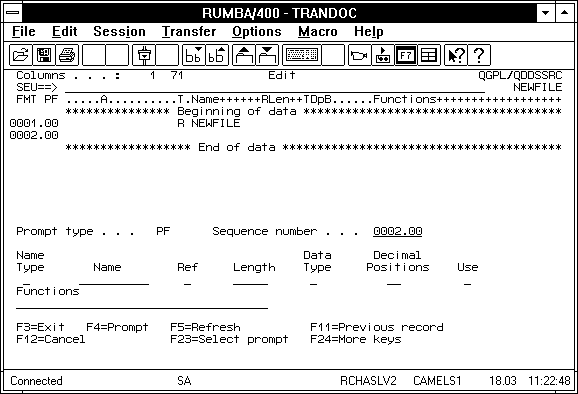
Type the required parameters to define the fields. In this case, we are interested in the Name, Length, Data Type, and Decimal Positions fields.
Here we show the DDS after definitions for several fields have been entered.

In this case, we have entered four fields and are inputting a fifth:
| o | NAME which is 10 characters of text (A). |
| o | AGE which is two positions of zoned numeric (S). |
| o | BALANCE and CREDIT which are five position-packed numeric (P), with two of the five positions to the right of the decimal. |
| o | And CATEGORY being inputted, which is two characters of text (A). |
Once you are finished entering your DDS data, press F3 to Exit, and select Y to Change/create member.
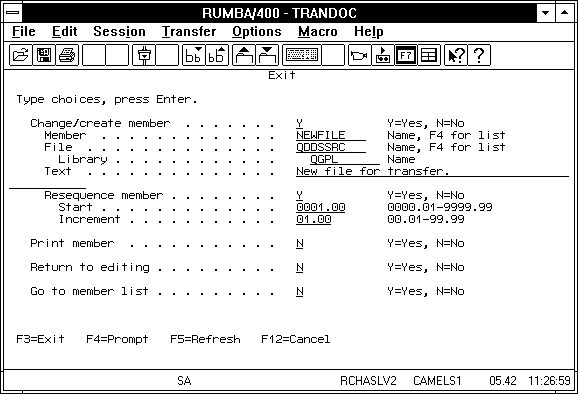
A DDS file has been successfully created. You must now create an actual database physical file to hold the data.
Compiling the DDS with CRTPF
From an operating system command line, type CRTPF, and press F4 to prompt.
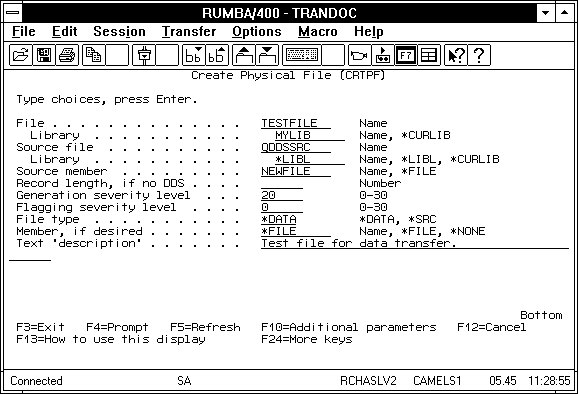
In this example, we will create a file named TESTFILE in library MYLIB.
We have specified that the DDS source file is QDDSSRC and the member to reference in that file is NEWFILE, which we have just finished creating in PDM.
Tips:
| 11. | If more than one member is created in this file, the Maximum Members parameter must be changed. Press F10 for additional parameters, and page down to locate this option. |
| 22. | If the file is expected to contain more than 13,000 records, the Member Size parameter must be changed. By default, the maximum member size is 10,000 records with three increments of 1,000 records allowed, yielding a maximum record count of 13,000 records. If the maximum size of the file needed is not known, this may be set to *NOMAX. |
Historical Number
9444347
Was this topic helpful?
Document Information
Modified date:
18 December 2019
UID
nas8N1010052